7. 数据存储
7. 数据存储
文章目录
- 7. 数据存储
-
- 7.1 基本存储
-
- 7.1.1 EmptyDir
- 7.1.2 HostPath
- 7.1.3 NFS
- 7.2 高级存储
-
- 7.2.1 PV
- 7.2.2 PVC
- 7.2.3 生命周期
- 7.3 配置存储
-
- 7.3.1 ConfigMap
- 7.3.2 Secret
在前面已经提到,容器的生命周期可能很短,会被频繁地创建和销毁。那么容器在销毁时,保存在容器中的数据也会被清除。这种结果对用户来说,在某些情况下是不乐意看到的。为了持久化保存容器的数据,kubernetes引入了Volume的概念。
Volume是Pod中能够被多个容器访问的共享目录,它被定义在Pod上,然后被一个Pod里的多个容器挂载到具体的文件目录下,kubernetes通过Volume实现同一个Pod中不同容器之间的数据共享以及数据的持久化存储。Volume的生命容器不与Pod中单个容器的生命周期相关,当容器终止或者重启时,Volume中的数据也不会丢失。
kubernetes的Volume支持多种类型,比较常见的有下面几个:
- 简单存储:EmptyDir、HostPath、NFS
- 高级存储:PV、PVC
- 配置存储:ConfigMap、Secret
7.1 基本存储
7.1.1 EmptyDir
EmptyDir是最基础的Volume类型,一个EmptyDir就是Host上的一个空目录。
EmptyDir是在Pod被分配到Node时创建的,它的初始内容为空,并且无须指定宿主机上对应的目录文件,因为kubernetes会自动分配一个目录,当Pod销毁时, EmptyDir中的数据也会被永久删除。 EmptyDir用途如下:
- 临时空间,例如用于某些应用程序运行时所需的临时目录,且无须永久保留
- 一个容器需要从另一个容器中获取数据的目录(多容器共享目录)
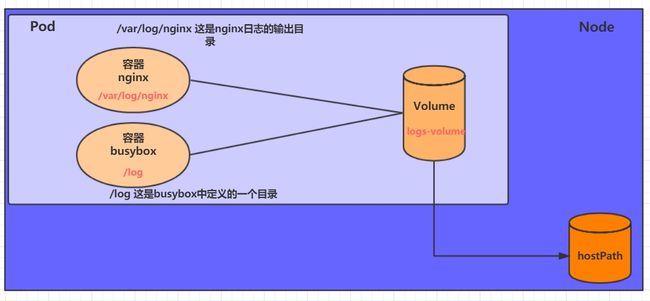
接下来,通过一个容器之间文件共享的案例来使用一下EmptyDir。
在一个Pod中准备两个容器nginx和busybox,然后声明一个Volume分别挂在到两个容器的目录中,然后nginx容器负责向Volume中写日志,busybox中通过命令将日志内容读到控制台。

创建一个volume-emptydir.yaml
[root@k8s-master inventory]# cat volume-emptydir.yaml
apiVersion: v1
kind: Pod
metadata:
  name: volume-emptydir
  namespace: dev
spec:
  containers:
  - name: nginx
    image: nginx:1.17.1
    ports:
    - containerPort: 80
    volumeMounts:     # 将logs-volume挂在到nginx容器中,对应的目录为 /var/log/nginx
    - name: logs-volume
      mountPath: /var/log/nginx
  - name: busybox
    image: busybox:1.30
    command: ["bin/sh","-c","tail -f /logs/access.log"]  # 初始命令,动态读取指定文件中内容
    volumeMounts:   # 将logs-volume 挂在到busybox容器中,对应的目录为 /logs
    - name: logs-volume
      mountPath: /logs
  volumes:   # 声明volume, name为logs-volume,类型为emptyDir
  - name: logs-volume
    emptyDir: {}
[root@k8s-master inventory]# kubectl apply -f volume-emptydir.yaml
pod/volume-emptydir created

# 通过podIp访问nginx  多访问几次
[root@k8s-master ~]# curl 10.244.1.2
<!DOCTYPE html>
<html>
<head>
<title>Welcome to nginx!</title>
<style>
    body {
        width: 35em;
        margin: 0 auto;
        font-family: Tahoma, Verdana, Arial, sans-serif;
    }
</style>
</head>
<body>
<h1>Welcome to nginx!</h1>
<p>If you see this page, the nginx web server is successfully installed and
working. Further configuration is required.</p>

<p>For online documentation and support please refer to
<a href="http://nginx.org/">nginx.org</a>.<br/>
Commercial support is available at
<a href="http://nginx.com/">nginx.com</a>.</p>

<p><em>Thank you for using nginx.</em></p>
</body>
</html>

# 通过kubectl logs命令查看指定容器的标准输出
[root@k8s-master ~]# kubectl logs -f volume-emptydir -n dev -c busybox
10.244.1.1 - - [13/Dec/2023:06:16:58 +0000] "GET / HTTP/1.1" 200 612 "-" "curl/7.61.1" "-"
10.244.1.1 - - [13/Dec/2023:06:17:07 +0000] "GET / HTTP/1.1" 200 612 "-" "curl/7.61.1" "-"
10.244.1.1 - - [13/Dec/2023:06:17:08 +0000] "GET / HTTP/1.1" 200 612 "-" "curl/7.61.1" "-"
10.244.1.1 - - [13/Dec/2023:06:17:08 +0000] "GET / HTTP/1.1" 200 612 "-" "curl/7.61.1" "-"
10.244.1.1 - - [13/Dec/2023:06:20:14 +0000] "GET / HTTP/1.1" 200 612 "-" "curl/7.61.1" "-"
10.244.1.1 - - [13/Dec/2023:06:20:15 +0000] "GET / HTTP/1.1" 200 612 "-" "curl/7.61.1" "-"
10.244.1.1 - - [13/Dec/2023:06:20:15 +0000] "GET / HTTP/1.1" 200 612 "-" "curl/7.61.1" "-"
10.244.1.1 - - [13/Dec/2023:06:20:16 +0000] "GET / HTTP/1.1" 200 612 "-" "curl/7.61.1" "-"
10.244.1.1 - - [13/Dec/2023:06:20:16 +0000] "GET / HTTP/1.1" 200 612 "-" "curl/7.61.1" "-"
10.244.1.1 - - [13/Dec/2023:06:20:17 +0000] "GET / HTTP/1.1" 200 612 "-" "curl/7.61.1" "-"
10.244.1.1 - - [13/Dec/2023:06:20:17 +0000] "GET / HTTP/1.1" 200 612 "-" "curl/7.61.1" "-"
10.244.1.1 - - [13/Dec/2023:06:20:17 +0000] "GET / HTTP/1.1" 200 612 "-" "curl/7.61.1" "-"
10.244.1.1 - - [13/Dec/2023:06:20:17 +0000] "GET / HTTP/1.1" 200 612 "-" "curl/7.61.1" "-"
10.244.1.1 - - [13/Dec/2023:06:20:17 +0000] "GET / HTTP/1.1" 200 612 "-" "curl/7.61.1" "-"
10.244.1.1 - - [13/Dec/2023:06:20:18 +0000] "GET / HTTP/1.1" 200 612 "-" "curl/7.61.1" "-"
10.244.1.1 - - [13/Dec/2023:06:20:18 +0000] "GET / HTTP/1.1" 200 612 "-" "curl/7.61.1" "-"
10.244.1.1 - - [13/Dec/2023:06:20:18 +0000] "GET / HTTP/1.1" 200 612 "-" "curl/7.61.1" "-"
10.244.1.1 - - [13/Dec/2023:06:20:18 +0000] "GET / HTTP/1.1" 200 612 "-" "curl/7.61.1" "-"
10.244.0.0 - - [13/Dec/2023:06:20:32 +0000] "GET / HTTP/1.1" 200 612 "-" "curl/7.61.1" "-"
10.244.0.0 - - [13/Dec/2023:06:20:34 +0000] "GET / HTTP/1.1" 200 612 "-" "curl/7.61.1" "-"
7.1.2 HostPath
EmptyDir中数据不会被持久化,它会随着Pod的结束而销毁,如果想简单的将数据持久化到主机中,可以选择HostPath。
HostPath就是将Node主机中一个实际目录挂在到Pod中,以供容器使用,这样的设计就可以保证Pod销毁了,但是数据依据可以存在于Node主机上。
创建一个volume-hostpath.yaml:
[root@k8s-master inventory]# vi volume-hostpath.yaml
[root@k8s-master inventory]# cat volume-hostpath.yaml
apiVersion: v1
kind: Pod
metadata:
  name: volume-hostpath
  namespace: dev
spec:
  containers:
  - name: nginx
    image: nginx:1.17.1
    ports:
    - containerPort: 80
    volumeMounts:
    - name: logs-volume
      mountPath: /var/log/nginx
  - name: busybox
    image: busybox:1.30
    command: ["bin/sh","-c","tail -f /logs/access.log"]
    volumeMounts:
    - name: logs-volume
      mountPath: /logs
  volumes:
  - name: logs-volume
    hostPath:
      path: /root/logs
      type: DirectoryOrCreate    # 目录存在就使用,不存在就先创建后使用
[root@k8s-master inventory]# kubectl apply -f volume-hostpath.yaml
pod/volume-hostpath created
[root@k8s-master inventory]# kubectl get -f volume-hostpath.yaml -o wide
NAME              READY   STATUS    RESTARTS   AGE   IP           NODE        NOMINATED NODE   READINESS GATES
volume-hostpath   2/2     Running   0          10s   10.244.1.3   k8s-node1   <none>           <none>

#访问nginx
[root@k8s-master ~]# curl 10.244.1.3
<!DOCTYPE html>
<html>
<head>
<title>Welcome to nginx!</title>
<style>
    body {
        width: 35em;
        margin: 0 auto;
        font-family: Tahoma, Verdana, Arial, sans-serif;
    }
</style>
</head>
<body>
<h1>Welcome to nginx!</h1>
<p>If you see this page, the nginx web server is successfully installed and
working. Further configuration is required.</p>

<p>For online documentation and support please refer to
<a href="http://nginx.org/">nginx.org</a>.<br/>
Commercial support is available at
<a href="http://nginx.com/">nginx.com</a>.</p>

<p><em>Thank you for using nginx.</em></p>
</body>
</html>


# 接下来就可以去host的/root/logs目录下查看存储的文件了
###  注意: 下面的操作需要到Pod所在的节点运行
[root@k8s-node1 ~]# cd logs/
[root@k8s-node1 logs]# ls
access.log  error.log
[root@k8s-node1 logs]# tail -f access.log
10.244.0.0 - - [13/Dec/2023:09:06:24 +0000] "GET / HTTP/1.1" 200 612 "-" "curl/7.61.1" "-"
10.244.0.0 - - [13/Dec/2023:09:06:25 +0000] "GET / HTTP/1.1" 200 612 "-" "curl/7.61.1" "-"
10.244.0.0 - - [13/Dec/2023:09:06:30 +0000] "GET / HTTP/1.1" 200 612 "-" "curl/7.61.1" "-"

# 同样的道理,如果在此目录下创建一个文件,到容器中也是可以看到的
[root@k8s-master ~]# kubectl exec -itn dev volume-hostpath -c busybox -- /bin/sh
/ # ls
bin   dev   etc   home  logs  proc  root  sys   tmp   usr   var
/ # cd logs/
/logs # ls
access.log  error.log
/logs # touch abc
/logs # ls
abc         access.log  error.log
[root@k8s-node1 logs]# ls
abc  access.log  error.log

[root@k8s-node1 logs]# rm -rf abc
[root@k8s-node1 logs]# ls
access.log  error.log
/logs # ls
access.log  error.log

# 将pod删除之后,主机上的目录还存在
[root@k8s-master inventory]# kubectl delete -f volume-hostpath.yaml
pod "volume-hostpath" deleted
[root@k8s-node1 logs]# ls
access.log  error.log
- 注意:pod在哪个节点运行,那个目录就在那个主机节点上
关于type的值的一点说明:
    DirectoryOrCreate 目录存在就使用,不存在就先创建后使用
    Directory   目录必须存在
    FileOrCreate  文件存在就使用,不存在就先创建后使用
    File 文件必须存在
    Socket  unix套接字必须存在
    CharDevice  字符设备必须存在
    BlockDevice 块设备必须存在
7.1.3 NFS
HostPath可以解决数据持久化的问题,但是一旦Node节点故障了,Pod如果转移到了别的节点,又会出现问题了,此时需要准备单独的网络存储系统,比较常用的用NFS、CIFS。
NFS是一个网络文件存储系统,可以搭建一台NFS服务器,然后将Pod中的存储直接连接到NFS系统上,这样的话,无论Pod在节点上怎么转移,只要Node跟NFS的对接没问题,数据就可以成功访问。

1)首先要准备nfs的服务器,这里为了简单,直接是master节点做nfs服务器
[root@k8s-master ~]# yum -y install nfs-utils
[root@k8s-master inventory]# cat /etc/exports
/nfs *(rw,no_root_squash
# rw,no_root_squash:能读能写,root用户不去映射匿名账户
# * 或 192.168.232.128/24
[root@k8s-node1 ~]# yum install nfs-utils -y
[root@k8s-node1 ~]# showmount -e 192.168.207.10
Export list for 192.168.207.10:
/nfs *

[root@k8s-node2 ~]# yum install nfs-utils -y
[root@k8s-node2 ~]# showmount -e 192.168.207.10
Export list for 192.168.207.10:
/nfs *


[root@k8s-master ~]# mkdir /nfs
[root@k8s-master ~]# cd /nfs/
[root@k8s-master nfs]# ls
[root@k8s-master nfs]# vi /etc/exports
[root@k8s-master nfs]# systemctl enable --now nfs-server
Created symlink /etc/systemd/system/multi-user.target.wants/nfs-server.service → /usr/lib/systemd/system/nfs-server.service.

[root@k8s-master inventory]# cat volume-nfs.yaml
apiVersion: v1
kind: Pod
metadata:
  name: volume-nfs
  namespace: dev
spec:
  containers:
  - name: nginx
    image: nginx:1.17.1
    ports:
    - containerPort: 80
    volumeMounts:
    - name: logs-volume
      mountPath: /var/log/nginx
  - name: busybox
    image: busybox:1.30
    command: ["bin/sh","-c","tail -f /logs/access.log"]
    volumeMounts:
    - name: logs-volume
      mountPath: /logs
  volumes:
  - name: logs-volume
    nfs:
      server: 192.168.207.10   #nfs服务器地址
      path: /nfs

[root@k8s-master inventory]# kubectl apply -f volume-nfs.yaml
pod/volume-nfs created
[root@k8s-master inventory]# kubectl get -f volume-nfs.yaml
NAME         READY   STATUS              RESTARTS   AGE
volume-nfs   0/2     ContainerCreating   0          3s
[root@k8s-master inventory]# kubectl get -f volume-nfs.yaml -o wide
NAME         READY   STATUS    RESTARTS   AGE    IP           NODE        NOMINATED NODE   READINESS GATES
volume-nfs   2/2     Running   0          112m   10.244.2.2   k8s-node2   <none>           <none>

# 查看nfs服务器上的共享目录,发现已经有文件了
[root@k8s-master ~]# cd /nfs/
[root@k8s-master nfs]# ls
access.log  error.log


# 访问:
[root@k8s-master ~]# curl 10.244.2.2
<!DOCTYPE html>
<html>
<head>
<title>Welcome to nginx!</title>
<style>
    body {
        width: 35em;
        margin: 0 auto;
        font-family: Tahoma, Verdana, Arial, sans-serif;
    }
</style>
</head>
<body>
<h1>Welcome to nginx!</h1>
<p>If you see this page, the nginx web server is successfully installed and
working. Further configuration is required.</p>

<p>For online documentation and support please refer to
<a href="http://nginx.org/">nginx.org</a>.<br/>
Commercial support is available at
<a href="http://nginx.com/">nginx.com</a>.</p>

<p><em>Thank you for using nginx.</em></p>
</body>
</html>


[root@k8s-master nfs]# tail access.log
10.244.0.0 - - [14/Dec/2023:06:10:57 +0000] "GET / HTTP/1.1" 200 612 "-" "curl/7.61.1" "-"
10.244.0.0 - - [14/Dec/2023:06:11:00 +0000] "GET / HTTP/1.1" 200 612 "-" "curl/7.61.1" "-"
10.244.0.0 - - [14/Dec/2023:06:11:00 +0000] "GET / HTTP/1.1" 200 612 "-" "curl/7.61.1" "-"
10.244.0.0 - - [14/Dec/2023:07:58:49 +0000] "GET / HTTP/1.1" 200 612 "-" "curl/7.61.1" "-"
7.2 高级存储
前面已经学习了使用NFS提供存储,此时就要求用户会搭建NFS系统,并且会在yaml配置nfs。由于kubernetes支持的存储系统有很多,要求客户全都掌握,显然不现实。为了能够屏蔽底层存储实现的细节,方便用户使用, kubernetes引入PV和PVC两种资源对象。
PV(Persistent Volume)是持久化卷的意思,是对底层的共享存储的一种抽象。一般情况下PV由kubernetes管理员进行创建和配置,它与底层具体的共享存储技术有关,并通过插件完成与共享存储的对接。
PVC(Persistent Volume Claim)是持久卷声明的意思,是用户对于存储需求的一种声明。换句话说,PVC其实就是用户向kubernetes系统发出的一种资源需求申请。

使用了PV和PVC之后,工作可以得到进一步的细分:
- 存储:存储工程师维护
- PV: kubernetes管理员维护
- PVC:kubernetes用户维护
PV是持久化卷的意思,是对底层的共享存储的一种抽象
- PV是存储资源的抽象
7.2.1 PV
PV是存储资源的抽象,下面是资源清单文件:
apiVersion: v1
kind: PersistentVolume
metadata:
  name: pv2
spec:
  nfs: # 存储类型,与底层真正存储对应
  capacity:  # 存储能力,目前只支持存储空间的设置
    storage: 2Gi
  accessModes:  # 访问模式
  storageClassName: # 存储类别
  persistentVolumeReclaimPolicy: # 回收策略
PV 的关键配置参数说明:
-
存储类型
底层实际存储的类型,kubernetes支持多种存储类型,每种存储类型的配置都有所差异
-
存储能力(capacity)
目前只支持存储空间的设置( storage=1Gi ),不过未来可能会加入IOPS、吞吐量等指标的配置
-
访问模式(accessModes)
用于描述用户应用对存储资源的访问权限,访问权限包括下面几种方式:
- ReadWriteOnce(RWO):读写权限,但是只能被单个节点挂载
- ReadOnlyMany(ROX): 只读权限,可以被多个节点挂载
- ReadWriteMany(RWX):读写权限,可以被多个节点挂载
需要注意的是,底层不同的存储类型可能支持的访问模式不同 -
回收策略(persistentVolumeReclaimPolicy)
当PV不再被使用了之后,对其的处理方式。目前支持三种策略:
- Retain (保留) 保留数据,需要管理员手工清理数据
- Recycle(回收) 清除 PV 中的数据,效果相当于执行 rm -rf /thevolume/*
- Delete (删除) 与 PV 相连的后端存储完成 volume 的删除操作,当然这常见于云服务商的存储服务
需要注意的是,底层不同的存储类型可能支持的回收策略不同 -
存储类别
PV可以通过storageClassName参数指定一个存储类别
- 具有特定类别的PV只能与请求了该类别的PVC进行绑定
- 未设定类别的PV则只能与不请求任何类别的PVC进行绑定
-
状态(status)
一个 PV 的生命周期中,可能会处于4中不同的阶段:
- Available(可用): 表示可用状态,还未被任何 PVC 绑定
- Bound(已绑定): 表示 PV 已经被 PVC 绑定
- Released(已释放): 表示 PVC 被删除,但是资源还未被集群重新声明
- Failed(失败): 表示该 PV 的自动回收失败
实验
使用NFS作为存储,来演示PV的使用,创建3个PV,对应NFS中的3个暴露的路径。
[root@k8s-master nfs]# mkdir pv{a..c}
[root@k8s-master nfs]# ls
pva  pvb  pvc

# # 暴露服务
[root@k8s-master nfs]# vi /etc/exports
[root@k8s-master nfs]# cat /etc/exports
/nfs/pva *(rw,no_root_squash)
/nfs/pvb *(rw,no_root_squash)
/nfs/pvc *(rw,no_root_squash)

# # 重启服务
[root@k8s-master nfs]#  systemctl restart nfs-server

[root@k8s-node1 ~]# showmount -e 192.168.207.10
Export list for 192.168.207.10:
/nfs/pvc *
/nfs/pvb *
/nfs/pva *

[root@k8s-master inventory]# cat pv.yaml
apiVersion: v1
kind: PersistentVolume
metadata:
  name: pva
spec:
  capacity:
    storage: 1Gi
  accessModes:
  - ReadWriteMany
  persistentVolumeReclaimPolicy: Retain
  nfs:
    path: /nfs/pva
    server: 192.168.207.10

---

apiVersion: v1
kind: PersistentVolume
metadata:
  name: pvb
spec:
  capacity:
    storage: 2Gi
  accessModes:
  - ReadWriteMany
  persistentVolumeReclaimPolicy: Retain
  nfs:
    path: /nfs/pvb
    server: 192.168.207.10

---

apiVersion: v1
kind: PersistentVolume
metadata:
  name: pvc
spec:
  capacity:
    storage: 3Gi
  accessModes:
  - ReadWriteMany
  persistentVolumeReclaimPolicy: Retain
  nfs:
    path: /nfs/pvc
    server: 192.168.207.10

# 创建pv
[root@k8s-master inventory]# kubectl apply -f pv.yaml
persistentvolume/pva created
persistentvolume/pvb created
persistentvolume/pvc created

# 查看pv
[root@k8s-master inventory]# kubectl get -f pv.yaml -o wide
NAME   CAPACITY   ACCESS MODES   RECLAIM POLICY   STATUS      CLAIM   STORAGECLASS   REASON   AGE   VOLUMEMODE
pva    1Gi        RWX            Retain           Available                                   6s    Filesystem
pvb    2Gi        RWX            Retain           Available                                   6s    Filesystem
pvc    3Gi        RWX            Retain           Available                                   6s    Filesystem
7.2.2 PVC
PVC是资源的申请,用来声明对存储空间、访问模式、存储类别需求信息。下面是资源清单文件:
apiVersion: v1
kind: PersistentVolumeClaim
metadata:
  name: pvc
  namespace: dev
spec:
  accessModes: # 访问模式
  selector: # 采用标签对PV选择
  storageClassName: # 存储类别
  resources: # 请求空间
    requests:
      storage: 5Gi
PVC 的关键配置参数说明:
- 访问模式(accessModes)
用于描述用户应用对存储资源的访问权限
-
选择条件(selector)
通过Label Selector的设置,可使PVC对于系统中己存在的PV进行筛选
-
存储类别(storageClassName)
PVC在定义时可以设定需要的后端存储的类别,只有设置了该class的pv才能被系统选出
-
资源请求(Resources )
描述对存储资源的请求
-
pv接近后端,pvc接近前端,用户
实验
创建pvc.yaml,申请pv
# pvc2和pvc3不是对应pv2和pv3,按照空间来分配
[root@k8s-master inventory]# vi pvc.yaml
[root@k8s-master inventory]# cat pvc.yaml
apiVersion: v1
kind: PersistentVolumeClaim
metadata:
  name: pvc1
  namespace: dev
spec:
  accessModes:
  - ReadWriteMany
  resources:
    requests:
      storage: 1Gi

---

apiVersion: v1
kind: PersistentVolumeClaim
metadata:
  name: pvc2
  namespace: dev
spec:
  accessModes:
  - ReadWriteMany
  resources:
    requests:
      storage: 1Gi

---

apiVersion: v1
kind: PersistentVolumeClaim
metadata:
  name: pvc3
  namespace: dev
spec:
  accessModes:
  - ReadWriteMany
  resources:
    requests:
      storage: 1Gi
[root@k8s-master inventory]# kubectl apply -f pvc.yaml
persistentvolumeclaim/pvc1 created
persistentvolumeclaim/pvc2 created
persistentvolumeclaim/pvc3 created

# 查看pvc
[root@k8s-master inventory]# kubectl get pvc -n dev -o wide
NAME   STATUS   VOLUME   CAPACITY   ACCESS MODES   STORAGECLASS   AGE   VOLUMEMODE
pvc1   Bound    pva      1Gi        RWX                           5s    Filesystem
pvc2   Bound    pvb      2Gi        RWX                           5s    Filesystem
pvc3   Bound    pvc      3Gi        RWX                           5s    Filesystem
[root@k8s-master inventory]# kubectl get pv -n dev -o wide
NAME   CAPACITY   ACCESS MODES   RECLAIM POLICY   STATUS   CLAIM      STORAGECLASS   REASON   AGE     VOLUMEMODE
pva    1Gi        RWX            Retain           Bound    dev/pvc1                           4h42m   Filesystem
pvb    2Gi        RWX            Retain           Bound    dev/pvc2                           4h42m   Filesystem
pvc    3Gi        RWX            Retain           Bound    dev/pvc3                           4h42m   Filesystem


# 创建pods.yaml, 使用pv
[root@k8s-master inventory]# cat pods.yaml
apiVersion: v1
kind: Pod
metadata:
  name: pod1
  namespace: dev
spec:
  containers:
  - name: busybox
    image: busybox:1.30
    command: ["/bin/sh","-c","while true;do echo pod1 >> /root/out.txt; sleep 10; done;"]
    volumeMounts:
    - name: volume
      mountPath: /root/   ###容器里的
  volumes:
    - name: volume
      persistentVolumeClaim:
        claimName: pvc1
        readOnly: false

---

apiVersion: v1
kind: Pod
metadata:
  name: pod2
  namespace: dev
spec:
  containers:
  - name: busybox
    image: busybox:1.30
    command: ["/bin/sh","-c","while true;do echo pod2 >> /root/out.txt; sleep 10; done;"]
    volumeMounts:
    - name: volume
      mountPath: /root/
  volumes:
    - name: volume
      persistentVolumeClaim:
        claimName: pvc2
        readOnly: false

---

apiVersion: v1
kind: Pod
metadata:
  name: pod3
  namespace: dev
spec:
  containers:
  - name: busybox
    image: busybox:1.30
    command: ["/bin/sh","-c","while true;do echo pod3 >> /root/out.txt; sleep 10; done;"]
    volumeMounts:
    - name: volume
      mountPath: /root/
  volumes:
    - name: volume
      persistentVolumeClaim:
        claimName: pvc3
        readOnly: false

# 创建pod
[root@k8s-master inventory]# kubectl apply -f pods.yaml
pod/pod1 created
pod/pod2 created
pod/pod3 created

# 查看pod
[root@k8s-master inventory]# kubectl get -f pods.yaml -o wide
NAME   READY   STATUS    RESTARTS   AGE   IP           NODE        NOMINATED NODE   READINESS GATES
pod1   1/1     Running   0          15s   10.244.2.6   k8s-node2   <none>           <none>
pod2   1/1     Running   0          15s   10.244.1.7   k8s-node1   <none>           <none>
pod3   1/1     Running   0          15s   10.244.1.6   k8s-node1   <none>           <none>

# 查看pvc
[root@k8s-master inventory]# kubectl get -f pods.yaml -n dev -o wide
NAME   READY   STATUS    RESTARTS   AGE   IP           NODE        NOMINATED NODE   READINESS GATES
pod1   1/1     Running   0          19s   10.244.2.6   k8s-node2   <none>           <none>
pod2   1/1     Running   0          19s   10.244.1.7   k8s-node1   <none>           <none>
pod3   1/1     Running   0          19s   10.244.1.6   k8s-node1   <none>           <none>


# 查看nfs中的文件存储
[root@k8s-master nfs]# ll
total 0
drwxr-xr-x 2 root root 21 Dec 15 23:55 pva
drwxr-xr-x 2 root root  6 Dec 15 18:07 pvb
drwxr-xr-x 2 root root  6 Dec 15 18:07 pvc
[root@k8s-master nfs]# cat pva/out.txt
pod1
pod1
pod1
pod1
pod1
pod1
pod1
pod1
pod1
pod1
pod1
pod1
[root@k8s-master nfs]# cat pvb/out.txt
pod2
pod2
pod2
pod2
pod2
pod2
pod2
pod2
pod2
pod2
pod2
pod2
pod2
pod2
[root@k8s-master nfs]# cat pvc/out.txt
pod3
pod3
pod3
pod3
pod3
pod3
pod3
pod3
pod3
pod3
pod3
pod3
pod3
pod3
7.2.3 生命周期
PVC和PV是一一对应的,PV和PVC之间的相互作用遵循以下生命周期:
-
资源供应:管理员手动创建底层存储和PV
-
资源绑定:用户创建PVC,kubernetes负责根据PVC的声明去寻找PV,并绑定
在用户定义好PVC之后,系统将根据PVC对存储资源的请求在已存在的PV中选择一个满足条件的
- 一旦找到,就将该PV与用户定义的PVC进行绑定,用户的应用就可以使用这个PVC了
- 如果找不到,PVC则会无限期处于Pending状态,直到等到系统管理员创建了一个符合其要求的PV
PV一旦绑定到某个PVC上,就会被这个PVC独占,不能再与其他PVC进行绑定了
-
资源使用:用户可在pod中像volume一样使用pvc
Pod使用Volume的定义,将PVC挂载到容器内的某个路径进行使用。
-
资源释放:用户删除pvc来释放pv
当存储资源使用完毕后,用户可以删除PVC,与该PVC绑定的PV将会被标记为“已释放”,但还不能立刻与其他PVC进行绑定。通过之前PVC写入的数据可能还被留在存储设备上,只有在清除之后该PV才能再次使用。
-
资源回收:kubernetes根据pv设置的回收策略进行资源的回收
对于PV,管理员可以设定回收策略,用于设置与之绑定的PVC释放资源之后如何处理遗留数据的问题。只有PV的存储空间完成回收,才能供新的PVC绑定和使用

7.3 配置存储
7.3.1 ConfigMap
ConfigMap是一种比较特殊的存储卷,它的主要作用是用来存储配置信息的。
创建configmap.yaml,内容如下:
[root@k8s-master inventory]# vi configmap.yaml
[root@k8s-master inventory]# cat configmap.yaml
apiVersion: v1
kind: ConfigMap
metadata:
  name: configmap
  namespace: dev
data:
  info: |
    username:admin
    password:123456

# 创建configmap
[root@k8s-master inventory]# kubectl apply -f configmap.yaml
configmap/configmap created
[root@k8s-master inventory]# kubectl get -f configmap.yaml
NAME        DATA   AGE
configmap   1      8s

# 查看configmap详情
[root@k8s-master inventory]# kubectl describe cm configmap -n dev
Name:         configmap
Namespace:    dev
Labels:       >
Annotations:  >

Data
====
info:
----
username:admin
password:123456


BinaryData
====

Events:  >

# 创建一个pod-configmap.yaml,将上面创建的configmap挂载进去
[root@k8s-master inventory]# vi pod-configmap.yaml
[root@k8s-master inventory]# cat pod-configmap.yaml
apiVersion: v1
kind: Pod
metadata:
  name: pod-configmap
  namespace: dev
spec:
  containers:
  - name: nginx
    image: nginx:1.17.1
    volumeMounts:   # 将configmap挂载到目录
    - name: config
      mountPath: /configmap/config
  volumes:
  - name: config
    configMap:
      name: configmap  # 名字可以是别的

# 创建pod
[root@k8s-master inventory]# kubectl apply -f pod-configmap.yaml
pod/pod-configmap created
[root@k8s-master inventory]# kubectl get -f pod-configmap.yaml
NAME            READY   STATUS    RESTARTS   AGE
pod-configmap   1/1     Running   0          11s

#进入容器
[root@k8s-master inventory]# kubectl exec -itn dev pod-configmap -- /bin/sh
# ls
bin  boot  configmap  dev  etc	home  lib  lib64  media  mnt  opt  proc  root  run  sbin  srv  sys  tmp  usr  var
# cd /configmap
# ls
config
# cd config
# ls
info
# cat info
username:admin
password:123456
# exit

# 将文件改了之后,查看容器是否改了
[root@k8s-master inventory]# kubectl edit cm configmap -n dev
configmap/configmap edited

# 内容修改如下
apiVersion: v1
data:
  info: |
    username:admin
    password:12345678


# 将pod重建,让其生效
[root@k8s-master inventory]# kubectl apply -f pod-configmap.yaml
pod/pod-configmap configured

# 查看容器
[root@k8s-master inventory]# kubectl exec -itn dev pod-configmap -- /bin/sh
# cd /configmap/config
# cat info
username:admin
password:12345678
# exit


# 可以看到映射已经成功,每个configmap都映射成了一个目录
# key--->文件     value---->文件中的内容
# 此时如果更新configmap的内容, 容器中的值也会动态更新
7.3.2 Secret
在kubernetes中,还存在一种和ConfigMap非常类似的对象,称为Secret对象。它主要用于存储敏感信息,例如密码、秘钥、证书等等。
[root@k8s-master inventory]# clear
[root@k8s-master inventory]# echo -n 'admin' | base64
YWRtaW4=
[root@k8s-master inventory]# echo -n '123456' | base64
MTIzNDU2

# echo -n 没有换行符,将换行符去掉

[root@k8s-master inventory]# vi secret.yaml
[root@k8s-master inventory]# cat secret.yaml
apiVersion: v1
kind: Secret
metadata:
  name: secret
  namespace: dev
type: Opaque
data:
    username: YWRtaW4=
    password: MTIzNDU2

# 创建secret
[root@k8s-master inventory]# kubectl apply -f secret.yaml
secret/secret created

# 查看secret详情
[root@k8s-master inventory]# kubectl get -f secret.yaml
NAME     TYPE     DATA   AGE
secret   Opaque   2      5s
[root@k8s-master inventory]# kubectl describe secret secret -n dev
Name:         secret
Namespace:    dev
Labels:       <none>
Annotations:  <none>

Type:  Opaque

Data
====
password:  6 bytes
username:  5 bytes

# 创建pod-secret.yaml,将上面创建的secret挂载进去
[root@k8s-master inventory]# vi pod-secret.yaml
[root@k8s-master inventory]# cat pod-secret.yaml
apiVersion: v1
kind: Pod
metadata:
  name: pod-secret
  namespace: dev
spec:
  containers:
  - name: nginx
    image: nginx:1.17.1
    volumeMounts:  # 将secret挂载到目录
    - name: config
      mountPath: /secret/config
  volumes:
  - name: config
    secret:
      secretName: secret
[root@k8s-master inventory]# kubectl apply -f pod-secret.yaml
pod/pod-secret created
[root@k8s-master inventory]# kubectl get -f pod-secret.yaml
NAME         READY   STATUS    RESTARTS   AGE
pod-secret   1/1     Running   0          6s

# 进入容器,查看secret信息,发现已经自动解码了
[root@k8s-master inventory]# kubectl exec -itn dev pod-secret -- /bin/sh
# ls
bin  boot  dev	etc  home  lib	lib64  media  mnt  opt	proc  root  run  sbin  secret  srv  sys  tmp  usr  var
# cd /secret/config
# ls
password  username
# cat password
123456#
# cat username
admin# exit