容器:ArrayList, Hashmap
一、ArrayList
step1:创建ArrayList() 数组:
    // eg1:初始化ArrayList实例,则elementData={}
    public ArrayList() {
        this.elementData = DEFAULTCAPACITY_EMPTY_ELEMENTDATA; // Object[] DEFAULTCAPACITY_EMPTY_ELEMENTDATA = {};
    }
elementData是最底层存储ArrayList元素的数组,使用transient修饰则该变量不会被序列化,反序列化时不会有该变量,这样做可以节省空间,增加效率。
    /**
     * 【问题1】elementData为什么被transient修饰?
     * 答:ArrayList在序列化的时候会调用writeObject,
     * 直接将size和element写入ObjectOutputStream;
     * 反序列化时调用readObject,从ObjectInputStream获取
     * size和element,再恢复到elementData。
     * writeObject 和 readObject 取代了序列化的默认逻辑

     * 【问题2】为什么不直接用elementData来序列化,而采用上述的方式来实现序列化呢?
     * 答:原因在于elementData是一个缓存数组,它通常会预留一些容量,
     * 等容量不足时再扩充容量,那么有些空间可能就没有实际存储元素,
     * 采用上述的方式来实现序列化时,就可以保证只序列化实际存储的那些元素,
     * 而不是整个数组,从而节省空间和时间。
     */
    transient Object[] elementData; // non-private to simplify nested class access
step2:调用add() 方法
   /**
     * 新增元素操作
     *
     * List list = new ArrayList();
     * list.add("a1");
     */
    // eg1:第一次新增元素e="a1"
    public boolean add(E e) {
        /** 确定是否需要扩容,如果需要,则进行扩容操作*/
        ensureCapacityInternal(size + 1);  // Increments modCount!!

        // eg1:size=0,elementData[0]="a1",然后a自增为1
        elementData[size++] = e;
        return true;
    }
size的默认值:
    /**
     * ArrayList中包含的元素数量
     */
    private int size;
ensureCapacityInternal(int minCapacity) 方法:
    // eg1:第一次新增元素,所以size=0,则:minCapacity=size+1=1
    private void ensureCapacityInternal(int minCapacity) {
        // eg1:第一次新增元素,calculateCapacity方法返回值为DEFAULT_CAPACITY=10
        ensureExplicitCapacity(calculateCapacity(elementData, minCapacity));
    }
/**
* 计算ArrayList的容量
*
* 如果elementData数组中没有已存储的元素,则返回默认值10
* 否则,返回minCapacity。
*
* @param elementData 底层存储ArrayList元素的数组
* @param minCapacity ArrayList中的元素个数
* @return
*/
// eg1:第一次新增元素,elementData={} minCapacity=1
private static int calculateCapacity(Object[] elementData, int minCapacity) {
if (elementData == DEFAULTCAPACITY_EMPTY_ELEMENTDATA) {
return Math.max(DEFAULT_CAPACITY, minCapacity); // eg1:满足if判断,DEFAULT_CAPACITY=10
}
return minCapacity;
} /**
* ArrayList默认的容量为10个Object元素
*/
private static final int DEFAULT_CAPACITY = 10;
所以,ArrayList创建初期,数组的长度初始化为10。
    /**
     * 确保明确的ArrayList的容量
     *
     * @param minCapacity ArrayList所需的最小容量
     */
    // eg1:第一次新增元素,minCapacity=10
    private void ensureExplicitCapacity(int minCapacity) {
        // eg1: modCount++后,修改次数 modCount=1
        modCount++;

        /** 如果所需的最小容量大于elementData数组的容量,则进行扩容操作 */
        if (minCapacity - elementData.length > 0) { // eg1:10-0=10,满足扩容需求
            // eg1:minCapacity=10
            grow(minCapacity);
        }
    }
/**
* The maximum size of array to allocate.
* Some VMs reserve some header words in an array.
* Attempts to allocate larger arrays may result in
* OutOfMemoryError: Requested array size exceeds VM limit
*
* 要分配的数组的最大大小。一些vm在数组中保留一些头字。
* 尝试分配较大的数组可能会导致OutOfMemory错误:请求的数组大小超过了虚拟机限制
*/
// MAX_ARRAY_SIZE=2147483639=01111111 11111111 11111111 11110111
private static final int MAX_ARRAY_SIZE = Integer.MAX_VALUE - 8;
/**
* Increases the capacity to ensure that it can hold at least the
* number of elements specified by the minimum capacity argument.
*
* 扩容操作
*
* @param minCapacity 所需要的最小扩容量
*/
// eg1:第一次新增元素,minCapacity=10,即:需要将elementData的0长度扩容为10长度。
private void grow(int minCapacity) {
/** 原有数组elementData的长度*/
int oldCapacity = elementData.length; // eg1:oldCapacity=0
/**
* A >> 1 等于 A/2
* eg: 3 >> 1 = 3/2 = 1
* 4 >> 1 = 4/2 = 2
* ------------------------
* A << 1 等于 A*2
* eg: 3 << 1 = 3*2 = 6
* 4 << 1 = 4*2 = 8
*
* 000100 >> 1 = 000010
* 000100 << 1 = 001000
*/
/** 新增oldCapacity的一半整数长度作为newCapacity的额外增长长度 */
int newCapacity = oldCapacity + (oldCapacity >> 1); // eg1:newCapacity=0+(0>>1)=0
/** 新的长度newCapacity依然无法满足需要的最小扩容量minCapacity,则新的扩容长度为minCapacity */
if (newCapacity - minCapacity < 0) {
// eg1:newCapacity=10
newCapacity = minCapacity;
}
/** 新的扩容长度newCapacity超出了最大的数组长度MAX_ARRAY_SIZE huge:巨大的 */
if (newCapacity - MAX_ARRAY_SIZE > 0) {
newCapacity = hugeCapacity(minCapacity);
}
/** 扩展数组长度为newCapacity,并且将旧数组中的元素赋值到新的数组中 */
// eg1:newCapacity=10, 扩容elementData的length=10
elementData = Arrays.copyOf(elementData, newCapacity);
}
所以,以“增加原长度的一半”的方式进行扩容;
截止到此,add方法给原始数据进行了扩容,新数组的长度为10;然后将需要加入的元素e放到数组即可,(size默认值为0)
step2:调用get() 方法
    public E get(int index) {
        rangeCheck(index);
        return elementData(index);
    }
// eg1:index=0
private void rangeCheck(int index) {
if (index >= size) {
throw new IndexOutOfBoundsException(outOfBoundsMsg(index));
}
}二、LinkedList
step1:创建linkedList链表
    public LinkedList() {
    }
step2:调用add() 方法
    /**
     * 新增元素
     */
    // eg1: e="a1"
    public boolean add(E e) {
        linkLast(e);
        return true;
    }
/**
* 将新添加的元素e作为链表的最后一个元素, 并维护进去
*/
// eg1: e="a1"
void linkLast(E e) {
// last的初始值为空:
// 指向最后一个结点
// transient Node last;
final Node l = last;
// eg1: newNode null<--"a1"-->null
/** 创建一个e的Node节点,前置指向原last节点,后置指向null */
final Node newNode = new Node<>(l, e, null);
/** 将newNode节点赋值为last节点 */
last = newNode;
// eg1: l=null
if (l == null) {
/** 如果是第一个添加的元素,则first指针指向该结点*/
first = newNode; // eg1: first指向newNode
} else {
/** 如果不是第一个添加进来的元素,则更新l的后置结点指向新添加的元素结点newNode*/
l.next = newNode;
}
size++;
modCount++;
} Node节点的结构:
    private static class Node {
        E item; // 结点元素
        Node next; // 后置结点指针
        Node prev; // 前置结点指针

        Node(Node prev, E element, Node next) {
            this.item = element;
            this.next = next;
            this.prev = prev;
        }
    }
所以,LinkedList是双向链表。
step3:调用get() 方法
    /**
     * 查询指定下标index的结点
     */
    public E get(int index) {
        checkElementIndex(index);
        return node(index).item;
    }
/**
* 校验是否越界
*
* @param index
*/
private void checkElementIndex(int index) {
/** index >= 0 && index < size */
if (!isElementIndex(index)) {
throw new IndexOutOfBoundsException(outOfBoundsMsg(index));
}
} /**
* Tells if the argument is the index of an existing element.
*/
private boolean isElementIndex(int index) {
return index >= 0 && index < size;
} /**
* Returns the (non-null) Node at the specified element index.
*
* 根据传入的index值,返回对应的结点node
*/
// eg1:index=0
Node node(int index) {
// assert isElementIndex(index);
/** 如果需要获取的index小于总长度size的一半,则从头部开始向后遍历查找 */
if (index < (size >> 1)) {
Node x = first;
for (int i = 0; i < index; i++) {
x = x.next; // 从first结点向后next查找,直到index下标node,返回node
}
return x;
} else { /** 从尾部开始向前遍历查找 */
Node x = last;
for (int i = size - 1; i > index; i--) {
x = x.prev; // 从last结点向前prev查找,直到index下标node,返回node
}
return x;
}
}
所以,对于LinkedList的get方法来说,先判断要get的索引值在链表长度一半位置的左侧还是右侧,若在左侧则从链表的first开始往右查找,若在右侧,则从链表的last往左查找。
三、Hashmap
step1:创建hashmap()
    /**
     * Constructs an empty HashMap with the default initial capacity
     * (16) and the default load factor (0.75).
     */
    public HashMap() {
        this.loadFactor = DEFAULT_LOAD_FACTOR; // all other fields defaulted
    }
static final float DEFAULT_LOAD_FACTOR = 0.75f; static final int DEFAULT_INITIAL_CAPACITY = 1 << 4; // aka 16所以,负载因子默认是0.75,主要用来确定阈值;数组(表)容量默认值为16.
    // eg1: hashMap.put(0, "a0");
    // eg2: hashMap.put(1, "a1");
    // eg3: hashMap.put(16, "a16");
    // eg4: hashMap.put(32, "a32");
    // eg5: hashMap.put(48, "a48");
    // hashMap.put(64, "a64");
    // hashMap.put(80, "a80");
    // hashMap.put(96, "a96");
    // hashMap.put(112, "a112");
    // eg6: hashMap.put(128, "a128");
    public V put(K key, V value) {
        return putVal(hash(key), key, value, false, true);
    }
// egx: key="k1"
// eg1: key=0
static final int hash(Object key) {
int h;
/**
* 按位异或运算(^):两个数转为二进制,然后从高位开始比较,如果相同则为0,不相同则为1。
*
* 扰动函数————(h = key.hashCode()) ^ (h >>> 16) 表示:
* 将key的哈希code一分为二。其中:
* 【高半区16位】数据不变。
* 【低半区16位】数据与高半区16位数据进行异或操作,以此来加大低位的随机性。
* 注意:如果key的哈希code小于等于16位,那么是没有任何影响的。只有大于16位,才会触发扰动函数的执行效果。
* */
// egx: 110100100110^000000000000=110100100110,由于k1的hashCode都是在低16位,所以原样返回3366
return (key == null) ? 0 : (h = key.hashCode()) ^ (h >>> 16);
/**
* case1:
* h=高16位(全是0) and 低16位(有1)
* h >>> 16 = 低16位全部消失,那么变成了32位(全是0)
* h ^ (h >>> 16) = 原样输出
* case2:
* h=高16位(有1) and 低16位(有1)
* h >>> 16 = 低16位全部消失,那么变成了高16位(全是0)and低16位(有1)
* h ^ (h >>> 16) = 不是原样输出 将原高16位于原低16位进行扰动。
*/
}String的hashCode(): (不太可控)
        /**
     * 计算String的哈希值
     *
     * 假设 n=3
     * i=0 -> h = 31 * 0 + val[0]
     * i=1 -> h = 31 * (31 * 0 + val[0]) + val[1]
     * i=2 -> h = 31 * (31 * (31 * 0 + val[0]) + val[1]) + val[2]
     *        h = 31*31*31*0 + 31*31*val[0] + 31*val[1] + val[2]
     *        h = 31^(n-1)*val[0] + 31^(n-2)*val[1] + val[2]
     * 即:
     *    s[0]*31^(n-1) + s[1]*31^(n-2) + ... + s[n-1]
     */
    // eg1: key="k1"
    public int hashCode() {
        // eg1: 默认hash=0 h=0
        int h = hash;
        // eg1: value={'k','1'} value.length=2
        /** 只有第一次计算hash值时,才进入下面逻辑中。此后调用hashCode方法,都直接返回hash*/
        if (h == 0 && value.length > 0) {
            char val[] = value;

            for (int i = 0; i < value.length; i++) {
                // eg1: val[0]=107 val[1]=49
                h = 31 * h + val[i];
            }
            // eg1: 31(31*0+107)+49=3366
            hash = h;
        }
        return h;
    }
Integer的hashCode(): (直接将integer的值返回了)
    public int hashCode() {
        return Integer.hashCode(value);
    }
public static int hashCode(int value) {
return value;
}putVal()方法具体的内容:(下面先是完整的方法内容,接下来一块一块分别分析)
/**
* Implements Map.put and related methods.
*
* @param hash key的哈希值
* @param key key值
* @param value value值
* @param onlyIfAbsent 如果是true,则不改变已存在的value值,(倒数27行)如果是false,则已经存在该key值,要对value值进行更新操作
* @param evict 驱逐,赶出,逐出 if false, the table is in creation mode.
*
* @return previous value, or null if none
*/
// eg1: hash=0 key=0 value="a0" onlyIfAbsent=false evict=true
// eg2: hash=1 key=1 value="a1" onlyIfAbsent=false evict=true
// eg3: hash=16 key=16 value="a16" onlyIfAbsent=false evict=true
// eg4: hash=32 key=32 value="a32" onlyIfAbsent=false evict=true
// eg5: 由于执行步骤与eg4相似,故略过。
// eg6: hash=128 key=128 value="a128" onlyIfAbsent=false evict=true
final V putVal(int hash, K key, V value, boolean onlyIfAbsent, boolean evict) {
Node[] tab;
Node p;
int n, i;
// eg1: table=null
// eg2: table是长度为16的Node数组,且table[1]=Node(1, 1, "a1", null)
// eg3: table是长度为16的Node数组,且table[1]=Node(1, 1, "a1", null) ... table[6]=Node(6, 6, "a6", null)
// eg4: table是长度为16的Node数组,且table[1]=Node(1, 1, "a1", null) ... table[6]=Node(6, 6, "a6", null)
// eg6: table是长度为16的Node数组,且table[1]=Node(1, 1, "a1", null) ... table[6]=Node(6, 6, "a6", null)
/** 如果是空的table,那么默认初始化一个长度为16的Node数组*/
if ((tab = table) == null || (n = tab.length) == 0) {
// eg1: resize返回(Node[]) new Node[16],所以:tab=(Node[]) new Node[16], n=16
n = (tab = resize()).length;
}
// eg1: i = (n-1)&hash = (16-1)&0 = 1111&0000 = 0000 = 0; 即:p=tab[0]=null
// eg2: i = (n-1)&hash = (16-1)&1 = 1111&0001 = 0001 = 1; 即:p=tab[1]=null
// eg3: i = (n-1)&hash = (16-1)&16 = 1111&10000 = 0000 = 0; 即:p=tab[0]=Node(0, 0, "a0", null)
// eg4: i = (n-1)&hash = (16-1)&32 = 1111&100000 = 0000 = 0; 即:p=tab[0]=Node(0, 0, "a0", null)
// eg6: i = (n-1)&hash = (16-1)&128 = 1111&10000000 = 0000 = 0; 即:p=tab[0]=Node(0, 0, "a0", null)
/** 如果计算后的下标i,在tab数组中没有数据,那么则新增Node节点*/
if ((p = tab[i = (n - 1) & hash]) == null) {
// eg1: tab[0] = newNode(0, 0, "a0", null)
// eg2: tab[1] = newNode(1, 1, "a1", null)
tab[i] = newNode(hash, key, value, null);
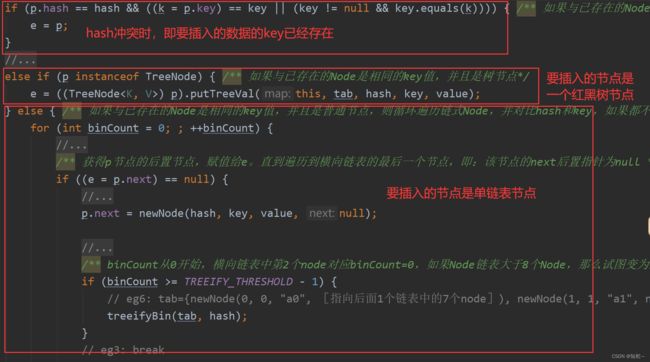
} else { /** 如果计算后的下标i,在tab数组中已存在数据,则执行以下逻辑 */
Node e;
K k;
// eg3: p.hash==0, hash==16,所以返回false
// eg4: p.hash==0, hash==32,所以返回false
// eg6: p.hash==0, hash==128,所以返回false
if (p.hash == hash && ((k = p.key) == key || (key != null && key.equals(k)))) { /** 如果与已存在的Node是相同的key值*/
e = p;
}
// eg3: p instanceof Node,所以为false
// eg4: p instanceof Node,所以为false
// eg6: p instanceof Node,所以为false
else if (p instanceof TreeNode) { /** 如果与已存在的Node是相同的key值,并且是树节点*/
e = ((TreeNode) p).putTreeVal(this, tab, hash, key, value);
} else { /** 如果与已存在的Node是相同的key值,并且是普通节点,则循环遍历链式Node,并对比hash和key,如果都不相同,则将新的Node拼装到链表的末尾。如果相同,则进行更新。*/
for (int binCount = 0; ; ++binCount) {
// eg3: p.next == null
// eg4-loop1: p.next == Node(16, 16, "a16", null) 不为空
// eg4-loop2: p.next == null
/** 获得p节点的后置节点,赋值给e。直到遍历到横向链表的最后一个节点,即:该节点的next后置指针为null */
if ((e = p.next) == null) {
// eg3: p.next = newNode(16, 16, "a16", null);
// eg4-loop2: p.next == newNode(32, 32, "a32", null);
// eg6: p.next == newNode(128, 128, "a128", null);
p.next = newNode(hash, key, value, null);
// eg3: binCount == 0
// eg4-loop2: binCount == 1
/** binCount从0开始,横向链表中第2个node对应binCount=0,如果Node链表大于8个Node,那么试图变为红黑树 */
if (binCount >= TREEIFY_THRESHOLD - 1) {
// eg6: tab={newNode(0, 0, "a0", [指向后面1个链表中的7个node]), newNode(1, 1, "a1", null)}, hash=128
treeifyBin(tab, hash);
}
// eg3: break
// eg4-loop2: break
break;
}
// eg4-loop1: e.hash==16 hash==32 所以返回false
/** 针对链表中的每个节点,都来判断一下,是否待插入的key与已存在的链表节点相同,如果相同,则跳出循环,并在后续的操作中,将该节点内容更新为最新的插入值 */
if (e.hash == hash && ((k = e.key) == key || (key != null && key.equals(k)))) {
break;
}
// eg4-loop1: p=e=Node(16, 16, "a16", null)
p = e;
}
}
// eg3: e = null
// eg4: e = null
/** 如果存在相同的key值*/
if (e != null) {
// egx: String oldValue = "v1"
V oldValue = e.value;
// egx: onlyIfAbsent=false
if (!onlyIfAbsent || oldValue == null) {
// egx: e = Node(3366, "k1", "v2", null)
/** 则将新的value值进行更新*/
e.value = value;
}
afterNodeAccess(e); /** doing nothing */
// egx: 返回oldValue="v1"
return oldValue;
}
}
// eg1: modCount==0 ++modCount==1
// eg2: modCount==1 ++modCount==2
// eg3: modCount==7 ++modCount==8
// eg4: modCount==8 ++modCount==9
++modCount;
// eg1: size=0, threshold=12
// eg2: size=1, threshold=12
// eg3: size=7, threshold=12
// eg4: size=8, threshold=12
if (++size > threshold) {
resize();
}
afterNodeInsertion(evict); /** doing nothing */
return null;
}
resize() 方法:(扩容)
扩容涉及三部分内容:
- 数组长度
- 数组本身
- 阈值threshold:负载因子*数组长度
该方法分为两部分:
(1)数组中没有数据则创建新数组
(2)数组中有数据则数据迁移
TreeNode 继承了 LinkedHashMap.Entry, LinkedHashMap.Entry 继承了 HashMap.Node
Node有next指针,TreeNode有prev指针 和继承自Node的next指针以及父节点和左右节点
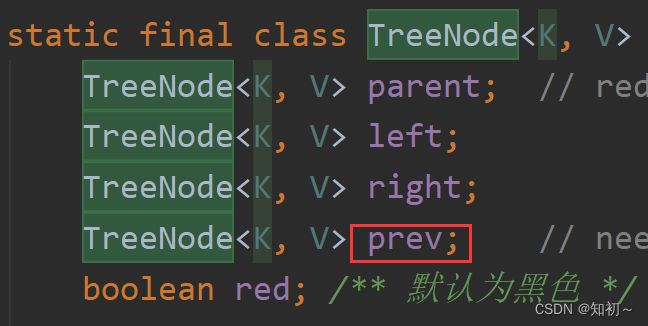
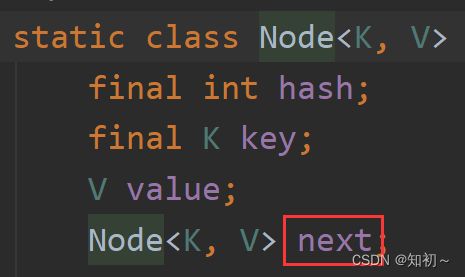
所以Node是单向链表,TreeNode是双向链表 + 红黑树的结构。
所以,hashmap的底层是:数组 + (单向)链表 + 红黑树(其中每个节点维护了双向链表)
链表的表头和红黑树的root节点要存到数组中。
红黑树有自适性。
jdk1.8之后新增节点加入到单向链表是尾插法,之前是头插法。
hashmap本身不是线程安全的。
当底层存储node的数组长度 >= 64并且单向链表长度 > 8时,单向链表转为红黑树。