黑马头条--day01.环境搭建
目录
一.前言
二.环境搭建
1.数据库
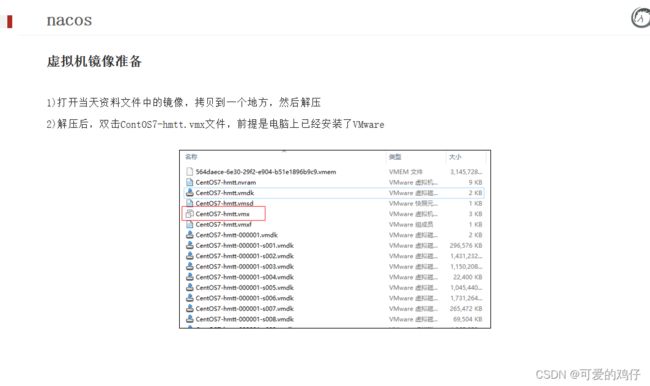
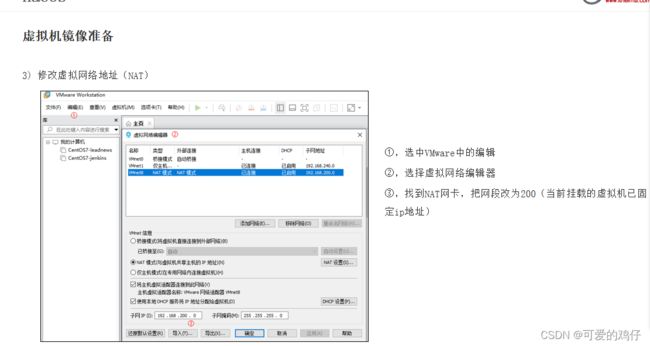
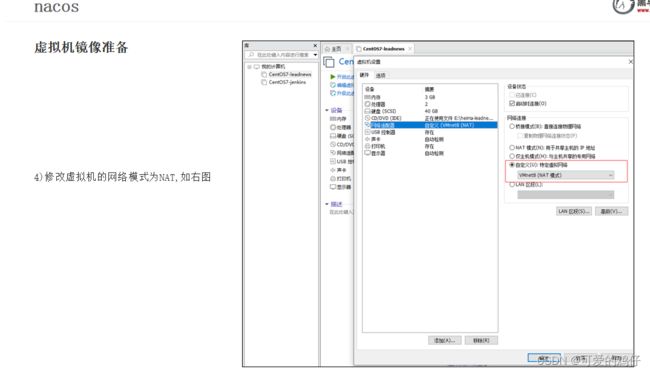
2.虚拟机搭建
3.1docker更换源
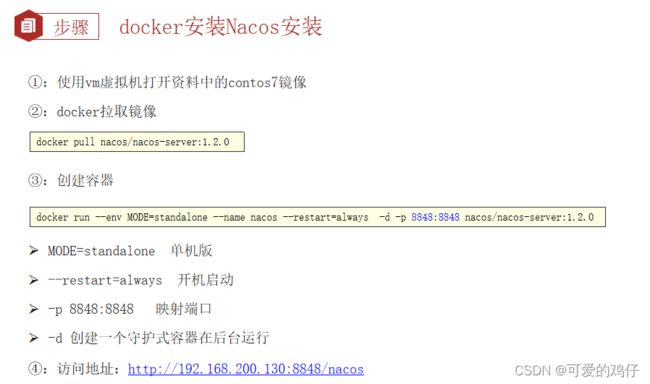
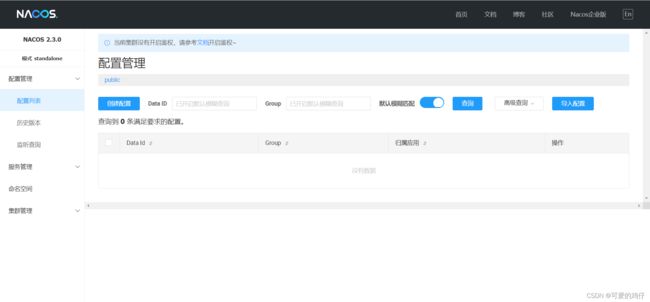
3.docker安装nacos
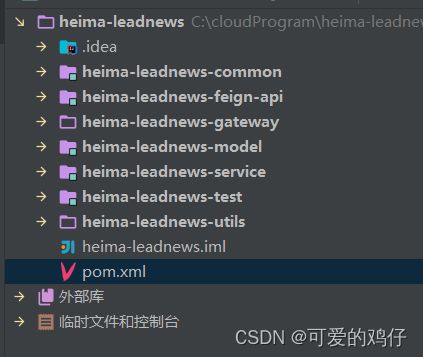
4.初始化工程
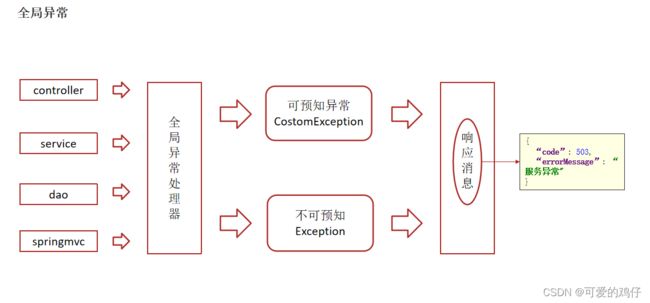
三.全局异常处理
四.登录加密
五.nacos公共配置数据源和mybatis-plus
六.user模块创建
1.配置文件bootstrap.yml
2.日志文件配置logback.xml
3.登录接口
七.统一结果处理
1.统一结果枚举类
2.统一结果返回类
3.统一分页结果返回类
4.分页结果dto类
八.登录逻辑
1.controller
2.service
九.postman测试
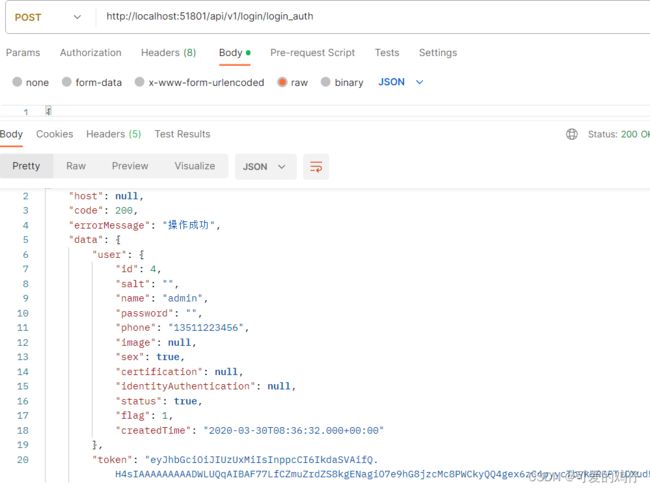
1.测试登录成功
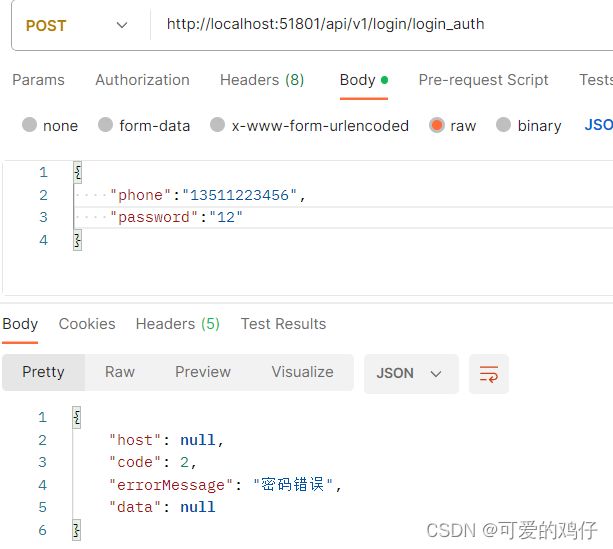
2.输错密码
3.游客登录
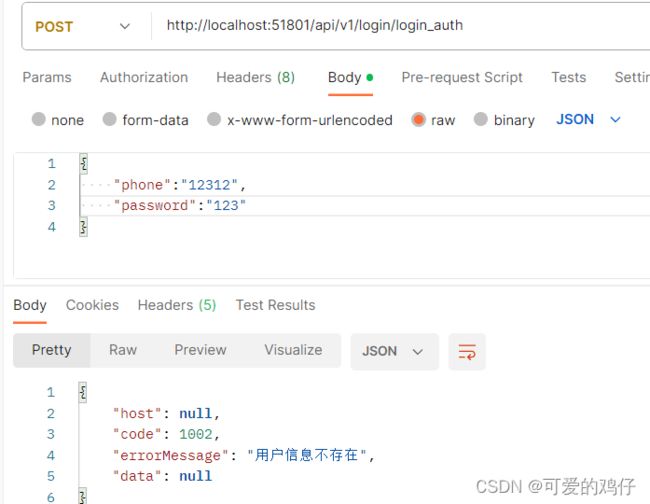
4.输错手机号
十.swagger接口文档
十一.knfie4j接口文档
十二.gateway网关
1)在heima-leadnews-gateway导入以下依赖
(2)在heima-leadnews-gateway下创建heima-leadnews-app-gateway微服务
3.bootstrap.yml
4.nacos中配置文件 编辑
十三.前端项目启动
9.2)配置nginx
一.前言
该项目学习自黑马程序员,由我整理如下,版权归黑马程序员所有
二.环境搭建
1.数据库
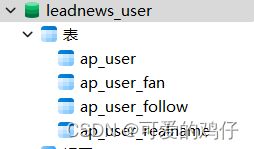
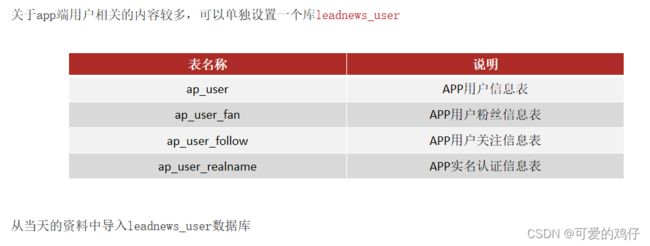
第一天,先创建如下库和表:
sql文件如下:
CREATE DATABASE IF NOT EXISTS leadnews_user DEFAULT CHARACTER SET utf8mb4 COLLATE utf8mb4_unicode_ci;
USE leadnews_user;
SET NAMES utf8;
/*
Navicat MySQL Data Transfer

Source Server         : localhost
Source Server Version : 50721
Source Host           : localhost:3306
Source Database       : leadnews_user

Target Server Type    : MYSQL
Target Server Version : 50721
File Encoding         : 65001

Date: 2021-04-12 13:58:42
*/

SET FOREIGN_KEY_CHECKS=0;

-- ----------------------------
-- Table structure for ap_user
-- ----------------------------
DROP TABLE IF EXISTS `ap_user`;
CREATE TABLE `ap_user` (
  `id` int(11) unsigned NOT NULL AUTO_INCREMENT COMMENT '主键',
  `salt` varchar(32) COLLATE utf8mb4_unicode_ci DEFAULT NULL COMMENT '密码、通信等加密盐',
  `name` varchar(20) COLLATE utf8mb4_unicode_ci DEFAULT NULL COMMENT '用户名',
  `password` varchar(32) COLLATE utf8mb4_unicode_ci DEFAULT NULL COMMENT '密码,md5加密',
  `phone` varchar(11) COLLATE utf8mb4_unicode_ci DEFAULT NULL COMMENT '手机号',
  `image` varchar(255) COLLATE utf8mb4_unicode_ci DEFAULT NULL COMMENT '头像',
  `sex` tinyint(1) unsigned DEFAULT NULL COMMENT '0 男\r\n            1 女\r\n            2 未知',
  `is_certification` tinyint(1) unsigned DEFAULT NULL COMMENT '0 未\r\n            1 是',
  `is_identity_authentication` tinyint(1) DEFAULT NULL COMMENT '是否身份认证',
  `status` tinyint(1) unsigned DEFAULT NULL COMMENT '0正常\r\n            1锁定',
  `flag` tinyint(1) unsigned DEFAULT NULL COMMENT '0 普通用户\r\n            1 自媒体人\r\n            2 大V',
  `created_time` datetime DEFAULT NULL COMMENT '注册时间',
  PRIMARY KEY (`id`) USING BTREE
) ENGINE=InnoDB AUTO_INCREMENT=7 DEFAULT CHARSET=utf8mb4 COLLATE=utf8mb4_unicode_ci ROW_FORMAT=DYNAMIC COMMENT='APP用户信息表';

-- ----------------------------
-- Records of ap_user
-- ----------------------------
INSERT INTO `ap_user` VALUES ('1', 'abc', 'zhangsan', 'abc', '13511223453', null, '1', null, null, '1', '1', '2020-03-19 23:22:07');
INSERT INTO `ap_user` VALUES ('2', 'abc', 'lisi', 'abc', '13511223454', '', '1', null, null, '1', '1', '2020-03-19 23:22:07');
INSERT INTO `ap_user` VALUES ('3', 'sdsa', 'wangwu', 'wangwu', '13511223455', null, null, null, null, null, '1', null);
INSERT INTO `ap_user` VALUES ('4', '123abc', 'admin', '81e158e10201b6d7aee6e35eaf744796', '13511223456', null, '1', null, null, '1', '1', '2020-03-30 16:36:32');
INSERT INTO `ap_user` VALUES ('5', '123', 'suwukong', 'suwukong', '13511223458', null, '1', null, null, '1', '1', '2020-08-01 11:09:57');
INSERT INTO `ap_user` VALUES ('6', null, null, null, null, null, null, null, null, null, null, null);

-- ----------------------------
-- Table structure for ap_user_fan
-- ----------------------------
DROP TABLE IF EXISTS `ap_user_fan`;
CREATE TABLE `ap_user_fan` (
  `id` int(11) unsigned NOT NULL AUTO_INCREMENT COMMENT '主键',
  `user_id` int(11) unsigned DEFAULT NULL COMMENT '用户ID',
  `fans_id` int(11) unsigned DEFAULT NULL COMMENT '粉丝ID',
  `fans_name` varchar(20) COLLATE utf8mb4_unicode_ci DEFAULT NULL COMMENT '粉丝昵称',
  `level` tinyint(1) unsigned DEFAULT NULL COMMENT '粉丝忠实度\r\n            0 正常\r\n            1 潜力股\r\n            2 勇士\r\n            3 铁杆\r\n            4 老铁',
  `created_time` datetime DEFAULT NULL COMMENT '创建时间',
  `is_display` tinyint(1) unsigned DEFAULT NULL COMMENT '是否可见我动态',
  `is_shield_letter` tinyint(1) unsigned DEFAULT NULL COMMENT '是否屏蔽私信',
  `is_shield_comment` tinyint(1) unsigned DEFAULT NULL COMMENT '是否屏蔽评论',
  PRIMARY KEY (`id`) USING BTREE
) ENGINE=InnoDB DEFAULT CHARSET=utf8mb4 COLLATE=utf8mb4_unicode_ci ROW_FORMAT=DYNAMIC COMMENT='APP用户粉丝信息表';

-- ----------------------------
-- Records of ap_user_fan
-- ----------------------------

-- ----------------------------
-- Table structure for ap_user_follow
-- ----------------------------
DROP TABLE IF EXISTS `ap_user_follow`;
CREATE TABLE `ap_user_follow` (
  `id` int(11) unsigned NOT NULL AUTO_INCREMENT COMMENT '主键',
  `user_id` int(11) unsigned DEFAULT NULL COMMENT '用户ID',
  `follow_id` int(11) unsigned DEFAULT NULL COMMENT '关注作者ID',
  `follow_name` varchar(20) COLLATE utf8mb4_unicode_ci DEFAULT NULL COMMENT '粉丝昵称',
  `level` tinyint(1) unsigned DEFAULT NULL COMMENT '关注度\r\n            0 偶尔感兴趣\r\n            1 一般\r\n            2 经常\r\n            3 高度',
  `is_notice` tinyint(1) unsigned DEFAULT NULL COMMENT '是否动态通知',
  `created_time` datetime DEFAULT NULL COMMENT '创建时间',
  PRIMARY KEY (`id`) USING BTREE
) ENGINE=InnoDB DEFAULT CHARSET=utf8mb4 COLLATE=utf8mb4_unicode_ci ROW_FORMAT=DYNAMIC COMMENT='APP用户关注信息表';

-- ----------------------------
-- Records of ap_user_follow
-- ----------------------------

-- ----------------------------
-- Table structure for ap_user_realname
-- ----------------------------
DROP TABLE IF EXISTS `ap_user_realname`;
CREATE TABLE `ap_user_realname` (
  `id` int(11) unsigned NOT NULL AUTO_INCREMENT COMMENT '主键',
  `user_id` int(11) unsigned DEFAULT NULL COMMENT '账号ID',
  `name` varchar(20) CHARACTER SET utf8mb4 DEFAULT NULL COMMENT '用户名称',
  `idno` varchar(20) COLLATE utf8mb4_unicode_ci DEFAULT NULL COMMENT '资源名称',
  `font_image` varchar(100) COLLATE utf8mb4_unicode_ci DEFAULT NULL COMMENT '正面照片',
  `back_image` varchar(100) COLLATE utf8mb4_unicode_ci DEFAULT NULL COMMENT '背面照片',
  `hold_image` varchar(100) COLLATE utf8mb4_unicode_ci DEFAULT NULL COMMENT '手持照片',
  `live_image` varchar(255) COLLATE utf8mb4_unicode_ci DEFAULT NULL COMMENT '活体照片',
  `status` tinyint(1) unsigned DEFAULT NULL COMMENT '状态\r\n            0 创建中\r\n            1 待审核\r\n            2 审核失败\r\n            9 审核通过',
  `reason` varchar(50) COLLATE utf8mb4_unicode_ci DEFAULT NULL COMMENT '拒绝原因',
  `created_time` datetime DEFAULT NULL COMMENT '创建时间',
  `submited_time` datetime DEFAULT NULL COMMENT '提交时间',
  `updated_time` datetime DEFAULT NULL COMMENT '更新时间',
  PRIMARY KEY (`id`) USING BTREE
) ENGINE=InnoDB AUTO_INCREMENT=6 DEFAULT CHARSET=utf8mb4 COLLATE=utf8mb4_unicode_ci ROW_FORMAT=DYNAMIC COMMENT='APP实名认证信息表';

-- ----------------------------
-- Records of ap_user_realname
-- ----------------------------
INSERT INTO `ap_user_realname` VALUES ('1', '1', 'zhangsan', '512335455602781278', 'http://161.189.111.227/group1/M00/00/00/rBFwgF9bbHSAQlqFAAXIZNzAq9E126.jpg', 'http://161.189.111.227/group1/M00/00/00/rBFwgF9bbF6AR16RAAZB2e1EsOg460.jpg', 'http://161.189.111.227/group1/M00/00/00/rBFwgF9bbDeAH2qoAAbD_WiUJfk745.jpg', 'http://161.189.111.227/group1/M00/00/00/rBFwgF9ba9qANVEdAAS25KJlEVE291.jpg', '9', '', '2019-07-30 14:34:28', '2019-07-30 14:34:30', '2019-07-12 06:48:04');
INSERT INTO `ap_user_realname` VALUES ('2', '2', 'lisi', '512335455602781279', 'http://161.189.111.227/group1/M00/00/00/rBFwgF9bbHSAQlqFAAXIZNzAq9E126.jpg', 'http://161.189.111.227/group1/M00/00/00/rBFwgF9bbF6AR16RAAZB2e1EsOg460.jpg', 'http://161.189.111.227/group1/M00/00/00/rBFwgF9bbDeAH2qoAAbD_WiUJfk745.jpg', 'http://161.189.111.227/group1/M00/00/00/rBFwgF9ba9qANVEdAAS25KJlEVE291.jpg', '1', '', '2019-07-11 17:21:18', '2019-07-11 17:21:20', '2019-07-12 06:48:04');
INSERT INTO `ap_user_realname` VALUES ('3', '3', 'wangwu6666', '512335455602781276', 'http://161.189.111.227/group1/M00/00/00/rBFwgF9bbHSAQlqFAAXIZNzAq9E126.jpg', 'http://161.189.111.227/group1/M00/00/00/rBFwgF9bbF6AR16RAAZB2e1EsOg460.jpg', 'http://161.189.111.227/group1/M00/00/00/rBFwgF9bbDeAH2qoAAbD_WiUJfk745.jpg', 'http://161.189.111.227/group1/M00/00/00/rBFwgF9ba9qANVEdAAS25KJlEVE291.jpg', '9', '', '2019-07-11 17:21:18', '2019-07-11 17:21:20', '2019-07-12 06:48:04');
INSERT INTO `ap_user_realname` VALUES ('5', '5', 'suwukong', '512335455602781279', 'http://161.189.111.227/group1/M00/00/00/rBFwgF9bbHSAQlqFAAXIZNzAq9E126.jpg', 'http://161.189.111.227/group1/M00/00/00/rBFwgF9bbF6AR16RAAZB2e1EsOg460.jpg', 'http://161.189.111.227/group1/M00/00/00/rBFwgF9bbDeAH2qoAAbD_WiUJfk745.jpg', 'http://161.189.111.227/group1/M00/00/00/rBFwgF9ba9qANVEdAAS25KJlEVE291.jpg', '1', '', '2020-08-01 11:10:31', '2020-08-01 11:10:34', '2020-08-01 11:10:36');
2.虚拟机搭建
然后就是用finalshell连接虚拟机了
3.1docker更换源
一、国内常用镜像源
Docker中国官方镜像加速
--registry-mirror=https://registry.docker-cn.com

网易163镜像加速
--registry-mirror=http://hub-mirror.c.163.com

中科大镜像加速
--registry-mirror=https://docker.mirrors.ustc.edu.cn

阿里云镜像加速(需要注册账号后使用)
--registry-mirror=https://{your_id}.mirror.aliyuncs.com
二、创建daemon.json文件
sudo mkdir -p /etc/docker
sudo tee /etc/docker/daemon.json <<-'EOF'
{
  "registry-mirrors": ["https://docker.mirrors.ustc.edu.cn"]
}
EOF
三、重载Docker配置文件
sudo systemctl daemon-reload
四、重启Docker服务
sudo systemctl restart docker
五、查看配置结果
docker info|grep Mirrors -A 13.docker安装nacos
注意:一定要访问ip:8848/nacos,不要少了nacos,否则会报404
4.初始化工程
三.全局异常处理
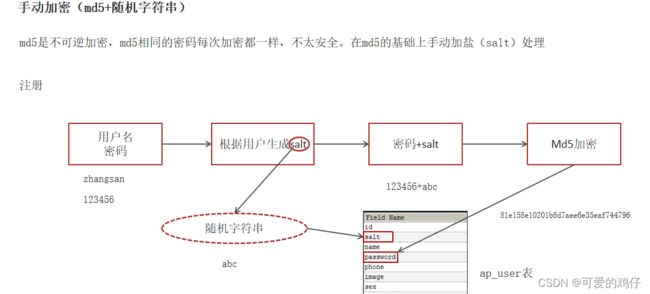
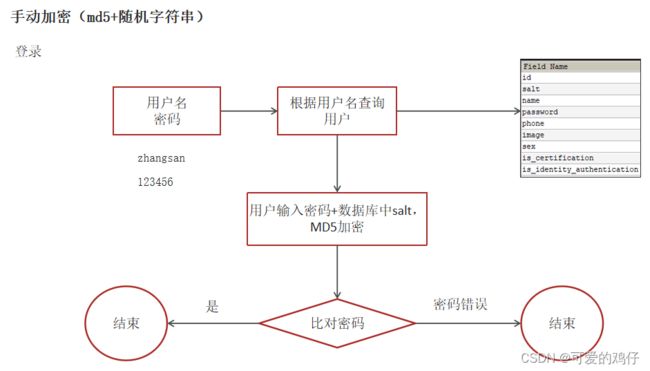
四.登录加密
通过加盐,可以保证每个人最终生成的md5加密字符串不同,使其难以破解
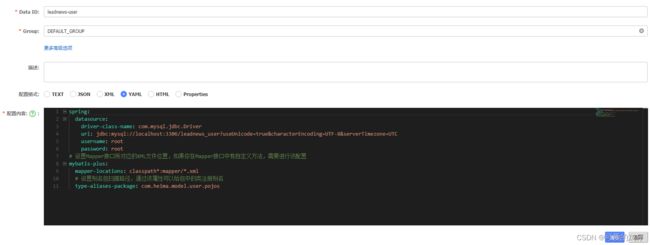
五.nacos公共配置数据源和mybatis-plus
公共配置:
spring:
  datasource:
    driver-class-name: com.mysql.jdbc.Driver
    url: jdbc:mysql://localhost:3306/leadnews_user?useUnicode=true&characterEncoding=UTF-8&serverTimezone=UTC
    username: root
    password: root
# 设置Mapper接口所对应的XML文件位置,如果你在Mapper接口中有自定义方法,需要进行该配置
mybatis-plus:
  mapper-locations: classpath*:mapper/*.xml
  # 设置别名包扫描路径,通过该属性可以给包中的类注册别名
  type-aliases-package: com.heima.model.user.pojos
六.user模块创建
1.配置文件bootstrap.yml
server:
  port: 51801
spring:
  application:
    name: leadnews-user
  cloud:
    nacos:
      discovery:
        server-addr: 192.168.200.130:8848
      config:
        server-addr: 192.168.200.130:8848
        file-extension: yml
2.日志文件配置logback.xml
            %d{yyyy-MM-dd HH:mm:ss.SSS} [%thread] %-5level %logger{36} - %msg%n
            utf8


            ${LOG_HOME}/leadnews.%d{yyyy-MM-dd}.log


            %d{yyyy-MM-dd HH:mm:ss.SSS} [%thread] %-5level %logger{36} - %msg%n


        0

        512
3.登录接口
七.统一结果处理
1.统一结果枚举类
package com.heima.model.common.enums;

public enum AppHttpCodeEnum {

    // 成功段固定为200
    SUCCESS(200,"操作成功"),
    // 登录段1~50
    NEED_LOGIN(1,"需要登录后操作"),
    LOGIN_PASSWORD_ERROR(2,"密码错误"),
    // TOKEN50~100
    TOKEN_INVALID(50,"无效的TOKEN"),
    TOKEN_EXPIRE(51,"TOKEN已过期"),
    TOKEN_REQUIRE(52,"TOKEN是必须的"),
    // SIGN验签 100~120
    SIGN_INVALID(100,"无效的SIGN"),
    SIG_TIMEOUT(101,"SIGN已过期"),
    // 参数错误 500~1000
    PARAM_REQUIRE(500,"缺少参数"),
    PARAM_INVALID(501,"无效参数"),
    PARAM_IMAGE_FORMAT_ERROR(502,"图片格式有误"),
    SERVER_ERROR(503,"服务器内部错误"),
    // 数据错误 1000~2000
    DATA_EXIST(1000,"数据已经存在"),
    AP_USER_DATA_NOT_EXIST(1001,"ApUser数据不存在"),
    DATA_NOT_EXIST(1002,"数据不存在"),
    // 数据错误 3000~3500
    NO_OPERATOR_AUTH(3000,"无权限操作"),
    NEED_ADMIND(3001,"需要管理员权限");

    int code;
    String errorMessage;

    AppHttpCodeEnum(int code, String errorMessage){
        this.code = code;
        this.errorMessage = errorMessage;
    }

    public int getCode() {
        return code;
    }

    public String getErrorMessage() {
        return errorMessage;
    }
}
2.统一结果返回类
package com.heima.model.common.dtos;

import com.alibaba.fastjson.JSON;
import com.heima.model.common.enums.AppHttpCodeEnum;

import java.io.Serializable;
import java.util.ArrayList;
import java.util.HashMap;
import java.util.List;
import java.util.Map;

/**
 * 通用的结果返回类
 * @param
 */
public class ResponseResult implements Serializable {

    private String host;

    private Integer code;

    private String errorMessage;

    private T data;

    public ResponseResult() {
        this.code = 200;
    }

    public ResponseResult(Integer code, T data) {
        this.code = code;
        this.data = data;
    }

    public ResponseResult(Integer code, String msg, T data) {
        this.code = code;
        this.errorMessage = msg;
        this.data = data;
    }

    public ResponseResult(Integer code, String msg) {
        this.code = code;
        this.errorMessage = msg;
    }

    public static ResponseResult errorResult(int code, String msg) {
        ResponseResult result = new ResponseResult();
        return result.error(code, msg);
    }

    public static ResponseResult okResult(int code, String msg) {
        ResponseResult result = new ResponseResult();
        return result.ok(code, null, msg);
    }

    public static ResponseResult okResult(Object data) {
        ResponseResult result = setAppHttpCodeEnum(AppHttpCodeEnum.SUCCESS, AppHttpCodeEnum.SUCCESS.getErrorMessage());
        if(data!=null) {
            result.setData(data);
        }
        return result;
    }

    public static ResponseResult errorResult(AppHttpCodeEnum enums){
        return setAppHttpCodeEnum(enums,enums.getErrorMessage());
    }

    public static ResponseResult errorResult(AppHttpCodeEnum enums, String errorMessage){
        return setAppHttpCodeEnum(enums,errorMessage);
    }

    public static ResponseResult setAppHttpCodeEnum(AppHttpCodeEnum enums){
        return okResult(enums.getCode(),enums.getErrorMessage());
    }

    private static ResponseResult setAppHttpCodeEnum(AppHttpCodeEnum enums, String errorMessage){
        return okResult(enums.getCode(),errorMessage);
    }

    public ResponseResult error(Integer code, String msg) {
        this.code = code;
        this.errorMessage = msg;
        return this;
    }

    public ResponseResult ok(Integer code, T data) {
        this.code = code;
        this.data = data;
        return this;
    }

    public ResponseResult ok(Integer code, T data, String msg) {
        this.code = code;
        this.data = data;
        this.errorMessage = msg;
        return this;
    }

    public ResponseResult ok(T data) {
        this.data = data;
        return this;
    }

    public Integer getCode() {
        return code;
    }

    public void setCode(Integer code) {
        this.code = code;
    }

    public String getErrorMessage() {
        return errorMessage;
    }

    public void setErrorMessage(String errorMessage) {
        this.errorMessage = errorMessage;
    }

    public T getData() {
        return data;
    }

    public void setData(T data) {
        this.data = data;
    }

    public String getHost() {
        return host;
    }

    public void setHost(String host) {
        this.host = host;
    }


}
3.统一分页结果返回类
package com.heima.model.common.dtos;

import java.io.Serializable;

public class PageResponseResult extends ResponseResult implements Serializable {
    private Integer currentPage;
    private Integer size;
    private Integer total;

    public PageResponseResult(Integer currentPage, Integer size, Integer total) {
        this.currentPage = currentPage;
        this.size = size;
        this.total = total;
    }

    public PageResponseResult() {

    }


    public int getCurrentPage() {
        return currentPage;
    }

    public void setCurrentPage(int currentPage) {
        this.currentPage = currentPage;
    }

    public int getSize() {
        return size;
    }

    public void setSize(int size) {
        this.size = size;
    }

    public int getTotal() {
        return total;
    }

    public void setTotal(int total) {
        this.total = total;
    }
}
4.分页结果dto类
package com.heima.model.common.dtos;

import lombok.Data;
import lombok.extern.slf4j.Slf4j;

@Data
@Slf4j
public class PageRequestDto {

    protected Integer size;
    protected Integer page;

    public void checkParam() {
        if (this.page == null || this.page < 0) {
            setPage(1);
        }
        if (this.size == null || this.size < 0 || this.size > 100) {
            setSize(10);
        }
    }
}
八.登录逻辑
1.controller
@RestController
@RequestMapping("/api/v1/login")
@Api(value = "app端用户登录",tags = "app端用户登录")
public class ApUserLoginController {

    @Autowired
    private ApUserService apUserService;

    @PostMapping("/login_auth")
    @ApiOperation("用户登录")
    public ResponseResult login(@RequestBody LoginDto dto){
        return apUserService.login(dto);
    }
}
2.service
@Service
@Transactional
@Slf4j
public class ApUserServiceImpl extends ServiceImpl implements ApUserService {
    /**
     * app端登录功能
     * @param dto
     * @return
     */
    @Override
    public ResponseResult login(LoginDto dto) {
        //1.正常登录 用户名和密码
        if(StringUtils.isNotBlank(dto.getPhone()) && StringUtils.isNotBlank(dto.getPassword())){
            //1.1 根据手机号查询用户信息
            ApUser dbUser = getOne(Wrappers.lambdaQuery().eq(ApUser::getPhone, dto.getPhone()));
            if(dbUser == null){
                return ResponseResult.errorResult(AppHttpCodeEnum.DATA_NOT_EXIST,"用户信息不存在");
            }

            //1.2 比对密码
            String salt = dbUser.getSalt();
            String password = dto.getPassword();
            String pswd = DigestUtils.md5DigestAsHex((password + salt).getBytes());
            if(!pswd.equals(dbUser.getPassword())){
                return ResponseResult.errorResult(AppHttpCodeEnum.LOGIN_PASSWORD_ERROR);
            }

            //1.3 返回数据  jwt  user
            String token = AppJwtUtil.getToken(dbUser.getId().longValue());
            Map map = new HashMap<>();
            map.put("token",token);
            dbUser.setSalt("");
            dbUser.setPassword("");
            map.put("user",dbUser);

            return ResponseResult.okResult(map);
        }else {
            //2.游客登录
            Map map = new HashMap<>();
            map.put("token",AppJwtUtil.getToken(0L));
            return ResponseResult.okResult(map);
        }


    }
}
九.postman测试
1.测试登录成功
2.输错密码
3.游客登录
4.输错手机号
十.swagger接口文档
引入依赖,在heima-leadnews-model和heima-leadnews-common模块中引入该依赖
    io.springfox
    springfox-swagger2


    io.springfox
    springfox-swagger-ui
-
在heima-leadnews-common工程中添加一个配置类
新增:com.heima.common.swagger.SwaggerConfiguration
package com.heima.common.swagger;

import org.springframework.context.annotation.Bean;
import org.springframework.context.annotation.Configuration;
import springfox.documentation.builders.ApiInfoBuilder;
import springfox.documentation.builders.PathSelectors;
import springfox.documentation.builders.RequestHandlerSelectors;
import springfox.documentation.service.ApiInfo;
import springfox.documentation.service.Contact;
import springfox.documentation.spi.DocumentationType;
import springfox.documentation.spring.web.plugins.Docket;
import springfox.documentation.swagger2.annotations.EnableSwagger2;

@Configuration
@EnableSwagger2
public class SwaggerConfiguration {

   @Bean
   public Docket buildDocket() {
      return new Docket(DocumentationType.SWAGGER_2)
              .apiInfo(buildApiInfo())
              .select()
              // 要扫描的API(Controller)基础包
              .apis(RequestHandlerSelectors.basePackage("com.heima"))
              .paths(PathSelectors.any())
              .build();
   }

   private ApiInfo buildApiInfo() {
      Contact contact = new Contact("黑马程序员","","");
      return new ApiInfoBuilder()
              .title("黑马头条-平台管理API文档")
              .description("黑马头条后台api")
              .contact(contact)
              .version("1.0.0").build();
   }
}
在heima-leadnews-common模块中的resources目录中新增以下目录和文件
文件:resources/META-INF/Spring.factories
org.springframework.boot.autoconfigure.EnableAutoConfiguration=\
  com.heima.common.swagger.SwaggerConfiguration
(3)Swagger常用注解
在Java类中添加Swagger的注解即可生成Swagger接口文档,常用Swagger注解如下:
@Api:修饰整个类,描述Controller的作用
@ApiOperation:描述一个类的一个方法,或者说一个接口
@ApiParam:单个参数的描述信息
@ApiModel:用对象来接收参数
@ApiModelProperty:用对象接收参数时,描述对象的一个字段
@ApiResponse:HTTP响应其中1个描述
@ApiResponses:HTTP响应整体描述
@ApiIgnore:使用该注解忽略这个API
@ApiError :发生错误返回的信息
@ApiImplicitParam:一个请求参数
@ApiImplicitParams:多个请求参数的描述信息
启动user微服务,访问地址:http://localhost:51801/swagger-ui.html
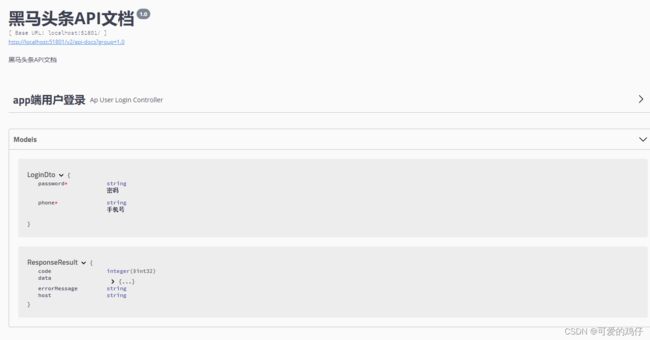
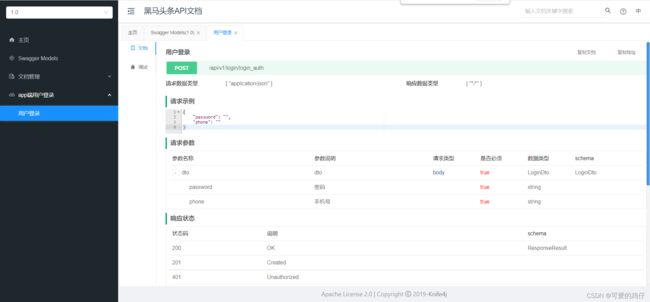
十一.knfie4j接口文档
knife4j是为Java MVC框架集成Swagger生成Api文档的增强解决方案,前身是swagger-bootstrap-ui,取名kni4j是希望它能像一把匕首一样小巧,轻量,并且功能强悍!
在heima-leadnews-common模块中的pom.xml文件中引入knife4j的依赖,如下:
     com.github.xiaoymin
     knife4j-spring-boot-starter
-
创建Swagger配置文件
在heima-leadnews-common模块中新建配置类
新建Swagger的配置文件SwaggerConfiguration.java文件,创建springfox提供的Docket分组对象,代码如下:
package com.heima.common.knife4j;

import com.github.xiaoymin.knife4j.spring.annotations.EnableKnife4j;
import org.springframework.context.annotation.Bean;
import org.springframework.context.annotation.Configuration;
import org.springframework.context.annotation.Import;
import springfox.bean.validators.configuration.BeanValidatorPluginsConfiguration;
import springfox.documentation.builders.ApiInfoBuilder;
import springfox.documentation.builders.PathSelectors;
import springfox.documentation.builders.RequestHandlerSelectors;
import springfox.documentation.service.ApiInfo;
import springfox.documentation.spi.DocumentationType;
import springfox.documentation.spring.web.plugins.Docket;
import springfox.documentation.swagger2.annotations.EnableSwagger2;

@Configuration
@EnableSwagger2
@EnableKnife4j
@Import(BeanValidatorPluginsConfiguration.class)
public class Swagger2Configuration {

    @Bean(value = "defaultApi2")
    public Docket defaultApi2() {
        Docket docket=new Docket(DocumentationType.SWAGGER_2)
                .apiInfo(apiInfo())
                //分组名称
                .groupName("1.0")
                .select()
                //这里指定Controller扫描包路径
                .apis(RequestHandlerSelectors.basePackage("com.heima"))
                .paths(PathSelectors.any())
                .build();
        return docket;
    }
    private ApiInfo apiInfo() {
        return new ApiInfoBuilder()
                .title("黑马头条API文档")
                .description("黑马头条API文档")
                .version("1.0")
                .build();
    }
}
以上有两个注解需要特别说明,如下表:
| 注解 | 说明 |
|---|---|
@EnableSwagger2 |
该注解是Springfox-swagger框架提供的使用Swagger注解,该注解必须加 |
@EnableKnife4j |
该注解是knife4j提供的增强注解,Ui提供了例如动态参数、参数过滤、接口排序等增强功能,如果你想使用这些增强功能就必须加该注解,否则可以不用加 |
-
添加配置
在Spring.factories中新增配置
org.springframework.boot.autoconfigure.EnableAutoConfiguration=\
  com.heima.common.swagger.Swagger2Configuration, \
com.heima.common.swagger.SwaggerConfiguration-
访问
在浏览器输入地址:http://host:port/doc.html
十二.gateway网关
1)在heima-leadnews-gateway导入以下依赖
        org.springframework.cloud
        spring-cloud-starter-gateway


        com.alibaba.cloud
        spring-cloud-starter-alibaba-nacos-discovery


            com.alibaba.cloud
            spring-cloud-starter-alibaba-nacos-config


        io.jsonwebtoken
        jjwt
(2)在heima-leadnews-gateway下创建heima-leadnews-app-gateway微服务
package com.heima.app.gateway;

import org.springframework.boot.SpringApplication;
import org.springframework.boot.autoconfigure.SpringBootApplication;
import org.springframework.cloud.client.discovery.EnableDiscoveryClient;

@SpringBootApplication
@EnableDiscoveryClient  //开启注册中心
public class AppGatewayApplication {

    public static void main(String[] args) {
        SpringApplication.run(AppGatewayApplication.class,args);
    }
}
3.bootstrap.yml
server:
  port: 51601
spring:
  application:
    name: leadnews-app-gateway
  cloud:
    nacos:
      discovery:
        server-addr: 192.168.200.130:8848
      config:
        server-addr: 192.168.200.130:8848
        file-extension: yml
4.nacos中配置文件 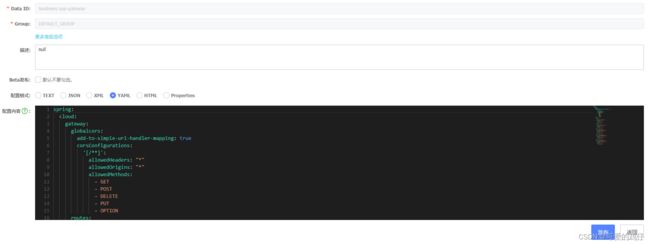
spring:
  cloud:
    gateway:
      globalcors:
        add-to-simple-url-handler-mapping: true
        corsConfigurations:
          '[/**]':
            allowedHeaders: "*"
            allowedOrigins: "*"
            allowedMethods:
              - GET
              - POST
              - DELETE
              - PUT
              - OPTION
      routes:
        # 平台管理
        - id: user
          uri: lb://leadnews-user
          predicates:
            - Path=/user/**
          filters:
            - StripPrefix= 1
环境搭建完成以后,启动项目网关和用户两个服务,使用postman进行测试
请求地址:http://localhost:51601/user/api/v1/login/login_auth
思路分析:
-
用户进入网关开始登陆,网关过滤器进行判断,如果是登录,则路由到后台管理微服务进行登录
-
用户登录成功,后台管理微服务签发JWT TOKEN信息返回给用户
-
用户再次进入网关开始访问,网关过滤器接收用户携带的TOKEN
-
网关过滤器解析TOKEN ,判断是否有权限,如果有,则放行,如果没有则返回未认证错误
具体实现:
第一:
在认证过滤器中需要用到jwt的解析,所以需要把工具类拷贝一份到网关微服务
第二:
在网关微服务中新建全局过滤器:
package com.heima.app.gateway.filter;


import com.heima.app.gateway.util.AppJwtUtil;
import io.jsonwebtoken.Claims;
import lombok.extern.slf4j.Slf4j;
import org.apache.commons.lang.StringUtils;
import org.springframework.cloud.gateway.filter.GatewayFilterChain;
import org.springframework.cloud.gateway.filter.GlobalFilter;
import org.springframework.core.Ordered;
import org.springframework.http.HttpStatus;
import org.springframework.http.server.reactive.ServerHttpRequest;
import org.springframework.http.server.reactive.ServerHttpResponse;
import org.springframework.stereotype.Component;
import org.springframework.web.server.ServerWebExchange;
import reactor.core.publisher.Mono;

@Component
@Slf4j
public class AuthorizeFilter implements Ordered, GlobalFilter {
    @Override
    public Mono filter(ServerWebExchange exchange, GatewayFilterChain chain) {
        //1.获取request和response对象
        ServerHttpRequest request = exchange.getRequest();
        ServerHttpResponse response = exchange.getResponse();

        //2.判断是否是登录
        if(request.getURI().getPath().contains("/login")){
            //放行
            return chain.filter(exchange);
        }


        //3.获取token
        String token = request.getHeaders().getFirst("token");

        //4.判断token是否存在
        if(StringUtils.isBlank(token)){
            response.setStatusCode(HttpStatus.UNAUTHORIZED);
            return response.setComplete();
        }

        //5.判断token是否有效
        try {
            Claims claimsBody = AppJwtUtil.getClaimsBody(token);
            //是否是过期
            int result = AppJwtUtil.verifyToken(claimsBody);
            if(result == 1 || result  == 2){
                response.setStatusCode(HttpStatus.UNAUTHORIZED);
                return response.setComplete();
            }
        }catch (Exception e){
            e.printStackTrace();
            response.setStatusCode(HttpStatus.UNAUTHORIZED);
            return response.setComplete();
        }

        //6.放行
        return chain.filter(exchange);
    }

    /**
     * 优先级设置  值越小  优先级越高
     * @return
     */
    @Override
    public int getOrder() {
        return 0;
    }
}
测试:
启动user服务,继续访问其他微服务,会提示需要认证才能访问,这个时候需要在heads中设置设置token才能正常访问。
十三.前端项目启动
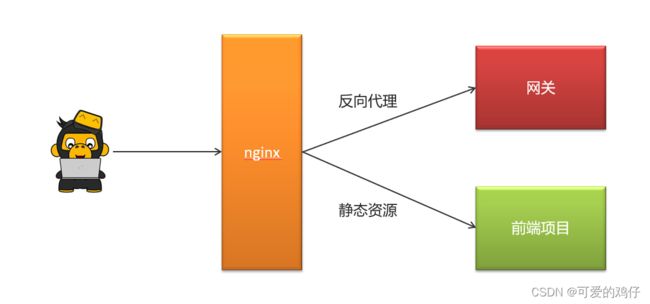
9.2)配置nginx
①:解压资料文件夹中的压缩包nginx-1.18.0.zip
②:解压资料文件夹中的前端项目app-web.zip
③:配置nginx.conf文件
在nginx安装的conf目录下新建一个文件夹leadnews.conf,在当前文件夹中新建heima-leadnews-app.conf文件
heima-leadnews-app.conf配置如下:
upstream  heima-app-gateway{
    server localhost:51601;
}

server {
	listen 8801;
	location / {
		root D:/workspace/app-web/;
		index index.html;
	}

	location ~/app/(.*) {
		proxy_pass http://heima-app-gateway/$1;
		proxy_set_header HOST $host;  # 不改变源请求头的值
		proxy_pass_request_body on;  #开启获取请求体
		proxy_pass_request_headers on;  #开启获取请求头
		proxy_set_header X-Real-IP $remote_addr;   # 记录真实发出请求的客户端IP
		proxy_set_header X-Forwarded-For $proxy_add_x_forwarded_for;  #记录代理信息
	}
}
nginx.conf 把里面注释的内容和静态资源配置相关删除,引入heima-leadnews-app.conf文件加载
#user  nobody;
worker_processes  1;

events {
    worker_connections  1024;
}
http {
    include       mime.types;
    default_type  application/octet-stream;
    sendfile        on;
    keepalive_timeout  65;
	# 引入自定义配置文件
	include leadnews.conf/*.conf;
}
④ :启动nginx
在nginx安装包中使用命令提示符打开,输入命令nginx启动项目
可查看进程,检查nginx是否启动
重新加载配置文件:
nginx -s reload
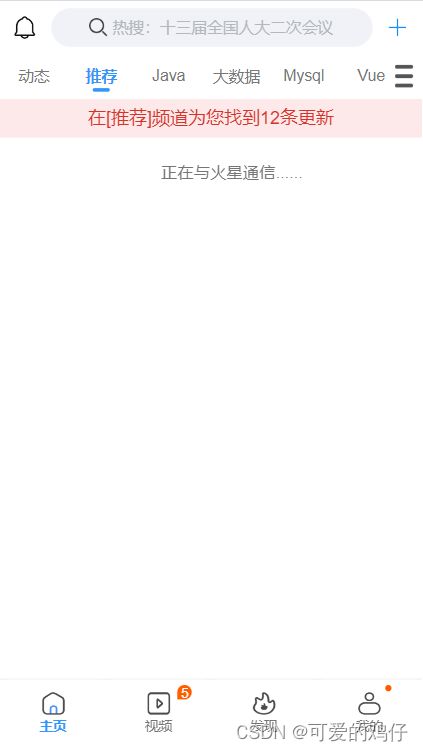
⑤:打开前端项目进行测试 -- > http://localhost:8801
用谷歌浏览器打开,调试移动端模式进行访问
可以看到前端已经启动起来了!
关于windows中对nginx的操作:
1.停止nginx服务
taskkill /f /t /im nginx.exe