Android Studio Notes/学习笔记
学习视频来源:https://www.bilibili.com/video/BV1jW411375J?from=search&seid=16068849106535436916
文章目录
- 小知识
- 参考资料
- 一、关于安卓应用
-
- P2 Module
- P3 项目结构
- P4 模拟器
- P8 新建module
- 二、用户界面设计基础
-
- p10 View类
- ==内边距==
- p11 ViewGroup类
- ==外边距==
- p12 控制UI界面
- P20 布局管理器简介
- ==P21相对布局管理器==
- ==P23线性布局管理器==
- ==P25帧布局管理器==
- ==p27表格布局管理器==
- ==p29网格布局管理器==
- p31布局管理器的嵌套
- 三、基本UI组件
-
- p34文本框组件
- p36编辑框组件
- p38普通按钮组件
- p40图片按钮
- p42单选按钮
- p44复选框
- p46日期选择器
- p47时间选择器
- p48计时器
- 四、高级UI组件
-
- p50进度条语法
- p52拖动条语法
- p54星级评分条语法
- p56图像视图
- p58图像切换器
- ==适配器==
- p60网格视图
- p62下拉列表框
- p64列表视图
- p66滚动视图
- p68选项卡
小知识
-
快捷键
-
提示:Alt+回车
-
注释或取消注释当前行或选中的代码块,以双斜杠的方式即“//”:Ctrl+斜杠
-
注释或取消注释选中的代码块,以“/……/”方式注释:Ctrl+shift+斜杠
-
复制行:ctrl+D
-
重命名:shift+F6 可以将相关的内容都换掉
-
setings(设置) :ctrl+Alt+S
查找类:ctrl+N
自动代码:Ctrl+J
运行:Alt+Shift+X
自己在setings中设置新建类的快捷键为F10
提取局部变量:Ctrl+Alt+V
提取全局变量:Ctrl+Alt+F
提取方法:Shit+Alt+M
矩形选区 Alt+左键
-
Alt+Insert可以生成构造器/Getter/Setter
快速将字符串变成常量的windows快捷键是Ctrl+Alt+C
变成全局变量在windows/linux下的快捷键是Ctrl+Alt+F
-
-
关于开发环境
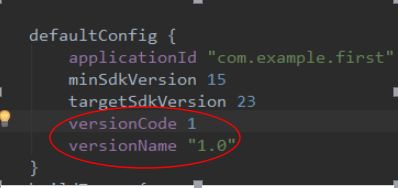
- 修改应用的版本号:在build.gradle中修改
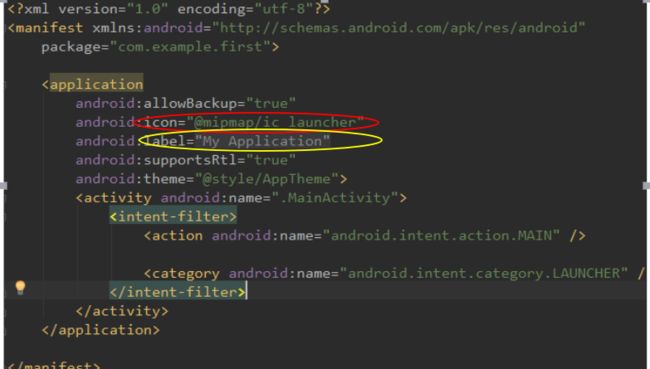
- 修改应用图标和名称:在Manifest中修改
红色地方是修改图标,黄色是修改应用名称
-
设置屏幕方向:在Manifest中添加 android:screenOrientation=“landscape”
<activity android:name=".MainActivity"
    android:screenOrientation="landscape">
    <intent-filter>
        <action android:name="android.intent.action.MAIN" />

        <category android:name="android.intent.category.LAUNCHER" />
    </intent-filter>
</activity>
-
改变字体大小
启动Android Studio,菜单"File"-“Setting…”,“Editor”-“Font” 。
参考资料
https://www.jianshu.com/u/0a61c9729dbc
一、关于安卓应用
P2 Module
-
一个Project对应多个Module,一个Module对应一个APP
-
Application name:应用名称
Package name:包名(不能有中文、数字、空格)
-
SDK版本越低适配性越强
-
左侧项目结构栏:
app:一个Module,默认创建的应用
-
xml预览没有应用名怎么办?点“小眼睛”,把倒数第二个打钩
P3 项目结构
-
左侧项目结构栏:以Android为例讲解
.app\
-
manifests:全局描述文件
-
java:java源码文件
-
res:资源文件,图片、布局等等
-
-
manifests:(前三行默认生成)
<application //配置应用属性 android: //配置应用图标、标签等 <activity android:name=".MainActivity"> //配置所应用的Activity <intent-filter> <action android:name="android.intent.action.MAIN" /> <category android:name="android.intent.category.LAUNCHER" /> </intent-filter> </activity> </application> -
Java:
.\MainActivity:
public class MainActivity extends AppCompatActivity { //定义一个java类,一个Activity就是一个java类,MainActivity继承AppCompatActivity @Override protected void onCreate(Bundle savedInstanceState) { //重写onCreate super.onCreate(savedInstanceState); setContentView(R.layout.activity_main); //指定当前Activity的布局文件 注意:R文件自动生成 // R文件生成失败解决方法:Build-Clean Project } } -
Res:
-
drawable:位图文件PNG JPEG GIF、9path文件、xml资源文件(后面两种只能放在该目录)
-
layout:布局文件
-
mipmap:图标文件(需要适应屏幕分辨率的图片推荐放在该目录,可提高显示性能、占用内存更少)
-
values:保存一些资源,颜色、尺寸、字符串、样式
P4 模拟器
借助AVD看模拟器
P8 新建module
.file \new \new module
二、用户界面设计基础
p10 View类
-
View类
- 位于***android.view***包中 如:android.view.View
-
View类的子类一般位于***android.widget***包中 如:android.widget.TextView
-
View类常用属性:
android:id = "@+id/user"     //唯一标识
android:background = "@mipmap/bg"     //设置背景 图片资源
android:background = "#FF00FF"     //设置背景 颜色值
内边距
android:padding = "16dp"    //设置上下左右内边距组件
android:padding = "@dimen/activity_margin"
    //细分:android:paddingLeft = android:paddingStart
    //     android:paddingTop
    //     android:paddingRight = android:paddingEnd
    //     android:paddingBottom
p11 ViewGroup类
-
ViewGroup类
- 控制View的摆放
-
继承View类,抽象类,使用子类作为容器
-
控制其子组件分布时依赖的内部类
-
ViewGroup.LayoutParams类
- 设置布局宽度、高度
android:layout_width="100dp"
android:layout_height="100dp"
//FILL_PARENT:与父容器相同
//MATCH_PARENT:与父容器相同
//WRAP_CONTENT:根据自身内容确定
- ViewGroup.MarginLayoutParams类
外边距
android:layout_marginLeft //=android:layout_marginStart
android:layout_marginTop
android:layout_marginRight //=android:layout_marginEnd
android:layout_marginBottom
p12 控制UI界面
建议使用xml布局文件控制UI界面
P20 布局管理器简介
- 布局管理器
- RelativeLayout:相对布局管理器 (相对其它组件的布局方式)
- LinearLayout:线性布局管理器 (按照垂直或者水平方向布局的组件)
- FrameLayout:帧布局管理器 (组件从屏幕左上方布局组件)
- TableLayout:表格布局管理器 (按照行列方式布局组件)
AbsoluteLayout:绝对布局管理器 (按照绝对坐标来布局组件)- GridLayout:网格布局管理器
P21相对布局管理器
-
RelativeLayout:相对布局管理器 (这个是在布局管理器上设置的属性)
android:gravity //设置布局管理器中各组件的摆放方式 android:ignoreGravity //指定哪一个组件不受上一个属性影响 -
RelativeLayout.LayoutParams (这个是在组件上设置的属性)
 android:layout_above  //指定组件相对于参考组件相对位置
android:layout_below
android:layout_toLeftof
android:layout_toRightof

android:layout_alignParentBottom  //设置组件与布局管理器哪边对齐 bool类型 true对齐
android:layout_alignParentLeft
android:layout_alignParentRight
android:layout_alignParentTop

android:layout_alignBottom  //设置组件与哪个组件的哪边对齐
android:layout_alignLeft
android:layout_alignRight
android:layout_alignTop

android:layout_centerHorizontal  //设置组件位于布局管理器哪个位置
android:layout_centerInParent
android:layout_centervertical
P23线性布局管理器
-
LinearLayout:线性布局管理器
-
android:orientation: //设置布局的方向-
竖直:android:orientation=“vertical”
一行只能放一个组件,组件不会换行
组件一个一个排到边缘时,剩下的组件不会显示出来
-
水平:android:orientation=“horizontal”
一列只能放一个组件
组件一个一个排到边缘时,剩下的组件不会显示出来
-
-
android:gravity: //控制组件的对齐方式center:居中
right:居右
right|bottom:居右下角
-
子组件属性
-
android:layout_weight: //设置组件所占权重,组件在父容器 剩余空间 的比例,默认值0如:在水平布局的LinearLayout中有两个Button,一个占80,一个占120,总宽度为320,则剩余空间120:如果这两个Button的layout_weight属性值都为0,那么这两个按钮都会按原大小显示;如果layout_weight都为1,则一个占140,一个占180。
-
android:layout_gravity //设置组件位置
-
P25帧布局管理器
-
组件重叠
-
FrameLayout:帧布局管理器
android:foreground    //设置前景图像(始终位于最上层的图像)
android:foregroundGravity    //设置前景图像的位置,原尺寸显示,可以只盖住一部分
p27表格布局管理器
-
TableLayout:表格布局管理器
android:collapseColumns //设置哪些列被隐藏,列序号从0开始,多个列用“,”表示 android:stretchColumns //允许哪些列被拉伸,即自动拉伸适应屏幕剩余空间,列序号同上 android:shrinkColumns //允许哪些列被收缩,即当一行内容超出屏幕宽度时,收缩某一列宽度使其它内容显示出来,列序号同上 -
**TableRow:**表格行 一个组件占一列
<TableRow
   android:paddingTop="200dp">
p29网格布局管理器
-
GridLayout:网格布局管理器
android:columnCout //指定网格最大列数 android:orientation //当没有为组件分配行和列时,为其设置排列方式,水平或垂直 android:rowCount //指定网格的最大行数 -
GridLayout.LayoutParams
android:layout_column      //指定组件位于网格第几列
android:layout_columnSpan      //指定组件横向跨几列
android:layout_columnWeight      //指定组件在水平方向的权重,即分配水平空间的比例
android:layout_gravity      //设置组件用什么方式占据网格空间
android:layout_row      //指定组件位于网格第几行
android:layout_rowSpan      //指定组件纵向跨几列
android:layout_rowWeight      //指定组件在垂直方向的权重
p31布局管理器的嵌套
- 根布局管理器必须包含xmlns属性
- 在一个布局文件中,最多只能有一个根布局管理器
- 不能嵌套太深,太深会影响性能
三、基本UI组件
- 包括:文本类组件、按钮类组件、日期时间类组件
p34文本框组件
-
文本框
<TextView android:id="@+id/name" android:layout_width="wrap_content" android:layout_height="200dp" android:text="@string/name" android:textSize="36sp" android:textColor="FFFFFF"/> -
设置颜色时,可以用RGB,也可以直接用ARGB调透明度
-
设置单行文本框: (多余字用省略号显示)
android:singleLine="true"
p36编辑框组件
-
编辑框(文本框组件的子类,文本框的属性都适用)
<EditText android:layout_width="wrap_content" android:layout_height="wrap_content" android:hint="@string/hint_text"/> -
指定提示信息:
android:hint="请输入账号" -
输入密码变成小黑点,即密码框:
android:inputType="textPassword" //密码框 android:inputType="number" //只能输入数字 -
在编辑框内绘制图像属性
android:drawableLeft="@mipmap/mc" //相当于android:drawableStart //类似的有android:drawableBottom //android:drawableEnd=android:drawableRight //android:drawableTop-
图片与文字的间距调整:
android:drawablePadding
-
-
设置编辑框组件的行数:
android:lines="5"输入第六行时第一行不见了,可以滚动鼠标显示
-
获取编辑框内容:到java咯!
xml里编辑框id设为et1
EditText et=(EditText)findViewById(R.id.et1);
et.getText();
p38普通按钮组件
-
按钮
<Button android:layout_width="wrap_content" android:layout_height="wrap_content" android:text="text"/> -
监听器
为按钮设置一个监听器,点击按钮时会触发这个监听器,从而执行相关操作。
-
为普通按钮添加单击事件监听器
-
匿名内部类作为单击事件监听器
xml里按钮1的id设为button1,java代码:
Button button=(Button)findViewById(R.id.button1); button.setOnClickListener(new View.OnClickListener() { @Override public void onClick(View v) { Toast.makeText(MainActivity.this,"单击了按钮1",Toast.LENGTH_SHORT).show(); } }); -
通过onClick属性实现
xml里按钮2的id设为button2
-
在java的Activity中编写一个包含View类型参数的方法
public void myClick(View view){ Toast.makeText(MainActivity.this,"单击了按钮2",Toast.LENGTH_SHORT).show(); //编写要执行的动作代码 } -
将xml里按钮2的android.onClick属性指定为步骤1中的方法名
android.onClick="myClick"
-
-
p40图片按钮
-
图片按钮ImageButton与普通按钮Button的异同点:
- 相同点:单击时都可以触发onClick事件
- 不同点:ImageButton没有android.text属性,文字是在制作图片时添加的
-
图片按钮
<ImageButton android:layout_width="wrap_content" android:layout_height="wrap_content" android:src="@mipmap/picture"/>-
去掉多余的灰色背景:
android:background="#0000"
-
p42单选按钮
-
单选按钮
<RadioButton
        android:layout_width="wrap_content"
        android:layout_height="wrap_content"
        android:text="选我"/>
默认选中状态:
android:isChecked="true" -
多个单选按钮
<RadioGroup android:layout_width="wrap_content" android:layout_height="wrap_content" android:id="@+id/rg"> <RadioButton android:layout_width="wrap_content" android:layout_height="wrap_content" android:text="男"/> <RadioButton android:layout_width="wrap_content" android:layout_height="wrap_content" android:text="女"/> <RadioButton android:layout_width="wrap_content" android:layout_height="wrap_content" android:text="保密"/> </RadioGroup> <Button android:layout_width="wrap_content" android:layout_height="wrap_content" android:text="提交" android:id="@+id/button"/> -
获取选中项的值
RadioGroup rg=(RadioGroup)findViewById(R.id.rg); rg.setOnCheckedChangeListener(new RadioGroup.OnCheckedChangeListener() { @Override public void onCheckedChanged(RadioGroup group, int checkedId) { RadioButton r=(RadioButton)findViewById(checkedId); r.getText(); Toast.makeText(MainActivity.this,"性别:"+r.getText(),Toast.LENGTH_SHORT).show(); } }); -
单击其它按钮(提交)时获得单选按钮组的值
RadioGroup rg=(RadioGroup)findViewById(R.id.rg);

Button button=(Button)findViewById(R.id.button);
button.setOnClickListener(new View.OnClickListener() {
    @Override
    public void onClick(View v) {
        for (int i=0;i<rg.getChildCount();i++){
            RadioButton r=(RadioButton)rg.getChildAt(i);
            if(r.isChecked()){
                Toast.makeText(MainActivity.this,r.getText(),Toast.LENGTH_SHORT).show();
                break;
            }
        }
    }
});
p44复选框
-
复选框
<CheckBox
    android:layout_width="wrap_content"
    android:layout_height="wrap_content"
    android:text="显示密码"/>
默认选中状态:
android:isChecked="true" -
多个单选按钮
-
多个复选框
多复制几个
<CheckBox android:id="@+id/pingguo" android:layout_width="wrap_content" android:layout_height="wrap_content" android:text="苹果"/> <CheckBox android:id="@+id/xiangjiao" android:layout_width="wrap_content" android:layout_height="wrap_content" android:text="香蕉"/> <CheckBox android:id="@+id/mihoutao" android:layout_width="wrap_content" android:layout_height="wrap_content" android:text="猕猴桃"/> -
监听复选框:
CheckBox apple=(CheckBox)findViewById(R.id.apple);
        apple.setOnCheckedChangeListener(new CompoundButton.OnCheckedChangeListener() {
            @Override
            public void onCheckedChanged(CompoundButton buttonView, boolean isChecked) {
                if(apple.isChecked()){
                    Toast.makeText(MainActivity.this,apple.getText(),Toast. LENGTH_SHORT).show();
                }
            }
        });
p46日期选择器
-
日期选择器
<DatePicker
    android:id="@+id/data"
    android:layout_width="match_parent"
    android:layout_height="match_parent">
</DatePicker>
java里把继承AppCompatActivity改成继承Activity可以使其完整显示。
-
点击日期显示:
public class MainActivity extends Activity {

    int year,month,day;

    @Override
    protected void onCreate(Bundle savedInstanceState) {
        super.onCreate(savedInstanceState);
        setContentView(R.layout.activity_main);

        DatePicker data=(DatePicker)findViewById(R.id.data);
        Calendar calendar=Calendar.getInstance();
        year=calendar.get(Calendar.YEAR);
        month=calendar.get(Calendar.MONTH);
        day=calendar.get(Calendar.DAY_OF_MONTH);
        data.init(year, month, day, new DatePicker.OnDateChangedListener() {
            @Override
            public void onDateChanged(DatePicker view, int year, int monthOfYear, int dayOfMonth) {
                MainActivity.this.year=year;
                MainActivity.this.month=monthOfYear;
                MainActivity.this.day=dayOfMonth;
                show(year,monthOfYear,dayOfMonth);
            }
        });
    }

    private void show(int year,int month,int day){
        String str=year+"年"+(month+1)+"月"+day+"日";
        Toast.makeText(MainActivity.this,str,Toast.LENGTH_SHORT).show();
    }
}
p47时间选择器
-
时间选择器
<TimePicker android:id="@+id/time" android:layout_width="wrap_content" android:layout_height="wrap_content"/> -
点击显示:
TimePicker time=(TimePicker)findViewById(R.id.time);
        time.setIs24HourView(true);   //采用24小时进制
        time.setOnTimeChangedListener(new TimePicker.OnTimeChangedListener() {
            @Override
            public void onTimeChanged(TimePicker view, int hourOfDay, int minute) {
                String str=hourOfDay+"时"+minute+"分";
                Toast.makeText(MainActivity.this,str,Toast.LENGTH_SHORT).show();
            }
        });
p48计时器
- 计时器
<Chronometer
    android:layout_width="wrap_content"
    android:layout_height="wrap_content"/>
-
设置其它样式:
-
在前面+文字:
android:format="已用时间:" -
使用时分秒格式:
android:format="%s"
-
-
设置方法达到计时功能:
- setBase():设置计时器的起始时间
- setFormat():设置显示时间的格式
- start():指定开始计时
- stop():指定停止计时
- setOnChronometerTickListener():为计时器绑定事件监听器,当计时器改变时触发该监听器
四、高级UI组件
- 进度条类组件
- 图像类组件
- 列表类组件
- 通用组件
p50进度条语法
-
进度条
<ProgressBar android:id="@+id/progressBar" android:layout_width="match_parent" android:layout_height="wrap_content"/> -
设置不同类型的进度条
-
细水平长条进度条
style="?android:attr/progressBarStyleHorizontal" -
小圆形进度条
style="?android:attr/progressBarStyleSmall" -
大圆形进度条
style="?android:attr/progressBarStyleLarge" -
粗水平长条进度条
style="@android:style/Widget.ProgressBar.Horizontal" -
旋转画面的大圆形进度条
style="@android:style/Widget.ProgressBar.Large" -
旋转画面的小圆形进度条
style="@android:style/Widget.ProgressBar.Small"
-
-
设置进度条进度
-
最大
android:max="100" -
当前
android:progress="50"
-
-
实时改变:
创建线程——>是否完成? <—————————————————|
是——>调用setVisibility()方法设置进度条不显示 |
否——>调用setProgress()方法更新进度——————|
-
设置全屏显示:
getWindow().setFlags(WindowManager.LayoutParams.FLAG_FULLSCREEN, WindowManager.LayoutParams.FLAG_FULLSCREEN); -
实例:
public class MainActivity extends Activity {
    private ProgressBar progressBar;
    private int mProgress=0;
    private Handler mHandler;

    @Override
    protected void onCreate(Bundle savedInstanceState) {
        super.onCreate(savedInstanceState);
        setContentView(R.layout.activity_main);

        getWindow().setFlags(WindowManager.LayoutParams.FLAG_FULLSCREEN,
                WindowManager.LayoutParams.FLAG_FULLSCREEN);
        progressBar= (ProgressBar)findViewById(R.id.progressBar);
        mHandler=new Handler(){
            @Override
            public void handleMessage(Message msg) {
                if(msg.what==0x111){
                    progressBar.setProgress(mProgress);
                }else {
                    Toast.makeText(MainActivity.this,"耗时操作已完成",Toast.LENGTH_SHORT).show();
                    progressBar.setVisibility(View.GONE);
                }
            }
        };
        new Thread(new Runnable() {
            @Override
            public void run() {
                while (true){
                    mProgress=doWork();
                    Message m=new Message();
                    if(mProgress<100){
                        m.what=0x111;
                        mHandler.sendMessage(m);
                    }else {
                        m.what=0x110;
                        mHandler.sendMessage(m);
                        break;
                    }
                }
            }
            private int doWork(){
                mProgress+=Math.random()*10;
                try {
                    Thread.sleep(200);
                } catch (InterruptedException e) {
                    e.printStackTrace();
                }
                return mProgress;
            }
        }).start();
    }
}
p52拖动条语法
-
拖动条
<SeekBar android:id="@+id/seekbar" android:layout_width="match_parent" android:layout_height="wrap_content"/> -
设置进度
-
最大进度
android:max="10" -
当前进度
android:progress="5"
-
-
设置进度条的小圆点
android:thumb="@drawable/icon" -
点击、拖动进度条显示:
SeekBar seekBar=(SeekBar) findViewById(R.id.seekbar);
seekBar.setOnSeekBarChangeListener(new SeekBar.OnSeekBarChangeListener() {
        @Override
        //进度条改变时的方法
        public void onProgressChanged(SeekBar seekBar, int progress, boolean fromUser) {
            Toast.makeText(MainActivity.this,"进度条改变"+progress,Toast.LENGTH_SHORT).show();
        }

        @Override
        //开始触摸时的方法
        public void onStartTrackingTouch(SeekBar seekBar) {
            Toast.makeText(MainActivity.this,"开始触摸",Toast.LENGTH_SHORT).show();
        }

        @Override
        //停止触摸时的方法
        public void onStopTrackingTouch(SeekBar seekBar) {
            Toast.makeText(MainActivity.this,"停止触摸",Toast.LENGTH_SHORT).show();
        }
});
p54星级评分条语法
-
星级评分条
<RatingBar android:layout_width="wrap_content" android:layout_height="wrap_content" android:id="@+id/star"/> -
设置初始几颗星
android:numStars="5" -
设置初始点亮几颗星
android:rating="2" -
设置一次点亮一颗星或半颗星,默认半颗星
android:stepSize="1" -
设置固定星级评分条
android:isIndicator="true" -
一些方法:
RatingBar ratingBar=(RatingBar)findViewById(R.id.ratingbar);
//获取选中了几颗星
String rating=String.valueOf(ratingBar.getRating());
Toast.makeText(MainActivity.this,"Rating:"+rating,Toast.LENGTH_SHORT).show();
//获取每次至少要改变几颗星
String stepSize=String.valueOf(ratingBar.getStepSize());
Toast.makeText(MainActivity.this,"StepSize:"+stepSize,Toast.LENGTH_SHORT).show();
//获取进度
String progress=String.valueOf(ratingBar.getProgress());
Toast.makeText(MainActivity.this,"Progress:"+progress,Toast.LENGTH_SHORT).show();
p56图像视图
-
图像视图
<ImageView android:layout_width="wrap_content" android:layout_height="wrap_content" android:src="@drawable/a"/> -
关于放缩
android:scaleType="center"  //保持原图的大小,显示在ImageView中心,当图片的size超过ImageView大小,超出部分裁剪。

android:scaleType="centerCrop"  //原图按等比例大小在中心进行缩放,直至填满整个ImageView。
android:scaleType="centerInside"  //如果原图小于ImageView大小,则按原图大小显示在ImageView中心。
                                  //如果原图大于ImageView大小,则进行等比例缩放,直至可以放在ImageView中。

android:scaleType="fitCenter"  //原图等比例缩放至ImageView的最短一边的大小,居中显示。

android:scaleType="matrix"  //不改变原图大小,在ImageView左上角开始显示,超出部分进行裁剪。

android:scaleType="fitStart"  //把原图按比例扩大(缩小)到ImageView的高度,显示在ImageView的上部分位置
android:scaleType="fitEnd"  //把原图按比例扩大(缩小)到ImageView的高度,显示在ImageView的下部分位置

android:scaleType="fitXY"  //把原图按照指定的大小在View中显示,拉伸显示图片,不保持原比例,填满ImageView.
p58图像切换器
-
图像切换器
<ImageSwitcher android:layout_width="wrap_content" android:layout_height="wrap_content" android:id="@+id/imagesitcher"/> -
点击换图像以及淡入淡出效果
ImageSwitcher imageSwitcher=findViewById(R.id.imagesitcher); imageSwitcher.setOutAnimation(AnimationUtils.loadAnimation(MainActivity.this, android.R.anim.fade_out)); //淡出效果 imageSwitcher.setInAnimation(AnimationUtils.loadAnimation(MainActivity.this, android.R.anim.fade_in)); //淡入效果 imageSwitcher.setFactory(new ViewSwitcher.ViewFactory() { @Override public View makeView() { ImageView imageView=new ImageView(MainActivity.this); imageView.setImageResource(R.drawable.img01); return imageView; } }); imageSwitcher.setOnClickListener(new View.OnClickListener() { @Override public void onClick(View v) { ((ImageSwitcher)v).setImageResource(R.drawable.img02); } }); -
左右滑动图片切换
public class MainActivity extends Activity {
    private int[] arrayPicture=new  int[]{
            R.drawable.img01,R.drawable.img02,R.drawable.img03};  //显示图片id的数组
    private ImageSwitcher imageSwitcher;  //图像切换器对象
    private int index;  //记录要显示的图片在图片数组中的索引
    private float touchDownX;  //手指按下的x轴坐标
    private float touchUpX;  //手指抬起的x轴坐标

    @Override
    protected void onCreate(Bundle savedInstanceState) {
        super.onCreate(savedInstanceState);
        setContentView(R.layout.activity_main);

        getWindow().setFlags(WindowManager.LayoutParams.FLAG_FULLSCREEN,
                WindowManager.LayoutParams.FLAG_FULLSCREEN);  //设置全屏显示

        ImageSwitcher imageSwitcher=findViewById(R.id.imagesitcher);
        imageSwitcher.setFactory(new ViewSwitcher.ViewFactory() {  //设置一个视图工厂
            @Override
            public View makeView() {
                ImageView imageView=new ImageView(MainActivity.this);  //用于显示图片
                imageView.setImageResource(arrayPicture[index]);  //指定要显示的默认图片
                return imageView;
            }
        });
        imageSwitcher.setOnTouchListener(new View.OnTouchListener() {  //触摸事件监听器
            @Override
            public boolean onTouch(View v, MotionEvent event) {
                if(event.getAction()==MotionEvent.ACTION_DOWN){  //事件动作是按下
                    touchDownX=event.getX();  //手指按下的坐标
                    return true;
                }else if(event.getAction()==MotionEvent.ACTION_UP){  //事件动作是抬起
                    touchUpX=event.getX();  //手指抬起的坐标
                    if(touchUpX-touchDownX>100){  //判断手指是否是从左向右滑
                        index=index==0?arrayPicture.length-1:index-1;  //如果照片是第一张的索引,让其等于最后一张的索引
                        imageSwitcher.setOutAnimation(AnimationUtils.loadAnimation(MainActivity.this, android.R.anim.slide_out_right));
                        imageSwitcher.setInAnimation(AnimationUtils.loadAnimation(MainActivity.this, android.R.anim.slide_in_left));
                        imageSwitcher.setImageResource(arrayPicture[index]);
                    }else if(touchDownX-touchUpX>100){  //判断手指是否是从右向左滑
                        index=index==arrayPicture.length-1?0:index+1;
                        imageSwitcher.setOutAnimation(AnimationUtils.loadAnimation(MainActivity.this, android.R.anim.slide_out_left));
                        imageSwitcher.setInAnimation(AnimationUtils.loadAnimation(MainActivity.this, android.R.anim.slide_in_right));
                        imageSwitcher.setImageResource(arrayPicture[index]);
                        }
                    return true;
                }
                return false;
            }
        });
    }
}
适配器
-
什么是适配器?
连接后端数据和前端显示的接口,数据和UI组件的纽带。
数据源——> Adapter ——>GridView
-
Android提供了四个常用的适配器实现类:
-
ArrayAdapter:
数组适配器,通常用于将数组的多个值包装成多个列表项,只能显示一行文字。
-
SimpleAdapter:
简单适配器,通常用于把list集合的多个值包装成多个列表项,可以自定义多个效果。(功能强大)
-
SimpleCursorAdapter:
将数据库的内容以列表的形式展现出来。
-
BaseAdapter:
对各个列表项进行最大限度的定制,具有很高的灵活性。
-
p60网格视图
-
网格视图
<GridView android:id="@+id/gridView" android:layout_width="match_parent" android:layout_height="match_parent"/> -
列宽度
android:columnWidth="100dp" -
规定几列
auto_fit:自动排列
android:numColumns="3" android:numColumns="auto_fit" -
设置垂直间距
android:verticalSpacing="5dp" -
与图像视图不同,显示图片要通过设置一个适配器实现,使用SimpleAdapter适配器。
-
添加一个cell.xml:LinearLayout
<ImageView android:id="@+id/image" android:layout_width="100dp" android:layout_height="75dp"/> -
在java中:
public class MainActivity extends AppCompatActivity {

    private int[] picture=new int[]{
            R.drawable.img01,R.drawable.img02,R.drawable.img03};

    @Override
    protected void onCreate(Bundle savedInstanceState) {
        super.onCreate(savedInstanceState);
        setContentView(R.layout.activity_main);

        GridView gridView=findViewById(R.id.gridView);
        List<Map<String,Object>> listitem=new ArrayList<Map<String,Object>>();
        //创建一个list对象,它的列表项是map对象,是通过键值对保存的图像资源
        for(int i=0;i<picture.length;i++){  //通过for循环把map对象添加到list中
            Map<String,Object> map=new HashMap<String, Object>();
            map.put("image",picture[i]); //把当前的图片资源id保存到map对象中
            listitem.add(map); //把map对象添加到list中
        }
        SimpleAdapter simpleAdapter=new SimpleAd apter(this,listitem,R.layout.cell,new String[]{"image"},new int[]{R.id.image});
        gridView.setAdapter(simpleAdapter); //为网格视图设置适配器
    }
}
p62下拉列表框
-
下拉列表框
<Spinner android:id="@+id/spinner" android:layout_width="wrap_content" android:layout_height="wrap_content"/> -
设置列表项
-
第一种方法:这个属性值是一个数组资源,要定义一个数组资源,在values里新建xml里的values xml:arrays.xml
<resources>
    <string-array name="ctype">
        <item>全部</item>
        <item>电影</item>
        <item>图书</item>
        <item>游戏</item>
    </string-array>
</resources>
然后在activity_main.xml里添加属性:
android:entries="@array/ctype" -
在java里利用适配器:
String[] ctype=new String[]{"全部","美术","音乐","体育"};
ArrayAdapter<String> adapter=new ArrayAdapter<String>(this,
        android.R.layout.simple_spinner_item,ctype);
adapter.setDropDownViewResource(android.R.layout.simple_spinner_dropdown_item);
Spinner spinner=findViewById(R.id.spinner);
spinner.setAdapter(adapter);
-
p64列表视图
-
列表视图
<ListView android:id="@+id/listView" android:layout_width="match_parent" android:layout_height="wrap_content"/> -
添加列表项
-
第一种
android:entries="@array/ctype" -
第二种
String[] ctype=new String[]{"全部","美术","音乐","体育"};
ArrayAdapter<String> adapter=new ArrayAdapter<String>(this,
        android.R.layout.simple_list_item_1,ctype);
ListView listView=findViewById(R.id.listView);
listView.setAdapter(adapter);
-
p66滚动视图
-
滚动视图
<ScrollView android:layout_width="match_parent" android:layout_height="wrap_content"> <TextView android:textSize="60sp" android:text="@string/content" android:layout_width="match_parent" android:layout_height="match_parent"/> </ScrollView> -
默认是竖直滚动,改成水平:
<HorizontalScrollView -
滚动条只能放一个组件,要放多个必须使用布局管理器
<HorizontalScrollView android:layout_width="match_parent" android:layout_height="wrap_content"> <LinearLayout android:orientation="vertical" android:layout_width="match_parent" android:layout_height="match_parent"> <TextView android:textSize="60sp" android:text="@string/content" android:layout_width="match_parent" android:layout_height="match_parent"/> <TextView android:textSize="60sp" android:text="@string/content" android:layout_width="match_parent" android:layout_height="match_parent"/> </LinearLayout> </HorizontalScrollView> -
在java创建滚动视图
- 使用构造方法ScrollView(Context c)创建一个滚动视图
- 应用addView()方法添加组件到滚动视图中
- 将滚动视图添加到布局管理器中
-
xml里:
android:orientation="vertical" android:id="@+id/ll" -
java里:
LinearLayout ll=findViewById(R.id.ll);
LinearLayout ll2=new LinearLayout(MainActivity.this);
ll2.setOrientation(LinearLayout.VERTICAL);
ScrollView scrollView=new ScrollView(MainActivity.this);
ll.addView(scrollView);
scrollView.addView(ll2);
ImageView imageView=new ImageView(MainActivity.this);
imageView.setImageResource(R.drawable.img01);
ll2.addView(imageView);
TextView textView=new TextView(MainActivity.this);
textView.setText(R.string.content);
ll2.addView(textView);
p68选项卡
-
选项卡
- 在布局文件中添加TabHost、TabWidget和TabContent组件
- 编写各标签页的xml布局文件
- 获取并初始化TabHost组件
- 为TabHost对象添加标签页
-
代码:
-
activity.xml
<TabHost xmlns:android="http://schemas.android.com/apk/res/android" xmlns:app="http://schemas.android.com/apk/res-auto" xmlns:tools="http://schemas.android.com/tools" android:layout_width="match_parent" android:layout_height="match_parent" android:id="@android:id/tabhost" tools:context=".MainActivity"> <LinearLayout android:orientation="vertical" android:layout_width="match_parent" android:layout_height="match_parent"> <TabWidget android:layout_width="match_parent" android:layout_height="wrap_content" android:id="@android:id/tabs"></TabWidget> <FrameLayout android:id="@android:id/tabcontent" android:layout_width="match_parent" android:layout_height="match_parent"></FrameLayout> </LinearLayout> </TabHost> -
tab1.xml
<LinearLayout xmlns:android="http://schemas.android.com/apk/res/android" android:id="@+id/left" android:layout_width="match_parent" android:layout_height="match_parent"> <ImageView android:src="@drawable/img01" android:layout_width="match_parent" android:layout_height="match_parent"/> </LinearLayout> -
tab2.xml
<LinearLayout xmlns:android="http://schemas.android.com/apk/res/android" android:id="@+id/right" android:layout_width="match_parent" android:layout_height="match_parent"> <ImageView android:src="@drawable/img02" android:layout_width="match_parent" android:layout_height="match_parent"/> </LinearLayout> -
java
TabHost tabHost=findViewById(android.R.id.tabhost);
tabHost.setup();
LayoutInflater inflater=LayoutInflater.from(this);
inflater.inflate(R.layout.tab1,tabHost.getTabContentView());
inflater.inflate(R.layout.tab2,tabHost.getTabContentView());
tabHost.addTab(tabHost.newTabSpec("tab1").setIndicator("A").setContent(R.id.left));
tabHost.addTab(tabHost.newTabSpec("tab2").setIndicator("B").setContent(R.id.right));
-
"
android:layout_width=“match_parent”
android:layout_height=“match_parent”>
```
-
tab1.xml
<LinearLayout xmlns:android="http://schemas.android.com/apk/res/android" android:id="@+id/left" android:layout_width="match_parent" android:layout_height="match_parent"> <ImageView android:src="@drawable/img01" android:layout_width="match_parent" android:layout_height="match_parent"/> </LinearLayout> -
tab2.xml
<LinearLayout xmlns:android="http://schemas.android.com/apk/res/android" android:id="@+id/right" android:layout_width="match_parent" android:layout_height="match_parent"> <ImageView android:src="@drawable/img02" android:layout_width="match_parent" android:layout_height="match_parent"/> </LinearLayout> -
java
TabHost tabHost=findViewById(android.R.id.tabhost);
tabHost.setup();
LayoutInflater inflater=LayoutInflater.from(this);
inflater.inflate(R.layout.tab1,tabHost.getTabContentView());
inflater.inflate(R.layout.tab2,tabHost.getTabContentView());
tabHost.addTab(tabHost.newTabSpec("tab1").setIndicator("A").setContent(R.id.left));
tabHost.addTab(tabHost.newTabSpec("tab2").setIndicator("B").setContent(R.id.right));
未完待续

