Android Studio基础_学校课程案例_笔记
移动应用课程案例_笔记
- 开发环境搭建
-
- Android Studio
- Genymotion 模拟器
- 案例
-
- 飞机大战三个控件
- 密码与用户登录
- 五个按钮
- 桌面台球-帧布局
- 用户登录-表格布局
- 图片-线性布局
- 图片ImageView案例
- 说点什么吧
- 开心消消乐
- 简陋拨号跳转
- 飞机大战授权界面
- 绿豆通讯录
- 收货地址管理
- 淡入淡出轮播图
- 电子相册
-
- 思路
- 源码
- 川菜菜谱
开发环境搭建
Android Studio
创建文件
File -> new -> new project -> Empty Activity -> next
-> save location: D:\ASworkspace\My Application1
name: My Application1
Language: Java
-> Finish
看到文件
下拉菜单选择project
activity_main.xml选择code模式
activity_main.xml是设置外观的文件
app\src\main\res\activity_main.xml中标题头、命名空间不要删掉
< xmlns:android="http://schemas.android.com/apk/res/android"
MainActivity是设置功能的文件
app\src\main\java\com\example\myapplication228
图片要放在res\drawable文件夹中
banner文件名修改在strings.xml文件中
app\src\main\res\values\strings.xml
调整字体大小
更改代码字体大小:
File -> Setting -> Editor -> Font ->Size字体大小(改成20),Line spacing行间距(这个不用更改)
更改菜单栏等外观大小:
appearance -> use custom font -> size(不用改)
Genymotion 模拟器
右上角三个点,选择start,点击continue,即可运行
运行后,按红色⬛️即停止运行,并可重新运行
案例
飞机大战三个控件
效果图
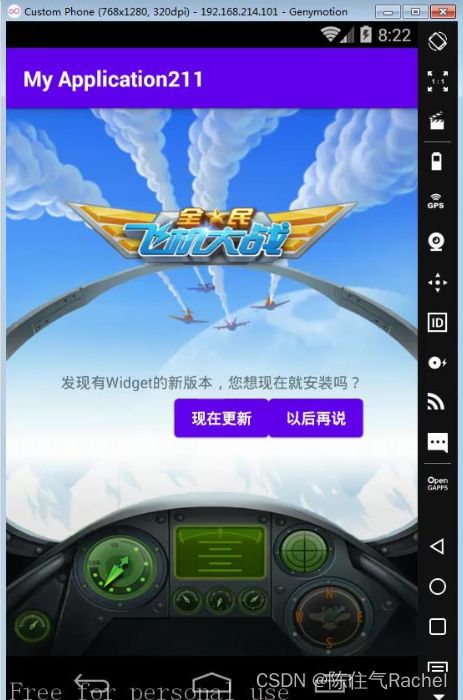
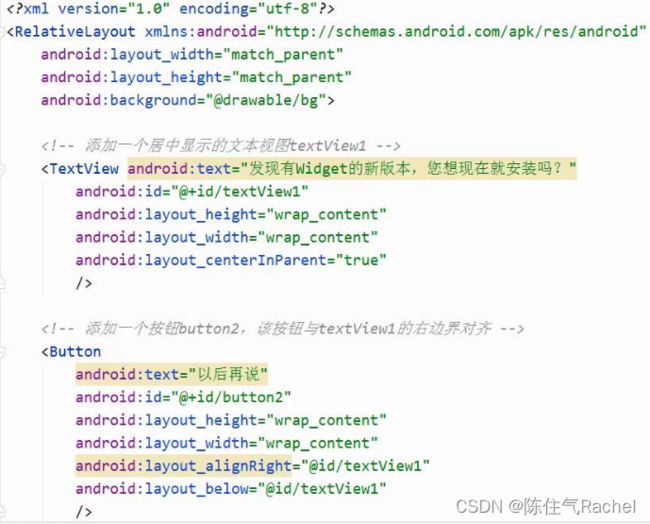
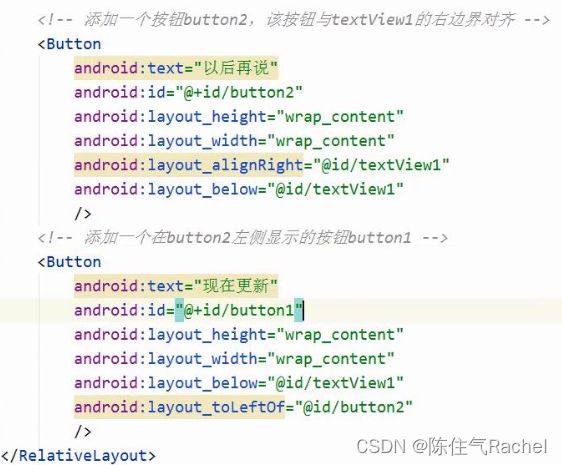
代码
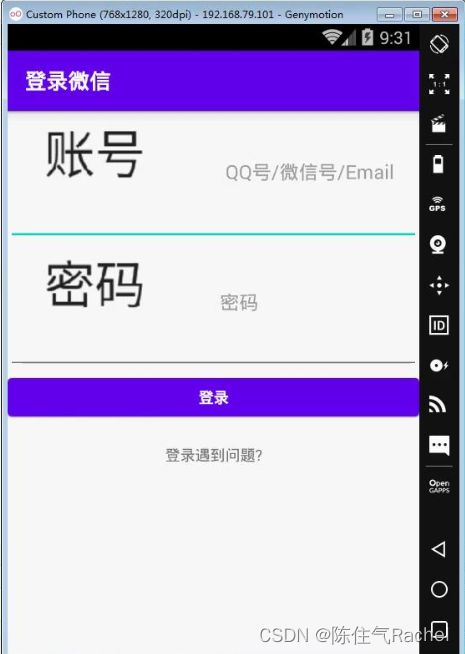
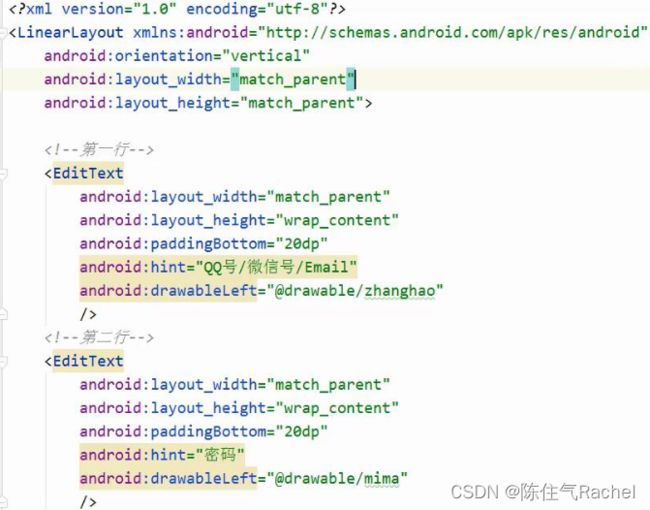
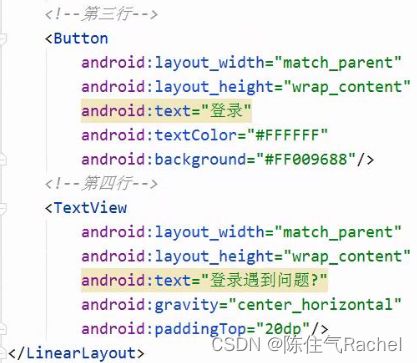
密码与用户登录
效果
代码
五个按钮
效果

代码
<RelativeLayout xmlns:android="http://schemas.android.com/apk/res/android"
    xmlns:app="http://schemas.android.com/apk/res-auto"
    xmlns:tools="http://schemas.android.com/tools"
    android:layout_width="match_parent"
    android:layout_height="match_parent">

    <Button
        android:layout_width="wrap_content"
        android:layout_height="wrap_content"
        android:text="BUTTON2"
        android:id="@+id/BUTTON2"
        android:layout_centerInParent="true" />

    <Button
        android:layout_width="wrap_content"
        android:layout_height="wrap_content"
        android:text="BUTTON1"
        android:id="@+id/BUTTON1"
        android:layout_centerInParent="true"
        android:layout_below="@id/BUTTON2"
        android:layout_marginTop="20dp"/>
    <Button
        android:layout_width="wrap_content"
        android:layout_height="wrap_content"
        android:text="BUTTON5"
        android:id="@+id/BUTTON5"
        android:layout_centerInParent="true"
        android:layout_below="@id/BUTTON1"
        android:layout_marginTop="20dp"/>
    <Button
        android:layout_width="wrap_content"
        android:layout_height="wrap_content"
        android:text="BUTTON3"
        android:id="@+id/BUTTON3"
        android:layout_centerInParent="true"
        android:layout_toLeftOf="@id/BUTTON1"
        android:layout_below="@id/BUTTON2"
        android:layout_marginTop="20dp"
        android:layout_marginRight="15dp"/>
    <Button
        android:layout_width="wrap_content"
        android:layout_height="wrap_content"
        android:text="BUTTON4"
        android:id="@+id/BUTTON"
        android:layout_centerInParent="true"
        android:layout_toRightOf="@id/BUTTON1"
        android:layout_below="@id/BUTTON2"
        android:layout_marginTop="20dp"
        android:layout_marginLeft="15dp"/>
RelativeLayout>
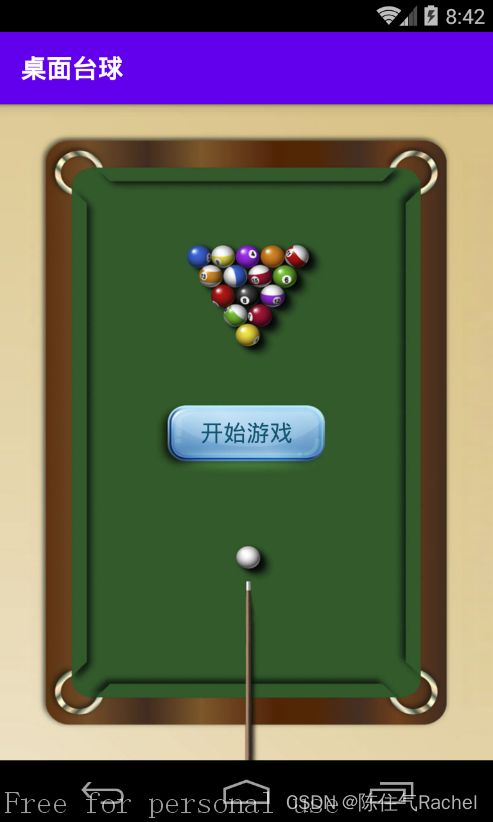
桌面台球-帧布局
运用 帧布局、文本域TextView,属性 **layout_gravity=“center”**水平垂直居中
效果图
代码
<FrameLayout xmlns:android="http://schemas.android.com/apk/res/android"
    android:layout_width="match_parent"
    android:layout_height="match_parent"
    android:background="@drawable/bg">

    <TextView
        android:layout_width="wrap_content"
        android:layout_height="wrap_content"
        android:layout_gravity="center"
        android:textSize="18sp"
        android:textColor="#115572"
        android:text="开始游戏"/>
FrameLayout>
背景图片放置在 res\ drawable文件夹里
在 res\ values\strings.xml里 **更改banner文本 **
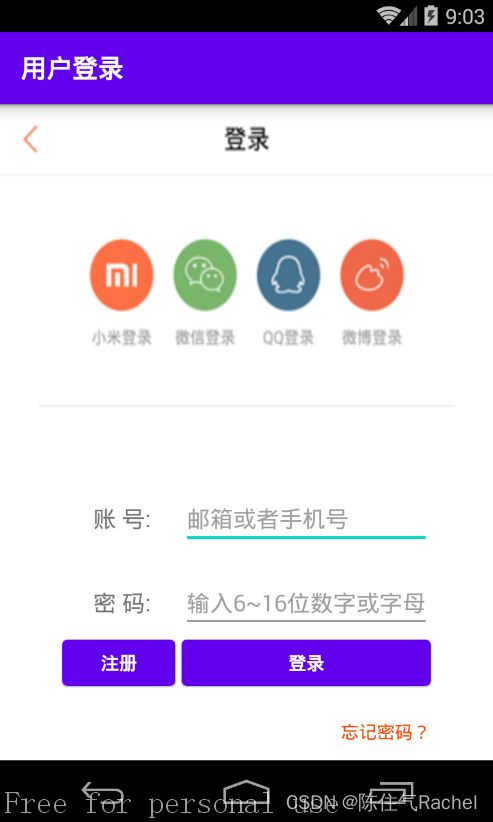
用户登录-表格布局
运用表格布局,控件TableRow、TextView,
修改banner,添加背景图片,
属性gravity=“center_horizontal”、gravity=“right”、hint
效果图
代码
<TableLayout xmlns:android="http://schemas.android.com/apk/res/android"
    android:layout_width="match_parent"
    android:layout_height="match_parent"
    android:background="@drawable/biaoge"
    android:stretchColumns="0,3">


    <TableRow
        android:layout_width="wrap_content"
        android:layout_height="wrap_content"
        android:paddingTop="300dp"
        >
        <TextView />
        <TextView
            android:layout_width="wrap_content"
            android:layout_height="wrap_content"
            android:textSize="18sp"
            android:text="账 号:"
            android:gravity="center_horizontal"
            />
        <EditText
            android:layout_width="match_parent"
            android:layout_height="wrap_content"
            android:hint="邮箱或者手机号"
            />
        <TextView />
    TableRow>

    <TableRow
        android:layout_width="wrap_content"
        android:layout_height="wrap_content"
        android:paddingTop="20dp"
        >
        <TextView/>
        <TextView
            android:layout_width="wrap_content"
            android:layout_height="wrap_content"
            android:textSize="18sp"
            android:text="密 码:"
            android:gravity="center_horizontal"
            />
        <EditText
            android:layout_width="wrap_content"
            android:layout_height="wrap_content"
            android:hint="输入6~16位数字或字母"
            />
        <TextView/>
    TableRow>

    <TableRow
        android:layout_width="wrap_content"
        android:layout_height="wrap_content">
        <TextView/>
        <Button
            android:layout_width="wrap_content"
            android:layout_height="wrap_content"
            android:layout_marginRight="5dp"
            android:text="注册"
            />
        <Button
            android:layout_height="wrap_content"
            android:layout_width="wrap_content"
            android:text="登录"
            android:background="#FF8247"
            />
    TableRow>

    <TableRow
        android:layout_width="wrap_content"
        android:layout_height="wrap_content"
        android:paddingTop="20dp"
        >
        <TextView/>
        <TextView/>
        <TextView
            android:text="忘记密码?"
            android:textColor="#FF4500"
            android:gravity="right"/>
    TableRow>
TableLayout>
图片-线性布局
线性布局(layout_weight=“1”)先设置控件排列顺序为纵向,添加顶部图片
内部嵌套相对布局(layout_weight=“2”),先后添加中间、下方、左侧、右侧图片
效果

代码
<LinearLayout xmlns:android="http://schemas.android.com/apk/res/android"
    android:orientation="vertical"
    android:layout_height="match_parent"
    android:layout_width="match_parent">


    <ImageView
        android:layout_width="match_parent"
        android:layout_height="wrap_content"
        android:scaleType="centerCrop"
        android:layout_weight="1"
        android:src="@drawable/top"/>


    <RelativeLayout
        android:layout_width="match_parent"
        android:layout_height="wrap_content"
        android:layout_weight="2"
        android:id="@+id/relativeLayout1"
        android:background="@drawable/bottom">

        <ImageView
            android:layout_width="wrap_content"
            android:layout_height="wrap_content"
            android:id="@+id/imageButtom0"
            android:src="@drawable/in"
            android:layout_centerInParent="true"
            />

        <ImageView
            android:layout_width="wrap_content"
            android:layout_height="wrap_content"
            android:id="@+id/imageButtom1"
            android:src="@drawable/setting"
            android:layout_above="@id/imageButtom0"
            android:layout_alignRight="@id/imageButtom0"/>

        <ImageView
            android:layout_width="wrap_content"
            android:layout_height="wrap_content"
            android:id="@+id/imageButtom2"
            android:src="@drawable/exit"
            android:layout_below="@id/imageButtom0"
            android:layout_alignLeft="@id/imageButtom0"/>

        <ImageView
            android:layout_width="wrap_content"
            android:layout_height="wrap_content"
            android:id="@+id/imageButtom3"
            android:src="@drawable/help"
            android:layout_toLeftOf="@id/imageButtom0"
            android:layout_alignTop="@id/imageButtom0"/>

        <ImageView
            android:layout_width="wrap_content"
            android:layout_height="wrap_content"
            android:id="@+id/imageButtom4"
            android:src="@drawable/board"
            android:layout_toRightOf="@+id/imageButtom0"
            android:layout_alignTop="@id/imageButtom0"/>
    RelativeLayout>
LinearLayout>
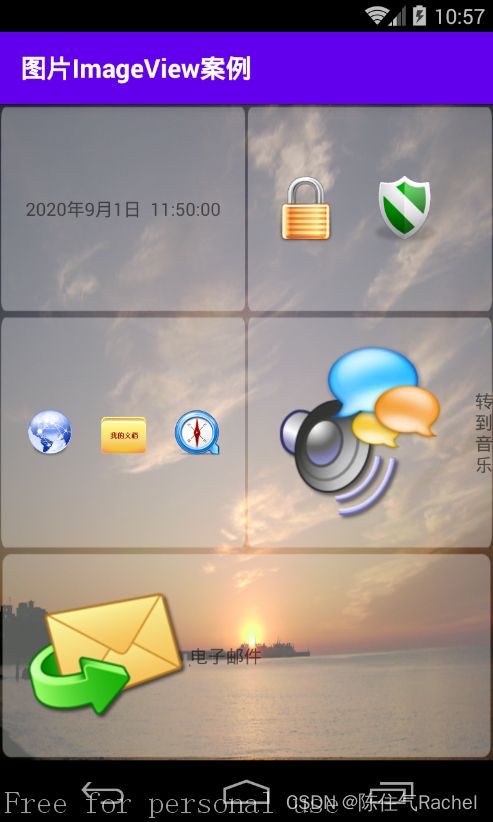
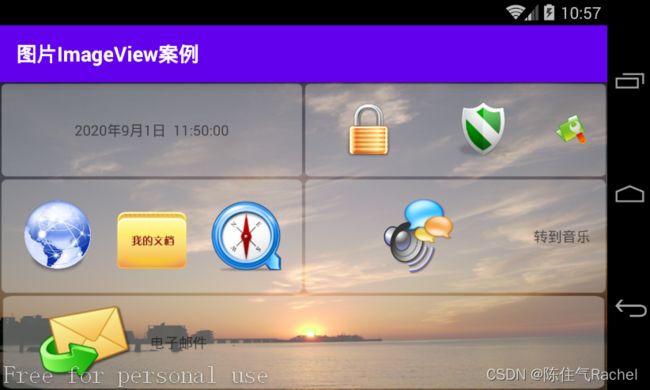
图片ImageView案例
效果图
代码
<TableLayout xmlns:android="http://schemas.android.com/apk/res/android"
    android:id="@+id/tableLayout1"
    android:layout_width="match_parent"
    android:layout_height="match_parent"
    android:background="@drawable/background">


    <TableRow
        android:id="@+id/tableRow1"
        android:layout_width="match_parent"
        android:layout_weight="1">
        <LinearLayout
            android:id="@+id/LinearLayout1"
            android:layout_width="wrap_content"
            android:layout_height="match_parent"
            android:layout_weight="1"
            android:background="@drawable/blockbg_big">
            <TextView
                android:id="@+id/textView1"
                android:text="2020年9月1日  11:50:00"
                android:layout_width="match_parent"
                android:layout_height="match_parent"
                android:gravity="center"/>
        LinearLayout>
        <LinearLayout
            android:id="@+id/LinearLayout2"
            android:layout_height="match_parent"
            android:layout_weight="1"
            android:background="@drawable/blockbg_big"
            android:padding="40px">
            <ImageView
                android:layout_width="wrap_content"
                android:layout_height="match_parent"
                android:src="@drawable/img01"
                android:id="@+id/imageView01"
                android:layout_weight="1"/>
            <ImageView
                android:layout_width="wrap_content"
                android:layout_height="match_parent"
                android:src="@drawable/img02"
                android:id="@+id/imageView02"
                android:layout_marginLeft="50px"
                android:layout_weight="1"/>
            <ImageView
                android:layout_width="wrap_content"
                android:layout_height="match_parent"
                android:src="@drawable/img03a"
                android:id="@+id/imageView03"
                android:layout_marginLeft="50px"
                android:layout_weight="1"/>
        LinearLayout>
    TableRow>

    <TableRow
        android:id="@+id/tableRow2"
        android:layout_width="match_parent"
        android:layout_weight="1">
        <LinearLayout
            android:id="@+id/LinearLayout3"
            android:layout_height="match_parent"
            android:layout_weight="1"
            android:background="@drawable/blockbg_big"
            android:padding="40px">
            <ImageView
                android:layout_width="wrap_content"
                android:layout_height="match_parent"
                android:src="@drawable/img04"
                android:id="@+id/imageView04"
                android:layout_weight="1"/>
            <ImageView
                android:layout_width="wrap_content"
                android:layout_height="match_parent"
                android:src="@drawable/img05"
                android:id="@+id/imageView05"
                android:layout_marginLeft="40px"
                android:layout_weight="1"/>
            <ImageView
                android:layout_width="wrap_content"
                android:layout_height="match_parent"
                android:src="@drawable/img06"
                android:id="@+id/imageView06"
                android:layout_marginLeft="40px"
                android:layout_weight="1"/>
        LinearLayout>
        <LinearLayout
            android:id="@+id/LinearLayout4"
            android:layout_height="match_parent"
            android:layout_weight="1"
            android:background="@drawable/blockbg_big">
            <ImageView
                android:layout_width="wrap_content"
                android:layout_height="match_parent"
                android:src="@drawable/img07"
                android:id="@+id/imageView07"
                android:layout_weight="1"
                android:layout_margin="40px"/>
            <TextView
                android:layout_width="wrap_content"
                android:layout_height="match_parent"
                android:text="转到音乐"
                android:id="@+id/textView2"
                android:gravity="center_vertical"
                android:layout_weight="3"/>
        LinearLayout>
    TableRow>

    <TableRow
        android:id="@+id/tableRow3"
        android:layout_width="match_parent"
        android:layout_weight="1"
        android:background="@drawable/blockbg_big">
        <LinearLayout
            android:id="@+id/LinearLayout5"
            android:layout_height="match_parent"
            android:layout_weight="1"
            android:layout_marginLeft="20px">
            <ImageView
                android:id="@+id/textView8"
                android:src="@drawable/email"
                android:layout_marginLeft="20px"
                android:layout_width="wrap_content"
                android:layout_height="match_parent"/>
            <TextView
                android:id="@+id/textView3"
                android:text="电子邮件"
                android:gravity="center_vertical"
                android:layout_width="wrap_content"
                android:layout_height="match_parent"/>
        LinearLayout>
    TableRow>
TableLayout>
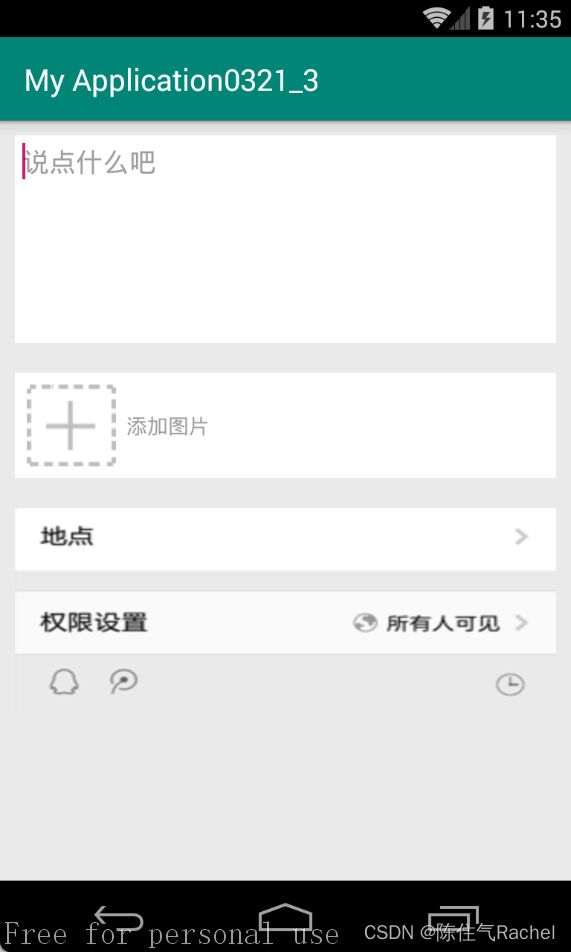
说点什么吧
<LinearLayout xmlns:android="http://schemas.android.com/apk/res/android"
    android:layout_width="match_parent"
    android:layout_height="match_parent"
    android:orientation="vertical"
    android:background="#eaeaea">

    <EditText
        android:layout_width="match_parent"
        android:layout_height="wrap_content"
        android:hint="说点什么吧"
        android:gravity="top"
        android:lines="6"
        android:background="#fff"
        android:padding="5dp"
        android:layout_margin="10dp"
        android:inputType="textMultiLine"/>
    <TextView
        android:layout_width="match_parent"
        android:layout_height="wrap_content"
        android:drawableLeft="@drawable/plus"
        android:hint="  添加图片"
        android:background="#fff"
        android:gravity="center_vertical"
        android:padding="8dp"
        android:layout_margin="10dp"/>
    <ImageView
        android:layout_width="match_parent"
        android:layout_height="wrap_content"
        android:src="@drawable/place"
        android:scaleType="fitXY"
        android:layout_margin="10dp"/>
LinearLayout>
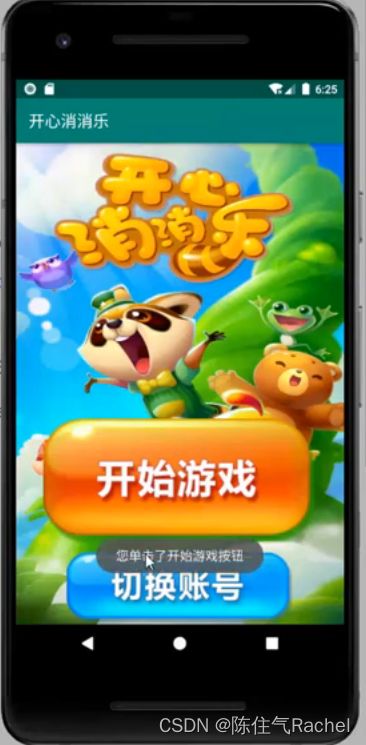
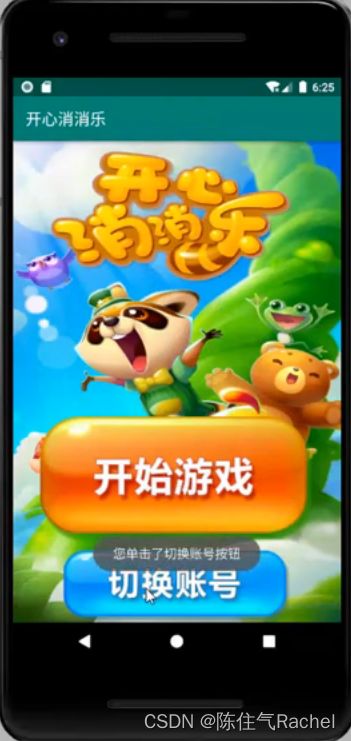
开心消消乐
<RelativeLayout xmlns:android="http://schemas.android.com/apk/res/android"
    android:layout_width="match_parent"
    android:layout_height="match_parent"
    >

    <ImageView
        android:layout_width="wrap_content"
        android:layout_height="wrap_content"
        android:background="@drawable/bg"/>
    <ImageView
        android:layout_width="wrap_content"
        android:layout_height="wrap_content"
        android:id="@+id/btn1"
        android:src="@drawable/bt_start"
        android:layout_centerHorizontal="true"
        android:layout_marginTop="270dp"/>
    <ImageView
        android:layout_width="wrap_content"
        android:layout_height="wrap_content"
        android:id="@+id/btn2"
        android:src="@drawable/bt_switch"
        android:layout_centerHorizontal="true"
        android:layout_alignParentBottom="true"
        />

RelativeLayout>
package com.example.homework2;

import androidx.appcompat.app.AppCompatActivity;

import android.os.Bundle;
import android.view.View;
import android.widget.Button;
import android.widget.ImageView;
import android.widget.Toast;

public class MainActivity extends AppCompatActivity {
    ImageView btn1,btn2;
    @Override
    protected void onCreate(Bundle savedInstanceState) {
        super.onCreate(savedInstanceState);
        setContentView(R.layout.activity_main);
        btn1=(ImageView)findViewById(R.id.btn1);
        btn2=(ImageView)findViewById(R.id.btn2);
        btn1.setOnClickListener(new View.OnClickListener(){
            @Override
            public void  onClick(View v){
                Toast.makeText(MainActivity.this, "您单击了开始游戏按钮", Toast.LENGTH_SHORT).show();
            }
        });
        btn2.setOnClickListener(new View.OnClickListener(){
            @Override
            public void  onClick(View v){
                Toast.makeText(MainActivity.this, "您单击了切换账号按钮", Toast.LENGTH_SHORT).show();
            }
        });
    }
}
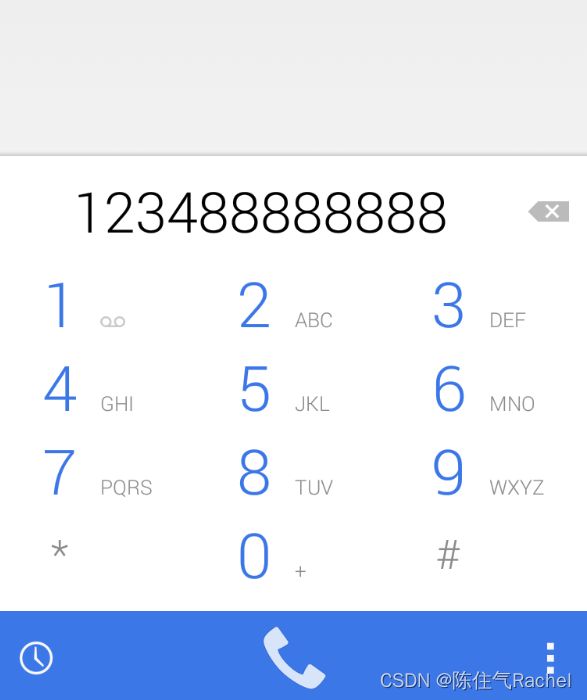
简陋拨号跳转
- 点击图片跳转页面


<RelativeLayout xmlns:android="http://schemas.android.com/apk/res/android"
    xmlns:app="http://schemas.android.com/apk/res-auto"
    xmlns:tools="http://schemas.android.com/tools"
    android:layout_width="match_parent"
    android:layout_height="match_parent"
    tools:context=".MainActivity">

    <TextView
        android:id="@+id/text1"
        android:layout_width="wrap_content"
        android:layout_height="wrap_content"
        android:text="技术支持:东莞职业技术学院"
        android:layout_marginTop="20dp"/>
    <TextView
        android:id="@+id/text2"
        android:layout_width="wrap_content"
        android:layout_height="wrap_content"
        android:text="网址:https://www.dgpt.edu.cn"
        android:layout_marginTop="10dp"
        android:layout_below="@+id/text1"/>
    <TextView
        android:id="@+id/text3"
        android:layout_width="wrap_content"
        android:layout_height="wrap_content"
        android:text="企业邮箱:[email protected]"
        android:layout_marginTop="10dp"
        android:layout_below="@+id/text2"/>
    <TextView
        android:id="@+id/text4"
        android:layout_width="wrap_content"
        android:layout_height="wrap_content"
        android:text="技术服务热线:1234_88888888"
        android:layout_marginTop="10dp"
        android:layout_below="@+id/text3"/>
    <ImageButton
        android:id="@+id/imageButton_phone"
        android:layout_width="wrap_content"
        android:layout_height="wrap_content"
        android:src="@drawable/phone"
        android:layout_below="@+id/text4"
        android:layout_marginTop="30dp"
        android:background="#fff"/>
    <ImageButton
        android:id="@+id/imageButton_sms"
        android:layout_width="wrap_content"
        android:layout_height="wrap_content"
        android:layout_toRightOf="@+id/imageButton_phone"
        android:layout_below="@+id/text4"
        android:layout_marginTop="30dp"
        android:layout_marginLeft="30dp"
        android:src="@drawable/sms"
        android:background="#fff"/>
RelativeLayout>
package com.example.myapplication4_2_1;

import androidx.appcompat.app.AppCompatActivity;

import android.content.Intent;
import android.net.Uri;
import android.os.Bundle;
import android.view.View;
import android.widget.ImageButton;

public class MainActivity extends AppCompatActivity {

    @Override
    protected void onCreate(Bundle savedInstanceState) {
        super.onCreate(savedInstanceState);
        setContentView(R.layout.activity_main);
        ImageButton imageButton = (ImageButton) findViewById(R.id.imageButton_phone);
        ImageButton imageButton1 = (ImageButton) findViewById(R.id.imageButton_sms);
        imageButton.setOnClickListener(listener);
        imageButton1.setOnClickListener(listener);
    }

    View.OnClickListener listener = new View.OnClickListener() {
        @Override
        public void onClick(View v) {
            Intent intent = new Intent();
            switch (v.getId()){
                case R.id.imageButton_phone:
                    intent.setAction(intent.ACTION_DIAL);
                    intent.setData(Uri.parse("tel:12348888888"));
                    startActivity(intent);
                    break;
                case R.id.imageButton_sms:
                    intent.setAction(intent.ACTION_SENDTO);
                    intent.setData(Uri.parse("smsto:88888888"));
                    intent.putExtra("sms_body","Welcome to Android!");
                    startActivity(intent);
            }
        }
    };
}
<manifest xmlns:android="http://schemas.android.com/apk/res/android"
    package="com.example.myapplication4_2_1">

    <uses-permission android:name="android.permission.CALL_PHONE"/>
    <uses-permission android:name="android.permission.SEND_SMS"/>

    <application
        android:allowBackup="true"
        android:icon="@mipmap/ic_launcher"
        android:label="@string/app_name"
        android:roundIcon="@mipmap/ic_launcher_round"
        android:supportsRtl="true"
        android:theme="@style/AppTheme">
        <activity android:name=".MainActivity">
            <intent-filter>
                <action android:name="android.intent.action.MAIN" />

                <category android:name="android.intent.category.LAUNCHER" />
            intent-filter>
        activity>
    application>

manifest>
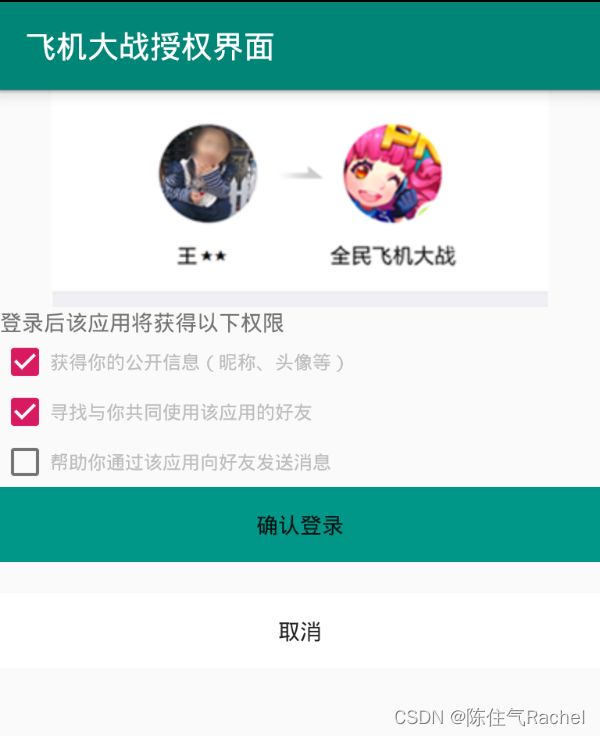
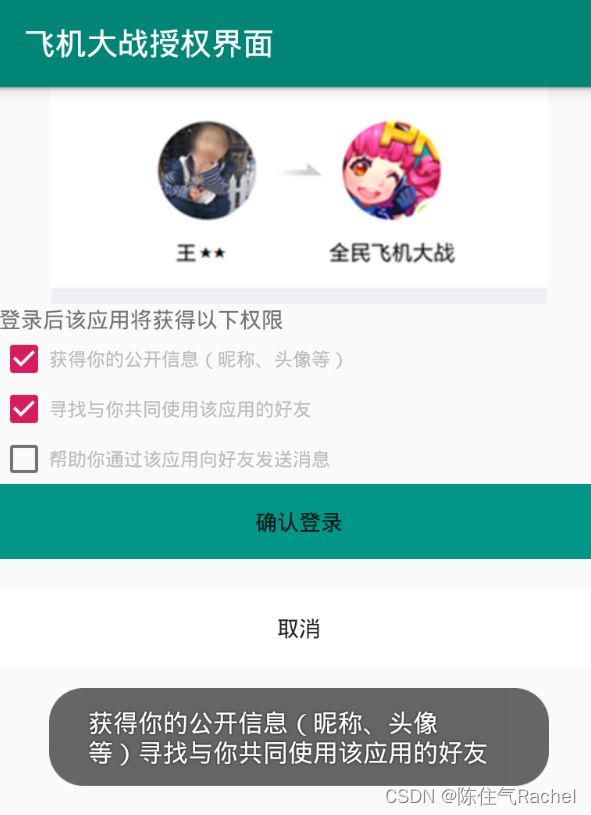
飞机大战授权界面
<LinearLayout xmlns:android="http://schemas.android.com/apk/res/android"
    xmlns:tools="http://schemas.android.com/tools"
    android:layout_width="match_parent"
    android:layout_height="match_parent"
    android:orientation="vertical"
    tools:context=".MainActivity">

    <ImageView
        android:layout_width="match_parent"
        android:layout_height="wrap_content"
        android:src="@drawable/image"/>
    <TextView
        android:layout_width="match_parent"
        android:layout_height="wrap_content"
        android:text="登录后该应用将获得以下权限" />
    <CheckBox
        android:id="@+id/cb_one"
        android:layout_width="match_parent"
        android:layout_height="wrap_content"
        android:text="获得你的公开信息(昵称、头像等)"
        android:textColor="#ccc"/>
    <CheckBox
        android:id="@+id/cb_two"
        android:layout_width="match_parent"
        android:layout_height="wrap_content"
        android:text="寻找与你共同使用该应用的好友"
        android:textColor="#ccc"/>
    <CheckBox
        android:id="@+id/cb_three"
        android:layout_width="match_parent"
        android:layout_height="wrap_content"
        android:text="帮助你通过该应用向好友发送信息"
        android:textColor="#ccc"/>
    <Button
        android:id="@+id/btn1"
        android:layout_width="match_parent"
        android:layout_height="wrap_content"
        android:text="确认登录"
        android:background="#009688"/>
    <Button
        android:id="@+id/btn2"
        android:layout_width="match_parent"
        android:layout_height="wrap_content"
        android:text="取消"
        android:background="#fff"
        android:layout_marginTop="20dp"/>
LinearLayout>
package com.example.myapplication4_3;

import androidx.appcompat.app.AppCompatActivity;

import android.os.Bundle;
import android.view.View;
import android.widget.Button;
import android.widget.CheckBox;
import android.widget.CompoundButton;
import android.widget.Toast;

public class MainActivity extends AppCompatActivity implements View.OnClickListener,CompoundButton.OnCheckedChangeListener{

    private CheckBox cb_one;
    private CheckBox cb_two;
    private CheckBox cb_three;
    private Button btn_send;
    private Button btn_two;

    @Override
    protected void onCreate(Bundle savedInstanceState) {
        super.onCreate(savedInstanceState);
        setContentView(R.layout.activity_main);

        cb_one = (CheckBox) findViewById(R.id.cb_one);
        cb_two = (CheckBox) findViewById(R.id.cb_two);
        cb_three = (CheckBox) findViewById(R.id.cb_three);
        btn_send = (Button) findViewById(R.id.btn1);
        btn_two = (Button) findViewById(R.id.btn2);

        cb_one.setOnCheckedChangeListener(this);
        cb_two.setOnCheckedChangeListener(this);
        cb_three.setOnCheckedChangeListener(this);
        btn_send.setOnClickListener(this);
        btn_two.setOnClickListener(this);
    }

    @Override
    public void onCheckedChanged(CompoundButton compoundButton, boolean b) {
//        if(compoundButton.isChecked()) Toast.makeText(this,compoundButton.getText().toString(),Toast.LENGTH_SHORT).show();
    }

    @Override
    public void onClick(View view) {
        String choose = "";
        if(cb_one.isChecked())choose += cb_one.getText().toString() + "";
        if(cb_two.isChecked())choose += cb_two.getText().toString() + "";
        if(cb_three.isChecked())choose += cb_three.getText().toString() + "";
        Toast.makeText(this,choose,Toast.LENGTH_SHORT).show();
    }
}
<resources>
    <string name="app_name">飞机大战授权界面string>
resources>
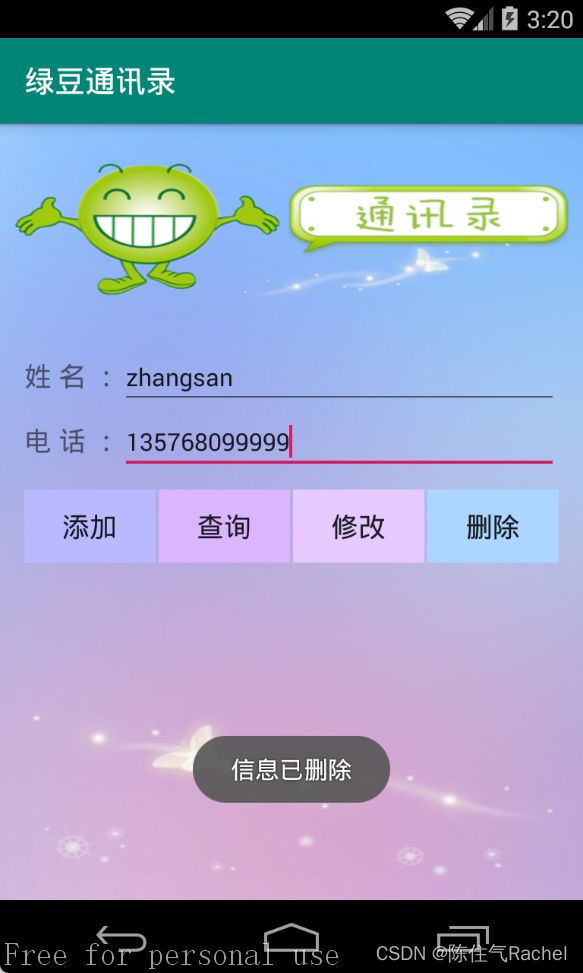
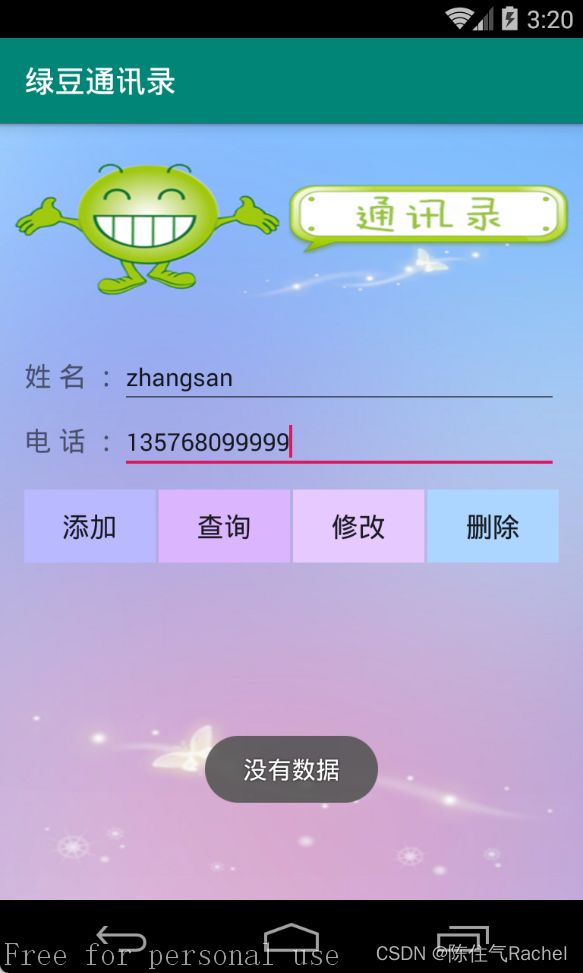
绿豆通讯录


activity_main.xml
<LinearLayout xmlns:android="http://schemas.android.com/apk/res/android"
    android:layout_width="match_parent"
    android:layout_height="match_parent"
    android:background="@drawable/bg"
    android:padding="16dp"
    android:orientation="vertical">
    <LinearLayout
        android:layout_marginTop="130dp"
        android:layout_width="match_parent"
        android:layout_height="wrap_content">
        <TextView
            android:layout_width="wrap_content"
            android:layout_height="wrap_content"
            android:text="姓 名 :"
            android:textSize="18sp"/>
        <EditText
            android:id="@+id/et_name"
            android:layout_width="match_parent"
            android:layout_height="wrap_content"
            android:hint="请输入姓名"
            android:textSize="16sp"/>
    LinearLayout>
    <LinearLayout
        android:layout_width="match_parent"
        android:layout_height="wrap_content"
        android:layout_marginBottom="10dp">
        <TextView
            android:layout_width="wrap_content"
            android:layout_height="wrap_content"
            android:text="电 话 :"
            android:textSize="18sp"/>
        <EditText
            android:id="@+id/et_phone"
            android:layout_width="match_parent"
            android:layout_height="wrap_content"
            android:hint="请输入手机号码"
            android:textSize="16sp"/>
    LinearLayout>
    <LinearLayout
        android:layout_width="match_parent"
        android:layout_height="wrap_content">
        <Button
            android:id="@+id/btn_add"
            android:layout_width="0dp"
            android:layout_height="wrap_content"
            android:layout_marginRight="2dp"
            android:layout_weight="1"
            android:background="#B9B9FF"
            android:text="添加"
            android:textSize="18sp"/>
        <Button
            android:id="@+id/btn_query"
            android:layout_width="0dp"
            android:layout_height="wrap_content"
            android:layout_marginRight="2dp"
            android:layout_weight="1"
            android:background="#DCB5FF"
            android:text="查询"
            android:textSize="18sp"/>
        <Button
            android:id="@+id/btn_update"
            android:layout_width="0dp"
            android:layout_height="wrap_content"
            android:layout_marginRight="2dp"
            android:layout_weight="1"
            android:background="#E6CAFF"
            android:text="修改"
            android:textSize="18sp"/>
        <Button
            android:id="@+id/btn_delete"
            android:layout_width="0dp"
            android:layout_height="wrap_content"
            android:layout_weight="1"
            android:background="#ACD6FF"
            android:text="删除"
            android:textSize="18sp"/>
    LinearLayout>
    <TextView
        android:id="@+id/tv_show"
        android:layout_width="match_parent"
        android:layout_height="wrap_content"
        android:layout_marginTop="25dp"
        android:textSize="20sp"/>
LinearLayout>
strings.xml
<resources>
    <string name="app_name">绿豆通讯录string>
resources>
MainActivity.java
package com.example.myapplication0425;

import androidx.appcompat.app.AppCompatActivity;

import android.content.ContentValues;
import android.content.Context;
import android.database.Cursor;
import android.database.sqlite.SQLiteDatabase;
import android.database.sqlite.SQLiteOpenHelper;
import android.os.Bundle;
import android.view.View;
import android.widget.Button;
import android.widget.EditText;
import android.widget.TextView;
import android.widget.Toast;

public class MainActivity extends AppCompatActivity implements View.OnClickListener {
    MyHelper myHelper;
    private EditText mEtName;
    private EditText mEtPhone;
    private TextView mTvShow;
    private Button mBtnAdd;
    private Button mBtnQuery;
    private Button mBtnUpdate;
    private Button mBtnDelete;

    @Override
    protected void onCreate(Bundle savedInstanceState) {
        super.onCreate(savedInstanceState);
        setContentView(R.layout.activity_main);
        myHelper = new MyHelper(this);
        init();
    }

    private void init() {
        mEtName = (EditText) findViewById(R.id.et_name);
        mEtPhone = (EditText) findViewById(R.id.et_phone);
       mTvShow = (TextView) findViewById(R.id.tv_show);
        mBtnAdd = (Button) findViewById(R.id.btn_add);
        mBtnQuery = (Button) findViewById(R.id.btn_query);
        mBtnUpdate = (Button) findViewById(R.id.btn_update);
        mBtnDelete = (Button) findViewById(R.id.btn_delete);
        mBtnAdd.setOnClickListener(this);
        mBtnQuery.setOnClickListener(this);
        mBtnUpdate.setOnClickListener(this);
        mBtnDelete.setOnClickListener(this);
    }

    @Override
    public void onClick(View v) {
        String name, phone;
        SQLiteDatabase db;
        ContentValues values;
        switch (v.getId()) {
            case R.id.btn_add:
                name = mEtName.getText().toString();
                phone = mEtPhone.getText().toString();
                db = myHelper.getWritableDatabase();
                values = new ContentValues();
                values.put("name", name);
                values.put("phone", phone);
                db.insert("information", null, values);
                Toast.makeText(this, "信息已添加", Toast.LENGTH_SHORT).show();
                db.close();
                break;
            case R.id.btn_query:
                db = myHelper.getReadableDatabase();
                Cursor cursor = db.query("information", null, null, null, null, null, null);
                if (cursor.getCount() == 0) {
                    mTvShow.setText("");
                    Toast.makeText(this, "没有数据", Toast.LENGTH_SHORT).show();
                } else {
                    cursor.moveToFirst();
                    mTvShow.setText("Name : " + cursor.getString(1) + " ;Tel :" + cursor.getString(2));
                }
                cursor.close();
                db.close();
                break;
            case R.id.btn_update:
                db = myHelper.getWritableDatabase();
                values = new ContentValues();
                values.put("phone", phone = mEtPhone.getText().toString());
                db.update("information", values, "name=?",
                        new String[]{mEtName.getText().toString()});
                Toast.makeText(this, "信息已修改", Toast.LENGTH_SHORT).show();
                db.close();
                break;
            case R.id.btn_delete:
                db = myHelper.getWritableDatabase();
                db.delete("information", null, null);
                Toast.makeText(this, "信息已删除", Toast.LENGTH_SHORT).show();
                mTvShow.setText("");
                db.close();
                break;
        }
    }

    class MyHelper extends SQLiteOpenHelper {
        public MyHelper(Context context) {
            super(context, "itcast.db", null, 1);
        }

        public void onCreate(SQLiteDatabase db) {
            db.execSQL("CREATE TABLE information(_id INTEGER PRIMARY KEY AUTOINCREMENT, name VARCHAR(20), phone VARCHAR(20))");
        }

        @Override
        public void onUpgrade(SQLiteDatabase db, int oldVersion, int newVersion) {

        }
    }
}
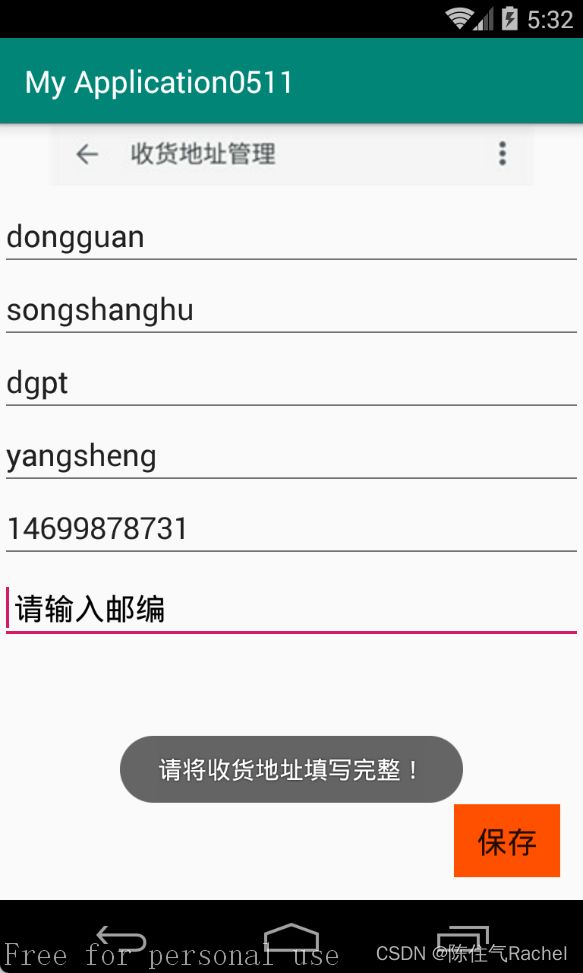
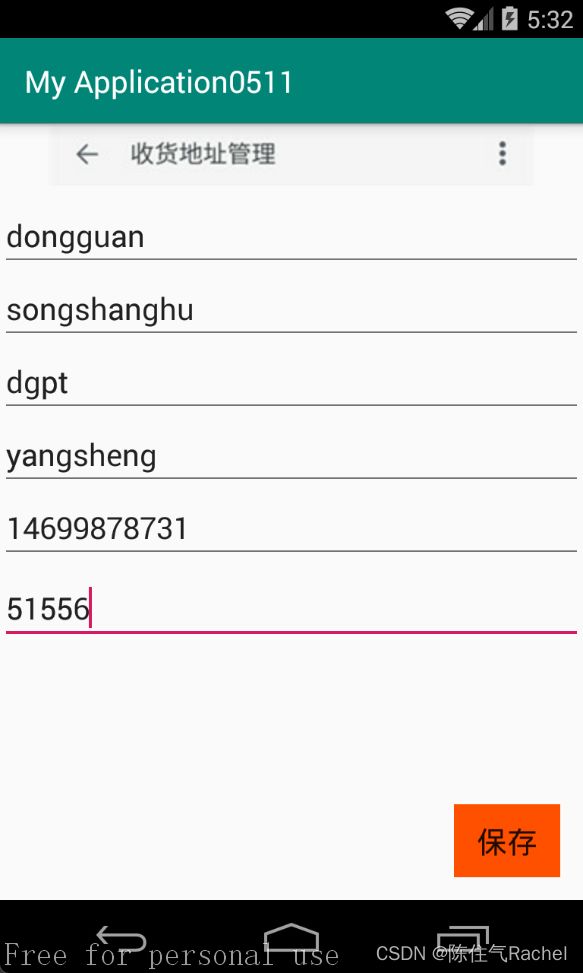
收货地址管理
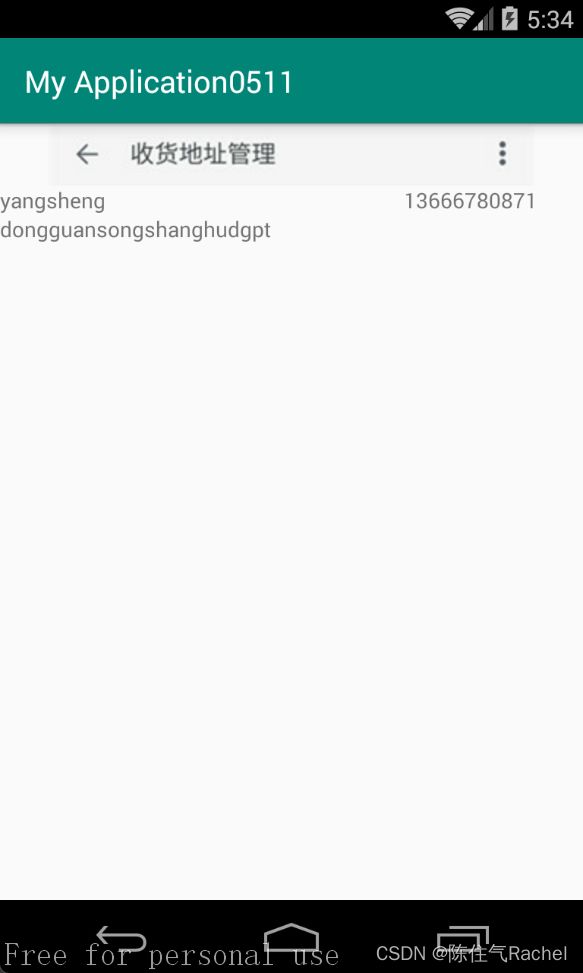
- android:layout_alignParentEnd :将控件结束位置与父控件的结束位置对齐
activity_main.xml
<RelativeLayout xmlns:android="http://schemas.android.com/apk/res/android"
    android:layout_width="match_parent"
    android:layout_height="match_parent">

    <ImageView
        android:layout_width="match_parent"
        android:layout_height="wrap_content"
        android:src="@drawable/top" />

    <EditText
        android:id="@+id/et_sitel"
        android:layout_width="match_parent"
        android:layout_height="wrap_content"
        android:hint=" 请输入所在地区"
        android:textSize="20sp"
        android:textColorHint="#000000"
        android:layout_marginTop="50dp"/>

    <EditText
        android:id="@+id/et_site2"
        android:layout_width="match_parent"
        android:layout_height="wrap_content"
        android:hint=" 请输入街道"
        android:textSize="20sp"
        android:textColorHint="#000000"
        android:layout_below="@+id/et_sitel" />

    <EditText
        android:id="@+id/et_site3"
        android:layout_width="match_parent"
        android:layout_height="wrap_content"
        android:hint=" 请输入详细地址"
        android:textSize="20sp"
        android:textColorHint="#000000"
        android:layout_below="@+id/et_site2" />

    <EditText
        android:id="@+id/et_name"
        android:layout_width="match_parent"
        android:layout_height="wrap_content"
        android:hint=" 请输入收货人姓名"
        android:textSize="20sp"
        android:textColorHint="#000000"
        android:layout_below="@+id/et_site3" />

    <EditText
        android:id="@+id/et_phone"
        android:layout_width="match_parent"
        android:layout_height="wrap_content"
        android:hint=" 请输入收货人联系电话"
        android:textSize="20sp"
        android:textColorHint="#000000"
        android:layout_below="@+id/et_name" />

    <EditText
        android:id="@+id/et_mail"
        android:layout_width="match_parent"
        android:layout_height="wrap_content"
        android:layout_marginTop="5dp"
        android:hint=" 请输入邮编"
        android:textSize="20sp"
        android:textColorHint="#000000"
        android:layout_below="@+id/et_phone" />
    <Button
        android:id="@+id/btn"
        android:layout_width="70dp"
        android:layout_height="wrap_content"
        android:text="保存"
        android:textSize="20sp"
        android:background="#ff5000"
        android:layout_marginRight="15dp"
        android:layout_marginBottom="15dp"
        android:layout_alignParentBottom="true"
        android:layout_alignParentRight="true"/>
RelativeLayout>
MainActivity.java
- bundle.putExtras(bundle);
package com.example.myapplication0511;

import android.content.Intent;
import android.os.Bundle;
import android.view.View;
import android.widget.Button;
import android.widget.EditText;
import android.widget.Toast;

import androidx.appcompat.app.AppCompatActivity;

public class MainActivity extends AppCompatActivity {

    @Override
    protected void onCreate(Bundle savedInstanceState) {
        super.onCreate(savedInstanceState);
        setContentView(R.layout.activity_main);
        Button btn = (Button) findViewById(R.id.btn);//获取保存按钮
        btn.setOnClickListener(new View.OnClickListener() {//为按钮添加单击监听事件
            @Override
            public void onClick(View v) {
                //获取输入的所在地区
                String site1 = ((EditText) findViewById(R.id.et_sitel)).getText().toString();
                //获取输入的所在街道
                String site2 = ((EditText) findViewById(R.id.et_site2)).getText().toString();
                //获取输入的详细地址
                String site3 = ((EditText) findViewById(R.id.et_site3)).getText().toString();
                //获取输入的用户信息
                String name = ((EditText) findViewById(R.id.et_name)).getText().toString();
                //获取输入的手机号码
                String phone = ((EditText) findViewById(R.id.et_phone)).getText().toString();
                //获取输入的邮箱
                String email = ((EditText) findViewById(R.id.et_mail)).getText().toString();
                if (!"".equals(site1) && !"".equals(site2) && !"".equals(site3) && !"".equals(name) && !"".equals(phone) && !"".equals(email)) {
                    //将输入的信息保存到Bundle中,通过Intent传递到另一个Activity当中并显示出来
                    Intent intent = new Intent(MainActivity.this, AddressAcitivity.class);
                    //创建并实例化一个Bundle对象
                    Bundle bundle = new Bundle();
                    bundle.putCharSequence("name", name);//保存姓名
                    bundle.putCharSequence("phone", phone);//保存手机号码
                    bundle.putCharSequence("site1", site1);//保存所在地区信息
                    bundle.putCharSequence("site2", site2);//保存所在街道信息
                    bundle.putCharSequence("site3", site3);//保存详细地址信息
                    intent.putExtras(bundle);//将Bundle对象添加到Intent对象中
                    startActivity(intent);// startActivity(intent);
                }else{
                    Toast.makeText(MainActivity.this,
                            "请将收货地址填写完整!",Toast.LENGTH_SHORT).show();
                }
            }
        });
    }
}
- 新建Empty Activity(不能直接新建JavaClass)
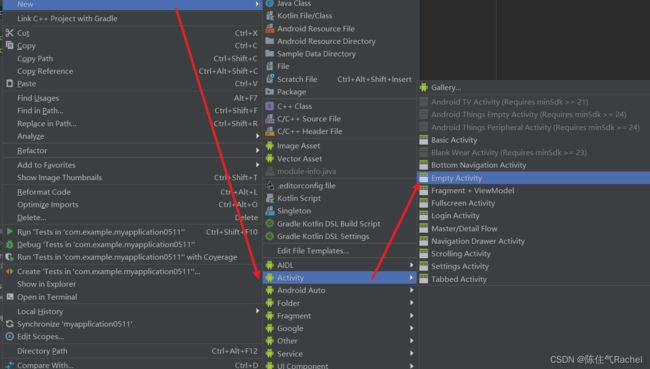
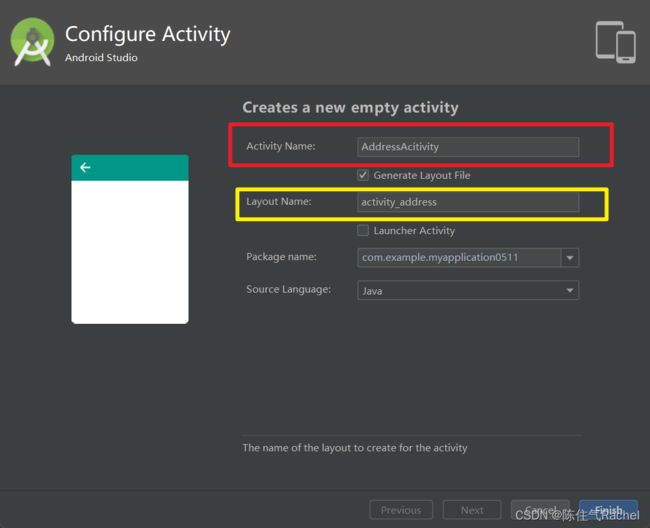
AddressAcitivity
package com.example.myapplication0511;

import android.content.Intent;
import android.os.Bundle;
import android.widget.TextView;

import androidx.appcompat.app.AppCompatActivity;

public class AddressAcitivity extends AppCompatActivity {

    @Override
    protected void onCreate(Bundle savedInstanceState) {
        super.onCreate(savedInstanceState);
        setContentView(R.layout.activity_address);
        Intent intent = getIntent();//获取Intent对象
        Bundle bundle = intent.getExtras();//获取传递的Bundle信息
        TextView name = (TextView) findViewById(R.id.name);//获取显示姓名的TextView组件
        name.setText(bundle.getString("name"));//获取输入的姓名并显示到TextView组件
        TextView phone = (TextView) findViewById(R.id.phone);//获取显示手机号码的TextView组件
        phone.setText(bundle.getString("phone"));//获取输入的手机号码并显示到TextView组件
        TextView site = (TextView) findViewById(R.id.site);//获取显示地址的TextView组件
        //获取输入的地址并显示到TextView组件中
        site.setText(bundle.getString("site1")
                + bundle.getString("site2") + bundle.get("site3"));
    }
}
activity_address.xml
<RelativeLayout xmlns:android="http://schemas.android.com/apk/res/android"
    android:layout_width="match_parent"
    android:layout_height="match_parent">
<ImageView
    android:id="@+id/top"
    android:layout_width="match_parent"
    android:layout_height="wrap_content"
    android:src="@drawable/top"/>
    <TextView
        android:id="@+id/name"
        android:layout_width="wrap_content"
        android:layout_height="wrap_content"
        android:layout_below="@+id/top"/>
    <TextView
        android:id="@+id/phone"
        android:layout_width="wrap_content"
        android:layout_height="wrap_content"
        android:layout_above="@+id/site"
        android:layout_alignParentRight="true"
        android:layout_marginRight="30dp"/>
    <TextView
        android:layout_width="wrap_content"
        android:layout_height="wrap_content"
        android:id="@+id/site"
        android:layout_below="@+id/name"/>
RelativeLayout>
淡入淡出轮播图
向左滑动鼠标,显示前一张图片,向右反之
activity_main.xml
<RelativeLayout xmlns:android="http://schemas.android.com/apk/res/android"
    xmlns:app="http://schemas.android.com/apk/res-auto"
    xmlns:tools="http://schemas.android.com/tools"
    android:layout_width="match_parent"
    android:layout_height="match_parent"
    tools:context=".MainActivity">

    <ViewFlipper
        android:layout_width="match_parent"
        android:layout_height="match_parent"
        android:id="@+id/flipper">
    ViewFlipper>

RelativeLayout>
在 src\main\res 文件夹创建 anim 文件夹
在src\main\res\anim这个路径下
anim_alpha_in.xml
<set xmlns:android="http://schemas.android.com/apk/res/android">
    <alpha android:fromAlpha="0"
        android:toAlpha="1"
        android:duration="4000"/>
set>
anim_alpha_out.xml
<set xmlns:android="http://schemas.android.com/apk/res/android">
    <alpha android:fromAlpha="1"
        android:toAlpha="0"
        android:duration="2000"/>
set>
MainActivity
package com.example.myapplication0523_2;

import androidx.appcompat.app.AppCompatActivity;

import android.os.Bundle;
import android.view.GestureDetector;
import android.view.MotionEvent;
import android.view.animation.Animation;
import android.view.animation.AnimationUtils;
import android.widget.ImageView;
import android.widget.ViewFlipper;

public class MainActivity extends AppCompatActivity implements GestureDetector.OnGestureListener {
    ViewFlipper flipper;                            //定义ViewFlipper
    GestureDetector detector;                       //定义手势检测器
    Animation[] animation = new Animation[2];       //定义动画数组,为ViewFlipper指定切换动画
    final int distance = 50;                        //定义手势动作两点之间最小距离
    //定义图片数组
    private int[] images = new int[]{
            R.drawable.img01, R.drawable.img02, R.drawable.img03,
            R.drawable.img04, R.drawable.img05, R.drawable.img06,
            R.drawable.img07, R.drawable.img08, R.drawable.img09,
    };

    @Override
    protected void onCreate(Bundle savedInstanceState) {
        super.onCreate(savedInstanceState);
        setContentView(R.layout.activity_main);
        detector = new GestureDetector(this, this);    //创建手势检测器
        flipper = (ViewFlipper) findViewById(R.id.flipper);             //获取ViewFlipper
        for (int i = 0; i < images.length; i++) {
            ImageView imageView = new ImageView(this);
            imageView.setImageResource(images[i]);
            flipper.addView(imageView);     //加载图片
        }
        //初始化动画数组
        animation[0] = AnimationUtils.loadAnimation(this, R.anim.anim_alpha_in);    //淡入动画
        animation[1] = AnimationUtils.loadAnimation(this, R.anim.anim_alpha_out);   //淡出动画
    }


    @Override
    public boolean onDown(MotionEvent e) {
        return false;
    }

    @Override
    public void onShowPress(MotionEvent e) {

    }

    @Override
    public boolean onSingleTapUp(MotionEvent e) {
        return false;
    }

    @Override
    public boolean onScroll(MotionEvent e1, MotionEvent e2, float distanceX, float distanceY) {
        return false;
    }

    @Override
    public void onLongPress(MotionEvent e) {

    }

    public boolean onFling(MotionEvent e1, MotionEvent e2, float velocityX, float velocityY) {
        //为flipper设置切换的动画效果
        flipper.setInAnimation(animation[0]);
        flipper.setOutAnimation(animation[1]);
        //如果第一个触点时间的X坐标到第二个触点事件的X坐标的距离超过distance就是从右向左滑动
        if (e1.getX() - e2.getX() > distance) {
            flipper.showPrevious();
            return true;
            //如果第二个触点事件的x坐标到第一个触点事件的x坐标的距离超过distance就是从左向右滑动
        } else if (e2.getX() - e1.getX() > distance) {
            flipper.showNext();
            return true;
        }
        return false;
    }

    public boolean onTouchEvent(MotionEvent event) {
        //将当前Activity上的触碰事件交给GestureDetector处理
        return detector.onTouchEvent(event);
    }
}
电子相册
效果图
思路
需要写5个文件:
- 一个为主界面BigImage.java
- (对应的布局文件是activity_main.xml)
- 一个为主界面跳转后的界面BigActivity.java
- (对应的布局文件是big.xml)
- 最后一个文件是注册文件,在application结束符之前,上一个activity结束符之后,写上
name是必不可少的,label可以省略 - 主界面布局用的是
GridView,其中numColumns表示有几列- 并且需要在BigImage.java中配合适配器
BaseAdapter使用,且用数组的形式载入12张图片
- 并且需要在BigImage.java中配合适配器
源码
activity_main.xml
<LinearLayout xmlns:android="http://schemas.android.com/apk/res/android"
    android:layout_width="match_parent"
    android:layout_height="match_parent"
    android:orientation="vertical">
<GridView
    android:id="@+id/gridView1"
    android:layout_width="match_parent"
    android:layout_height="match_parent"
    android:layout_marginTop="10px"
    android:horizontalSpacing="3px"
    android:verticalSpacing="3px"
    android:numColumns="4" />
LinearLayout>
big.xml
<LinearLayout xmlns:android="http://schemas.android.com/apk/res/android"
    android:orientation="vertical" android:layout_width="match_parent"
    android:layout_height="match_parent"
    android:gravity="center_horizontal">
<ImageView
    android:id="@+id/imageView1"
    android:paddingTop="6px"
    android:layout_width="wrap_content"
    android:layout_height="wrap_content"
    android:src="@drawable/img01"/>
    <Button
        android:id="@+id/button1"
        android:layout_width="wrap_content"
        android:layout_height="wrap_content"
        android:text="返回"/>
LinearLayout>
BigImage.java
package com.example.myapplication0620;

import android.content.Intent;
import android.os.Bundle;
import android.view.View;
import android.view.ViewGroup;
import android.widget.AdapterView;
import android.widget.BaseAdapter;
import android.widget.GridView;
import android.widget.ImageView;

import androidx.appcompat.app.AppCompatActivity;

public class BigImage extends AppCompatActivity {
    public int[] imageId = new int[]{R.drawable.img01, R.drawable.img02, R.drawable.img03, R.drawable.img04, R.drawable.img05, R.drawable.img06,
            R.drawable.img07, R.drawable.img08, R.drawable.img09, R.drawable.img10, R.drawable.img11, R.drawable.img12
    };

    //定义并初始化保存图片id的数组
    @Override
    protected void onCreate(Bundle savedInstanceState) {
        super.onCreate(savedInstanceState);
        setContentView(R.layout.activity_main);//设置该Activity使用的布局,对应的布局就是activity_main.xml
        GridView gridview = (GridView) findViewById(R.id.gridView1);//获取GridView组件
        BaseAdapter adapter = new BaseAdapter() {

            /*
            BaseAdapter 简单理解就是adapter是view和数据的桥梁。
            在一个ListView或者GridView中,
            你不可能手动给每一个格子都新建一个view,
            所以这时候就需要Adapter的帮忙,
            它会帮你自动绘制view并且填充数据。
            BaseAdapter是最基础的Adapter类,也是最实用最常用的一个类。
            */

            /*
             * 功能:获得数量
             */
            @Override
            public int getCount() {
                return imageId.length;
            }

            /*
             * 功能:获得当前选项
             */
            @Override
            public Object getItem(int position) {
                return position;
            }

            /*
             * 功能:获得当前选项的ID
             */
            @Override
            public long getItemId(int position) {
                return position;
            }

            @Override
            public View getView(int position, View convertView, ViewGroup parent) {
                ImageView imageview;//声明ImageView的对象
                if (convertView == null) {
                    imageview = new ImageView(BigImage.this);//实例化ImageView的对象
                    /***************** 设置图像的宽度和高度 *****************/
                    imageview.setAdjustViewBounds(true);//是否保持宽高比
                    imageview.setMaxWidth(180);
                    imageview.setMaxHeight(135);
                    /*******************************************************/
                    imageview.setPadding(5, 5, 5, 5);//设置ImageView的内边距
                } else {
                    imageview = (ImageView) convertView;
                }
                imageview.setImageResource(imageId[position]);//为ImageView设置要显示的图片
                return imageview;
            }

        };
        gridview.setAdapter(adapter);//将适配器与GridView关联
        gridview.setOnItemClickListener(new AdapterView.OnItemClickListener() {
            @Override
            public void onItemClick(AdapterView<?> parent, View view, int position, long id) {
                Intent intent = new Intent(BigImage.this, BigActivity.class);
                Bundle bundle = new Bundle();//创建并实例化一个Bundle对象
                bundle.putInt("imgId", imageId[position]);//保存图片ID
                intent.putExtras(bundle);//将Bundle对象添加到Intent对象中
                startActivity(intent);
            }
        });
    }
}
BigActivity.java
package com.example.myapplication0620;

import android.content.Intent;
import android.os.Bundle;
import android.view.View;
import android.view.ViewGroup;
import android.widget.AdapterView;
import android.widget.BaseAdapter;
import android.widget.Button;
import android.widget.GridView;
import android.widget.ImageView;

import androidx.appcompat.app.AppCompatActivity;

public class BigActivity extends AppCompatActivity {

    @Override
    protected void onCreate(Bundle savedInstanceState) {
        super.onCreate(savedInstanceState);
        setContentView(R.layout.big);//设置使用的布局文件 big.xml
        Intent intent=getIntent();//获取Intent对象
        Bundle bundle=intent.getExtras();//获取传递过来的数据包
        int imgId=bundle.getInt("imgId");
        ImageView iv=(ImageView)findViewById(R.id.imageView1);
        iv.setImageResource(imgId);//设置要显示的图片

        Button button=(Button)findViewById(R.id.button1);
        button.setOnClickListener(new View.OnClickListener() {
            @Override
            public void onClick(View view) {
                finish();//返回
            }
        });
    }
}
AndroidManifest.xml
<manifest xmlns:android="http://schemas.android.com/apk/res/android"
    package="com.example.myapplication0620">

    <application
        android:allowBackup="true"
        android:icon="@mipmap/ic_launcher"
        android:label="@string/app_name"
        android:roundIcon="@mipmap/ic_launcher_round"
        android:supportsRtl="true"
        android:theme="@style/AppTheme">
        <activity android:name=".BigImage">
            <intent-filter>
                <action android:name="android.intent.action.MAIN" />

                <category android:name="android.intent.category.LAUNCHER" />
            intent-filter>
        activity>

        <activity
            android:name=".BigActivity"
            android:label="原图" />
    application>

manifest>
川菜菜谱
需要写七个文件
activity_main.xml (用FrameLayout布局)
<LinearLayout xmlns:android="http://schemas.android.com/apk/res/android"
    xmlns:tools="http://schemas.android.com/tools"
    android:layout_width="match_parent"
    android:layout_height="match_parent"
    android:orientation="horizontal"
    tools:context=".MainActivity">

    <FrameLayout
        android:id="@+id/menu"
        android:layout_width="0dp"
        android:layout_height="match_parent"
        android:layout_weight="1">FrameLayout>

    <FrameLayout
        android:id="@+id/foodcontent"
        android:layout_width="0dp"
        android:layout_height="match_parent"
        android:layout_weight="3">FrameLayout>
LinearLayout>
fragment_content.xml (fagment内容)
<LinearLayout xmlns:android="http://schemas.android.com/apk/res/android"
    android:layout_width="match_parent"
    android:layout_height="match_parent"
    android:orientation="vertical" >
    <TextView
        android:id="@+id/content"
        android:layout_width="wrap_content"
        android:layout_height="wrap_content"
        android:layout_alignParentLeft="true"
        android:layout_centerVertical="true"
        android:textSize="18sp"
        android:layout_marginLeft="10dp"/>
LinearLayout>
fragment_menu.xml(fragment菜单)
<LinearLayout xmlns:android="http://schemas.android.com/apk/res/android"
    android:layout_width="match_parent"
    android:layout_height="match_parent"
    android:orientation="vertical" >
    <ListView
        android:id="@+id/menulist"
        android:layout_width="match_parent"
        android:layout_height="wrap_content"/>
LinearLayout>
item_list.xml
<RelativeLayout xmlns:android="http://schemas.android.com/apk/res/android"
    android:layout_width="match_parent"
    android:layout_height="wrap_content">
    <ImageView
        android:id="@+id/food_icon"
        android:layout_width="100dp"
        android:layout_height="40dp"
        android:layout_centerInParent="true"
        android:layout_margin="10dp"/>
    <TextView
        android:id="@+id/food_name"
        android:layout_width="match_parent"
        android:layout_height="wrap_content"
        android:layout_below="@+id/food_icon"
        android:gravity="center"/>
RelativeLayout>
ContentFragment
package com.example.myapplication0620_2;

import android.app.Activity;
import android.app.Fragment;
import android.os.Bundle;
import android.view.LayoutInflater;
import android.view.View;
import android.view.ViewGroup;
import android.widget.TextView;

public class ContentFragment extends Fragment {
    private View view;
    private TextView mContent;

    @Override
    public void onAttach(Activity activity) {
        super.onAttach(activity);
    }

    @Override
    public View onCreateView(LayoutInflater inflater, ViewGroup container,
                             Bundle savedInstanceState) {
        //将布局文件解析出来
        view = inflater.inflate(R.layout.fragment_content, container, false);
        if (view != null) {   //如果view不为空
            initView();
        }
        //获取Activity中的设置文字
        setText(((MainActivity) getActivity()).getSettingText()[0]);
        return view;
    }

    public void initView() {
        mContent = (TextView) view.findViewById(R.id.content);
    }

    public void setText(String text) {
        mContent.setText(text);
    }
}
MenuFragment
package com.example.myapplication0620_2;

import android.annotation.SuppressLint;
import android.app.Fragment;
import android.os.Bundle;
import android.view.LayoutInflater;
import android.view.View;
import android.view.ViewGroup;
import android.widget.AdapterView;
import android.widget.BaseAdapter;
import android.widget.ImageView;
import android.widget.ListView;
import android.widget.TextView;

@SuppressLint("NewApi")
public class MenuFragment extends Fragment {
    private View view;
    private int[] settingicon;
    private String[] foodNames;
    private String[] settingText;
    private ListView mListView;

    @Override
    public View onCreateView(LayoutInflater inflater, ViewGroup container,
                             Bundle savedInstanceState) {
        //解析布局
        view = inflater.inflate(R.layout.fragment_menu, container, false);
        //获取Acitivty实例对象
        MainActivity activity = (MainActivity) getActivity();
        //获取Activity中的图标数组
        settingicon = activity.getIcons();
        //获取Activity中定义的川菜名称
        foodNames = activity.getNames();
        //获取Activity中的设置文字数组
        settingText = activity.getSettingText();
        if (view != null) { // 如果view不为空
            initView();
        }
        //为ListView设置条目监听
        mListView.setOnItemClickListener(new AdapterView.OnItemClickListener() {
            @Override
            public void onItemClick(AdapterView<?> parent, View view, int position,
                                    long id) {
                //点击左侧的川菜列表item,右侧菜品做法内容相应改变逻辑
                //通过Activity实例获取另一个Fragment实例
                ContentFragment listFragment = (ContentFragment) ((MainActivity)
                        getActivity()).getFragmentManager().findFragmentById(R.id.foodcontent);
                //设置菜品类表点击位置对应的菜品做法的Fragment文字
                listFragment.setText(settingText[position]);
            }
        });
        return view;
    }

    //初始化控件的方法
    private void initView() {
        mListView = (ListView) view.findViewById(R.id.menulist);
        if (settingicon != null) {
            mListView.setAdapter(new MyAdapter());
        }
    }

    //适配器
    class MyAdapter extends BaseAdapter {
        @Override
        public int getCount() {
            return settingicon.length;
        }

        @Override
        public Object getItem(int position) {
            return settingicon[position];
        }

        @Override
        public long getItemId(int position) {
            return position;
        }

        @Override
        public View getView(int position, View convertView, ViewGroup parent) {
            convertView = View.inflate(getActivity(), R.layout.item_list, null);
            ImageView mNameTV = (ImageView) convertView
                    .findViewById(R.id.food_icon);
            mNameTV.setBackgroundResource(settingicon[position]);
            TextView mFoodName = (TextView) convertView.findViewById
                    (R.id.food_name);
            mFoodName.setText(foodNames[position]);
            return convertView;
        }
    }
}
MainActivity
package com.example.myapplication0620_2;

import android.app.Activity;
import android.app.FragmentTransaction;
import android.os.Bundle;

public class MainActivity extends Activity {
    private FragmentTransaction beginTransaction;
    //设置文字
    private String[] settingText = {"" +
            "1.将鸡蛋清和淀粉调料调匀成糊,涂抹在肉片上。\n" +
            "2.将花椒、干辣椒慢火炸,待辣椒呈金黄色捞出切成细末。\n" +
            "3.用锅中油爆炒豆瓣辣酱,然后将白菜叶,调料放入。\n" +
            "4.随即放入 肉片,再炖几分钟,肉片熟后,将肉片盛起,将辣椒、花椒末撒上。\n" +
            "5.用植物油烧开,淋在肉片上,即可使麻、辣、浓香四溢。",
            "1、豆腐切丁,香葱、生姜、大蒜、干辣椒切细末备用。\n" +
                    "2、锅内放入油烧热, 先爆香葱末、生姜末、大蒜末、干辣椒末和豆瓣酱,再放入猪肉馅炒熟。\n" +
                    "3、加入适量水,煮开后加入豆腐丁、酱油、白糖煮3分钟。\n" +
                    "4、再用水淀粉勾芡后盛入盘中。\n" +
                    "5、烧热香油,爆香花椒,将花椒油淋在豆腐上即可。\n"};
    //设置图标
    private int[] settingicons = {R.drawable.boiledmeat, R.drawable.mapoytofu};
    private String[] foodNames = {"水煮肉片", "麻婆豆腐"};

    //获取图标数组的方法
    public int[] getIcons() {
        return settingicons;
    }

    //获取设置菜品名称的方法
    public String[] getNames() {
        return foodNames;
    }

    //获取设置文字的方法
    public String[] getSettingText() {
        return settingText;
    }

    @Override
    protected void onCreate(Bundle savedInstanceState) {
        super.onCreate(savedInstanceState);
        setContentView(R.layout.activity_main);
        //创建Fragment
        ContentFragment contentFragment = new ContentFragment();
        MenuFragment menuFragment = new MenuFragment();
        //获取事务
        beginTransaction = getFragmentManager().beginTransaction();
        //添加Fragment
        beginTransaction.replace(R.id.foodcontent, contentFragment);
        beginTransaction.replace(R.id.menu, menuFragment);
        //提交事务
        beginTransaction.commit();
    }
}