制作自己想要的曲线以达成目标效果【shader】
在创作shader时经常需要一些曲线帮助实现效果,比如我想要一个间隔波动的曲线,在想象中我希望他是这个样子的
 并且,我希望间隔时间和波动时间都可受我调控且互不影响
推荐使用这样的一个数学网站去逐步实现想要获得的曲线Graphtoy
网站中的x在着色语言中多为时间变量,网站中的t变量我认为多为提供预览曲线变化的功能。
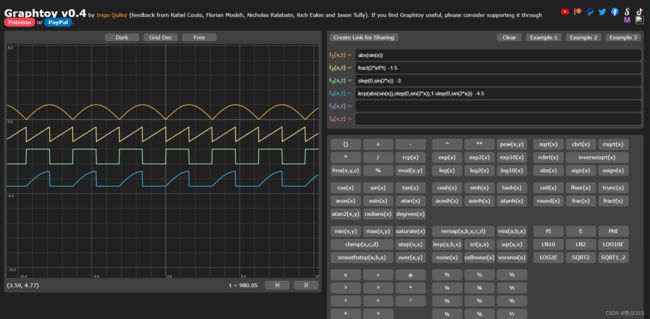
首先这样的波动比较好实现,利用sin,abs,step和lerp即可。
Share Link:
Graphtoy
但是这样并不能够达到目的,如果改动这个式子中的唯一变量x,变化的是波动时间和间隔时间整体。
就像这样子,给x乘以Π缩短至单位周期。
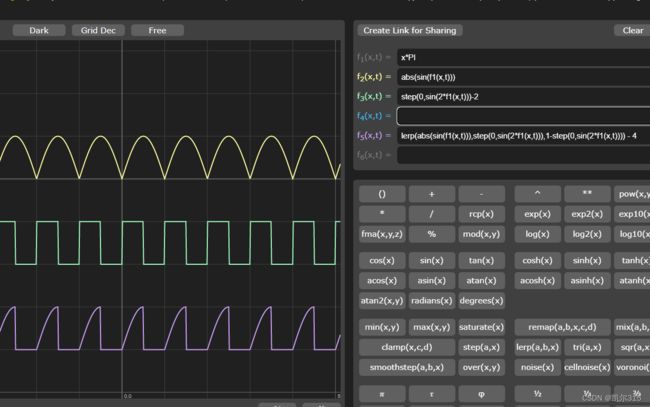
利用取余和step,可以实现控制间隔区间的曲线。
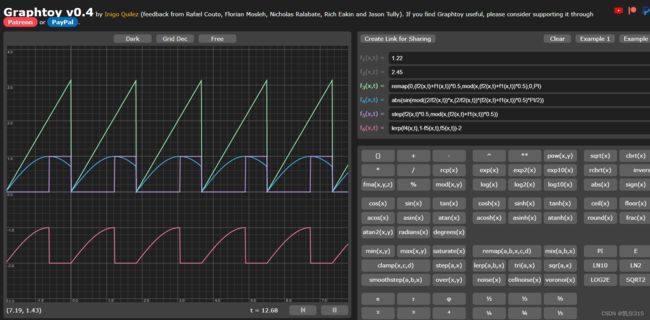
将Π归为单位1,所以一个上升弧度单位是半格
定义f1是间隔数
定义f2是持续数
f3:首先映射f1到f2内的增长为直线0~Π
f4:利用f1、f2计算周期和取余,创建取余周期曲线
f5:利用step和取余,区分出波动段和间隔段
f6:lerp两个曲线,获得最终的值(注意随后的-2是为了让图像移动到下方以方便观察)
Share Link:
Graphtoy
这里的自定义函数实在太少看起来很臃肿,貌似不能自由添加。
总之这样就实现了一个根据数值可随意调整的上升间隔曲线。
接下来把他转换到代码中。
            _RiseTime ("RiseTime ", range (0,10)) = 0
            _GapTime ("GapTime ", range (0,10)) = 0

            float _RiseTime;
            float _GapTime;

            float Myfunction1()
            {
                return  abs(sin(fmod((2/_RiseTime)*_Time.y,(2/_RiseTime)*(_RiseTime+_GapTime)*0.5)*UNITY_PI/2));
            }
            float Myfunction2()
            {
                return  step(_RiseTime*0.5,fmod(_Time.y,(_RiseTime+_GapTime)*0.5));
            }
            float Myfunction3()
            {
                return  lerp(Myfunction1(),1-Myfunction2(),Myfunction2());
            }
以颜色表示上升四单位间隔两单位就是
在一些静态的情况下可以使用Gradiet来替代制作曲线方程
为什么说是在静态的情况下?
因为Gradient的定义非常复杂,下面是这样一个Gradient的定义
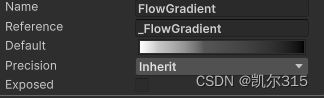
static Gradient _FlowGradient = {0,4,2,{float4(1,1,1,0),float4(0.5676471,0.5676471,0.5676471,0.1088273),float4(0.09179813,0.09179813,0.09179813,0.3882353),float4(0,0,0,1),float4(0,0,0,0),float4(0,0,0,0),float4(0,0,0,0),float4(0,0,0,0)},{float2(1,0),float2(1,0.9941252),float2(0,0),float2(0,0),float2(0,0),float2(0,0),float2(0,0),float2(0,0)}};而且shader在对外开放的属性中没有Gradient属性。读取Gradient如下。
        void Unity_SampleGradientV1_float(Gradient Gradient, float Time, out float4 Out)
        {
            float3 color = Gradient.colors[0].rgb;
            [unroll]
            for (int c = 1; c < Gradient.colorsLength; c++)
            {
                float colorPos = saturate((Time - Gradient.colors[c - 1].w) / (Gradient.colors[c].w - Gradient.colors[c - 1].w)) * step(c, Gradient.colorsLength - 1);
                color = lerp(color, Gradient.colors[c].rgb, lerp(colorPos, step(0.01, colorPos), Gradient.type));
            }
        #ifdef UNITY_COLORSPACE_GAMMA
            color = LinearToSRGB(color);
        #endif
            float alpha = Gradient.alphas[0].x;
            [unroll]
            for (int a = 1; a < Gradient.alphasLength; a++)
            {
                float alphaPos = saturate((Time - Gradient.alphas[a - 1].y) / (Gradient.alphas[a].y - Gradient.alphas[a - 1].y)) * step(a, Gradient.alphasLength - 1);
                alpha = lerp(alpha, Gradient.alphas[a].x, lerp(alphaPos, step(0.01, alphaPos), Gradient.type));
            }
            Out = float4(color, alpha);
        }
或许可以使用传入数组的方式,从脚本中创建曲线对象,动态改变读取值。但其一是精度问题、其二这也需要计算并动态改变曲线。所以想要什么曲线直接去函数计算我认为是一种合理方式。
-------------------------------------------------------------------------------------------------------------
后记:
在浏览Unity官方示例的时候,发现示例中使用了一种巧妙的解决办法
首先示例使用这样一个ScriptableObject去转化Gradient到textuer2D再传入shader的方法
using System;
using System.Collections.Generic;
using UnityEngine;

[CreateAssetMenu(fileName = "GradientTexture", menuName = "Gradient Texture", order = 310)]
public class GradientTexture : ScriptableObject
{
    [Delayed]
    public int width = 64;

    public List gradients = new List();
    private Texture2D _texture;

    private void OnEnable()
    {
        if(_texture == null && gradients.Count > 0)
            Generate();
    }

    [ContextMenu("Generate")]
    private void Generate()
    {
        // create texture that is width x gradients.Count
        // for each gradient, draw a line from left to right with the gradient
        // save to disk

        if(_texture != null)
            DestroyImmediate(_texture);
        _texture = new Texture2D(width, gradients.Count)
        {
            name = name
        };

        for (int i = 0; i < gradients.Count; i++)
        {
            var gradient = gradients[i];
            for (int x = 0; x < width; x++)
            {
                var color = gradient.Evaluate((float)x / width);
                _texture.SetPixel(x, i, color);
            }
        }
        _texture.Apply();

        #if UNITY_EDITOR
        // delayed call to save the icon
        UnityEditor.EditorApplication.delayCall += SaveIcon;
        #endif
    }

    private void OnValidate()
    {
        if(gradients.Count > 0)
            Generate();
    }

    [ContextMenu("Save")]
    private void SaveToDisk()
    {
#if UNITY_EDITOR
        // save to disk the texture using the AssetDatabase API
        var path = UnityEditor.AssetDatabase.GetAssetPath(this);
        path = path.Replace(".asset", ".png");
        var bytes = _texture.EncodeToPNG();
        System.IO.File.WriteAllBytes(path, bytes);
        UnityEditor.AssetDatabase.SaveAssets();
        UnityEditor.AssetDatabase.Refresh();

#endif
    }

    #if UNITY_EDITOR

    private void SaveIcon()
    {
        // use _texture as the icon for this object
        var path = UnityEditor.AssetDatabase.GetAssetPath(this);

        // add as sub asset or replace existing
        var icon = UnityEditor.AssetDatabase.LoadAssetAtPath(path);

        if (icon == null)
        {
            UnityEditor.AssetDatabase.AddObjectToAsset(_texture, this);
        }
        else
        {
            UnityEditor.EditorUtility.CopySerialized(_texture, icon);
        }

        UnityEditor.AssetDatabase.SaveAssets();
        UnityEditor.AssetDatabase.Refresh();
    }

    #endif

}
运行SaveToDisk后去根据Gradient生成一张texture2D,以此传入shader属性。