spring-boot学习:二十、spring-boot集成RabbitMQ
由于JMS存在跨语言跨平台的缺陷,所以出现了AMQP(Advanced Message Queuing Protocol),一个提供统一消息服务的应用层标准高级消息队列协议,代表RabbitMQ
一、下载安装RabbitMQ
-
安装
从https://www.rabbitmq.com/download.html下载RabbitMQ
由于RabbitMQ是用Erlang语言编写的,安装RabbitMQ需要先安装Erlang运行平台
http://www.erlang.org/downloads配置环境变量:
ERLANG_HOME:D:\software\erl10.4 (安装后可能已自动配置)
path加入%ERLANG_HOME%\bin\erl.exe重启计算机
-
安装管理界面management ui
参考:https://www.rabbitmq.com/management.html
运营命令:rabbitmq-plugins enable rabbitmq_management -
配置用户权限
1) 通过命令rabbitmqctl.bat list_users查看用户

2)添加用户
rabbitmqctl.bat add_user root root

3)设置角色
rabbitmqctl.bat set_user_tags root administrator
4)设置权限
rabbitmqctl.bat set_permissions -p / root “." ".” “.*”
5)使用账号登录

6)删除用户
rabbitmqctl delete_user username
7) 修改改密码
rabbimqctl change_password username newpassword
二、RabbitMQ详解
参考:
https://www.rabbitmq.com/getstarted.html
https://www.cnblogs.com/dongkuo/p/6001791.html 依托于官方文档详细解释
https://www.jianshu.com/p/80eefec808e5
0. 概念
消息队列服务一般由生产者、消息队列和消费者组成,RabbitMQ加入了交换机 (Exchange)的概念,这样生产者和队列就没有直接联系, 转而变成生产者把消息给交换器, 交换器根据调度策略再把消息再给队列。
1)Server(Broker):接收客户端连接,实现AMQP协议的消息队列和路由功能的进程;
2)Virtual Host:虚拟主机的概念,类似权限控制组,一个Virtual Host里可以有多个Exchange和Queue;
3)Exchange:交换机,接收生产者发送的消息,并根据Routing Key将消息路由到服务器中的队列Queue。
4)ExchangeType:交换机类型决定了路由消息行为,RabbitMQ中有四种类型Exchange,分别是fanout、direct、topic、headers
5)Message Queue:消息队列,用于存储还未被消费者消费的消息;
6)Message:由Header和body组成,Header是由生产者添加的各种属性的集合,包括Message是否被持久化、优先级是多少、由哪个Message Queue接收等;body是真正需要发送的数据内容;
7)BindingKey:绑定关键字,将一个特定的Exchange和一个特定的Queue绑定起来。
1. 最简单的消息发送Hello World

功能:一个生产者P发送消息到队列Q,一个消费者C接收
生产者:
通过连接工厂ConnectionFactory创建连接connection,使用连接创建通道channel, channel声明队列queue,channel使用queue发送消息
ConnectionFactory factory = new ConnectionFactory();
factory.setHost("localhost");
Connection connection = factory.newConnection();
Channel channel = connection.createChannel());
channel.queueDeclare(QUEUE_NAME, false, false, false, null);
String message = "Hello World!";
channel.basicPublish("", QUEUE_NAME, null, message.getBytes());
消费者:跟生产者一样,建立连接,创建channel,声明queue,然后监听queue
ConnectionFactory factory = new ConnectionFactory();
factory.setHost("localhost");
Connection connection = factory.newConnection();
Channel channel = connection.createChannel();
channel.queueDeclare(QUEUE_NAME, false, false, false, null);
DeliverCallback deliverCallback = (consumerTag, delivery) -> {
    String message = new String(delivery.getBody(), "UTF-8");
    System.out.println(" [x] Received '" + message + "'");
};
channel.basicConsume(QUEUE_NAME, true, deliverCallback, consumerTag -> { });
功能:一个生产者(Boss)向队列发消息(任务),多个消费者(worker)从队列接受消息(任务)
特点:
1)一条消息只会被一个消费者接收;
2)消息是平均分配给消费者的;
3)消费者只有在处理完某条消息后,才会收到下一条消息。
By default, RabbitMQ will send each message to the next consumer, in sequence. On average every consumer will get the same number of messages. This way of distributing messages is called round-robin. Try this out with three or more workers.
默认情况下,RabbitMQ将按顺序向消费者发送消息,平均每个消费者收到相同数量的消息,这种分发消息叫做轮询。可以通过三个以上的worker(消费者)来进行测试。
由于worker执行任务需要一定时间,为了确保消息不丢失,RabbitMQ 支持
1)消息确认机制
DeliverCallback deliverCallback = (consumerTag, delivery) -> {
  String message = new String(delivery.getBody(), "UTF-8");
  System.out.println(" [x] Received '" + message + "'");
  try {
    doWork(message);//可使用sleep模拟
  } finally {
    System.out.println(" [x] Done");
    channel.basicAck(delivery.getEnvelope().getDeliveryTag(), false);
  }
};
2)消息持久化
// 将第二个参数设为true,表示声明一个需要持久化的队列。
// 需要注意的是,若你已经定义了一个非持久的,同名字的队列,要么将其先删除(不然会报错),要么换一个名字。
channel.queueDeclare("hello", true, false, false, null);

// 修改了第三个参数,这是表明消息需要持久化
channel.basicPublish("",  "hello", MessageProperties.PERSISTENT_TEXT_PLAIN, message.getBytes());
生产者是把消息发送到了交换机(exchange)中,然后交换机负责(决定)将消息发送到(哪一个)消息队列中。
前面的两个案例其实是经过了默认交换机(Default Exchange,用空字符串表示),每一个被创建的队列都会被自动的绑定到默认交换机上,并且路由键就是队列的名字。路由键用来指定交换机将消息发到指定的队列。
交换机有4种不同的类型,分别是direct,fanout,topic,headers:
direct:要求和它绑定的队列带有一个路由键K,若有一个带有路由键R的消息到达了交换机,交换机会将此消息路由到路由键K = R的队列。默认交换机便是该类型。
fanout:会路由每一条消息到所有和它绑定的队列,忽略路由键。即广播形式。
4. Routing模式
当有些消息只能部分消费者消费时,可使用Routing模式;队列绑定交换机,同时带上routing key,以多次调用队列绑定方法,调用时,队列名和交换机名都相同,而routing key不同,这样可以使一个队列带有多个routing key。
5. Topic
通配符匹配消息发送队列,routing key由多个关键词组成,词与词之间由点号(.)隔开,规定*表示任意的一个词,#号表示任意的0个或多个词。
6. RPC
参考文档
三、springboot rabbitmq详解
参考:
https://docs.spring.io/spring-amqp/docs/2.1.6.RELEASE/reference/html/#sending-messages
https://www.cnblogs.com/ityouknow/p/6120544.html
1.pom.xml
	org.springframework.boot
	spring-boot-starter-amqp
2. application.properties
spring.rabbitmq.host=localhost
spring.rabbitmq.port=5672
spring.rabbitmq.username=root
spring.rabbitmq.password=123
3. 注册Queue,RabbitConfig.java
@Configuration
public class RabbitConfig {
	@Bean
	public Queue helloQueue() {
		return new Queue("hello");
	}
}
4. 生产者,RabbitMQProducer.java
@Component
public class RabbitMQProducer {
	@Autowired
	private AmqpTemplate amqpTemplate;

	public void sendMsg(String routingKey, String msg) {
		amqpTemplate.convertAndSend(routingKey, msg);
	}
}
5. 测试
@Component
@OpenAPI
public class ApiTest {
	@Autowired
	private RabbitMQProducer rabbitMQProducer;

	@OpenAPIMethod(methodName = "testRabbitMQSender")
	public Object testRabbitMQSender(final String msg) throws Exception {
		rabbitMQProducer.sendMsg("hello",msg);
		return null;
	}
}
发送消息:http://10.0.0.57:9001/api/testRabbitMQSender?msg=Hello%20World
查看控制台,创建了一个叫hello的queue,积压了1条消息

消息内容:

6. 消费者
@Component
public class RabbitMQConsumer {
	@RabbitListener(queues = "hello")
	public void consumerHelloQueueMessage(String message){
        System.out.println("收到hello-queue报文:"+message);
    }
}
启动消费者后,会立即收到积压的消息
收到hello-queue报文:Hello World
7. 测试多个消费者监听同一个通道,如1个hello queue,3个消费者
发送9条消息,打印日志日下:
收到hello-queue报文:Hello World
收到hello-queue3报文:Hello World
收到hello-queue2报文:Hello World
收到hello-queue报文:Hello World
收到hello-queue报文:Hello World
收到hello-queue2报文:Hello World
收到hello-queue3报文:Hello World
收到hello-queue3报文:Hello World
收到hello-queue2报文:Hello World
结果表示RabbitMQ会轮询发送消息给消费者,一条消息只能被一个消费者接收
8. Direct Exchange
@Configuration
public class RabbitConfig {

	@Bean
	public Queue helloQueue() {
		return new Queue("hello");
	}

	@Bean
	public DirectExchange helloExchange() {
		return new DirectExchange("helloExchange");
	}

	@Bean
	public Binding helloBinding() {
		return BindingBuilder.bind(helloQueue()).to(helloExchange()).with("helloDirect");
	}
}
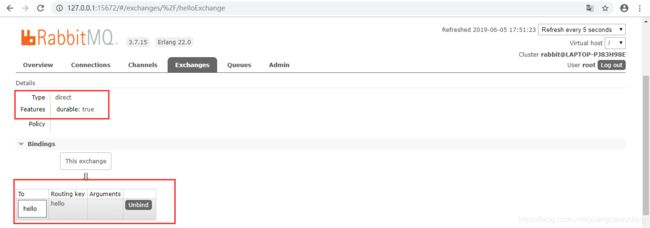
注册了一个叫helloExchange的Direct Exchange

查看helloExchange 详情:direct类型,绑定了hello queue

查看hello queue,除了绑定默认exchange还绑定了helloExchange

-
测试demo1
一个生产者,一个helloExchage,一个叫hello的queue,一个路由helloDirect,四个消费者(三个监听叫hello的queue,一个监听路由helloDirect对应hello queue且绑定了helloExchage交换器)
发送消息:
public void sendMsg(String exchange, String routingKey, String msg) {
	amqpTemplate.convertAndSend(exchange, routingKey, msg);
}

public Object testRabbitMQSender(final String msg) throws Exception {
	for(int i=0; i<9; i++) {
		rabbitMQProducer.sendMsg("helloExchange", "helloDirect",msg);
	}
	return null;
}
消费消息:
@RabbitListener(queues = "hello")
public void consumerHelloQueueMessage(String message){
	System.out.println("收到hello-queue报文:"+message);
}

@RabbitListener(queues = "hello")
public void consumerHelloQueueMessage2(String message){
	System.out.println("收到hello-queue2报文:"+message);
}

@RabbitListener(queues = "hello")
public void consumerHelloQueueMessage3(String message){
	System.out.println("收到hello-queue3报文:"+message);
}

// 当RabbitMQ中不存在绑定关系时,自动生成相应的绑定
// 如不存在helloExchange、hello queue或helloDirect任意一个,都会自动生成并绑定关系
@RabbitListener(bindings = @QueueBinding(
		value = @Queue(value = "hello", durable = "true"),
		exchange = @Exchange(value = "helloExchange", durable = "true"),
		key = "helloDirect"
	)
)
public void consumerQueueMessage(String message){
	System.out.println("收到helloExchage->hello queue->helloDirect route报文:"+message);
}
测试结果:四个消费者均匀收到消息
收到hello-queue2报文:Hello World
收到hello-queue报文:Hello World
收到hello-queue3报文:Hello World
收到helloExchage->hello queue->helloDirect route报文:Hello World
收到hello-queue2报文:Hello World
收到hello-queue报文:Hello World
收到hello-queue3报文:Hello World
收到hello-queue报文:Hello World
收到helloExchage->hello queue->helloDirect route报文:Hello World
结果说明:
关联示意图如下

当P通过helloExchange发送消息,经过路由helloDirect到达hello queue,然后均匀下发给所监听的C,所以四个消费者都收到了消息 -
测试demo2
在测试demo1的基础上增加一个hello2 queue, 并与helloExchange绑定,路由key为helloDirect2,一个消费者监听,示意图如下:

当P通过helloExchange发送消息,经过路由helloDirect2到达hello2 queue,监听的消费者收到消息
9. Fanout Exchange
以广播模式,给 Fanout 交换机发送消息,绑定了这个交换机的所有队列都收到这个消息。
// 定义exchange、queue、binding
@Bean
public Queue fanoutQueue1() {
	return new Queue("fanout1");
}

@Bean
public Queue fanoutQueue2() {
	return new Queue("fanout2");
}

@Bean
public Queue fanoutQueue3() {
	return new Queue("fanout3");
}

@Bean
public FanoutExchange fanoutExchange() {
	return new FanoutExchange("fanoutExchange");
}

@Bean
public Binding fanoutBinding() {
	return BindingBuilder.bind(fanoutQueue1()).to(fanoutExchange());
}

@Bean
public Binding fanoutBinding2() {
	return BindingBuilder.bind(fanoutQueue2()).to(fanoutExchange());
}

@Bean
public Binding fanoutBinding3() {
	return BindingBuilder.bind(fanoutQueue3()).to(fanoutExchange());
}
// 发送消息
public Object testRabbitMQSender(final String msg) throws Exception {
	rabbitMQProducer.sendMsg("fanoutExchange", "",msg);
	return null;
}
// 消费消息
@RabbitListener(bindings = @QueueBinding(
		value = @Queue(value = "fanout1", durable = "true"),
		exchange = @Exchange(value = "fanoutExchange", durable = "true", type = ExchangeTypes.FANOUT)
	)
)
public void consumerFanoutMessage1(String message){
	System.out.println("收到fanoutExchange->fanout报文1:"+message);
}

@RabbitListener(bindings = @QueueBinding(
		value = @Queue(value = "fanout2", durable = "true"),
		exchange = @Exchange(value = "fanoutExchange", durable = "true", type = ExchangeTypes.FANOUT)
	)
)
public void consumerFanoutMessage2(String message){
	System.out.println("收到fanoutExchange->fanout报文2:"+message);
}

@RabbitListener(bindings = @QueueBinding(
		value = @Queue(value = "fanout3", durable = "true"),
		exchange = @Exchange(value = "fanoutExchange", durable = "true", type = ExchangeTypes.FANOUT)
	)
)
public void consumerFanoutMessage3(String message){
	System.out.println("收到fanoutExchange->fanout报文3:"+message);
}
运行结果:
收到fanoutExchange->fanout报文1:Hello World fanout
收到fanoutExchange->fanout报文3:Hello World fanout
收到fanoutExchange->fanout报文2:Hello World fanout
10. Topic Exchange
使用通配符(*和#)路由
* (star) can substitute for exactly one word.
# (hash) can substitute for zero or more words.
// 定义exchange、queue、binding
@Bean
public Queue topicQueue1() {
	return new Queue("topic.q1");
}

@Bean
public Queue topicQueue2() {
	return new Queue("topic.q2");
}

@Bean
public Queue topicQueue3() {
	return new Queue("topic.q3");
}

@Bean
public TopicExchange topicExchange() {
	return new TopicExchange("topicExchange");
}

@Bean
public Binding topicBinding1() {
	return BindingBuilder.bind(topicQueue1()).to(topicExchange()).with("topic.q1");
}

@Bean
public Binding topicBinding2() {
	return BindingBuilder.bind(topicQueue2()).to(topicExchange()).with("topic.#");
}

@Bean
public Binding topicBinding3() {
	return BindingBuilder.bind(topicQueue3()).to(topicExchange()).with("topic.*");
}
// 消费者
@RabbitListener(queues = "topic.q1")
public void consumerTopicMessage(String message){
	System.out.println("收到topic.q1报文:"+message);
}

@RabbitListener(queues = "topic.q2")
public void consumerTopicMessage2(String message){
	System.out.println("收到topic.q2报文:"+message);
}

@RabbitListener(queues = "topic.q3")
public void consumerTopicMessage3(String message){
	System.out.println("收到topic.q3报文:"+message);
}
// 发送消息
1)rabbitMQProducer.sendMsg("topicExchange", "topic.q1",msg);
打印日志:(满足topic.q1、topic.#、topic.*的监听)
收到topic.q1报文:Hello World topic
收到topic.q2报文:Hello World topic
收到topic.q3报文:Hello World topic


2)rabbitMQProducer.sendMsg("topicExchange", "topic.q2",msg);
打印日志:(满足topic.#、topic.*的监听)
收到topic.q2报文:Hello World topic
收到topic.q3报文:Hello World topic

3)rabbitMQProducer.sendMsg("topicExchange", "topic.q2.x",msg);
打印日志:(满足topic.#的监听)
收到topic.q2报文:Hello World topic
常见异常
1. 未定义queue,直接监听queue报错:
org.springframework.amqp.rabbit.listener.BlockingQueueConsumer$DeclarationException: Failed to declare queue(s):[hello2]
Caused by: com.rabbitmq.client.ShutdownSignalException: channel error; protocol method: #method(reply-code=404, reply-text=NOT_FOUND - no queue 'hello2' in vhost '/', class-id=50, method-id=10)
解决方法:
1) 控制台手动创建queue
2)配置queue
@Configuration
public class RabbitConfig {

	@Bean
	public Queue helloQueue() {
		return new Queue("hello");
	}
}


