vue.js创建网站实例4
1.为表格添加模板
如果要设置上一篇文章中的pageivew,当大于1000时显示红色,否则显示蓝色,修改src/views/users/index.vue,
效果图:
代码如下:
<template slot-scope="scope">
  <span v-if="scope.row.pageviews>=1000" style="color:red">{{ scope.row.pageviews }}span>
  <span v-else style="color: green">{{ scope.row.pageviews }}span>
template>
或使用三元运算符,主要单引号一定是 `
<span :style="`${scope.row.pageviews>=1000?'color:red':'color:green' }` ">{{ scope.row.pageviews }}span>
或
<span :style="{ color: [scope.row.pageviews>=1000?'red':'green'] }">{{ scope.row.pageviews }}span>
2.为表格添加操作按钮
在上添加代码
<el-table-column label="Actions" align="center" width="250" class-name="small-padding fixed-width">
  <template slot-scope="{row,$index}">
    <el-button type="primary" size="mini" @click="handleUpdate(row)">
      Edit
    el-button>
    <el-button v-if="row.status!='published'" size="mini" type="success" @click="handleModifyStatus(row,'published')">
      Publish
    el-button>
    <el-button v-if="row.status!='draft'" size="mini" @click="handleModifyStatus(row,'draft')">
      Draft
    el-button>
    <el-button v-if="row.status!='deleted'" size="mini" type="danger" @click="handleDelete(row,$index)">
      Delete
    el-button>
  template>
el-table-column>
在分页器下添加编辑框,代码如下:
<el-dialog :title="textMap[dialogStatus]" :visible.sync="dialogFormVisible">
  <el-form ref="dataForm" :model="temp" label-position="left" label-width="70px" style="width: 400px; margin-left:50px;">
    <el-form-item label="Title" prop="title">
      <el-input v-model="temp.title" />
    el-form-item>
    <el-form-item label="Author" prop="author">
      <el-input v-model="temp.author" />
    el-form-item>
    <el-form-item label="Pageviews" prop="pageviews">
      <el-input v-model="temp.pageviews" />
    el-form-item>
    <el-form-item label="Status" prop="status">
      <el-select v-model="temp.status" class="filter-item" placeholder="Please select">
        <el-option v-for="item in calendarTypeOptions" :key="item.key" :label="item.display_name" :value="item.key" />
      el-select>
    el-form-item>
    <el-form-item label="Display_time" prop="display_time">
      <el-date-picker v-model="temp.display_time" type="datetime" placeholder="Please pick a date" />
    el-form-item>
  el-form>
  <div slot="footer" class="dialog-footer">
    <el-button @click="dialogFormVisible = false">
      Cancel
    el-button>
    <el-button type="primary" @click="dialogStatus==='create'?createData():updateData()">
      Confirm
    el-button>
  div>
el-dialog>
添加import
import { fetchList,getList,updateArticle } from '@/api/table'
在scr/api/table.js中添加updateArticle
export function updateArticle(data) {
  return request({
    // url: '/vue-element-admin/article/update',
    url: 'users/update.php',
    method: 'post',
    data
  })
}
添加弹出框中要用的下拉菜单内容
const calendarTypeOptions = [
  { key: 'published', display_name: 'published' },
  { key: 'draft', display_name: 'draft' },
  { key: 'deleted', display_name: 'deleted' }
]

const calendarTypeKeyValue = calendarTypeOptions.reduce((acc, cur) => {
  acc[cur.key] = cur.display_name
  return acc
}, {})
在data()上面添加
typeFilter(type) {
    return calendarTypeKeyValue[type]
  },
data()中添加
temp: {
  id: undefined,
  importance: 1,
  pageviews: 0,
  timestamp: new Date(),
  title: '',
  author: '',
  status: 'published',
  display_time: '',
  action: '',
},
calendarTypeOptions,
dialogFormVisible: false,
dialogStatus: '',
textMap: {
  update: 'Edit',
  create: 'Create'
},
添加handleUpdate和updateData事件
handleUpdate(row) {
  this.temp = Object.assign({}, row) // copy obj
  this.temp.timestamp = new Date(this.temp.timestamp)
  this.dialogStatus = 'update'
  this.dialogFormVisible = true
  this.$nextTick(() => {
    this.$refs['dataForm'].clearValidate()
  })
},
updateData() {
   this.$refs['dataForm'].validate((valid) => {
     if (valid) {
       const tempData = Object.assign({}, this.temp)
       tempData.timestamp = +new Date(tempData.timestamp) // change Thu Nov 30 2017 16:41:05 GMT+0800 (CST) to 1512031311464
       updateArticle(tempData).then(() => {
         const index = this.list.findIndex(v => v.id === this.temp.id)
         this.list.splice(index, 1, this.temp)
         this.dialogFormVisible = false
         this.$notify({
           title: '提示',
           message: '操作成功',
           type: 'success',
           duration: 2000
         })
       })
     }
   })
 },
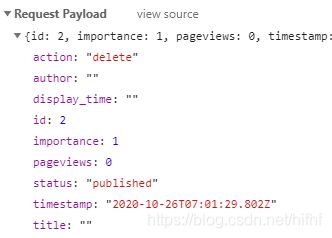
接口update.php,可以看到传递的参数如下图,进行接收并更新到数据库即可,其中,action是modify则更新所有字段,如果是modifystatus则只更新status

header('Content-Type:application/json');
// header("content-type:text/html;charset=utf-8");  //设置编码
$request_body = file_get_contents('php://input');
$json=json_decode($request_body);
echo($json->token);
// 验证token
$id=$_REQUEST["id"];
$title=$_REQUEST["title"];
$author=$_REQUEST["author"];
$pageviews=$_REQUEST["pageviews"];
$status=$_REQUEST["status"];
$display_time=$_REQUEST["display_time"];
$action=$_REQUEST["action"];
// 验证变量合法性
$arr = array('code' => 20000, 'data' => '操作成功');
//$arr = array('code' => 50008, 'message' =>  '操作失败');
echo(json_encode($arr));
?>
3.修改状态按钮,在点击时调用了handleModifyStatus方法
handleModifyStatus(row, status) {
  this.temp.id=row.id;
  this.temp.status=status;
  this.temp.action="modifystatus";
  const tempData = Object.assign({}, this.temp)
  updateArticle(tempData).then(() => {
    this.$message({
      message: '操作成功',
      type: 'success'
    })
    row.status = status
  })
},

其中,action是modify则更新所有字段,如果是modifystatus则只更新status
4.删除按钮
点删除按钮执行handleDelete事件,代码如下
handleDelete(row, index) {
  this.temp.id=row.id;
  this.temp.action="delete";
  const tempData = Object.assign({}, this.temp)
  updateArticle(tempData).then(() => {
    this.$notify({
      title: 'Success',
      message: '删除成功',
      type: 'success',
      duration: 2000
    })
    this.list.splice(index, 1)
  })
},
php接口文件里读取id和action,进行删除操作
- vue.js创建网站实例1
- vue.js创建网站实例2
- vue.js创建网站实例3
- vue.js创建网站实例4
- vue.js创建网站实例5
- vue.js创建网站实例6