SpringBoot基础入门笔记
SpringBoot基础入门笔记,源码可见下载链接
大家阅读时可善用目录功能,可以提高大家的阅读效率
下载地址:SpringBoot笔记+源码
SpringBoot简介
- 原生开发SpringMVC程序的过程
- 导入坐标
- Web核心配置类
- SpringMvc配置类
- Controller类实现功能
入门案例
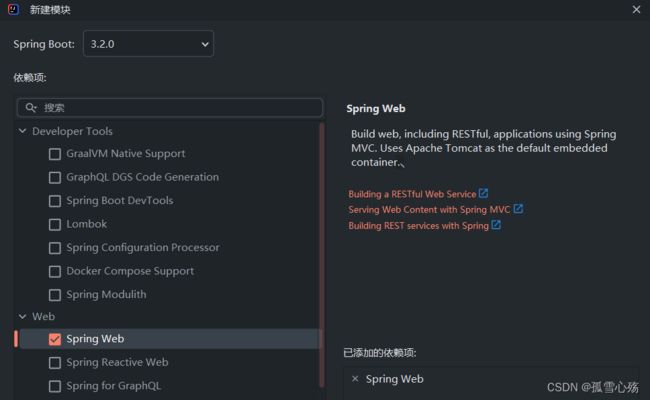
创建SpringBoots入门程序步骤
- 创建新模块,选择Spring Initializr 并配置相关的基础信息——注意对应的JDK版本
- SpringBoot3.X 强制要求JDK版本不低于17
- JDK8 可使用SpringBoot2.X
- 勾选SpringWeb
- 开发控制器controller类
- 运行自动生成的Application类
- 可以看见Tomcat的端口号和版本信息


- 可以看见Tomcat的端口号和版本信息
Spring程序与SpringBoot程序对比
- pom文件中的坐标
- Spring : 手动添加
- Springboot: 勾选添加
- Web配置类
- Spring : 手动添加
- Springboot: 无
- Spring/SpringMvc配置类
- Spring : 手动添加
- Springboot: 无
- pom文件中的坐标
- Spring : 手动添加
- Springboot: 勾选添加
注:开发Spring程序需要确保联网且能够加载到陈虚谷框架结构,不使用idea可以直接去官网(start.spring.io)创建项目
Spring项目快速启动
- 对SpringBoot项目进行打包(执行Maven构建指令package)
- 执行启动指令
java -jar 名称.jar- jar包的运行需要maven插件,打包时注意
    <build>
        <plugins>
            <plugin>
                <groupId>org.springframework.bootgroupId>
                <artifactId>spring-boot-maven-pluginartifactId>
            plugin>
        plugins>
    build>
SpringBoot概述
- SpringBoot是由Pivotal团队提供的全新框架,其设计目的是用来简化Spring应用的初始搭建以及开发的过程
- Spring程序缺点
- 配置繁琐
- 依赖设置繁琐
- SpringBoot程序优点
- 自动配置
- 起步依赖(简化依赖配置)
- 辅助功能(内置服务器,…)
-
起步依赖
- starter
- SpringBoot中常见的项目名称,定义了当前项目使用的所有坐标,以达到减少依赖配置的目的
- parent
- 所有Spring项目都要继承的项目,定义了若干个坐标的版本号(依赖管理,而非依赖),以达到减少依赖冲突的目的
- 实际开发
- 使用任意坐标时,仅书写GAV中的G和A,V由SpringBoot提供
- 如发生坐标错误,再指定version(小心版本冲突)
- starter
<project xmlns="http://maven.apache.org/POM/4.0.0" xmlns:xsi="http://www.w3.org/2001/XMLSchema-instance"
         xsi:schemaLocation="http://maven.apache.org/POM/4.0.0 https://maven.apache.org/xsd/maven-4.0.0.xsd">
    <modelVersion>4.0.0modelVersion>
    <parent>
        <groupId>org.springframework.bootgroupId>
        <artifactId>spring-boot-starter-parentartifactId>
        <version>3.2.0version>
    parent>

    <groupId>com.LonelysnowgroupId>
    <artifactId>SpringBootartifactId>
    <version>0.0.1-SNAPSHOTversion>

    <dependencies>
        <dependency>
            <groupId>org.springframework.bootgroupId>
            <artifactId>spring-boot-starter-webartifactId>
        dependency>
    dependencies>
project>
-
引导类
@SpringBootApplication
public class Application {
    public static void main(String[] args) {
        SpringApplication.run(Application.class, args);
    }
}
- SpringBoot在创建项目时,采用jar的打包方式
- SpringBoot的引导类时项目的入口,运行main方法就可以启动项目
- 变更起步依赖项非常便捷
<project xmlns="http://maven.apache.org/POM/4.0.0" xmlns:xsi="http://www.w3.org/2001/XMLSchema-instance"
         xsi:schemaLocation="http://maven.apache.org/POM/4.0.0 https://maven.apache.org/xsd/maven-4.0.0.xsd">
    <modelVersion>4.0.0modelVersion>
    <parent>
        <groupId>org.springframework.bootgroupId>
        <artifactId>spring-boot-starter-parentartifactId>
        <version>3.2.0version>
    parent>
    <groupId>com.LonelysnowgroupId>
    <artifactId>SpringBootartifactId>
    <version>0.0.1-SNAPSHOTversion>

    <dependencies>
        <dependency>
            <groupId>org.springframework.bootgroupId>
            <artifactId>spring-boot-starter-webartifactId>
            <exclusions>
                <exclusion>
                    <groupId>org.springframework.bootgroupId>
                    <artifactId>spring-boot-starter-tomcatartifactId>
                exclusion>
            exclusions>
        dependency>

        <dependency>
            <groupId>org.springframework.bootgroupId>
            <artifactId>spring-boot-starter-jettyartifactId>
        dependency>
    dependencies>

project>
基础配置
配置格式
SpringBoot提供了多种属性的配置方式
- application.properties
server.port=80
- application.yml
server:
  port: 80
- application.yaml
server:
  port: 80
如果yaml/yml文件没有自动补全,代码提示,可以在项目结构中将文件添加到项目的配置文件中

- Springboot配置文件的加载顺序
- application.properties
- application.yml
- application.yaml
yaml
yaml(YAML Ain’t Markup Language),一种数据序列化格式
-
优点
- 容易阅读
- 容易与脚本语言交互
- 以数据为核心,重数据轻格式
-
YAML文件拓展名
- .yml (主流)
- .yaml
-
语法规则:
- 大小写敏感
- 属性层级关系使用多行描述,每行结尾使用冒号结束
- 使用缩进表示层级关系,同层级左侧对齐,只允许使用空格(不允许使用tab)
- 属性值前面加空格(属性名与属性值之间使用冒号+空格作为分割)
- # 表示注释
核心格式:冒号后加空格
- 数组数据在数据书写位置的下方使用减号作为数据的开始符号,每行书写一个数据,减号与数据间空格分割
likes:
  - a
  - b
  - c
  - d
读取数据的方式
- 使用@Value读取单个数据,属性名引用方式 ${一级属性名.二级属性名}
- 封装全部数据到Environment对象
- 使用自定义对象封装数据
- 关联数据时,自定义类中要使用 @ConfigurationProperties(prefix = “目标数据名”)
BookController —— 调用
@RestController
@RequestMapping("/books")
public class BookController {

  @Value("${testA}")
  private int testA;
  @Value("${enterprise.C[0]}")
  private String C;
  @Value("${enterprise.C[1]}")
  private String A;

  @Autowired
  private Environment environment;

  @Autowired
  private Enterprise enterprise;

  @GetMapping
  public String get() {
    System.out.println(environment);
    System.out.println("________________________________________");
    System.out.println(enterprise);
    return "hello world";
  }
}
domain/Enterprise —— 自定义对象
@Component
@ConfigurationProperties(prefix = "enterprise")
public class Enterprise {
    private String A;
    private Integer B;
    private String D;
    private String[] C;

//  ......
//  getter setter方法省略
}
application.yml
testA: 100

enterprise:
  A: AAA
  B: 200
  D: BBB
  C:
    - 前端
    - aa
    - ba
    - ca
    - da
多环境开发
多环境配置
- yaml/yml格式 —— 不区分环境名称的先后顺序
spring:
  profiles:
    active: dev

---
server:
  port: 80
spring:
  config:
    activate:
      on-profile: dev
---

server:
  port: 81
spring:
  config:
    activate:
      on-profile: pro
---

server:
  port: 82
spring:
  config:
    activate:
      on-profile: test
- application.properties —— 主配置文件
#设定需要的运行环境
spring.profiles.active=dev
- application-dev.properties —— 新建配置文件,专用来更改环境
server.port=82
多环境启动命令
- cmd带参数启动SpringBoot
- 先执行clean操作清空上一次的操作影响
- 在执行package将程序封包
- 在jar包路径下运行cmd
java -jar SpringBoot-0.0.1-SNAPSHOT.jar --spring.profiles.active=XXX(环境名称)
java -jar SpringBoot-0.0.1-SNAPSHOT.jar --spring.profiles.active=dev --server.port=8081可运行
java -jar SpringBoot-0.0.1-SNAPSHOT.jar --spring.profiles.active=dev --server.port=8081 --server.port=8082会报错
注意事项:
- 如果yml/properties文件中有汉字的话,打包会报错,可以先去idea中修改文件编码格式为UTF-8
- 如果输入的配置指令错误,程序也不会报错,会跳过当前这条配置,如果未读到有效配置,则使用默认配置
- 多条配置重复时会报错
- Spring配置文件加载顺序,优先级从高到低

与Maven共同进行版本控制
- Maven中设置多环境属性
- SpringBoot中引用Maven属性
- pom.xml
<project>

    <profiles>
        <profile>
            <id>devid>
            <properties>
                <profile.active>devprofile.active>
            properties>
        profile>
        <profile>
            <id>proid>
            <properties>
                <profile.active>proprofile.active>
            properties>
            <activation>
                <activeByDefault>trueactiveByDefault>
            activation>
        profile>
        <profile>
            <id>testid>
            <properties>
                <profile.active>testprofile.active>
            properties>
        profile>
    profiles>


    <build>
        <plugins>

            <plugin>
                <groupId>org.apache.maven.plugins groupId>
                <artifactId>maven-resources-pluginartifactId>
                <version>3.3.1version>
                <configuration>
                    <useDefaultDelimiters>trueuseDefaultDelimiters>
                configuration>
            plugin>
        plugins>
    build>

project>
- application.yml
spring:
  profiles:
    active: ${profile.active}

---
server:
  port: 80
spring:
  config:
    activate:
      on-profile: dev
---

server:
  port: 81
spring:
  config:
    activate:
      on-profile: pro
---

server:
  port: 82
spring:
  config:
    activate:
      on-profile: test
配置文件分类

- 1,2级的路径是在jar包的目录下(跟着jar包走)
- 3,4级是写项目的时候配置的

整合第三方技术
SpringBoot整合JUnit
@SpringBootTest
class ApplicationTests {
    @Autowired
    private BookService bookService;

    @Test
     public void save(){
        bookService.save();
    }

}
Spring整合mybatis
Spring 整合mybatis(复习)
- SpringConfig
- 导入JdbcConfig
- 导入MybatisConfig
- JdbcConfig
- 定义数据源(加载properties配置项:driver,url,username,password)
- MyBatisConfig
- 定义SqlSessionFactoryBean
- 定义映射配置
SpringBoot整合MyBatis
- 创建新模块,选择Spring初始化,并配置模块相关基础信息
- 选择当前模块所需要使用的技术集(MyBatis,Mysql)
- 设置数据源参数
- 定义数据层接口与映射配置(记得引入Mapper坐标)
- 测试类中注入dao接口,测试功能

- pom.xml(勾选数据集之后会多出两个坐标)
<dependencies>
        <dependency>
            <groupId>mysqlgroupId>
            <artifactId>mysql-connector-javaartifactId>
            <scope>runtimescope>
            <version>8.0.33version>
        dependency>
        <dependency>
            <groupId>org.mybatis.spring.bootgroupId>
            <artifactId>mybatis-spring-boot-starterartifactId>
            <version>3.0.3version>
        dependency>
dependencies>
- application.yml
spring:
  profiles:
    active: ${profile.active}
  datasource:
    driver-class-name: com.mysql.cj.jdbc.Driver
    url: jdbc:mysql://localhost:3306/ssm_db
    username: root
    password: 123456
- BookDao(让Spring能扫描到,并为其添加自动代理)
@Mapper
public interface BookDao {
   @Select("select * from tbl_book where id = ${id}")
   Book getById(Integer id);
}
- ApplicationTests
@SpringBootTest
class ApplicationTests {

    @Autowired
    private BookDao bookDao;

    @Test
    public void testById(){
        Book book =  bookDao.getById(3);
        System.out.println(book);
    }
}
基于SpringBoot的SSM整合
- pom.xml
- 配置起步依赖,必要的资源坐标(druid)
- druid的作用:能够重复利用数据库连接(有些类似线程池),提高对请求的响应时间和服务器的性能。
- application.yml
- 设置数据源,端口等
- 配置类
- 全部删除
- dao
- 设置Mapper
- 测试类
- 页面:
- 放在resource目录下的static目录中