Hadoop学习笔记(7)Hadoop解压安装以及配置
一、安装Hadoop之前说明
安装Hadoop需要在官网把Hadoop文件下载好,并且上传到Linux中。上传步骤请参考:
Hadoop学习笔记(6)如何使用Xshell从Windows向Linux上传文件
二、解压安装Hadoop
输入命令查看文件存放
[admin@master ~]$ ls
hadoop-2.5.2.tar.gz  test  usr  公共  模板  视频  图片  文档  下载  音乐  桌面
开始解压安装
[admin@master ~]$ tar -zxvf hadoop-2.5.2.tar.gz
解压完毕后,可以查看到hadoop-3.1.4的信息
[admin@master ~]$ ls
_  hadoop-2.5.2  hadoop-2.5.2.tar.gz  test  usr  公共  模板  视频  图片  文档  下载  音乐  桌面
[admin@master ~]$ cd hadoop-2.5.2
[admin@master hadoop-2.5.2]$ ls
bin  etc  include  lib  libexec  LICENSE.txt  NOTICE.txt  README.txt  sbin  share
三、配置环境变量hadoop-env.sh
打开hadoop-2.5.2/etc/hadoop目录,然后编辑hadoop-env.sh
[admin@master ~]$ cd hadoop-2.5.2
[admin@master hadoop-3.1.4]$ cd etc
[admin@master etc]$ cd hadoop
[admin@master hadoop]$ vim hadoop-env.sh
在图中位置加入一句代码,然后保存退出

这样,hadoop即可使用了我们自己安装的JDK。
四、配置YARN的环境变量yarn-env.sh
注:hadoop-3.x不需要配置yarn-env.sh
YARN是Hadoop集群的资源管理系统。大家可以查看篇好文章进行详细了解。
Hadoop Yarn详解
打开hadoop-2.5.2/etc/hadoop目录,然后编辑hadoop-env.sh
[admin@master ~]$ cd hadoop-2.5.2
[admin@master hadoop-3.1.4]$ cd etc
[admin@master etc]$ cd hadoop
[admin@master hadoop]$ vim yarn-env.sh
在图中位置加入一句代码,然后保存退出

YARN环境变量配置完毕。
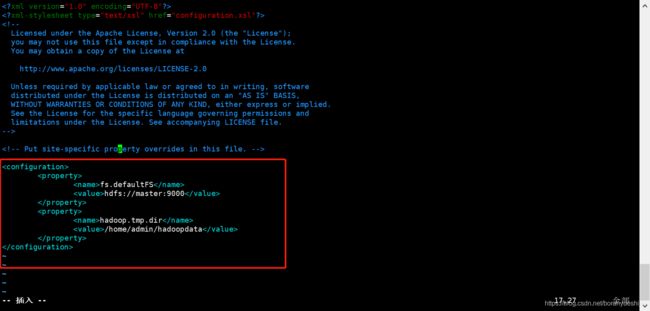
五、配置核心组件core-site.xml
core-site.xml主要内容:用于定义系统级别的参数,如HDFS URL、Hadoop的临时目录等。
在每个几点创建一个hadoopdata目录,用于存放数据
[admin@master ~]$ mkdir /home/admin/hadoopdata
[admin@slave ~]$ mkdir /home/admin/hadoopdata
[admin@slave1 ~]$ mkdir /home/admin/hadoopdata
打开hadoop-2.5.2/etc/hadoop目录,然后编辑core-site.xml
[admin@master ~]$ cd hadoop-2.5.2
[admin@master hadoop-2.5.2]$ cd etc
[admin@master etc]$ cd hadoop
[admin@master hadoop]$ vim core-site.xml
编辑如下内容
[admin@master hadoop]$ vim core-site.xml

"1.0" encoding="UTF-8"?>
-stylesheet type="text/xsl" href="configuration.xsl"?>
<!--
  Licensed under the Apache License, Version 2.0 (the "License");
  you may not use this file except in compliance with the License.
  You may obtain a copy of the License at

    http://www.apache.org/licenses/LICENSE-2.0

  Unless required by applicable law or agreed to in writing, software
  distributed under the License is distributed on an "AS IS" BASIS,
  WITHOUT WARRANTIES OR CONDITIONS OF ANY KIND, either express or implied.
  See the License for the specific language governing permissions and
  limitations under the License. See accompanying LICENSE file.
-->

<!-- Put site-specific property overrides in this file. -->


                fs.defaultFS</name>
                hdfs://master:9000</value>
        </property>

                hadoop.tmp.dir</name>
                /home/admin/hadoopdata</value>
        </property>
</configuration>
~
~
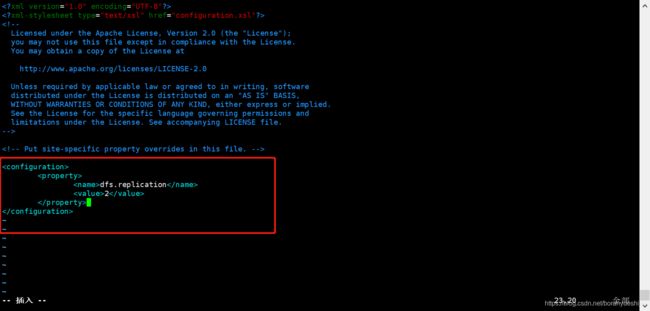
六、配置文件系统hdfs-site.xml
hdfs-site.xml的主要内容是如名称节点和数据节点的存放位置、文件
副本的个数、文件读取权限等。
打开hadoop-2.5.2/etc/hadoop目录,然后编辑hdfs-site.xml
[admin@master ~]$ cd hadoop-2.5.2
[admin@master hadoop-2.5.2]$ cd etc
[admin@master etc]$ cd hadoop
[admin@master hadoop]$ vim hdfs-site.xml
编辑如下内容
注:value为2,即从节点的个数,一般主节点不存储数据,只存储元数据信息。
[admin@master hadoop]$ vim hdfs-site.xml

"1.0" encoding="UTF-8"?>
-stylesheet type="text/xsl" href="configuration.xsl"?>
<!--
  Licensed under the Apache License, Version 2.0 (the "License");
  you may not use this file except in compliance with the License.
  You may obtain a copy of the License at

    http://www.apache.org/licenses/LICENSE-2.0

  Unless required by applicable law or agreed to in writing, software
  distributed under the License is distributed on an "AS IS" BASIS,
  WITHOUT WARRANTIES OR CONDITIONS OF ANY KIND, either express or implied.
  See the License for the specific language governing permissions and
  limitations under the License. See accompanying LICENSE file.
-->

<!-- Put site-specific property overrides in this file. -->


                dfs.replication</name>
                2</value>
        </property>
</configuration>
~
七、配置资源管理和任务调度yarn-site.xml
yarn-site.xml主要内容:配置 ResourceManager,NodeManager 的通信端口,web监控端口等。
打开hadoop-2.5.2/etc/hadoop目录,然后编辑yarn-site.xml
[admin@master ~]$ cd hadoop-2.5.2
[admin@master hadoop-2.5.2]$ cd etc
[admin@master etc]$ cd hadoop
[admin@master hadoop]$ vim yarn-site.xml
编辑如下内容
"1.0"?>
<!--
  Licensed under the Apache License, Version 2.0 (the "License");
  you may not use this file except in compliance with the License.
  You may obtain a copy of the License at

    http://www.apache.org/licenses/LICENSE-2.0

  Unless required by applicable law or agreed to in writing, software
  distributed under the License is distributed on an "AS IS" BASIS,
  WITHOUT WARRANTIES OR CONDITIONS OF ANY KIND, either express or implied.
  See the License for the specific language governing permissions and
  limitations under the License. See accompanying LICENSE file.
-->


<!-- Site specific YARN configuration properties -->
        <!-- NodeManager 上运行的附属服务。需要配置成mapreduce_shuffle,才可以运行MapReduce -->

            yarn.nodemanager.aux-services</name>
            mapreduce_shuffle</value>
        </property>

        <!-- ResourceManager对客户端暴露的访问地址。客户端通过该地址向RM提交应用程序 -->

            yarn.resourcemanager.address</name>
            master:18040</value>
        </property>

        <!-- ResourceManager对ApplicationManager(应用程序)暴露访问地址,ApplicationManager通过该地址向RM申请资源、释放资源等 -->

            yarn.resourcemanager.scheduler.address</name>
            master:18030</value>
        </property>

        <!-- ResourceManager对NodeManager暴露的访问地址。NodeManager通过该地址向RM汇报 -->

            yarn.resourcemanager.resource-tracker.address</name>
            master:18025</value>
        </property>

        <!-- ResourceManager对管理员暴露的访问地址。管理员通过该地址向RM发送管理命令 -->

            yarn.resourcemanager.admin.address</name>
            master:18141</value>
        </property>

        <!-- ResourceManager对web ui暴露的访问地址。用户通过该地址在浏览器中查看集群各类信息 -->

            yarn.resourcemanager.webapp.address</name>
            master:18088</value>
        </property>

        <!-- 设置在yarn平台运行spark程序查看运行结果日志的存储是否开启  -->

            yarn.log-aggregation-enable</name>
            true</value>
        </property>

        <!-- 通过 yarn logs -applicationId application_141  -->

            where to aggregate logs to.</description>
            yarn.nodemanager.remote-app-log-dir</name>
            /var/log/hadoop-yarn/apps</value>
        </property>

</configuration>
八、配置计算框架mapred-site.xml
mapred-site.xml主要内容:包括JobHistory Server和应用程序参数两部分,如reduce任务的默认个数、任务所能够使用内存的默认上下限等。
打开hadoop-2.5.2/etc/hadoop目录,然后编辑mapred-site.xml
[admin@master ~]$ cd hadoop-2.5.2
[admin@master hadoop-2.5.2]$ cd etc
[admin@master etc]$ cd hadoop
[admin@master hadoop]$ vim mapred-site.xml
由于没有mapred-site.xml,所以从mapred-site.xml.template复制
[admin@master hadoop]$ cp mapred-site.xml.template mapred-site.xml
编辑如下内容
[admin@master hadoop]$ vim mapred-site.xml

"1.0"?>
-stylesheet type="text/xsl" href="configuration.xsl"?>
<!--
  Licensed under the Apache License, Version 2.0 (the "License");
  you may not use this file except in compliance with the License.
  You may obtain a copy of the License at

    http://www.apache.org/licenses/LICENSE-2.0

  Unless required by applicable law or agreed to in writing, software
  distributed under the License is distributed on an "AS IS" BASIS,
  WITHOUT WARRANTIES OR CONDITIONS OF ANY KIND, either express or implied.
  See the License for the specific language governing permissions and
  limitations under the License. See accompanying LICENSE file.
-->

<!-- Put site-specific property overrides in this file. -->


                mapreduce.framework.name</name>
                yarn</value>
        </property>
</configuration>
~
~
~
九、在master节点配置slaves文件
为什么要配置slsves文件?由于master是主节点,那么需要通过slaves文件告诉master哪些是从节点。
打开hadoop-2.5.2/etc/hadoop目录,然后新建并编辑slaves
[admin@master ~]$ cd hadoop-2.5.2
[admin@master hadoop-2.5.2]$ cd etc
[admin@master etc]$ cd hadoop
[admin@master hadoop]$ vim slaves
配置内容如下
注:理论上master也可以作为从节点写入到slaves文件中,但一般情况下master只需存储元信息的,不建议存储数据,而存储数据放在从节点就够了。
slave
slave1
~
十、复制到两个从节点
[admin@master ~]$ scp -r hadoop-2.5.2 admin@slave:~/
[admin@master ~]$ scp -r hadoop-2.5.2 admin@slave1:~/