【Pytorch】学习记录分享1——Tensor张量初始化与基本操作
【Pytorch】学习记录分享1——Tensor张量初始化与基本操作
-
-
- 1. 基础资料汇总
- 2. Tensor张量初始化与基本操作(numpy对比)
-
- 2.1 tensor 创建的集中基本方式
- 2.2 修改tensor/numpy长度与维度
- 2.3 取 tensor/numpy 元素
- 2.4 numpy 对象的基本运算
- 2.5 tensor 对象的基本运算
-
1. 基础资料汇总
资料汇总
pytroch中文版本教程
PyTorch入门教程
B站强推!2023公认最通俗易懂的【PyTorch】教程,200集付费课程(附代码)人工智能_机器
视频
1.PyTorch简介
2.PyTorch环境搭建
basic: python numpy pandas pytroch
theory: study mlp cnn transform rnn
model: AlexNet VGG ResNet Yolo SSD
2. Tensor张量初始化与基本操作(numpy对比)
2.1 tensor 创建的集中基本方式
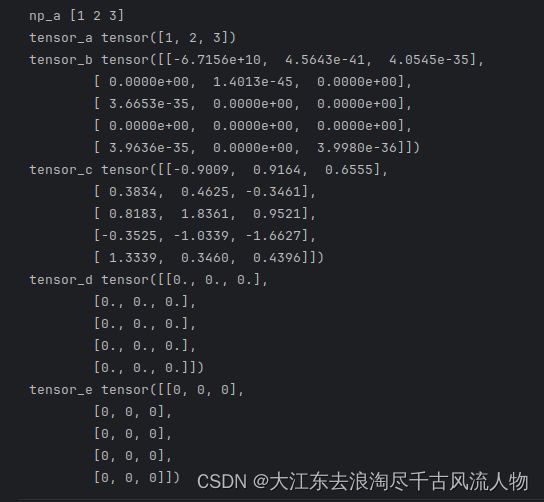
import numpy as np
import torch

np_a = np.array([1,2,3]) #ndarrays
tensor_a = torch.tensor([1,2,3]) #tensor
# tensor function and computer
tensor_b = torch.empty(5,3)
tensor_c = torch.randn(5,3) #用于确定模型的输入维度,做数据头尾
tensor_d = torch.zeros(5,3)  #用于 x->y 训练的一个映射 神经网络y truth_label one_hot表示
tensor_e = torch.zeros(5,3,dtype= torch.long) # dtype 数据格式

print("np_a",np_a)
print("tensor_a", tensor_a)
print("tensor_b", tensor_b)
print("tensor_c", tensor_c)
print("tensor_d", tensor_d)
print("tensor_e", tensor_e)
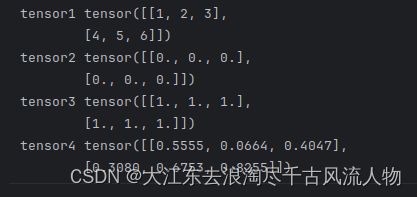
import torch

#通过数据直接创建张量:
data = [[1, 2, 3], [4, 5, 6]]
tensor1 = torch.tensor(data)
print("tensor1",tensor1)

#使用特定形状的全零张量:
import torch
tensor2 = torch.zeros(2, 3)
print("tensor2",tensor2)

#使用特定形状的全一张量:
import torch
tensor3 = torch.ones(2, 3)
print("tensor3",tensor3)

#利用随机数创建张量:
import torch
tensor4 = torch.rand(2, 3)
print("tensor4",tensor4)
2.2 修改tensor/numpy长度与维度
# 基于已经存在的 tensor进行操作
x = torch.tensor([1,2,3])
x.new_ones(5,3)  # 修改 x 的维度

tensor_f = torch.randn_like(x,dtype=torch.float) # 修改x 的类型与维度
print("tensor_f = ", tensor_f)

# 维度查看 np  shape   |  tensor size 层到另外一个层 矩阵相乘
np.array([1, 2, 3]).shape
torch.tensor([1,2,3]).size()
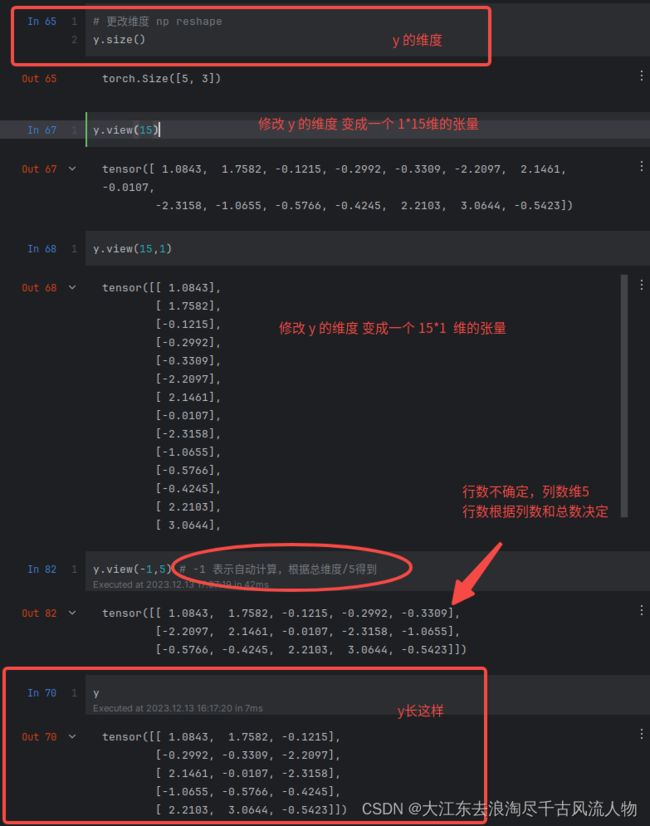
# 更改维度 np reshape
y.size()

y.view(15)

y.view(15,1)

y.view(-1,5) # -1 表示自动计算,根据总维度/5得到
2.3 取 tensor/numpy 元素
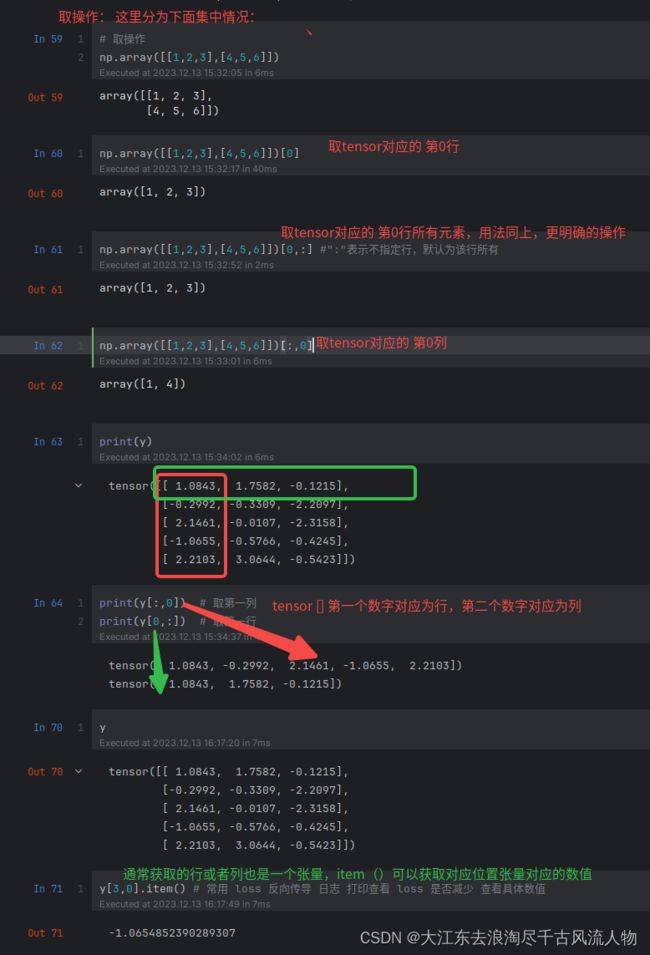
y = np.array([[1,2,3],[4,5,6]])

np.array([[1,2,3],[4,5,6]])[0]
np.array([[1,2,3],[4,5,6]])[0,:] #":"表示不指定行,默认为该行所有


np.array([[1,2,3],[4,5,6]])[:,0]
print(y[:,0])  # 取第一列
print(y[0,:])  # 取第一行


y[3,0].item() # 常用 loss 反向传导 日志 打印查看 loss 是否减少 查看具体数值
2.4 numpy 对象的基本运算
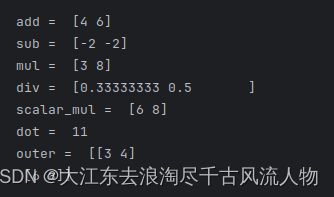
import numpy as np

# 加法
result_array_add = np.array([1, 2]) + np.array([3, 4])

# 减法
result_array_sub = np.array([1, 2]) - np.array([3, 4])

# 乘法
result_array_mul = np.array([1, 2]) * np.array([3, 4])

# 除法
result_array_div = np.array([1, 2]) / np.array([3, 4])

# 数乘
result_array_scalar_mul = 2 * np.array([3, 4])

# 内积
result_array_dot = np.dot(np.array([1, 2]), np.array([3, 4]))

# 外积
result_array_outer = np.outer(np.array([1, 2]), np.array([3, 4]))

print("add = ", result_array_add)
print("sub = ", result_array_sub)
print("mul = ", result_array_mul)
print("div = ", result_array_div)
print("scalar_mul = ", result_array_scalar_mul)
print("dot = ", result_array_dot)
print("outer = ", result_array_outer)
2.5 tensor 对象的基本运算
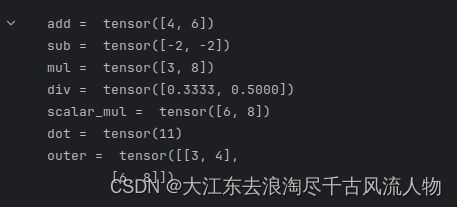
import torch

# 加法
result_tensor_add = torch.tensor([1, 2]) + torch.tensor([3, 4])

# 减法
result_tensor_sub = torch.tensor([1, 2]) - torch.tensor([3, 4])

# 乘法
result_tensor_mul = torch.tensor([1, 2]) * torch.tensor([3, 4])

# 除法
result_tensor_div = torch.tensor([1, 2], dtype=torch.float) / torch.tensor([3, 4], dtype=torch.float)

# 数乘
result_tensor_scalar_mul = 2 * torch.tensor([3, 4])

# 内积
result_tensor_dot = torch.dot(torch.tensor([1, 2]), torch.tensor([3, 4]))

# 外积
result_tensor_outer = torch.ger(torch.tensor([1, 2]), torch.tensor([3, 4]))


print("add = ", result_tensor_add)
print("sub = ", result_tensor_sub)
print("mul = ", result_tensor_mul)
print("div = ", result_tensor_div)
print("scalar_mul = ", result_tensor_scalar_mul)
print("dot = ", result_tensor_dot)
print("outer = ", result_tensor_outer)

