git分支管理(分支创建、合并、冲突、bug、多人协作、git标签)
学习目标:
GIT学习四、
学习内容:
1、创建与合并分支
2、解决冲突
3、分支分支管理策略
4、bug分支
5、多人协作
6、git标签
1、创建与合并分支
- 每次提交修改,Git都把它们串成一条时间线,这条时间线就是一个分支,HEAD严格来说不是指向提交修改的指针,而是指向master的,master才是指向提交修改的指针,所以,master指向的就是这个时间分支
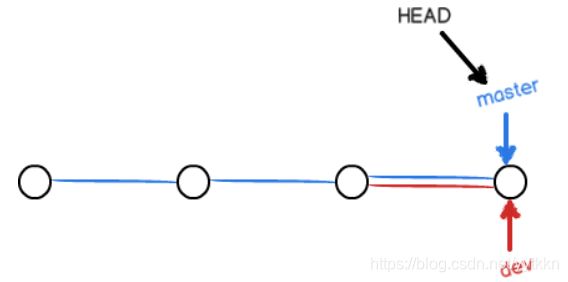
- 每次提交修改时,这个时间分支就会往前移动一下,master也会向前移动,直到下一个指针的出现,新建一个指针dev,指向master相同的提交修改,再把HEAD指向dev,就表示当前分支在dev上而master就会原地不动
-
我们在dev上工作对工作区的修改和提交就是针对dev分支了,比如新提交一次后,dev指针往前移动一步,而master指针不变,当dev工作完成时dev和主分支就会向前移动,HEAD也会向前移动

-
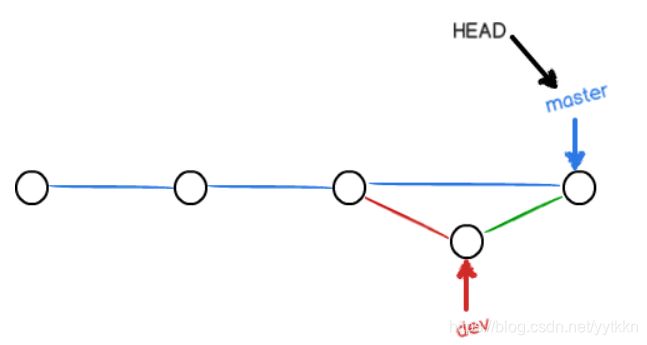
在合并时,直接把master指向dev的当前提交,就完成了合并,如果我们再把dev删掉那么HEAD就会直接指向master了,最后就只剩下master
git merge :合并某分支到当前分支
git branch -d: 删除分支
git branch -D :强行删除分支
git branch : 创建分支 /查看当前的分支
git checkout : 切换到分支
git checkout -b /git switch -c : 创建并切换分支
 - 在工作区的master分支下创建一个只有“a”yyt的文件,然后再创建一个dev分支并切换到dev,对yyt进行添加“b”的修改,然后git add和git commit到提交分支,切回到master查看yyt还是仅为“a”,合并master与dev后再次查看yyt就是修改后的版本文件了

[root@192 ~]# mkdir test
[root@192 ~]# cd test/
[root@192 test]# git init
已初始化空的 Git 仓库于 /root/test/.git/
[root@192 test]# vi yyt
[root@192 test]# git add yyt
[root@192 test]# git commit -m "add yyt" yyt
1 file changed, 1 insertion(+)
 create mode 100644 yyt
。。。
[root@192 test]# git branch
* master
[root@192 test]# git checkout -b dev
切换到一个新分支 'dev'
[root@192 test]# git branch
* dev
  master
[root@192 test]# cat yyt
aaaaaa
[root@192 test]# vi yyt
[root@192 test]# cat yyt
aaaaaa
bbbbbb
[root@192 test]# git add yyt
[root@192 test]# git commit -m "add" yyt
[dev 298fcea] add
 Committer: root <oot@192.168.70.128>
 1 file changed, 1 insertion(+)
[root@192 test]# git status
位于分支 dev
无文件要提交,干净的工作区
[root@192 test]# git checkout master
切换到分支 'master'
[root@192 test]# cat yyt
aaaaaa
[root@192 test]# git merge dev
更新 b50582c..298fcea
Fast-forward
 yyt | 1 +
 1 file changed, 1 insertion(+)
[root@192 test]# git branch
  dev
* master
[root@192 test]# cat yyt
aaaaaa
bbbbbb
[root@192 test]# git branch -d dev
已删除分支 dev(曾为 298fcea)。
[root@192 test]# git branch
* master
2、解决冲突
- 在工作区中创建了两个分支分别对这个文件进行了修改,并且都用git commit提交了,在合并的过程中产生了冲突
git log --graph --pretty=oneline --abbrev-commit : 查看分支的合并情况
git merge 分支名:合并分支
 - 创建一个yyt的文件,分别用master对yyt添加“c”和dev对yyt添加“b”两个不同的分支对它进行修改并提交,然后进行合并产生冲突,我们直接进入文本把需要的内容留下其余全部删掉,解决冲突最后提交最终版本

[root@bogon ~]# mkdir test
[root@bogon ~]# cd test
[root@bogon test]# git init
已初始化空的 Git 仓库于 /root/test/.git/
[root@bogon test]# vi yyt
[root@bogon test]# cat yyt
aaaaaaaaa
[root@bogon test]# git add yyt
[root@bogon test]# git commit -m "add a" yyt
[master(根提交) 485563c] add a
 1 file changed, 1 insertion(+)
 create mode 100644 yyt
[root@bogon test]# git branch
* master
[root@bogon test]# git checkout -b dev
切换到一个新分支 'dev'
[root@bogon test]# git branch
* dev
  master
[root@bogon test]# cat yyt
aaaaaaaaa
[root@bogon test]# vi yyt
[root@bogon test]# cat yyt
aaaaaaaaa
bbbbbbbbb
[root@bogon test]# git add yyt
[root@bogon test]# git commit -m "add b" yyt
[dev 2b94c06] add b
 1 file changed, 1 insertion(+)
[root@bogon test]# git checkout master
切换到分支 'master'
[root@bogon test]# cat yyt
aaaaaaaaa
[root@bogon test]# vi yyt
[root@bogon test]# cat yyt
aaaaaaaaa
ccccccccc
[root@bogon test]# git add yyt
[root@bogon test]# git commit -m "add c" yyt
[master 91db8bb] add c
 1 file changed, 1 insertion(+)
[root@bogon test]# git merge dev
自动合并 yyt
冲突(内容):合并冲突于 yyt
自动合并失败,修正冲突然后提交修正的结果。
[root@bogon test]# cat yyt
aaaaaaaaa
<<<<<<< HEAD
ccccccccc
=======
bbbbbbbbb
>>>>>>> dev
[root@bogon test]# vi yyt
[root@bogon test]# git add yyt
[root@bogon test]# git commit -m "config fixed"
[master fca1c99] config fixed
[root@bogon test]# git log --graph --pretty=oneline --abbrev-commit
*   fca1c99 (HEAD -> master) config fixed
|\
| * 2b94c06 (dev) add b
* | 91db8bb add c
|/
* 485563c add a
3、分支分支管理策略
 - 在工作区存在文本yyt,创建分支dev并对yyt添加“e”,然后进行合并

[root@bogon test]# git branch
* master
[root@bogon test]# cat yyt
aaaaaaaaa
ccccccccc
bbbbbbbbb
[root@bogon test]# git checkout -b dev
切换到一个新分支 'dev'
[root@bogon test]# vi yyt
[root@bogon test]# cat yyt
aaaaaaaaa
ccccccccc
bbbbbbbbb
eeeeeeeee
[root@bogon test]# git add yyt
[root@bogon test]# git commit -m "add meger"
[dev df18561] add meger
 1 file changed, 1 insertion(+)
[root@bogon test]# git checkout master
切换到分支 'master'
[root@bogon test]# git merge --no-ff -m "meger with no-ff" dev
Merge made by the 'recursive' strategy.
 yyt | 1 +
 1 file changed, 1 insertion(+)
[root@bogon test]# git log --graph --pretty=oneline --abbrev-commit
*   dc10ae2 (HEAD -> master) meger with no-ff
|\
| * df18561 (dev) add meger
|/
*   fca1c99 config fixed
|\
| * 2b94c06 add b
* | 91db8bb add c
|/
* 485563c add a
4、bug分支
- 每个bug都可以通过一个新的临时分支来修复,修复后,合并分支,然后将临时分支删除
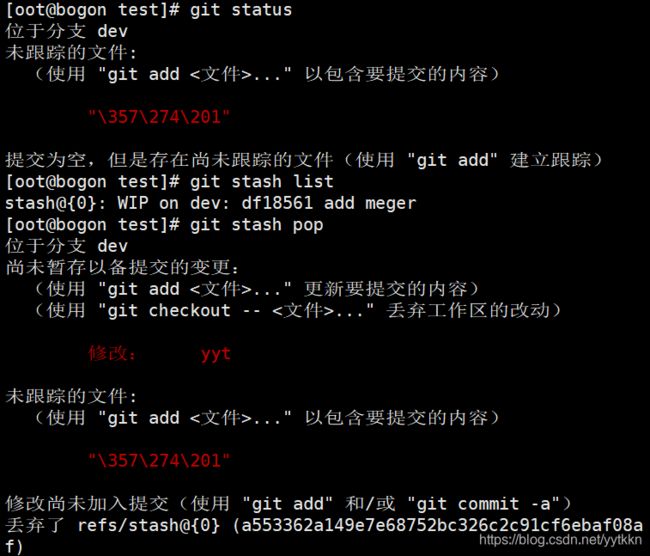
 - 在工作区新建一个bug修复区issue-101并在master分支上进行修改,最后修改完成后git add并git commit到分支,然后再与master进行合并,因为dev的工作好美结束,切入dev用git stash把当前工作现场“储藏”起来,等以后恢复现场后继续工作

[root@bogon test]# git checkout dev
切换到分支 'dev'
[oot@bogon test]# git branch
* dev
  master
[root@bogon test]# cat yyt
aaaaaaaaa
ccccccccc
bbbbbbbbb
eeeeeeeee
[root@bogon test]# vi yyt
[root@bogon test]# git checkout master
切换到分支 'master'
[root@bogon test]# git checkout -b issue-101
切换到一个新分支 'issue-101'
[root@bogon test]# vi yyt
[root@bogon test]# git add yyt
[root@bogon test]# git commit -m "fix bug"
[issue-101 33e98d2] fix bug
 1 file changed, 1 insertion(+)
[root@bogon test]# git checkout master
切换到分支 'master'
[root@bogon test]# git merge --no-ff -m "merged a bug " issue-101
Merge made by the 'recursive' strategy.
 yyt | 1 +
 1 file changed, 1 insertion(+)
[root@bogon test]# git checkout dev
切换到分支 'dev'
[root@bogon test]# git stash list
[root@bogon test]# git branch
* dev
 master
5、多人协作
git log --graph --pretty=oneline --abbrev-commit:查看提交的详细信息
git remote /git remote -v:查看远程仓库/查看远程仓库的详细信息
git push 远程仓库名 本地分支:向远程仓库提交本地的分支
git branch --set-upstream-to=远程分支名 本地分支名:指定本地dev分支与远程origin/dev分支的链接
git pull:在本地与远程分支链接后,用git pull把最新的提交从远程仓库抓下来,然后在本地合并
git clone -b <指定分支名> <远程仓库地址>
git pull -f 远程库名 远程版本库分支名:本地版本库分支名:把远程版本库某一分支拉到本地版本库分支
用两台虚拟机模拟两个人在同一个远程版本库上完成一个项目
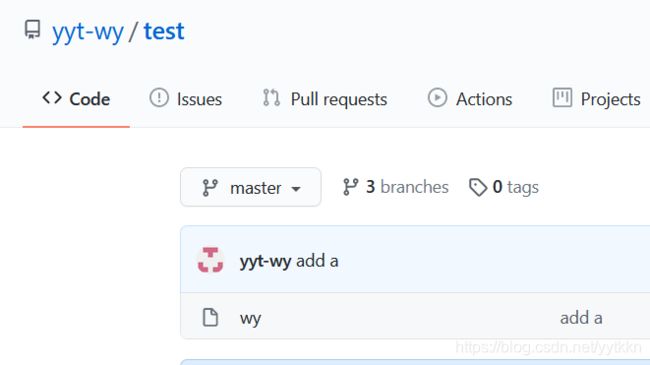
 - 在虚拟机一中创建文件wy,文件中写入“a”并git add和git commit到本地版本库,再提交到远程版本库,然后新建一个分支dev并且向文件wy中添加“b”修改并git add和git commit到本地数据库

[root@bogon ~]# mkdir yyt
[root@bogon ~]# cd yyt
[root@bogon yyt]# git init
已初始化空的 Git 仓库于 /root/yyt/.git/
[root@bogon yyt]# ssh-keygen -t rsa -C "[email protected]"
...
[root@bogon yyt]# git remote add origin git@github.com:yyt-wy/test
[root@bogon yyt]# git remote
origin
[root@bogon yyt]# vi wy
[root@bogon yyt]# git add wy
[root@bogon yyt]# git commit -m "add a" wy
[master(根提交) c67da23] add a
 1 file changed, 1 insertion(+)
 create mode 100644 wy
[root@bogon yyt]# git push -u origin master
枚举对象: 3, 完成.
对象计数中: 100% (3/3), 完成.
写入对象中: 100% (3/3), 197 bytes | 197.00 KiB/s, 完成.
...
[root@bogon yyt]# cat wy
aaaaaa
[root@bogon yyt]# git branch
 * master
[root@bogon yyt1]# git checkout -b dev
切换到一个新分支 'dev'
[root@bogon yyt1]# vi wy
[root@bogon yyt1]# git add wy
[root@bogon yyt1]# git commit -m "add b" wy
[dev bb87755] add b
 1 file changed, 1 insertion(+)
[root@bogon yyt1]# cat wy
aaaaaaaa
bbbbbbbb
 * 到虚拟机二中链接到远程版本库,然后把远程库的东西都拉下来到本地库 然后对文件wy进行修改添加“c”,再把这个版本上传到远程版本库中

[root@bogon yyt2]# git clone git@github.com:yyt-wy/test.git
正克隆到 'test'...
Warning: Permanently added the RSA host key for IP address '13.250.177.223' to the list of known hosts.
remote: Enumerating objects: 6, done.
remote: Counting objects: 100% (6/6), done.
remote: Compressing objects: 100% (2/2), done.
remote: Total 6 (delta 0), reused 3 (delta 0), pack-reused 0
接收对象中: 100% (6/6), 完成.
[root@bogon test]# cat wy
aaaaaaaa
[root@bogon test]# git checkout -b dev
切换到一个新分支 'dev'
[root@bogon test]# git remote
origin
[root@bogon test]# git push origin dev
Total 0 (delta 0), reused 0 (delta 0)
remote:
remote: Create a pull request for 'dev' on GitHub by visiting:
remote:      https://github.com/yyt-wy/test/pull/new/dev
remote:
To github.com:yyt-wy/test.git
 * [new branch]      dev -> dev
[root@bogon test]# vi wy
[root@bogon test]# git add wy
[root@bogon test]# git commit -m "add c" wy
[dev ced03d9] add c
 1 file changed, 1 insertion(+)
 [root@bogon test]# cat wy
aaaaaaaa
cccccccc
[root@bogon test]# git branch -r
  origin/HEAD -> origin/master
  origin/dev
  origin/main
  origin/master
[root@bogon test]# git push -u origin dev
枚举对象: 5, 完成.
对象计数中: 100% (5/5), 完成.
写入对象中: 100% (3/3), 230 bytes | 230.00 KiB/s, 完成.
Total 3 (delta 0), reused 0 (delta 0)
To github.com:yyt-wy/test.git
   dc60c3f..ced03d9  dev -> dev
分支 'dev' 设置为跟踪来自 'origin' 的远程分支 'dev'。
 * 回到虚拟机一时,它还不知道虚拟机二对文件进行了修改和提交及上传,当虚拟机要上传dev第二次对文件添加“b”的版本时,会发现无法上传要把虚拟机二上传的内容下载到本地并且解决冲突后才能再次上传

[root@bogon yyt1]# git push -u origin dev
Warning: Permanently added the RSA host key for IP address '13.229.188.59' to the list of known hosts.
To github.com:yyt-wy/test.git
 ! [rejected]        dev -> dev (fetch first)
error: 无法推送一些引用到 '[email protected]:yyt-wy/test.git'
提示:更新被拒绝,因为远程仓库包含您本地尚不存在的提交。这通常是因为另外
提示:一个仓库已向该引用进行了推送。再次推送前,您可能需要先整合远程变更
提示:(如 'git pull ...')。
提示:详见 'git push --help' 中的 'Note about fast-forwards' 小节。
[root@bogon yyt1]# git fetch
Warning: Permanently added the RSA host key for IP address '13.250.177.223' to the list of known hosts.
remote: Enumerating objects: 8, done.
remote: Counting objects: 100% (8/8), done.
remote: Compressing objects: 100% (2/2), done.
remote: Total 6 (delta 0), reused 3 (delta 0), pack-reused 0
展开对象中: 100% (6/6), 完成.
来自 github.com:yyt-wy/test
 * [新分支]          dev        -> origin/dev
 * [新分支]          main       -> origin/main
[root@bogon yyt1]# git branch --set-upstream-to=origin/dev dev
分支 'dev' 设置为跟踪来自 'origin' 的远程分支 'dev'。
[root@bogon yyt1]# git pull
自动合并 wy
冲突(内容):合并冲突于 wy
自动合并失败,修正冲突然后提交修正的结果。
[root@bogon yyt1]# cat wy
aaaaaaaa
<<<<<<< HEAD
bbbbbbbb
=======
cccccccc

>>>>>>> ced03d979f4c87c566411587c596e15a0ee1f2db
[root@bogon yyt1]# vi wy
[root@bogon yyt1]# git add wy
[root@bogon yyt1]# git commit -m "fixed"
[dev b319940] fixed
[root@bogon yyt1]# git push origin dev
Warning: Permanently added the RSA host key for IP address '52.74.223.119' to the list of known hosts.
枚举对象: 10, 完成.
对象计数中: 100% (10/10), 完成.
Delta compression using up to 2 threads.
压缩对象中: 100% (2/2), 完成.
写入对象中: 100% (6/6), 458 bytes | 32.00 KiB/s, 完成.
Total 6 (delta 0), reused 0 (delta 0)
To github.com:yyt-wy/test.git
   ced03d9..b319940  dev -> dev
总结:最后虚拟机一在虚拟机二上传新的文件之后也上传了新的文件,这样一个过程就是多人合作完成一个项目的过程
6、git标签
- 首先切入需要打标签的分支
[root@localhost yyt1]# git checkout dev
切换到分支 'dev'
您的分支与上游分支 'origin/dev' 一致。
[root@localhost yyt1]# git branch
- dev
 master
- 直接创建标签
git tag +tagname
[root@localhost yyt1]# git tag v1.0
[root@localhost yyt1]# git tag
v1.0
- 指定commit id创建标签
git tag tagname commit-id
[root@localhost yyt1]# git log --pretty=oneline --abbrev-commit
b319940 (HEAD -> dev, tag: v1.0, origin/dev) fixed
ced03d9 add c
bb87755 add b
dc60c3f (origin/master, master) add a
[root@localhost yyt1]# git tag v0.9 bb87755
[root@localhost yyt1]# git tag
v0.9
v1.0
[root@localhost yyt1]# git show v1.0
commit b3199401941cc77d4f8cc8b8414bee88f7380844 (HEAD -> dev, tag: v1.0, origin/dev)
Merge: bb87755 ced03d9
Author: yyt <812277079@qq.com>
Date:   Mon Oct 26 05:34:14 2020 -0400

...

diff --cc wy
index e7a9104,508ba3a..092b923
--- a/wy
+++ b/wy
@@@ -1,2 -1,2 +1,3 @@@
 aaaaaaaa
+bbbbbbbb
+ cccccccc
- 添加说明创建标签
git tag -a tagname -m “说明” commit-id
[root@localhost yyt1]# git tag -a v0.1 -m "add c" ced03d9
[root@localhost yyt1]# git tag
v0.1
v0.9
v1.0
[root@localhost yyt1]# git show v0.1
tag v0.1
Tagger: yyt <812277079@qq.com>
Date:   Tue Oct 27 02:00:38 2020 -0400
add c
commit ced03d979f4c87c566411587c596e15a0ee1f2db (tag: v0.1)
Author: yyt <812277079@qq.com>
Date:   Mon Oct 26 05:04:13 2020 -0400
add c
diff --git a/wy b/wy
index ea8f022..508ba3a 100644
--- a/wy
+++ b/wy
@@ -1 +1,2 @@
aaaaaaaa
+cccccccc
- 向远程版本库提交tag,并删除tag(先删除本地tag,再删除远程tag)
git push 远程库name tagname
git push 远程版本库名 :refs/tag/tagname
git tag -d tagname :删除标签
 [root@localhost yyt1]# git push origin v0.9
Total 0 (delta 0), reused 0 (delta 0)
To github.com:yyt-wy/test.git
 * [new tag]         v0.9 -> v0.9
[root@localhost yyt1]# git tag v1.0
fatal: 标签 'v1.0' 已存在
[root@localhost yyt1]# git tag -d v1.0
已删除标签 'v1.0'(曾为 b319940)
[root@localhost yyt1]# git tag -d v0.9
已删除标签 'v0.9'(曾为 bb87755)
[root@localhost yyt1]# git tag -d v0.1
已删除标签 'v0.1'(曾为 65aa650)
[root@localhost yyt1]# git push origin  :refs/tag/v0.9
remote: warning: Deleting a non-existent ref.
To github.com:yyt-wy/test.git
 - [deleted]         refs/tag/v0.9
[root@localhost yyt1]# git push origin  :refs/tag/v1.0
remote: warning: Deleting a non-existent ref.
To github.com:yyt-wy/test.git
 - [deleted]         refs/tag/v1.0


