Javaweb——Tomcat
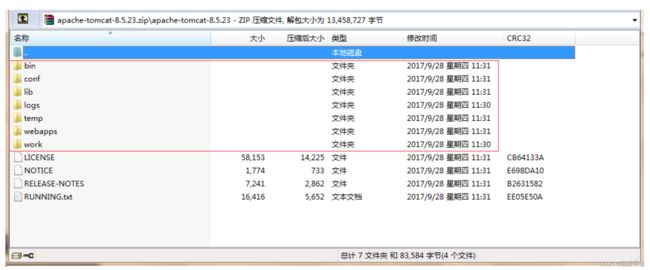
下图为 apache-tomcat-8.5.23.zip 在windows解压后的目录:
下面是解压后的一些关键目录:
* /bin - 启动和停止服务等批处理文件. ( *.sh) 文件 (为Unix系统)、 (*.bat) 文件 (for Windows系统)是一个功能性的复制文件. 自从Win32 command-line 开始是一些单一的,缺乏功能的组件, 现在有一些拓展性的功能
* /conf - 配置文件和一些相关的DTD文件. 最重要的是 server.xml. 它是这个容器最主要的配置文件.
* /logs - 日志文件会打印到这里
* /webapps - 这里是你的应用程序部署的地方.
一、Tomcat的组织结构
从最本质上讲,tomcat为一个servlet容器
Tomcat的组织结构
1.Tomcat结构解析:
Tomcat是一个基于组件的服务器,它的构成组件都是可配置的,其中最外层的是
Catalina servlet容器,其他组件按照一定的格式要求配置在这个顶层容器中。 Tomcat的各种组件都是在Tomcat安装目录下的/conf/server.xml文件中配置的
- Server(服务器)是Tomcat构成的顶级构成元素,所有一切均包含在Server中,Server的实现类StandardServer可以包含一个到多个Services,Service的实现类为StandardService调用了容器(Container)接口,其实是调用了Servlet Engine(引擎),而且StandardService类中也指明了该Service归属的Server;
- Container: 引擎(Engine)、主机(Host)、上下文(Context)和Wraper均继承自Container接口,所以它们都是容器。但是,它们是有父子关系的,在主机(Host)、上下文(Context)和引擎(Engine)这三类容器中,引擎是顶级容器,直接包含是主机容器,而主机容器又包含上下文容器,所以引擎、主机和上下文从大小上来说又构成父子关系,虽然它们都继承自Container接口
- 连接器(Connector)将Service和Container连接起来,首先它需要注册到一个Service,它的作用就是把来自客户端的请求转发到Container(容器),这就是它为什么称作连接器的原因
从功能的角度将Tomcat源代码分成5个子模块,分别是:
- Jsper模块: 这个子模块负责jsp页面的解析、jsp属性的验证,同时也负责将jsp页面动态转换为java代码并编译成class文件。在Tomcat源代码中,凡是属于org.apache.jasper包及其子包中的源代码都属于这个子模块
- Servlet和Jsp模块: 这个子模块的源代码属于javax.servlet包及其子包,如我们非常熟悉的javax.servlet.Servlet接口、javax.servet.http.HttpServlet类及javax.servlet.jsp.HttpJspPage就位于这个子模块中
- Catalina模块: 这个子模块包含了所有以org.apache.catalina开头的java源代码。该子模块的任务是规范了Tomcat的总体架构,定义了Server、Service、Host、Connector、Context、Session及Cluster等关键组件及这些组件的实现,这个子模块大量运用了Composite设计模式。同时也规范了Catalina的启动及停止等事件的执行流程
- Connector模块: 如果说上面三个子模块实现了Tomcat应用服务器的话,那么这个子模块就是Web服务器的实现。所谓连接器(Connector)就是一个连接客户和应用服务器的桥梁,它接收用户的请求,并把用户请求包装成标准的Http请求(包含协议名称,请求头Head,请求方法是Get还是Post等等)。同时,这个子模块还按照标准的Http协议,负责给客户端发送响应页面,比如在请求页面未发现时,connector就会给客户端浏览器发送标准的Http 404错误响应页面
- Resource模块: 这个子模块包含一些资源文件,如Server.xml及Web.xml配置文件。严格说来,这个子模块不包含java源代码,但是它还是Tomcat编译运行所必需的
2.由Server.xml的结构看Tomcat的体系结构:
 //顶层类元素,可以包括多个Service

     //顶层类元素,可包含一个Engine,多个Connecter

         //连接器类元素,代表通信接口

                 //容器类元素,为特定的Service组件处理客户请求,要包含多个Host

                         //容器类元素,为特定的虚拟主机组件处理客户请求,可包含多个Context

                                  //容器类元素,为特定的Web应用处理所有的客户请求
实际源码如下:
Tomcat的体系结构:
Tomcat的核心组件:Connector和Container
- Connector 主要负责对外交流;Container 主要处理 Connector 接受的请求,主要是处理内部事务
- 一个Container可以选择多个Connecter,多个Connector和一个Container就形成了一个Service
- Service可以对外提供服务,而Server服务器控制整个Tomcat的生命周期
二、Tomcat Server处理一个HTTP请求的过程
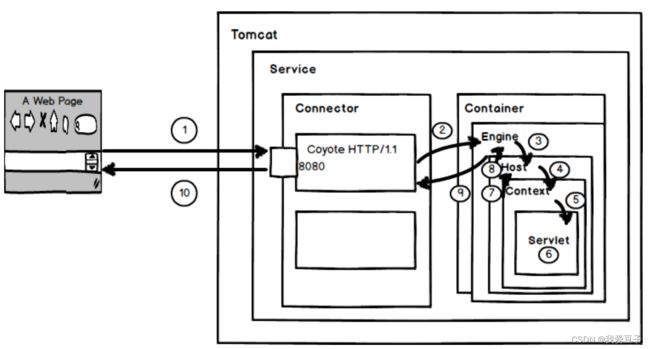
Tomcat Server处理一个HTTP请求的过程:
- 用户点击网页内容,请求被发送到本机端口8080,被在那里监听的Coyote HTTP/1.1 Connector获得
- Connector把该请求交给它所在的Service的Engine来处理,并等待Engine的回应
- Engine获得请求localhost/test/index.jsp,匹配所有的虚拟主机Host
- Engine匹配到名为localhost的Host(即使匹配不到也把请求交给该Host处理,因为该Host被定义为该Engine的默认主机),名为localhost的Host获得请求/test/index.jsp,匹配它所拥有的所有的Context。Host匹配到路径为/test的Context(如果匹配不到就把该请求交给路径名为“ ”的Context去处理)
- path=“/test”的Context获得请求/index.jsp,在它的mapping table中寻找出对应的Servlet。Context匹配到URL PATTERN为*.jsp的Servlet,对应于JspServlet类
- 构造HttpServletRequest对象和HttpServletResponse对象,作为参数调用JspServlet的doGet()或doPost().执行业务逻辑、数据存储等程序
- Context把执行完之后的HttpServletResponse对象返回给Host。
- Host把HttpServletResponse对象返回给Engine。
- Engine把HttpServletResponse对象返回Connector。
- Connector把HttpServletResponse对象返回给客户Browser。
三、Tomcat中重要接口
1.Service 接口
- Service 接口中定义的方法主要是为了关联 Connector 和 Container,同时会初始化它下面的其它组件
- 注意接口中它并没有规定一定要控制它下面的组件的生命周期
- 所有组件的生命周期在一个 Lifecycle 的接口中控制
- Tomcat 中 Service 接口的标准实现类是 StandardService 它不仅实现了 Service 接口,同时还实现了 Lifecycle 接口,这样它就可以控制它下面的组件的生命周期了
StandardService 中主要的几个方法实现的代码:
StandardService. SetContainer:
- 先判断当前的这个 Service 有没有已经关联了 Container,如果已经关联了,那么去掉这个关联关系—— oldContainer.setService(null)。如果这个 oldContainer 已经被启动了,结束它的生命周期。
-
后再替换新的关联、再初始化并开始这个新的 Container的生命周期。最后将这个过程通知感兴趣的事件监听程序。
-
值得注意的地方就是,修改 Container 时要将新的 Container 关联到每个 Connector
public void setContainer(Container container) {
Container oldContainer = this.container;
if ((oldContainer != null) && (oldContainer instanceof Engine))
((Engine) oldContainer).setService(null);
this.container = container;
if ((this.container != null) && (this.container instanceof Engine))
((Engine) this.container).setService(this);
if (started && (this.container != null) && (this.container instanceof Lifecycle)) {
try {
((Lifecycle) this.container).start();
} catch (LifecycleException e) {
;
}
}
synchronized (connectors) {
for (int i = 0; i < connectors.length; i++)
connectors[i].setContainer(this.container);
}
if (started && (oldContainer != null) && (oldContainer instanceof Lifecycle)) {
try {
((Lifecycle) oldContainer).stop();
} catch (LifecycleException e) {
;
}
}
support.firePropertyChange("container", oldContainer, this.container);
}
StandardService. addConnector
-
首先是设置关联关系,然后是初始化工作,开始新的生命周期
-
这里值得一提的是:注意 Connector 用的是数组,而不是 List 集合,这个从性能角度考虑可以理解,有趣的是这里用了数组但是并没有向我们平常那样,一开始就分配一个固定大小的数组,它这里的实现机制是:重新创建一个当前大小的数组对象,然后将原来的数组对象 copy 到新的数组中,这种方式实现了类似的动态数组的功能
public void addConnector(Connector connector) {
synchronized (connectors) {
connector.setContainer(this.container);
connector.setService(this);
Connector results[] = new Connector[connectors.length + 1];
System.arraycopy(connectors, 0, results, 0, connectors.length);
//从connectors索引为0开始,长度为connectors.length的数组,复制到数组results中,从索引为0开始复制
results[connectors.length] = connector;
connectors = results;
if (initialized) {
try {
connector.initialize();
} catch (LifecycleException e) {
e.printStackTrace(System.err);
}
}
if (started && (connector instanceof Lifecycle)) {
try {
((Lifecycle) connector).start();
} catch (LifecycleException e) {
;
}
}
support.firePropertyChange("connector", null, connector);
}
}
最新的 Tomcat6 中 StandardService 也基本没有变化,从 Tomcat5 开始 Service、Server 和容器类都继承了 MBeanRegistration 接口,Mbeans 的管理更加合理
2. Server接口
- Server的标准实现类 StandardServer实现了addService等方法,同时也实现了 Lifecycle、MbeanRegistration 两个接口的所有方法
StandardServer.addService
- 从代码第一句就知道了 Service 和 Server 是相互关联的
- Server 也是和 Service 管理 Connector 一样管理它,也是将 Service 放在一个数组中,后面部分的代码也是管理这个新加进来的 Service 的生命周期。Tomcat6 中也是没有什么变化的
public void addService(Service service) {
service.setServer(this);
synchronized (services) {
Service results[] = new Service[services.length + 1];
System.arraycopy(services, 0, results, 0, services.length);
results[services.length] = service;
services = results;
if (initialized) {
try {
service.initialize();
} catch (LifecycleException e) {
e.printStackTrace(System.err);
}
}
if (started && (service instanceof Lifecycle)) {
try {
((Lifecycle) service).start();
} catch (LifecycleException e) {
;
}
}
support.firePropertyChange("service", null, service);
}
}
3. Lifecycle接口
- Tomcat 中组件的生命周期是通过 Lifecycle 接口来控制的
- 组件只要继承 Lifecycle 接口并实现其中的方法就可以统一被拥有它的组件控制了,这样一层一层的直到一个最高级的组件就可以控制 Tomcat 中所有组件的生命周期,这个最高的组件就是 Server,而控制 Server 的是 Startup,也就是您启动和关闭 Tomcat
- 除了控制生命周期的 Start 和 Stop 方法外还有一个监听机制,在生命周期开始和结束的时候做一些额外的操作
Lifecycle 接口的方法的实现都在其它组件中,就像前面中说的,组件的生命周期由包含它的父组件控制,所以它的 Start 方法自然就是调用它下面的组件的 Start 方法,Stop 方法也是一样。如在 Server 中 Start 方法就会调用 Service 组件的 Start 方法
StandardServer.Start代码如下:
- 监听的代码会包围 Service 组件的启动过程,就是简单的循环启动所有 Service 组件的 Start 方法,但是所有 Service 必须要实现 Lifecycle 接口,这样做会更加灵活
public void start() throws LifecycleException {
if (started) {
log.debug(sm.getString("standardServer.start.started"));
return;
}
lifecycle.fireLifecycleEvent(BEFORE_START_EVENT, null);
lifecycle.fireLifecycleEvent(START_EVENT, null);
started = true;
synchronized (services) {
for (int i = 0; i < services.length; i++) {
if (services[i] instanceof Lifecycle)
((Lifecycle) services[i]).start();
}
}
lifecycle.fireLifecycleEvent(AFTER_START_EVENT, null);
}
Server 的 Stop 方法代码如下:
public void stop() throws LifecycleException {
if (!started)
return;
lifecycle.fireLifecycleEvent(BEFORE_STOP_EVENT, null);
lifecycle.fireLifecycleEvent(STOP_EVENT, null);
started = false;
for (int i = 0; i < services.length; i++) {
if (services[i] instanceof Lifecycle)
((Lifecycle) services[i]).stop();
}
lifecycle.fireLifecycleEvent(AFTER_STOP_EVENT, null);
}
四、Tomcat中的组件
1. connector组件
- 主要任务是负责接收浏览器的发过来的 tcp 连接请求,创建一个 Request 和 Response 对象,分别用于和请求端交换数据
- 然后分配线程让 Container 来处理这个请求,并把产生的 Request 和 Response 对象传给处理这个请求的线程
- Tomcat5 中默认的 Connector 是 Coyote,这个 Connector 是可以选择替换的
- Connector 最重要的功能就是接收连接请求,然后分配线程让 Container 来处理这个请求,所以这必然是多线程的,多线程的处理是 Connector 设计的核心
- Tomcat5 将这个过程更加细化,它将 Connector 划分成 Connector、Processor、Protocol, 另外 Coyote 也定义自己的 Request 和 Response 对象
HttpConnector.Start方法:
public void start() throws LifecycleException {
if (started)
throw new LifecycleException
(sm.getString("httpConnector.alreadyStarted"));
threadName = "HttpConnector[" + port + "]";
lifecycle.fireLifecycleEvent(START_EVENT, null);
started = true;
threadStart();
while (curProcessors < minProcessors) {
if ((maxProcessors > 0) && (curProcessors >= maxProcessors))
break;
HttpProcessor processor = newProcessor();
recycle(processor);
}
}
threadStart() 执行就会进入等待请求的状态,直到一个新的请求到来才会激活它继续执行,这个激活是在 HttpProcessor 的 assign 方法中,这个方法是代码如下 :
HttpProcessor.assign:
synchronized void assign(Socket socket) {
while (available) {
try {
wait();
} catch (InterruptedException e) {
}
}
this.socket = socket;
available = true;
notifyAll();
if ((debug >= 1) && (socket != null))
log(" An incoming request is being assigned");
}
创建 HttpProcessor 对象是会把 available 设为 false,所以当请求到来时不会进入 while 循环,将请求的 socket 赋给当期处理的 socket,并将 available 设为 true,当 available 设为 true 是 HttpProcessor 的 run 方法将被激活,接下去将会处理这次请求。Run 方法代码如下:
HttpProcessor.Run:
public void run() {
while (!stopped) {
Socket socket = await();
if (socket == null)
continue;
try {
process(socket);
} catch (Throwable t) {
log("process.invoke", t);
}
connector.recycle(this);
}
synchronized (threadSync) {
threadSync.notifyAll();
}
}
解析 socket 的过程在 process 方法中,process 方法的代码片段如下:
HttpProcessor.process:
private void process(Socket socket) {
boolean ok = true;
boolean finishResponse = true;
SocketInputStream input = null;
OutputStream output = null;
try {
input = new SocketInputStream(socket.getInputStream(),connector.getBufferSize());
} catch (Exception e) {
log("process.create", e);
ok = false;
}
keepAlive = true;
while (!stopped && ok && keepAlive) {
finishResponse = true;
try {
request.setStream(input);
request.setResponse(response);
output = socket.getOutputStream();
response.setStream(output);
response.setRequest(request);
((HttpServletResponse) response.getResponse())
.setHeader("Server", SERVER_INFO);
} catch (Exception e) {
log("process.create", e);
ok = false;
}
try {
if (ok) {
parseConnection(socket);
parseRequest(input, output);
if (!request.getRequest().getProtocol().startsWith("HTTP/0"))
parseHeaders(input);
if (http11) {
ackRequest(output);
if (connector.isChunkingAllowed())
response.setAllowChunking(true);
}
}
。。。。。。
try {
((HttpServletResponse) response).setHeader
("Date", FastHttpDateFormat.getCurrentDate());
if (ok) {
connector.getContainer().invoke(request, response);
}
。。。。。。
}
try {
shutdownInput(input);
socket.close();
} catch (IOException e) {
;
} catch (Throwable e) {
log("process.invoke", e);
}
socket = null;
}
当 Connector 将 socket 连接封装成 request 和 response 对象后接下来的事情就交给 Container 来处理了
2. Servlet 容器“Container”
- Container 是容器的父接口,所有子容器都必须实现这个接口
- Container 容器的设计用的是典型的责任链的设计模式,它有四个子容器组件构成,分别是:Engine、Host、Context、Wrapper,这四个组件不是平行的,而是父子关系,Engine 包含 Host,Host 包含 Context,Context 包含 Wrapper
- 通常一个 Servlet class 对应一个 Wrapper,如果有多个 Servlet 就可以定义多个 Wrapper,如果有多个 Wrapper 就要定义一个更高的 Container 了,如 Context,Context 通常就是对应下面这个配置:
Server.xml:
path="/library"
docBase="D:\projects\library\deploy\target\library.war"
reloadable="true"
/>
Context 还可以定义在父容器 Host 中,Host 不是必须的,但是要运行 war 程序,就必须要 Host,因为 war 中必有 web.xml 文件,这个文件的解析就需要 Host 了,如果要有多个 Host 就要定义一个 top 容器 Engine 了。而 Engine 没有父容器了,一个 Engine 代表一个完整的 Servlet 引擎
从 Tomcat5 开始,子容器的路由放在了 request 中,request 中保存了当前请求正在处理的 Host、Context 和 wrapper!!!
3. Engine 容器
- Engine 容器比较简单,它只定义了一些基本的关联关系
Engine 接口的标准实现类是 StandardEngine,这个类注意一点就是 Engine 没有父容器了,如果调用 setParent 方法时将会报错。添加子容器也只能是 Host 类型的,代码如下:
StandardEngine. addChild
public void addChild(Container child) {
if (!(child instanceof Host))
throw new IllegalArgumentException
(sm.getString("standardEngine.notHost"));
super.addChild(child);
}
public void setParent(Container container) {
throw new IllegalArgumentException
(sm.getString("standardEngine.notParent"));
}
Engine 容器的初始化方法也就是初始化和它相关联的组件,以及一些事件的监听
4. Host 容器
- Host 是 Engine 的子容器,一个 Host 在 Engine 中代表一个虚拟主机,这个虚拟主机的作用就是运行多个应用,它负责安装和展开这些应用,并且标识这个应用以便能够区分它们。
- Host的子容器通常是 Context,Host除了关联子容器外,还有就是保存一个主机应该有的信息
- StandardHost 还实现了 Deployer 接口,这个接口中的主要方法都是安装、展开、启动和结束每个 web application
- Deployer 接口的实现是 StandardHostDeployer,这个类实现了的几个方法,Host 可以调用这些方法完成应用的部署等
5. Context 容器
- Context 代表 Servlet 的 Context,它具备了 Servlet 运行的基本环境,理论上只要有 Context 就能运行 Servlet 了。简单的 Tomcat 可以没有 Engine 和 Host
- Context 最重要的功能就是管理它里面的 Servlet 实例
- Servlet 实例在 Context 中是以 Wrapper 出现的
Context 如何才能找到正确的 Servlet 来执行它呢?
Tomcat5 以前是通过一个 Mapper 类来管理的,Tomcat5 以后这个功能被移到了 request 中
Context 准备 Servlet 的运行环境是在 Start 方法开始的,这个方法的代码片段如下:
StandardContext.start:
- 它主要是设置各种资源属性和管理组件,还有非常重要的就是启动子容器和 Pipeline
synchronized void start() throws LifecycleException {
………
if( !initialized ) {
try {
init();
} catch( Exception ex ) {
throw new LifecycleException("Error initializaing ", ex);
}
}
………
lifecycle.fireLifecycleEvent(BEFORE_START_EVENT, null);
setAvailable(false);
setConfigured(false);
boolean ok = true;
File configBase = getConfigBase();
if (configBase != null) {
if (getConfigFile() == null) {
File file = new File(configBase, getDefaultConfigFile());
setConfigFile(file.getPath());
try {
File appBaseFile = new File(getAppBase());
if (!appBaseFile.isAbsolute()) {
appBaseFile = new File(engineBase(), getAppBase());
}
String appBase = appBaseFile.getCanonicalPath();
String basePath =
(new File(getBasePath())).getCanonicalPath();
if (!basePath.startsWith(appBase)) {
Server server = ServerFactory.getServer();
((StandardServer) server).storeContext(this);
}
} catch (Exception e) {
log.warn("Error storing config file", e);
}
} else {
try {
String canConfigFile = (new File(getConfigFile())).getCanonicalPath();
if (!canConfigFile.startsWith (configBase.getCanonicalPath())) {
File file = new File(configBase, getDefaultConfigFile());
if (copy(new File(canConfigFile), file)) {
setConfigFile(file.getPath());
}
}
} catch (Exception e) {
log.warn("Error setting config file", e);
}
}
}
………
Container children[] = findChildren();
for (int i = 0; i < children.length; i++) {
if (children[i] instanceof Lifecycle)
((Lifecycle) children[i]).start();
}
if (pipeline instanceof Lifecycle)
((Lifecycle) pipeline).start();
………
}
我们知道 Context 的配置文件中有个 reloadable 属性,如下面配置:
Server.xml:
path="/library"
docBase="D:\projects\library\deploy\target\library.war"
reloadable="true"
/>
当这个 reloadable 设为 true 时,war 被修改后 Tomcat 会自动的重新加载这个应用。如何做到这点的呢 ? 这个功能是在 StandardContext 的 backgroundProcess 方法中实现的,这个方法的代码如下:
StandardContext. backgroundProcess:
public void backgroundProcess() {
if (!started) return;
count = (count + 1) % managerChecksFrequency;
if ((getManager() != null) && (count == 0)) {
try {
getManager().backgroundProcess();
} catch ( Exception x ) {
log.warn("Unable to perform background process on manager",x);
}
}
if (getLoader() != null) {
if (reloadable && (getLoader().modified())) {
try {
Thread.currentThread().setContextClassLoader
(StandardContext.class.getClassLoader());
reload();
} finally {
if (getLoader() != null) {
Thread.currentThread().setContextClassLoader
(getLoader().getClassLoader());
}
}
}
if (getLoader() instanceof WebappLoader) {
((WebappLoader) getLoader()).closeJARs(false);
}
}
}
- 它会调用 reload 方法,而 reload 方法会先调用 stop 方法然后再调用 Start 方法,完成 Context 的一次重新加载
- 可以看出执行 reload 方法的条件是 reloadable 为 true 和应用被修改,那么这个 backgroundProcess 方法是怎么被调用的呢?
- 这个方法是在 ContainerBase 类中定义的内部类 ContainerBackgroundProcessor 被周期调用的,这个类是运行在一个后台线程中,它会周期的执行 run 方法,它的 run 方法会周期调用所有容器的 backgroundProcess 方法,因为所有容器都会继承 ContainerBase 类,所以所有容器都能够在 backgroundProcess 方法中定义周期执行的事件
6. Wrapper 容器
- Wrapper 代表一个 Servlet,它负责管理一个 Servlet,包括的 Servlet 的装载、初始化、执行以及资源回收
- Wrapper 是最底层的容器,它没有子容器了,所以调用它的 addChild 将会报错
- Wrapper 的实现类是 StandardWrapper
- 由于Servlet 在Web初始化的时候已经包装在StandardWrapper ,则对于初始化 Servlet,是在StandardWrapper的initServlet方法中,这个方法很简单就是调用 Servlet 的 init 的方法,同时把包装了 StandardWrapper 对象的 StandardWrapperFacade 作为 ServletConfig 传给 Servlet
- Servlet 可以获得的信息都在 StandardWrapperFacade 封装,这些信息又是在 StandardWrapper 对象中拿到的。所以 Servlet 可以通过 ServletConfig 拿到有限的容器的信息
五、Tomcat和其他WEB容器的区别
1.Tomcat和物理服务器的区别
Tomcat:
- 本质:软件 Web 应用服务器----一个免费的开放源代码的Web 应用服务器,属于轻量级应用服务器,在中小型系统和并发访问用户不是很多的场合下被普遍使用,是开发和调试JSP 程序的首选
- 用途:
- 当在一台机器(即物理服务器,也就是物理机)上配置好Apache 服务器,可利用它响应HTML页面的访问请求。实际上Tomcat是Apache 服务器的扩展,但运行时它是独立运行的,所以当你运行tomcat 时,它实际上作为一个与Apache 独立的进程单独运行的,Tomcat 实际上运行JSP 页面和Servlet
- Tomcat和IIS等Web服务器一样,具有处理HTML页面的功能,另外它还是一个Servlet和JSP容器,独立的Servlet容器是Tomcat的默认模式
物理服务器:
-
本质:硬件,也就是我们经常讲的服务器或者物理机,我们的PC就是一台性能较低的网络服务器,常见的有 云服务器(例如阿里云ECS)等
-
组成:处理器、硬盘、内存、系统总线等,和通用的计算机架构类似,但是由于需要提供高可靠的服务,因此在处理能力、稳定性、可靠性、安全性、可扩展性、可管理性等方面要求较高
2.详解tomcat 与 nginx,apache的区别及优缺点
Apache
- Apache HTTP服务器是一个模块化的服务器,可以运行在几乎所有广泛使用的计算机平台上
- Apache属于应用服务器。Apache支持支持模块多,性能稳定,Apache本身是静态解析,适合静态HTML、图片等,但可以通过扩展脚本、模块等支持动态页面等。(Apche可以支持PHPcgiperl,但是要使用Java的话,你需要Tomcat在Apache后台支撑,将Java请求由Apache转发给Tomcat处理。) 缺点:配置相对复杂,自身不支持动态页面
Tomcat:
- Tomcat是应用(Java)服务器,它只是一个Servlet(JSP也翻译成Servlet)容器,可以认为是Apache的扩展,但是可以独立于Apache运行
Nginx:
- Nginx是俄罗斯人编写的十分轻量级的HTTP服务器,Nginx,它的发音为“engine X”,是一个高性能的HTTP和反向代理服务器,同时也是一个IMAP/POP3/SMTP 代理服务器
1)区别:
Apache与Tomcat的比较:
- 相同点:
- 两者都是Apache组织开发的
- 两者都有HTTP服务的功能
- 两者都是免费的
- 不同点:
- Apache是专门用来提供HTTP服务的,以及相关配置的(例如虚拟主机、URL转发等等)放服务器
- Tomcat是Apache组织在符合Java EE的JSP、Servlet标准下开发的一个JSP服务器
- Apache是一个Web服务器环境程序,启用他可以作为Web服务器使用,不过只支持静态网页如(ASP,PHP,CGI,JSP)等动态网页的就不行。如果要在Apache环境下运行JSP的话就需要一个解释器来执行JSP网页,而这个JSP解释器就是Tomcat
- Apache:侧重于HTTPServer;Tomcat:侧重于Servlet引擎,如果以Standalone方式运行,功能上与Apache等效,支持JSP,但对静态网页不太理想
-
Apache是Web服务器,Tomcat是应用(Java)服务器,它只是一个Servlet(JSP也翻译成Servlet)容器,可以认为是Apache的扩展,但是可以独立于Apache运行
实际使用中Apache与Tomcat常常是整合使用:
- 如果客户端请求的是静态页面,则只需要Apache服务器响应请求。
- 如果客户端请求动态页面,则是Tomcat服务器响应请求。 因为JSP是服务器端解释代码的,这样整合就可以减少Tomcat的服务开销。
- 可以理解Tomcat为Apache的一种扩展。
Nginx与Apache比较:
- nginx相对于apache的优点:
- 轻量级:同样起web 服务,比apache占用更少的内存及资源
- 抗并发:nginx 处理请求是异步非阻塞的,而apache 则是阻塞型的,在高并发下nginx 能保持低资源低消耗高性能高度模块化的设计,编写模块相对简单提供负载均衡
- apache 相对于nginx 的优点:
- apache的 rewrite 比nginx 的强大
-
支持动态页面;
-
支持的模块多,基本涵盖所有应用;
-
性能稳定,而nginx相对bug较多
两者优缺点比较:
- Nginx 配置简洁, Apache 复杂 ;
- Nginx 静态处理性能比 Apache 高 3倍以上 ;
- Apache 对 PHP 支持比较简单,Nginx 需要配合其他后端用;Apache 的组件比 Nginx 多 ;
- apache是同步多进程模型,一个连接对应一个进程;nginx是异步的,多个连接(万级别)可以对应一个进程;
- nginx处理静态文件好,耗费内存少;
- 动态请求由apache去做,nginx只适合静态和反向;
- Nginx适合做前端服务器,负载性能很好;
- Nginx本身就是一个反向代理服务器 ,且支持负载均衡
3.总结:
- Nginx优点:负载均衡、反向代理、处理静态文件优势。nginx处理静态请求的速度高于apache;
- Apache优点:相对于Tomcat服务器来说处理静态文件是它的优势,速度快。Apache是静态解析,适合静态HTML、图片等。
- Tomcat:动态解析容器,处理动态请求,是编译JSPServlet的容器,Nginx有动静分离机制,静态请求直接就可以通过Nginx处理,动态请求才转发请求到后台交由Tomcat进行处理。
- Apache在处理动态有优势,Nginx并发性比较好,CPU内存占用低,如果rewrite频繁,那还是Apache较适合


