Unity RenderFeature架构分析
自定义RenderFeature接口流程
URP内部ScriptableRenderPass分析
public、protected属性
- renderPassEvent :渲染事件发生的时刻
- colorAttachments :渲染的颜色纹理列表 m_ColorAttachments
- colorAttachment :m_ColorAttachments[0];
- depthAttachment :m_DepthAttachment
- colorStoreActions:
RenderBufferStoreAction[]【Enum】这个 枚举 描述了当GPU完成渲染到渲染目标时应该在渲染目标上做什么。(与MSAA是否存储或解析有关) - depthStoreAction :
RenderBufferStoreAction【Enum】 - input :
ScriptableRenderPassInput【Enum】- None = 0x0,
- Depth = 0x1,
- Normal = 0x2,
- Color = 0x4,
- Motion = 0x8
- clearFlag :
ClearFlag【Enum】- None = 0x0,
- Color = 0x1,
- Depth = 0x2,
- Stencil = 0x4,
- DepthStencil = 0x6,
- ColorStencil = 0x5,
- All = 0x7
- clearColor :Color m_ClearColor
private 属性
internal 属性(同一命名空间使用)
        internal bool overrideCameraTarget { get; set; }
        internal bool isBlitRenderPass { get; set; }
        internal bool useNativeRenderPass { get; set; }
        internal int renderTargetWidth { get; set; }
        internal int renderTargetHeight { get; set; }
        internal int renderTargetSampleCount { get; set; }
        internal bool depthOnly { get; set; }
        internal bool isLastPass { get; set; }//这个标志每帧更新,以跟踪哪一帧是当前相机的最后一帧
        internal int renderPassQueueIndex { get; set; }//索引来跟踪当前帧中的位置
        internal NativeArray<int> m_ColorAttachmentIndices;
		internal NativeArray<int> m_InputAttachmentIndices;
		internal GraphicsFormat[] renderTargetFormat { get; set; }
		RenderTargetIdentifier[] m_ColorAttachments = new RenderTargetIdentifier[] { BuiltinRenderTextureType.CameraTarget };
		internal RenderTargetIdentifier[] m_InputAttachments = new RenderTargetIdentifier[8];
		internal bool[] m_InputAttachmentIsTransient = new bool[8];
		RenderTargetIdentifier m_DepthAttachment = BuiltinRenderTextureType.CameraTarget;
		ScriptableRenderPassInput m_Input = ScriptableRenderPassInput.None;
		ClearFlag m_ClearFlag = ClearFlag.None;
		Color m_ClearColor = Color.black;
URP内部ScriptableRenderer分析
ScriptableRenderer 管理所有的ScriptableRenderFeature以及ScriptableRenderPass
static数据
internal static ScriptableRenderer current = null;
private static bool m_UseOptimizedStoreActions = false;
static RenderTargetIdentifier[] m_ActiveColorAttachments = new RenderTargetIdentifier[] { 0, 0, 0, 0, 0, 0, 0, 0 };
static RenderTargetIdentifier m_ActiveDepthAttachment;
static RenderTargetIdentifier[][] m_TrimmedColorAttachmentCopies = new RenderTargetIdentifier[][]
private static Plane[] s_Planes = new Plane[6];
private static Vector4[] s_VectorPlanes = new Vector4[6];
核心数据
List<ScriptableRenderPass> m_ActiveRenderPassQueue = new List<ScriptableRenderPass>(32);
List<ScriptableRendererFeature> m_RendererFeatures = new List<ScriptableRendererFeature>(10);
RenderTargetIdentifier m_CameraColorTarget;//当前渲染管线上一帧结果的Color纹理
RenderTargetIdentifier m_CameraDepthTarget;
RenderTargetIdentifier m_CameraResolveTarget;
其他数据
private StoreActionsOptimization m_StoreActionsOptimizationSetting = StoreActionsOptimization.Auto;
const int k_RenderPassBlockCount = 4;
bool m_FirstTimeCameraColorTargetIsBound = true;
bool m_FirstTimeCameraDepthTargetIsBound = true;
bool m_IsPipelineExecuting = false;
internal bool isCameraColorTargetValid = false;
internal bool disableNativeRenderPassInFeatures = false;
internal bool useRenderPassEnabled = false;
internal bool useDepthPriming { get; set; } = false;
internal bool stripShadowsOffVariants { get; set; } = false;
internal bool stripAdditionalLightOffVariants { get; set; } = false;
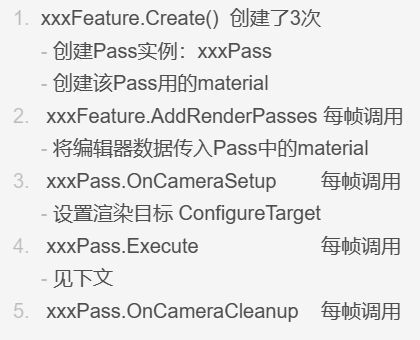
首先,当创建实例Pass时调用父类构造函数
public ScriptableRenderPass()
{
    renderPassEvent = RenderPassEvent.AfterRenderingOpaques;
    m_ColorAttachments = new RenderTargetIdentifier[] { BuiltinRenderTextureType.CameraTarget, 0, 0, 0, 0, 0, 0, 0 };
    m_InputAttachments = new RenderTargetIdentifier[] { -1, -1, -1, -1, -1, -1, -1, -1 };
    m_InputAttachmentIsTransient = new bool[] { false, false, false, false, false, false, false, false };
    m_DepthAttachment = BuiltinRenderTextureType.CameraTarget;
    m_ColorStoreActions = new RenderBufferStoreAction[] { RenderBufferStoreAction.Store, 0, 0, 0, 0, 0, 0, 0 };
    m_DepthStoreAction = RenderBufferStoreAction.Store;
    m_OverriddenColorStoreActions = new bool[] { false, false, false, false, false, false, false, false };
    m_OverriddenDepthStoreAction = false;
    m_ClearFlag = ClearFlag.None;
    m_ClearColor = Color.black;
    overrideCameraTarget = false;
    isBlitRenderPass = false;
    profilingSampler = new ProfilingSampler($"Unnamed_{nameof(ScriptableRenderPass)}");
    useNativeRenderPass = true;
    renderTargetWidth = -1;
    renderTargetHeight = -1;
    renderTargetSampleCount = -1;
    renderPassQueueIndex = -1;
    renderTargetFormat = new GraphicsFormat[]
    {
        GraphicsFormat.None, GraphicsFormat.None, GraphicsFormat.None,
        GraphicsFormat.None, GraphicsFormat.None, GraphicsFormat.None, GraphicsFormat.None, GraphicsFormat.None
    };
    depthOnly = false;
}
其次、调用AddRenderPasses时,将实例化Pass加入队列
使用函数
renderer.EnqueuePass(_scannerPass);
将该Pass加入到URP Renderer管线中
public void EnqueuePass(ScriptableRenderPass pass)
{
    m_ActiveRenderPassQueue.Add(pass);
    if (disableNativeRenderPassInFeatures)
        pass.useNativeRenderPass = false;
}
之后、调用OnCameraSetup,设置当前Pass的目标纹理
public override void OnCameraSetup(CommandBuffer cmd, ref RenderingData renderingData)
{
    // 将当前摄像机的cameraColorTarget作为该Pass渲染的目标纹理
    ConfigureTarget(renderingData.cameraData.renderer.cameraColorTarget);
}
最后、调用Execute函数渲染
作为后处理,我们可以通过如下流程
1. 创建着色器属性名称唯一标识符
int tempRT = Shader.PropertyToID("标识符名称,可自定义");
2. 根据当前摄像机的目标纹理设置,创建新的临时纹理
cmd.GetTemporaryRT(tempRT, renderingData.cameraData.cameraTargetDescriptor);
RenderTextureDescriptor这个结构体包含了创建RenderTexture所需的所有信息。即renderingData.cameraData.cameraTargetDescriptor返回的值
3. 对一个纹理做后处理
后处理材质为_material,使用Pass 0;并保存到下一个纹理中。
cmd.Blit(colorAttachment, tempRT, _material, 0);
Blit意思为位块传送,即将colorAttachment的所有数据,复制到tempRT中。
而这里,Unity不仅仅做位块传输,而是 使用着色器 将纹理中的像素数据复制到渲染纹理中。
public void Blit(RenderTargetIdentifier source, RenderTargetIdentifier dest, Material mat, int pass)
{
	// 设置描述如何执行命令缓冲区的意图的标志。
    ValidateAgainstExecutionFlags(CommandBufferExecutionFlags.None, CommandBufferExecutionFlags.AsyncCompute);
    // 位块传输   allSlices---所有位块
    Blit_Identifier(ref source, ref dest, mat, pass, new Vector2(1f, 1f), new Vector2(0f, 0f), Texture2DArray.allSlices, 0);
}
内部代码被封装,不可见!
4. 将临时纹理复制给目标
如果不使用自己的material,则使用Unity默认的mat,即只复制结果。
cmd.Blit(tempRT, colorAttachment);
5. 提交命令,释放命令池
//上下文执行这个CommandBuffer
context.ExecuteCommandBuffer(cmd);
//释放这个临时纹理
cmd.ReleaseTemporaryRT(tempRT);
//CommandBuffer池释放这个cmd
CommandBufferPool.Release(cmd);
Shader中的数据
复制的数据将作为_MainTex录入。
Properties
{
	_MainTex("MainTex",2D)= "white"{}
}
TEXTURE2D(_MainTex);
SAMPLER(sampler_MainTex);
深度图需要在UniversalRenderPipelineAsset中勾选Depth Texture。
但是如果未勾选,如果内部渲染有使用到DepthTexture,也可能会生成DepthTexture。
TEXTURE2D(_CameraDepthTexture);
SAMPLER(sampler_CameraDepthTexture);
