STM32单片机项目实例:基于TouchGFX的智能手表设计(7)MVP架构下的交互逻辑设计
STM32单片机项目实例:基于TouchGFX的智能手表设计(7)MVP架构下的交互逻辑设计
目录
一、概述
二、MVP架构下的交互逻辑
一、概述
本文例程是基于 TouchGFX 的智能手表设计—Designer 软件 UI 设计的例程 0B-2_STM32U575_MVP_Interactive工程的拷贝,用于MVP架构下的逻辑代码添加。
二、MVP架构下的交互逻辑
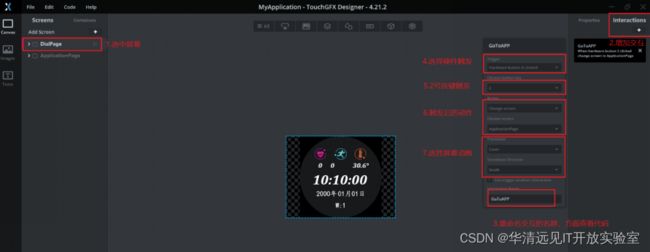
将资料光盘中的0B-2_STM32U575_MVP_Interactive例程拷贝至工程目录,并将文件夹重命名为0B-3_STM32U575_MVP_Interactive,打开…\0B-3_STM32U575_MVP_Interactive\TouchGFX 下的0B-2_STM32U575_MVP_Interactive.touchgfx,点击DialPage,在Interactions增加GoToAPP的硬件交互,用于表盘页面与APP页面的切换(硬件按键触发)。
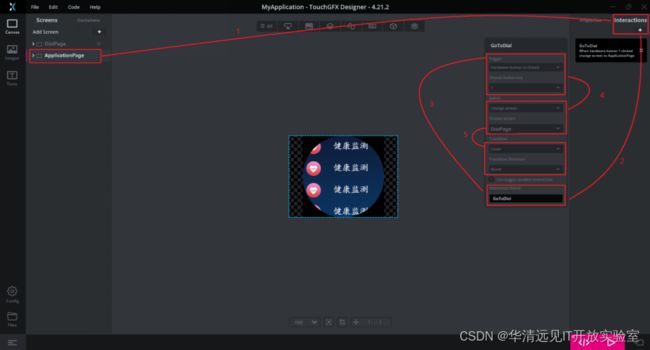
点击ApplicationPage,在Interactions增加GoToDial的硬件交互,用于APP页面与表盘页面的切换(硬件按键触发)。
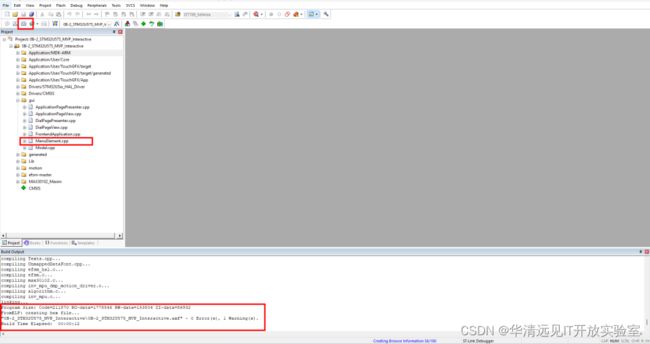
点击右下角的.生成代码,打开MDK工程,进行工程的全编译。
点击工程管理目录下的gui,打开MenuElement.cpp与MenuElement.hpp,在MenuElement.hpp中添加Scroll Wheel的相关函数声明。
#ifndef MENUELEMENT_HPP
#define MENUELEMENT_HPP
//
#include
#include
#include
//
class MenuElement : public MenuElementBase
{
public:
    MenuElement();
    virtual ~MenuElement() {}
		//
    virtual void initialize();
		int8_t number;
		void offset(int16_t x);
		virtual void setY(int16_t y);
		void setNumber(int no);
protected:
		//声明点击事件回调函数
		Callback imageClickHandler;
		//声明点击事件处理函数
    void image_click_handler(const touchgfx::ScalableImage &image , const touchgfx::ClickEvent &event);
};
#endif // MENUELEMENT_HPP
在MenuElement.cpp文件中增加以下代码:
#include

MenuElement::MenuElement():imageClickHandler(this,&MenuElement::image_click_handler)
{

}
//
void MenuElement::initialize()
{
    MenuElementBase::initialize();
}
//重新设置组件的x轴位置
void MenuElement::offset(int16_t x)
{
		//设置图标位置
		icon.moveTo(20 + x, icon.getY());
		//设置文本位置,文本跟随图标移动
		text.moveTo(43 + icon.getX(), 5 + icon.getY());
}
//点击图标后触发事件
void MenuElement::image_click_handler(const touchgfx::ScalableImage &image , const touchgfx::ClickEvent &event)
{
		touchgfx::ClickEvent::ClickEventType type = event.getType();
		if(type==touchgfx::ClickEvent::ClickEventType::PRESSED)
		{
				if(&image == &icon)
				{
						switch(number % 7)
						{
								case 0:		//健康监测事件触发,健康监测图标与文字
									icon.setBitmap(touchgfx::Bitmap(BITMAP_APPLICATIONPAGE_IMAGE_PRESSED_HEALTH_ID));
									icon.invalidate();
									//
									break;
								case 1:		//姿态读取事件触发,姿态读取图标与文字
									icon.setBitmap(touchgfx::Bitmap(BITMAP_APPLICATIONPAGE_IMAGE_PRESSED_6050_ID));
									icon.invalidate();
									//
break;
								case 2:		//事件触发,环境信息图标与文字
									icon.setBitmap(touchgfx::Bitmap(BITMAP_APPLICATIONPAGE_IMAGE_PRESSED_TEMP_ID));
									icon.invalidate();
									//
								break;
								case 3:		//芯片信息事件触发,芯片信息图标与文字
									icon.setBitmap(touchgfx::Bitmap(BITMAP_APPLICATIONPAGE_IMAGE_PRESSED_CHIP_ID));
									icon.invalidate();
									//
									break;
								case 4:		//振动控制事件触发,振动控制图标与文字
									icon.setBitmap(touchgfx::Bitmap(BITMAP_APPLICATIONPAGE_IMAGE_PRESSED_BUZZER_ID));
									icon.invalidate();
									//
									break;
								case 5:		//电池电量事件触发,电池电量图标与文字
									icon.setBitmap(touchgfx::Bitmap(BITMAP_APPLICATIONPAGE_IMAGE_PRESSED_BATTERY_ID));
									icon.invalidate();
									//
									break;
								case 6:		//无线连接事件触发,无线连接图标与文字
									icon.setBitmap(touchgfx::Bitmap(BITMAP_APPLICATIONPAGE_IMAGE_PRESSED_WIFI_ID));
									icon.invalidate();
									//
									break;
						}
				}
		}
}
//
void MenuElement::setY(int16_t y)
{
		MenuElementBase::setY(y);
		//设定圆弧的半径,表盘直径-图标半径
		const int circleRadius = 210;
//获取Y轴坐标信息
		y = y + getHeight()/2 - 240 / 2;
		//勾股定理计算X轴位置
		float x_f = circleRadius - sqrtf(abs((float)(circleRadius * circleRadius) - (y * y)));
		//重新设置组件的x轴位置
		offset((int16_t)(x_f));
}
//对const的buf指针做强转去掉const
#pragma GCC diagnostic push
#pragma GCC diagnostic ignored "-Wcast-qual"
//设置图标与文本
void MenuElement::setNumber(int no)
{
		icon.setClickAction(imageClickHandler);
		//修改图标
		switch(no % 7)
		{
				case 0:		//无触发事件时,健康监测图标与文字
					icon.setBitmap(touchgfx::Bitmap(BITMAP_APPLICATIONPAGE_IMAGE_HEALTH_ID));
					Unicode::snprintf(textBuffer, TEXT_SIZE, (Unicode::UnicodeChar*)L"健康监测");
					break;
				case 1:		//无触发事件时,姿态读取图标与文字
					icon.setBitmap(touchgfx::Bitmap(BITMAP_APPLICATIONPAGE_IMAGE_6050_ID));
					Unicode::snprintf(textBuffer, TEXT_SIZE, (Unicode::UnicodeChar*)L"姿态感知");
					break;
				case 2:		//无触发事件时,环境信息图标与文字
					icon.setBitmap(touchgfx::Bitmap(BITMAP_APPLICATIONPAGE_IMAGE_TEMP_ID));
					Unicode::snprintf(textBuffer, TEXT_SIZE, (Unicode::UnicodeChar*)L"环境信息");
					break;
				case 3:		//无触发事件时,芯片信息图标与文字
					icon.setBitmap(touchgfx::Bitmap(BITMAP_APPLICATIONPAGE_IMAGE_CHIPINFO_ID));
					Unicode::snprintf(textBuffer, TEXT_SIZE, (Unicode::UnicodeChar*)L"芯片信息");
					break;
				case 4:		//无触发事件时,振动控制图标与文字
					icon.setBitmap(touchgfx::Bitmap(BITMAP_APPLICATIONPAGE_IMAGE_BUZZER_ID));
					Unicode::snprintf(textBuffer, TEXT_SIZE,
(Unicode::UnicodeChar*)L"外部控制");
					break;
				case 5:		//无触发事件时,电池电量图标与文字
					icon.setBitmap(touchgfx::Bitmap(BITMAP_APPLICATIONPAGE_IMAGE_BATTERY_ID));
					Unicode::snprintf(textBuffer, TEXT_SIZE, (Unicode::UnicodeChar*)L"电池电量");
					break;
				case 6:		//无触发事件时,无线连接图标与文字
					icon.setBitmap(touchgfx::Bitmap(BITMAP_APPLICATIONPAGE_IMAGE_WIFI_ID));
					Unicode::snprintf(textBuffer, TEXT_SIZE, (Unicode::UnicodeChar*)L"无线连接");
					break;
		}
		number = no;
}
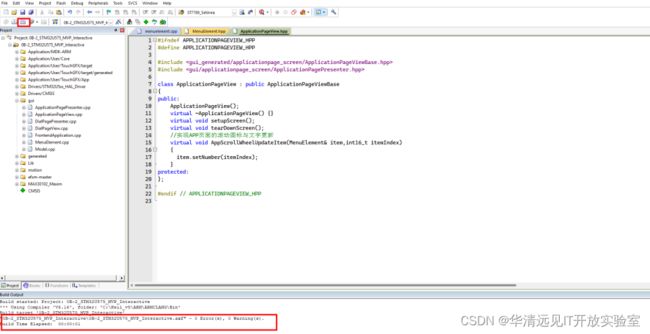
点击ApplicationPageView.cpp,打开ApplicationPageView.hpp文件,添加APP页面的图标滚动与字体更变。
#ifndef APPLICATIONPAGEVIEW_HPP
#define APPLICATIONPAGEVIEW_HPP

#include
#include

class ApplicationPageView : public ApplicationPageViewBase
{
public:
    ApplicationPageView();
    virtual ~ApplicationPageView() {}
    virtual void setupScreen();
    virtual void tearDownScreen();
		//实现APP页面的滚动图标与文字更新
		virtual void AppScrollWheelUpdateItem(MenuElement& item,int16_t itemIndex)
		{
			item.setNumber(itemIndex);
		}
protected:
};

#endif // APPLICATIONPAGEVIEW_HPP
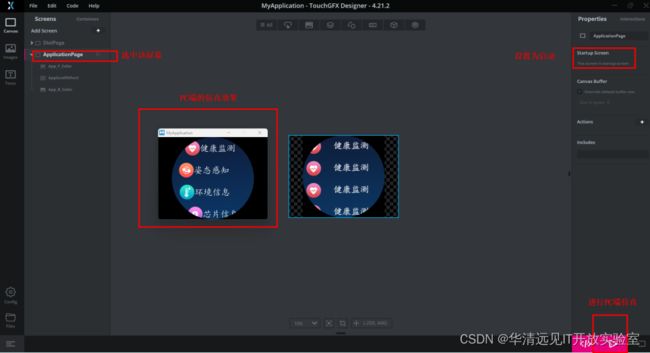
点击MDK全编译,完成后,在Designer软件中设置ApplicationPage为启动窗口,点击右下角的仿真。
也可以在MDK中进行开发板的下载,下载完成后,复位开发板。FS-STM32U5开发板屏幕的展示效果与PC端仿真相同。
| 开发板的显示效果 |
PC端Designer仿真效果 |
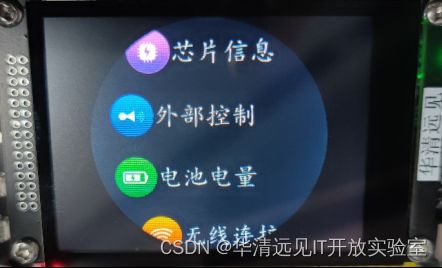 |
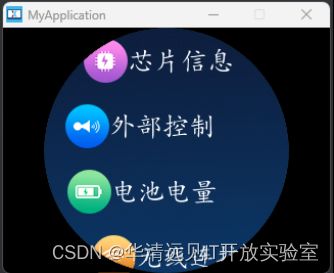 |
打开ApplicationPageView.cpp /ApplicationPageView.hpp/ ApplicationPagePresenter.cpp/ ApplicationPagePresenter.hpp / Model.cpp / Model.hpp/ModelListener.hpp文件,添加硬件按键的触发。
在ApplicationPageView.cpp文件中添加页面的跳转。
#include

//
ApplicationPageView::ApplicationPageView()
{

}
//
void ApplicationPageView::setupScreen()
{
    ApplicationPageViewBase::setupScreen();
}
//
void ApplicationPageView::tearDownScreen()
{
    ApplicationPageViewBase::tearDownScreen();
}
//页面跳转
void ApplicationPageView::AppPageChange(uint8_t newFiveKeyFunc)
{
		handleKeyEvent(newFiveKeyFunc);
} 在ApplicationPageView.hpp中添加函数声明
#ifndef APPLICATIONPAGEVIEW_HPP
#define APPLICATIONPAGEVIEW_HPP

#include
#include

class ApplicationPageView : public ApplicationPageViewBase
{
public:
    ApplicationPageView();
    virtual ~ApplicationPageView() {}
    virtual void setupScreen();
    virtual void tearDownScreen();
		//页面跳转
		void AppPageChange(uint8_t newFiveKeyFunc);
		//实现APP页面的滚动图标与文字更新
		virtual void AppScrollWheelUpdateItem(MenuElement& item,int16_t itemIndex)
		{
			item.setNumber(itemIndex);
		}
protected:

};

#endif // APPLICATIONPAGEVIEW_HPP 在ApplicationPagePresenter.cpp文件中添加APP页面任务使能与页面切换代码。
#include
#include

ApplicationPagePresenter::ApplicationPagePresenter(ApplicationPageView& v)
    : view(v)
{

}
//
void ApplicationPagePresenter::activate()
{
		ApplicationPagePresenterState(true);
}
//
void ApplicationPagePresenter::deactivate()
{
		ApplicationPagePresenterState(false);
}
//ApplicationPagePresenter状态
void ApplicationPagePresenter::ApplicationPagePresenterState(bool enable)
{
		if(enable == true)
			model->ApplicationPageViewTask(true);
		else
			model->ApplicationPageViewTask(false);
}
//页面跳转
void ApplicationPagePresenter::AppPageChange(uint8_t newFiveKeyFunc)
{
		view.AppPageChange(newFiveKeyFunc);
} 在ApplicationPagePresenter.hpp文件中添加函数声明。
#ifndef APPLICATIONPAGEPRESENTER_HPP
#define APPLICATIONPAGEPRESENTER_HPP

#include
#include

using namespace touchgfx;

class ApplicationPageView;

class ApplicationPagePresenter : public touchgfx::Presenter, public ModelListener
{
public:
    ApplicationPagePresenter(ApplicationPageView& v);

    /**
     * The activate function is called automatically when this screen is "switched in"
     * (ie. made active). Initialization logic can be placed here.
     */
    virtual void activate();

    /**
     * The deactivate function is called automatically when this screen is "switched out"
     * (ie. made inactive). Teardown functionality can be placed here.
     */
    virtual void deactivate();

    virtual ~ApplicationPagePresenter() {};

		//ApplicationPagePresenter状态
		void ApplicationPagePresenterState(bool enable);
		//页面跳转
		virtual void AppPageChange(uint8_t newFiveKeyFunc);
private:
    ApplicationPagePresenter();

    ApplicationPageView& view;
};
#endif // APPLICATIONPAGEPRESENTER_HPP
在Model.cpp中添加与底层驱动的相关获取与控制代码。
#include
#include

#if defined LINK_HARDWARE 	//TuchGFX仿真与实际硬件操作隔离
	//头文件包含
	extern "C"
	{
		#include "user_app.h"
	}
	//底层数据
	extern volatile SHT20_TemRH_Val gTemRH_Val;
	extern RTC_DateTypeDef gSystemDate;  //获取日期结构体
	extern RTC_TimeTypeDef gSystemTime;   //获取时间结构体
	extern gTask_BitDef gTaskStateBit;  //任务执行过程中使用到的标志位
	extern gTask_MarkEN gTaskEnMark;  //系统任务使能标识
	extern volatile StruAP3216C_Val gAP3216C_Val;	//AP3216数据结构
	extern volatile uint8_t gLastTimeSeconds;	//上一次的时间
	extern volatile float pitch,roll,yaw; //欧拉角
	extern unsigned long gSportStep;	//运动步数
	extern wifiRSSI ao_wifiRSSI;

	extern uint8_t gFiveKeyFunc;	//定义的五向按键值功能

	extern volatile uint16_t gCurrentVal;	//资源扩展板电流,通道IN8
	extern volatile uint16_t gVoltageVal;	//资源扩展板电压,通道IN9
	extern volatile uint16_t gChipTempVal;//内部参考电压,通道IN12
	extern volatile uint16_t gVrefVal;		//内部参考电压,通道IN13
	extern volatile uint16_t gVbatVal;		//RTC电池电压,通道IN14

	extern int32_t n_heart_rate;   //heart rate value=n_heart_rate/4,采样率100sps,max30102设置4点求平均
	extern int32_t n_sp02; //SPO2 value
	extern int8_t ch_spo2_valid;   //indicator to show if the SP02 calculation is valid
	extern int8_t  ch_hr_valid;    //indicator to show if the heart rate calculation is valid
	extern uint8_t gWiFiInfo[40];	//用于通知View界面的Text文本显示
	//
	volatile uint8_t gSwitchSpace = 0x00;	//页面切换的时间间隙
	static int32_t gHeartRate = 0;  //表盘页面的心率数据
#else //Designer仿真
	#include
	#ifndef _MSC_VER
	#include
#endif /* _MSC_VER*/
	//
	volatile uint8_t gBacklightVal = 50;	//背光值,默认50%
#endif
/**********************************TouchGFX与底层间的访问**********************************/
Model::Model() : modelListener(0)
{

}
//
void Model::tick()
{
	static uint8_t tickCount = 0;	//减少数据上传的次数,优化界面刷新
	tickCount++;

#if defined LINK_HARDWARE
	//
	if(gSwitchSpace != 0) gSwitchSpace--;
	/********************************硬件页面切换*********************************/
	//表盘页面
	if(gTaskEnMark.UPDATE_DIAL_EN && (gTaskStateBit.TouchPress == 0) && (!gSwitchSpace))
	{
		modelListener->DialPageChange(gFiveKeyFunc);
		gSwitchSpace = 0x0F;	//使能切换时间计数
	}
	//应用页面
	if(gTaskEnMark.UPDATE_APPPAGE && (gTaskStateBit.TouchPress == 0) && (!gSwitchSpace))
	{
		modelListener->AppPageChange(gFiveKeyFunc);
		gSwitchSpace = 0x0F;	//使能切换时间计数
	}

	/********************************更新各类信息*********************************/
	//更新时间信息,为使表盘页面滑动操作正常,在屏幕被点按时不更新数据
	if(gTaskEnMark.UPDATE_DIAL_EN && (gSystemTime.Seconds != gLastTimeSeconds)&&(gTaskStateBit.TouchPress == 0))	//每秒同步一次界面时间
	{
		modelListener->updateDate(gSystemDate.Year,gSystemDate.Month,gSystemDate.Date,gSystemDate.WeekDay);
		modelListener->updateTime(gSystemTime.Hours, gSystemTime.Minutes,
gSystemTime.Seconds);
		//更新新值
		gLastTimeSeconds = gSystemTime.Seconds;
		//更新温度/步数/心率
		modelListener->updateTempStepHeart(gTemRH_Val.Tem,gSportStep,gHeartRate);
	}
#else //Designer仿真
		timeval timenow;
		gettimeofday(&timenow, NULL);
		//仿真更新时间
		modelListener->updateTime((timenow.tv_sec / 60 / 60) % 24,(timenow.tv_sec / 60) % 60,timenow.tv_sec % 60);
#endif
}
/*********************gTaskEnMark赋值*************************/
//DialView的任务的状态
void Model::DialPageViewTask(bool enable)
{
	#if defined LINK_HARDWARE
	if(enable == true)
		gTaskEnMark.UPDATE_DIAL_EN = 1;	//任务使能
	else
		gTaskEnMark.UPDATE_DIAL_EN = 0;	//任务清除
#endif
}
//ApplicationPageView的任务的状态
void Model::ApplicationPageViewTask(bool enable)
{
	#if defined LINK_HARDWARE
	if(enable == true)
		gTaskEnMark.UPDATE_APPPAGE = 1;	//任务使能
	else
		gTaskEnMark.UPDATE_APPPAGE = 0;	//任务清除
#endif
} 在Model.hpp中添加相关函数的说明。
#ifndef MODEL_HPP
#define MODEL_HPP

class ModelListener;

class Model
{
public:
    Model();
 void bind(ModelListener* listener)
    {
        modelListener = listener;
    }
    void tick();
		//DialPageView的任务的状态
		void DialPageViewTask(bool enable);
		//ApplicationPageView的任务的状态
		void ApplicationPageViewTask(bool enable);

protected:
    ModelListener* modelListener;
};

#endif // MODEL_HPP在ModelListener.hpp中添加相关虚函数。
#ifndef MODELLISTENER_HPP
#define MODELLISTENER_HPP

#include
extern "C" {
#include "stdint.h"
}
class ModelListener
{
public:
    ModelListener() : model(0) {}

    virtual ~ModelListener() {}

    void bind(Model* m)
    {
        model = m;
    }
		//更新日期和时间
		virtual void updateDate(uint8_t Year, uint8_t Month, uint8_t Date, uint8_t WeekDay) {}
		virtual void updateTime(uint8_t Hours, uint8_t Minutes, uint8_t Seconds) {}
		//页面跳转
		virtual void DialPageChange(uint8_t newFiveKeyFunc){}
		virtual void AppPageChange(uint8_t newFiveKeyFunc){}
		//温度/步数/心率上传
		virtual void updateTempStepHeart(float newTem, unsigned long newStep, uint32_t newHeartRate){}
protected:
    Model* model;
};

#endif // MODELLISTENER_HPP
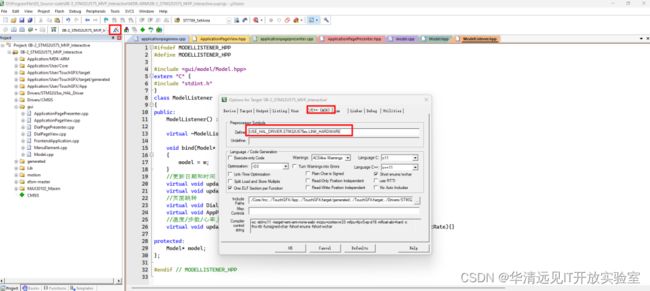
点击魔术棒图标,在C/C++选项卡增加LINK_HARDWARE的宏定义,用于PC端仿真与硬件底层驱动的隔离。
打开DialPageView.cpp / DialPageView.hpp/ DialPagePresenter.cpp/ DialPagePresenter.hpp文件,添加手表界面的信息上传代码。
在DialPageView.cpp文件中添加数字表盘与模拟表盘的数据更新代码。
#include
#include
#include "BitmapDatabase.hpp"
//标准库
#include
#include
//
DialPageView::DialPageView()
{

}
//
void DialPageView::setupScreen()
{
    DialPageViewBase::setupScreen();
}
//
void DialPageView::tearDownScreen()
{
    DialPageViewBase::tearDownScreen();
}
//更新时间
void DialPageView::updateTime(uint8_t newHours, uint8_t newMinutes, uint8_t newSeconds)
{
		digitalClock.setTime24Hour(newHours, newMinutes, newSeconds);
		analogClock.setTime24Hour(newHours,newMinutes,newSeconds);
}
//更新日期
void DialPageView::updateDate(uint8_t newYear, uint8_t newMonth, uint8_t newDate, uint8_t newWeekDay)
{
		Unicode::snprintf(textSystemYearBuffer, TEXTSYSTEMYEAR_SIZE, "%04d", newYear + 2000);
    textSystemYear.invalidate();
		//
		Unicode::snprintf(textSystemDateBuffer1, TEXTSYSTEMDATEBUFFER1_SIZE, "%02d", newMonth);
		Unicode::snprintf(textSystemDateBuffer2, TEXTSYSTEMDATEBUFFER2_SIZE, "%02d", newDate);
	  textSystemDate.invalidate();
		//
		Unicode::snprintf(textWeekDayBuffer, TEXTWEEKDAY_SIZE, "%d", newWeekDay);
    textWeekDay.invalidate();
		//
		Unicode::snprintf(DateWindowBuffer, DATEWINDOW_SIZE, "%02d", newDate);
    DateWindow.invalidate();
		//
}
//进入APP页面或快速设置界面
void DialPageView::DialPageChange(uint8_t newFiveKeyFunc)
{
		handleKeyEvent(newFiveKeyFunc);
}
//更新温度、步数、心率数据
void DialPageView::updateTempStepHeart(float newTem, unsigned long newStep, uint32_t newHeartRate)
{
		//更新温度-数字表盘
		Unicode::snprintfFloat(textTempBuffer, TEXTTEMP_SIZE, "%.1f",newTem);
	  textTemp.invalidate();
		//更新温度-模拟表盘
		Unicode::snprintfFloat(textTemp_anBuffer, TEXTTEMP_AN_SIZE, "%.1f",newTem);
	  textTemp_an.invalidate();
		//更新步数-数字表盘
		Unicode::snprintf(textStepBuffer, TEXTSTEP_SIZE, "%d",newStep);
	  textStep.invalidate();
	//更新步数-模拟表盘
		Unicode::snprintf(textStep_anBuffer, TEXTSTEP_AN_SIZE, "%d",newStep);
	  textStep_an.invalidate();
		//更新脉搏-数字表盘
		Unicode::snprintf(textPulseBuffer, TEXTPULSE_SIZE, "%d",newHeartRate);
	  textPulse.invalidate();
		//更新脉搏-模拟表盘
		Unicode::snprintf(textPulse_anBuffer, TEXTPULSE_AN_SIZE, "%d",newHeartRate);
	  textPulse_an.invalidate();
} 在DialPageView.hpp文件中添加声明。
#ifndef DIALPAGEVIEW_HPP
#define DIALPAGEVIEW_HPP

#include
#include

class DialPageView : public DialPageViewBase
{
public:
    DialPageView();
    virtual ~DialPageView() {}
    virtual void setupScreen();
    virtual void tearDownScreen();
		//更新日期和时间
		virtual void updateDate(uint8_t newYear, uint8_t newMonth, uint8_t newDate, uint8_t newWeekDay);
		virtual void updateTime(uint8_t newHours, uint8_t newMinutes, uint8_t newSeconds);
		virtual void DialPageChange(uint8_t newFiveKeyFunc);
		//温度/步数/心率信息上传
		void updateTempStepHeart(float newTem, unsigned long newStep, uint32_t newHeartRate);
protected:
};

#endif // DIALPAGEVIEW_HPP 在DialPagePresenter.cpp添加屏幕任务的使能与数据交互。
#include
#include
//
DialPagePresenter::DialPagePresenter(DialPageView& v)
    : view(v)
{
}
//
void DialPagePresenter::activate()
{
	DialPagePresenterState(true);
}
//
void DialPagePresenter::deactivate()
{
	DialPagePresenterState(false);
}
//DialPagePresenter
void DialPagePresenter::DialPagePresenterState(bool enable)
{
	if(enable == true)
		model->DialPageViewTask(true);
	else
		model->DialPageViewTask(false);
}
//更新时间
void DialPagePresenter::updateTime(uint8_t newHours, uint8_t newMinutes, uint8_t newSeconds)
{
    view.updateTime(newHours, newMinutes, newSeconds);
}
//更新日期
void DialPagePresenter::updateDate(uint8_t newYear, uint8_t newMonth, uint8_t newDate, uint8_t newWeekDay)
{
    view.updateDate(newYear, newMonth, newDate, newWeekDay);
}
//五向按键切换页面
void DialPagePresenter::DialPageChange(uint8_t newFiveKeyFunc)
{
	  view.DialPageChange(newFiveKeyFunc);
}
//更新温度/步数/心率
void DialPagePresenter::updateTempStepHeart(float newTem, unsigned long newStep, uint32_t newHeartRate)
{
		view.updateTempStepHeart(newTem,newStep,newHeartRate);
}
在DialPagePresenter.hpp添加以下代码。
#ifndef DIALPAGEPRESENTER_HPP
#define DIALPAGEPRESENTER_HPP
#include
#include

using namespace touchgfx;

class DialPageView;

class DialPagePresenter : public touchgfx::Presenter, public ModelListener
{
public:
    DialPagePresenter(DialPageView& v);

    /**
     * The activate function is called automatically when this screen is "switched in"
     * (ie. made active). Initialization logic can be placed here.
     */
    virtual void activate();

    /**
     * The deactivate function is called automatically when this screen is "switched out"
     * (ie. made inactive). Teardown functionality can be placed here.
     */
    virtual void deactivate();

    virtual ~DialPagePresenter() {};
		//DialPagePresenter的状态
		void DialPagePresenterState(bool enable);
		//更新日期和时间
		virtual void updateDate(uint8_t newYear, uint8_t newMonth, uint8_t newDate, uint8_t newWeekDay);
		virtual void updateTime(uint8_t newHours, uint8_t newMinutes, uint8_t newSeconds);
		virtual void DialPageChange(uint8_t newFiveKeyFunc);
		//更新温度/步数/心率
		virtual void updateTempStepHeart(float newTem, unsigned long newStep, uint32_t newHeartRate);
private:
    DialPagePresenter();

    DialPageView& view;
};

#endif // DIALPAGEPRESENTER_HPP
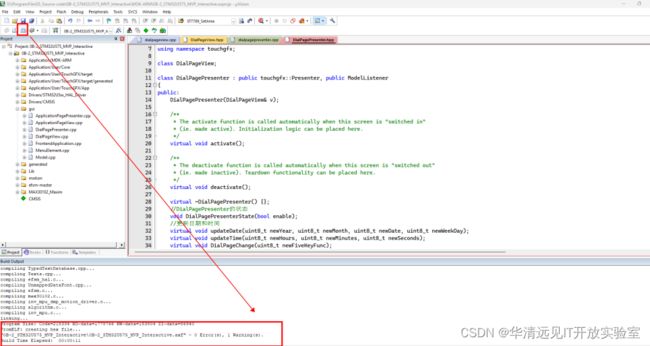
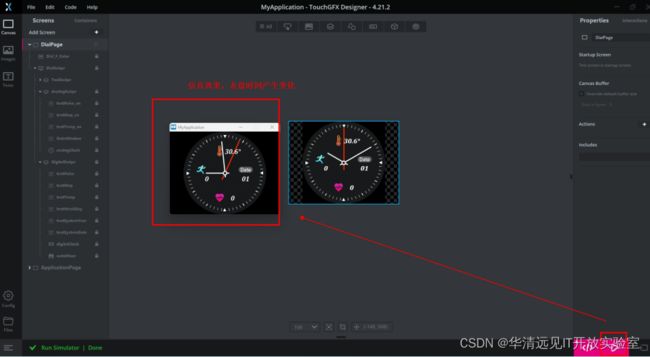
点击全编译,运行PC端的仿真,下载至开发板,进行代码的验证。
PC端的仿真结果。
