VTK 学习----VTK对象绘制-三角网(等值面)
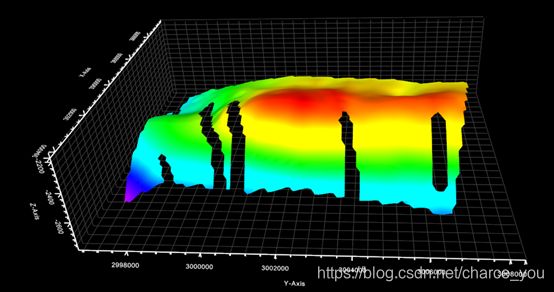
5.2 三角网的等值面显示
5.2.1 代码实现
三角网的构造面:
void ESContourGrid::create()
{
	//存放三角网的顶点
	vtkSmartPointer points = vtkSmartPointer::New();
	//存放Cell顶点
	vtkSmartPointer strips = vtkSmartPointer::New();
	//存放每个顶点的标量值
	vtkSmartPointer scalars = vtkSmartPointer::New();
	//
	vtkSmartPointer PolyData = vtkSmartPointer::New();
	vtkSmartPointer PolyDataMapper = vtkSmartPointer::New();
	vtkSmartPointer Actor = vtkSmartPointer::New();
	//定义用于将属性映射到RGB颜色值的传递函数
	vtkSmartPointer clrTransferFunc = vtkSmartPointer::New();
	clrTransferFunc->SetColorSpaceToRGB();
	//获取三角网的(序号,顶点坐标)
	std::vector pts = m_sfReader->getTrianglePtLst();
	//获取三角网所有顶点的序号
	std::vector topIdLst = m_sfReader->getTopIdLst();
	//将顶点坐标加入points、z值作为标量加入scalars
	TGS::Point3D pt;
	for (int index = 0; index < pts.size(); ++index)
	{
		pt = pts[index].second;
		scalars->InsertValue(pts[index].first, pt.z);
		points->InsertPoint(pts[index].first, pt.x, pt.y, pt.z);
	}
	//遍历所有序号,按每3个序号组合成一个cell
	for (int i = 0;i < topIdLst.size(); i += 3)
	{
		strips->InsertNextCell(3);
		strips->InsertCellPoint(topIdLst[i]);
		strips->InsertCellPoint(topIdLst[i + 1]);
		strips->InsertCellPoint(topIdLst[i + 2]);
	}
	PolyData->SetPoints(points);
	PolyData->SetStrips(strips);
	PolyData->GetPointData()->SetScalars(scalars);
	//计算三角网格顶点的法向量,平滑过渡颜色
	vtkSmartPointer normFilter = vtkSmartPointer::New();
	normFilter->SetInputData(PolyData);
	//开启点法向量计算
	normFilter->SetComputePointNormals(1);
	//关闭单元法向量计算
	normFilter->SetComputeCellNormals(0);
	normFilter->SetAutoOrientNormals(1);
	normFilter->SetSplitting(0);
	normFilter->Update();
	//获取色标信息
	std::vector clrs = m_clrBar->getColorBar();
	double dRange = m_zMax - m_zMin;
	double dValue = 0.0;
	for (int i = 0; i < clrs.size(); i++)
	{
		dValue = m_zMin + dRange * clrs[i].m_percent;
		unsigned int a, r, g, b;
		m_clrBar->convertColorToArgb(clrs[i].m_color, a, r, g, b);
		clrTransferFunc->AddRGBPoint(dValue, r / 255.0, g / 255.0, b / 255.0);
	}
	clrTransferFunc->Build();
	//
	PolyDataMapper->SetInputData(normFilter->GetOutput());
	PolyDataMapper->SetScalarRange(m_zMin, m_zMax);
	PolyDataMapper->SetLookupTable(clrTransferFunc);
	PolyDataMapper->ScalarVisibilityOn();
	Actor->SetMapper(PolyDataMapper);
	double* scale = m_vtkView->zoomScale();
	Actor->SetScale(scale[0], scale[1], scale[2]);
	m_pRender->AddActor(Actor);
	//
 	m_pCtLine->initRender();
 	m_pCtLine->create();

}
等值线:
void ESContourLine::create()
{
	//获取等值线数据
	std::vector lines = m_sfReader->getContourLines();
	for (int index = 0; index < lines.size(); ++index)
	{
		SurfaceDataReader::LineData lineData = lines.at(index);
		vtkSmartPointer Actor = vtkSmartPointer::New();
		vtkSmartPointer lineSource = vtkSmartPointer::New();
		vtkSmartPointer inputPoints = vtkSmartPointer::New();
		lineSource->GlobalWarningDisplayOff();
		inputPoints->SetDataType(VTK_DOUBLE);
		for (size_t i = 0; i < lineData.m_linePts.size(); i++)
		{
			inputPoints->InsertNextPoint(lineData.m_linePts[i].x, lineData.m_linePts[i].y,
				lineData.m_linePts[i].z);
		}
		lineSource->SetPoints(inputPoints);
		lineSource->Update();
		vtkSmartPointer lineMapper = vtkSmartPointer::New();
		vtkAlgorithmOutput* temp = lineSource->GetOutputPort();
		lineMapper->SetInputConnection(temp);
		lineMapper->SetScalarRange(m_zMin, m_zMax);
		Actor->SetMapper(lineMapper);
		Actor->SetScale(1, 1, 5);
		Actor->GetProperty()->SetColor(0, 0, 0);
		m_pRender->AddActor(Actor);
	}
	m_pCtLineLabel->create();
}
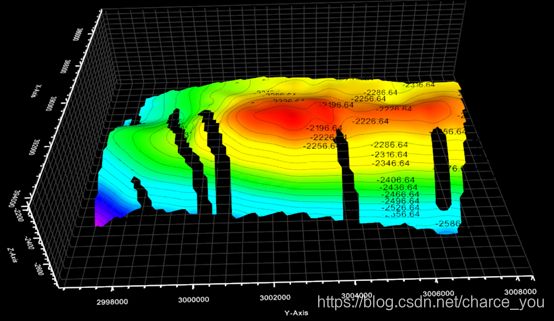
等值线标注:
void ESContourLineLabel::createNormalLabels()
{
	vtkCamera* pCamara = m_pRender->GetActiveCamera();
	std::vector labels = m_sfReader->getContourLabels();
	for (int index = 0; index < labels.size(); ++index)
	{
		auto label = labels.at(index);
		vtkSmartPointer atext = vtkSmartPointer::New();
		atext->SetText(label.first.c_str());
		//建立文本映射器对象
		vtkSmartPointer textMapper = vtkSmartPointer::New();
		textMapper->SetInputConnection(atext->GetOutputPort());
		//textMapper->SetScalarRange(minZ, maxZ);
		vtkSmartPointer textActor = vtkSmartPointer::New();
		textActor->SetMapper(textMapper);
		textActor->SetScale(18 * 8, 18 * 8, 18 * 8);
		double bound[6] = { 0,0,0,0,0,0 };
		textActor->GetBounds(bound);
		double pos[3];
		pos[0] = label.second.x /*- (bound[1] - bound[0]) / 2*/;
		pos[1] = label.second.y /*- (bound[3] - bound[2]) / 2*/;
		pos[2] = label.second.z /*- (bound[5] - bound[4]) / 2*/;
		textActor->SetPosition(pos[0] * 1, pos[1] * 1, pos[2] * 5);
		textActor->GetProperty()->SetColor(0, 0, 0);
		//atext->GetTextProperty()->SetFontSize(18);
		m_pRender->AddActor(textActor);
		textActor->SetCamera(m_pRender->GetActiveCamera());
	}
}
5.2.2 扩展
5.2.2.1 标注被遮挡问题
文字之所以被遮挡住,是因为是使用vtkFollower显示文字。vtkFollower的特点是它会始终面向摄像机。文字在调整其方向始终朝向摄像机时,是有可能会被场景中的其他物体挡住的。
可以使用vtkCaptionActor2D来显示文字。vtkCaptionActor2D用来绘制与点相关联的文本标签。
vtkCaptionActor2D是一个混合2D / 3D actor,用于将文本与场景中的一个点(AttachmentPoint)相关联。可以使用矩形边框和将标题连接到连接点的引线绘制标题。还可以在其端点处进行格式化以创建箭头或其他指示符。
要使用vtkCaptionActor2D,通常指定Position和Position2坐标(这些坐标继承自vtkActor2D超类)。(注意,可以使用vtkActor2D的SetWidth()和SetHeight()方法设置Position2。)Position和Position2定义标题的大小,第三个点AttachmentPoint定义标题与之关联的点。您还必须定义标题文本,是否需要标题周围的边框,以及是否需要从标题到关联点的引线。可以通过vtkTextProperty设置文本的字体属性与这个演员相关联。您还可以指明您是否希望引线是2D或3D。(2D引线总是被绘制在底层几何体上。三维引线可能被几何体遮挡。)引线也可能被可选的字形(例如,箭头)终止。
使用此类最棘手的部分是正确设置Position,Position2和AttachmentPoint。这些实例变量是vtkCoordinates,可以通过各种方式进行设置。在默认用法中,AttachmentPoint在世界坐标系中定义,Position是标题的左下角,相对于AttachmentPoint(在显示coordaintes中定义,即像素),而Position2是相对于Position,是上限 - 右角(也在显示坐标中)。但是,用户可以完全控制坐标,并且可以执行诸如将标题放置在渲染器中的固定位置,其中引导者使用AttachmentPoint移动。
但是,使用vtkCaptionActor2D又会产生新问题,就是如果文字过多时,会出现文字重叠,密集问题。如下图:
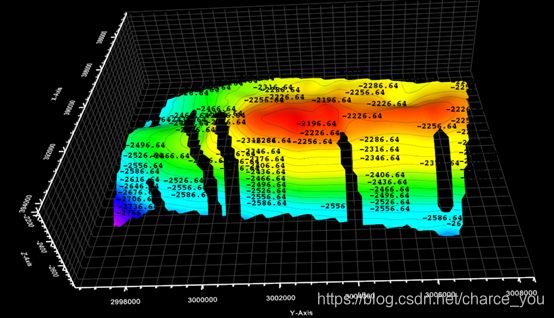
另外一种方法是使用vtkLabelPlacementMapper。vtkLabelPlacementMapper是用来放置不重叠标签的。要使用此映射器,首先通过vtkPointSetToLabelHierarchy发送数据,该数据采用一组点,将特殊数组与点(标签,优先级等)相关联,并生成标签的优先级空间树。然后,该映射器将该层次结构(或层次结构)作为输入,并且每个帧将决定按优先级顺序放置哪些标签和/或图标,并且将仅呈现那些标签/图标。

另外需要注意,使用vtkLabelPlacementMapper的渲染速度会比vtkFollower和vtkCaptionActor2D慢得多。