一文搞懂Spring @Autowired注解的使用及其原理
一、全文概览
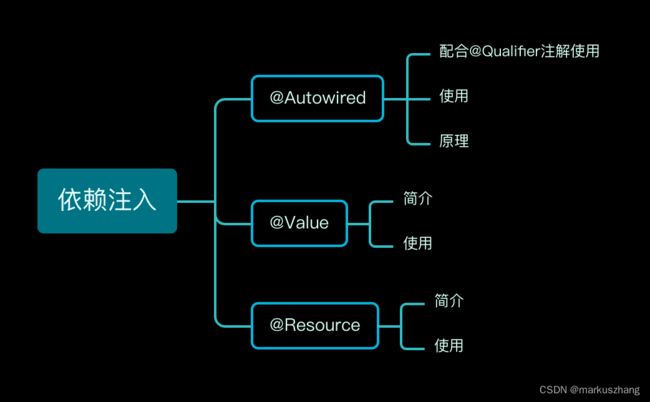
依赖注入(DI)是Spring核心特性之一,而@Autowired也是我们日常高频使用的Spring依赖注入方式之一,因此有必要对它的使用以及原理做一个全面的掌握。本文从@Autowired使用、原理入手记录,并扩展延伸Spring中其他具备注入功能的注解。
二、@Autowired简介与使用
1、简介
我们直接通Autowired注解源码来看下该注解的简介
// 可以标注在构造器、方法、参数、字段、注解类型(做为元注解)上
@Target({ElementType.CONSTRUCTOR, ElementType.METHOD, ElementType.PARAMETER, ElementType.FIELD, ElementType.ANNOTATION_TYPE})
// 运行时注解
@Retention(RetentionPolicy.RUNTIME)
@Documented
public @interface Autowired {

	/**
	 * Declares whether the annotated dependency is required.
	 * 声明该注解标注的依赖是否需要一定存在于Spring容器中
	 * 				true为必须存在,如果不存在的话就抛出NoSuchBeanDefinitionException异常
	 *				false不要求必须存在,如果不存在也不抛出异常(一般不建议设置,可能会引发线上事故)
	 * Defaults to {@code true}.
	 */
	boolean required() default true;

}
通过上面代码我们可以看出@Autowired可以标注在构造器、方法、参数、字段以及派生注解上,所以注入时机非常多,可以准确的控制在何时、何处注入以及如何注入。
2、使用
我们先来学习下关于@Autowired的使用方式:
Bean配置类
public class BeanConfiguration {

    @Bean
    public User user() {
        return new User("markus", 24);
    }
}
演示类
package com.markus.spring.injection;

import com.markus.spring.annotation.MyAutowired;
import com.markus.spring.bean.User;
import com.markus.spring.configuration.BeanConfiguration;
import org.springframework.beans.factory.annotation.Autowired;
import org.springframework.context.annotation.AnnotationConfigApplicationContext;
import org.springframework.context.annotation.Bean;
import org.springframework.context.annotation.Import;

import java.util.Collection;
import java.util.Map;

/**
 * @author: markus
 * @date: 2023/2/5 10:43 PM
 * @Description: @Autowired注解示例
 * @Blog: https://markuszhang.com
 * It's my honor to share what I've learned with you!
 */
// 导入Bean配置
@Import({
        com.markus.spring.configuration.BeanConfiguration.class
})
public class AutowiredAnnotationDependencyInjectionDemo {

    @Autowired
    private User user;

    @Autowired
    private Map<String, User> userMap;

    @Autowired
    private Collection<User> userCollection;

    private User userFromCtor;

    //    @Autowired 可标注在构造器或者构造器的参数里面,两者取其一即可
    public AutowiredAnnotationDependencyInjectionDemo(@Autowired User user) {
        this.userFromCtor = user;
    }

    private User userFromMethod;

    @Autowired
    public void autowiredUser(User user) {
        this.userFromMethod = user;
    }

    @MyAutowired
    private User userFromCustomAnnotation;

    public static void main(String[] args) {
        AnnotationConfigApplicationContext context = new AnnotationConfigApplicationContext();
        context.register(AutowiredAnnotationDependencyInjectionDemo.class);

        context.refresh();

        AutowiredAnnotationDependencyInjectionDemo demo = context.getBean(AutowiredAnnotationDependencyInjectionDemo.class);
        System.out.println("demo.user : " + demo.user);
        System.out.println("demo.userMap : " +demo.userMap);
        System.out.println("demo.userCollection : " +demo.userCollection);
        System.out.println("demo.userFromCtor : " +demo.userFromCtor);
        System.out.println("demo.userFromMethod : " +demo.userFromMethod);
        System.out.println("demo.userFromCustomAnnotation : " +demo.userFromCustomAnnotation);
        context.close();
    }

}
控制台结果
当Spring容器中有多个相同类型的Bean时,它还可以与@Qualifier配合使用来指定某一特定的Bean
Bean配置
/**
 * @author: markus
 * @date: 2023/2/11 4:49 PM
 * @Description: 相同类型多个Bean配置
 * @Blog: https://markuszhang.com
 * It's my honor to share what I've learned with you!
 */
public class SameTypeBeanConfiguration {
    @Bean
    public User user1() {
        return new User("markus", 24);
    }

    @Bean
    public User user2() {
        return new User("Luna", 23);
    }
}
演示类
package com.markus.spring.injection;

import com.markus.spring.bean.User;
import org.springframework.beans.factory.annotation.Autowired;
import org.springframework.beans.factory.annotation.Qualifier;
import org.springframework.context.annotation.AnnotationConfigApplicationContext;
import org.springframework.context.annotation.Import;

/**
 * @author: markus
 * @date: 2023/2/11 4:47 PM
 * @Description:
 * @Blog: https://markuszhang.com
 * It's my honor to share what I've learned with you!
 */
@Import({
        com.markus.spring.configuration.SameTypeBeanConfiguration.class
})
public class QualifierAnnotationUseDemo {

    @Autowired
    @Qualifier(value = "user1")
    private User user;

    public static void main(String[] args) {
        AnnotationConfigApplicationContext context = new AnnotationConfigApplicationContext();
        context.register(QualifierAnnotationUseDemo.class);
        context.refresh();

        QualifierAnnotationUseDemo demo = context.getBean(QualifierAnnotationUseDemo.class);
        System.out.println("demo.user : " + demo.user);

        context.close();
    }
}
控制台
三、@Autowired原理
1、Bean的生命周期
在讲解@Autowired原理之前,有必要先提及一下Bean的生命周期,但在这里不做过多叙述,只是让大家有个大致的认识,以及@Autowired在哪里开始发挥作用的。
上图为Spring Bean的整个的一个生命周期,包括定义Bean配置信息、加载解析并注册Bean元信息,在我们程序运行时getBean获取Spring Bean又会经过Bean的实例化、属性赋值、初始化等环节,在这些环节前后,Spring也给了我们一些扩展机会,例如实例化前后、属性赋值前、初始化前、初始化后。因为Spring 单例Bean的生命周期是交给容器去管理的,所以Bean的销毁最后也依赖于容器的销毁,当容器发出销毁消息时,会触发Bean的销毁逻辑,这是我们也可以在Bean销毁前做一些自定义操作。至此就是关于Spring Bean生命周期的一个大体介绍。
那么@Autowired到底发生在哪个阶段呢?我们接下来再来分析下BeanFactory#getBean的内部大致流程!
上图中标红的备注中正是@Autowired发挥作用的环节。Bean生命周期后续会单独写一篇文章,这里就不做展开了,我们把关注点聚焦到@Autowired实现细节上去!
2、@Autowired实现细节
通过Bean生命周期概览,我们知道如果想要挖掘@Autowired实现的原理,我们先要去了解两个类:
- AbstractAutowiredCapableBeanFactory
- AutowiredAnnotationBeanPostProcessor
1、AbstractAutowiredCapableBeanFactory
我们通过IDEA定位到AbstractAutowiredCapableBeanFactory这个类的doCreateBean方法,在这个方法里面我们关注两个函数:
- applyMergerBeanDefinitionPostProcessors 它是spring提供给用户or框架内部的有关post-processors去修改合并BeanDefinition的机会
- populateBean 它是spring给bean进行属性赋值的函数入口
protected Object doCreateBean(final String beanName, final RootBeanDefinition mbd, final @Nullable Object[] args)
			throws BeanCreationException {

  // Allow post-processors to modify the merged bean definition.
  synchronized (mbd.postProcessingLock) {
    if (!mbd.postProcessed) {
      try {
        applyMergedBeanDefinitionPostProcessors(mbd, beanType, beanName);
      }
      catch (Throwable ex) {
        // xxx
    }
  }

  try {
    populateBean(beanName, mbd, instanceWrapper);
  }
  catch (Throwable ex) {
    // xxx
  }

  return exposedObject;
}
通过doCreateBean函数进入到applyMergedBeanDefinitionPostProcessors方法,来看看其内部做了哪些事情:
- 它其实就做了一件事:拿到容器中的BeanPostProcessor集合并遍历,寻找属于MergedBeanDefinitionPostProcessor的BeanPostProcessor,并执行bdp.postProcessorMergedBeanDefinition后置处理方法
- AutowiredAnnotationBeanPostProcessor正是MergedBeanDefinitionPostProcessor的一个派生子类,稍后我们介绍该类的时候提及这个方法的细节
protected void applyMergedBeanDefinitionPostProcessors(RootBeanDefinition mbd, Class<?> beanType, String beanName) {
  for (BeanPostProcessor bp : getBeanPostProcessors()) {
    if (bp instanceof MergedBeanDefinitionPostProcessor) {
      MergedBeanDefinitionPostProcessor bdp = (MergedBeanDefinitionPostProcessor) bp;
      bdp.postProcessMergedBeanDefinition(mbd, beanType, beanName);
    }
  }
}
返回到doCreateBean函数并进入到populateBean方法,抛出非核心的代码逻辑,我们可以看到该函数内部一共有四大核心逻辑处理:
- 获取InstantiationAwareBeanPostProcessor集合并遍历执行其PostProcessAfterInstantiation后处理方法,意在执行bean实例化后、属性赋值前的一些扩展逻辑
- 解析bean元信息配置的依赖注入模型mbd.getResolvedAutowireMode,这里通常是有xml bean配置的autowire指定
- 这里处理byName和byType,constructor是通过实例创建的时候被处理的
- 获取InstantiationAwareBeanPostProcessor集合并遍历执行其postProcessProperties方法,这里也就是@Autowired注解进行依赖注入的时机,在AutowiredAnnotationBeanPostProcessor我们会提及这个方法的细节
- 最后将PropertyValues的内容注入到最终的Bean实例相应的字段中(这块用于xml配置的字段设置)
protected void populateBean(String beanName, RootBeanDefinition mbd, @Nullable BeanWrapper bw) {

  // Give any InstantiationAwareBeanPostProcessors the opportunity to modify the
  // state of the bean before properties are set. This can be used, for example,
  // to support styles of field injection.
  if (!mbd.isSynthetic() && hasInstantiationAwareBeanPostProcessors()) {
    for (BeanPostProcessor bp : getBeanPostProcessors()) {
      if (bp instanceof InstantiationAwareBeanPostProcessor) {
        InstantiationAwareBeanPostProcessor ibp = (InstantiationAwareBeanPostProcessor) bp;
        if (!ibp.postProcessAfterInstantiation(bw.getWrappedInstance(), beanName)) {
          return;
        }
      }
    }
  }

  PropertyValues pvs = (mbd.hasPropertyValues() ? mbd.getPropertyValues() : null);

  int resolvedAutowireMode = mbd.getResolvedAutowireMode();
  if (resolvedAutowireMode == AUTOWIRE_BY_NAME || resolvedAutowireMode == AUTOWIRE_BY_TYPE) {
    MutablePropertyValues newPvs = new MutablePropertyValues(pvs);
    // Add property values based on autowire by name if applicable.
    if (resolvedAutowireMode == AUTOWIRE_BY_NAME) {
      autowireByName(beanName, mbd, bw, newPvs);
    }
    // Add property values based on autowire by type if applicable.
    if (resolvedAutowireMode == AUTOWIRE_BY_TYPE) {
      autowireByType(beanName, mbd, bw, newPvs);
    }
    pvs = newPvs;
  }

  boolean hasInstAwareBpps = hasInstantiationAwareBeanPostProcessors();
  boolean needsDepCheck = (mbd.getDependencyCheck() != AbstractBeanDefinition.DEPENDENCY_CHECK_NONE);

  PropertyDescriptor[] filteredPds = null;
  if (hasInstAwareBpps) {
    if (pvs == null) {
      pvs = mbd.getPropertyValues();
    }
    for (BeanPostProcessor bp : getBeanPostProcessors()) {
      if (bp instanceof InstantiationAwareBeanPostProcessor) {
        InstantiationAwareBeanPostProcessor ibp = (InstantiationAwareBeanPostProcessor) bp;
        PropertyValues pvsToUse = ibp.postProcessProperties(pvs, bw.getWrappedInstance(), beanName);
        pvs = pvsToUse;
      }
    }
  }

  if (pvs != null) {
    applyPropertyValues(beanName, mbd, bw, pvs);
  }
}
2、AutowiredAnnotationBeanPostProcessor
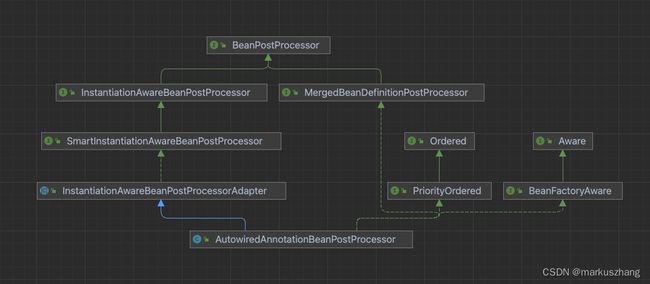
通过Bean生命周期概览,我们可以知道@Autowired是在Bean属性赋值阶段将依赖Bean注入到当前Bean字段中的,实现类是AutowiredAnnotationBeanPostProcessor,我们先来了解下它的继承结构并解释它的相关功能
看到上图的继承结构可以发现其实AutowiredAnnotationBeanPostProcessor具备两方面的功能,一方面是InstantiationAwareBeanPostProcessor在Bean实例化前后以及属性赋值前做些扩展;另一方面是在合并BeanDefinition后做些扩展,所谓“合并BeanDefinition”就是将配置的子BeanDefinition和父BeanDefinition合并形成当前Bean的最终BeanDefinition配置元信息,这里给大家举个具体例子:
<bean id="user" name="user,user2" class="com.markus.spring.ioc.container.domain.User">
    <property name="name" value="markus"/>
    <property name="age" value="23"/>
    <property name="city" value="BEIJING"/>
    <property name="workCities" value="BEIJING,HEZE"/>
    <property name="lifeCities" value="BEIJING,HEZE"/>
    <property name="resource" value="classpath:/META-INF/user-config.properties"/>
bean>

<bean id="superUser" class="com.markus.spring.ioc.container.domain.SuperUser" parent="user" primary="true">
    <property name="address" value="北京市朝阳区"/>
bean>
我们先来看下AutowiredAnnotationBeanPostProcessor的构造器,可以看出它是@Autowired、@Value以及jsr-330的@Inject注解的实现,我们本节主要分析@Autowired注解的实现原理。
public AutowiredAnnotationBeanPostProcessor() {
  this.autowiredAnnotationTypes.add(Autowired.class);
  this.autowiredAnnotationTypes.add(Value.class);
  try {
    this.autowiredAnnotationTypes.add((Class<? extends Annotation>)
        ClassUtils.forName("javax.inject.Inject", AutowiredAnnotationBeanPostProcessor.class.getClassLoader()));
    logger.trace("JSR-330 'javax.inject.Inject' annotation found and supported for autowiring");
  }
  catch (ClassNotFoundException ex) {
    // JSR-330 API not available - simply skip.
  }
}
接下来就是@Autowired的核心逻辑,两个方法:
- postProcessorMergedBeanDefinition 生命周期在前,主要构建注入元信息,并存储到缓存中
- postProcessProperties 生命周期在后,获取已经构建好的注解元信息,进行相应的依赖查找和依赖注入
首先我们先来看下注入元信息内容是什么:
public class InjectionMetadata {

  // 目标类
	private final Class<?> targetClass;

  // 注入元素 方法注入、字段注入
	private final Collection<InjectedElement> injectedElements;

	@Nullable
	private volatile Set<InjectedElement> checkedElements;
}
public abstract static class InjectedElement {

  protected final Member member;

  protected final boolean isField;

  // 这是核心方法,后续会涉及到,它是字段注入或者是方法注入的最终环节
  protected void inject(Object target, @Nullable String requestingBeanName, @Nullable PropertyValues pvs)
      throws Throwable {

    if (this.isField) {
      Field field = (Field) this.member;
      ReflectionUtils.makeAccessible(field);
      field.set(target, getResourceToInject(target, requestingBeanName));
    }
    else {
      if (checkPropertySkipping(pvs)) {
        return;
      }
      try {
        Method method = (Method) this.member;
        ReflectionUtils.makeAccessible(method);
        method.invoke(target, getResourceToInject(target, requestingBeanName));
      }
      catch (InvocationTargetException ex) {
        throw ex.getTargetException();
      }
    }
  }
}
再来看下postProcessorMergedBeanDefinition方法
@Override
public void postProcessMergedBeanDefinition(RootBeanDefinition beanDefinition, Class<?> beanType, String beanName) {
  // 1.构建注入元信息
  InjectionMetadata metadata = findAutowiringMetadata(beanName, beanType, null);
  metadata.checkConfigMembers(beanDefinition);
}
private InjectionMetadata findAutowiringMetadata(String beanName, Class<?> clazz, @Nullable PropertyValues pvs) {
  // 1.1 构建缓存key
  String cacheKey = (StringUtils.hasLength(beanName) ? beanName : clazz.getName());
  // 1.2 先从注解元信息缓存中获取,如果能获取到直接返回
  InjectionMetadata metadata = this.injectionMetadataCache.get(cacheKey);
  // 1.3 需要刷新注解元信息,两种情况:一种是元信息为空;另一种是元信息缓存类型与当前类型不匹配
  if (InjectionMetadata.needsRefresh(metadata, clazz)) {
    synchronized (this.injectionMetadataCache) {
      metadata = this.injectionMetadataCache.get(cacheKey);
      if (InjectionMetadata.needsRefresh(metadata, clazz)) {
        if (metadata != null) {
          metadata.clear(pvs);
        }
        // 1.4 真正构建注解元信息的逻辑
        metadata = buildAutowiringMetadata(clazz);
        // 1.5 将注解元信息存储到缓存中
        this.injectionMetadataCache.put(cacheKey, metadata);
      }
    }
  }
  return metadata;
}
// 1.4.1 在构建注解元信息有两个方法:一种是查找被@Autowired注解标注的字段;另一种是查找被@Autowired注解标注的方法
// 下面整个方法都是围绕这两个方面来开展的
private InjectionMetadata buildAutowiringMetadata(final Class<?> clazz) {
  if (!AnnotationUtils.isCandidateClass(clazz, this.autowiredAnnotationTypes)) {
    return InjectionMetadata.EMPTY;
  }

  List<InjectionMetadata.InjectedElement> elements = new ArrayList<>();
  Class<?> targetClass = clazz;

  do {
    final List<InjectionMetadata.InjectedElement> currElements = new ArrayList<>();

    ReflectionUtils.doWithLocalFields(targetClass, field -> {
      MergedAnnotation<?> ann = findAutowiredAnnotation(field);
      if (ann != null) {
        if (Modifier.isStatic(field.getModifiers())) {
          if (logger.isInfoEnabled()) {
            logger.info("Autowired annotation is not supported on static fields: " + field);
          }
          return;
        }
        boolean required = determineRequiredStatus(ann);
        currElements.add(new AutowiredFieldElement(field, required));
      }
    });

    ReflectionUtils.doWithLocalMethods(targetClass, method -> {
      Method bridgedMethod = BridgeMethodResolver.findBridgedMethod(method);
      if (!BridgeMethodResolver.isVisibilityBridgeMethodPair(method, bridgedMethod)) {
        return;
      }
      MergedAnnotation<?> ann = findAutowiredAnnotation(bridgedMethod);
      if (ann != null && method.equals(ClassUtils.getMostSpecificMethod(method, clazz))) {
        if (Modifier.isStatic(method.getModifiers())) {
          if (logger.isInfoEnabled()) {
            logger.info("Autowired annotation is not supported on static methods: " + method);
          }
          return;
        }
        if (method.getParameterCount() == 0) {
          if (logger.isInfoEnabled()) {
            logger.info("Autowired annotation should only be used on methods with parameters: " +
                method);
          }
        }
        boolean required = determineRequiredStatus(ann);
        PropertyDescriptor pd = BeanUtils.findPropertyForMethod(bridgedMethod, clazz);
        currElements.add(new AutowiredMethodElement(method, required, pd));
      }
    });

    elements.addAll(0, currElements);
    targetClass = targetClass.getSuperclass();
  }
  while (targetClass != null && targetClass != Object.class);

  return InjectionMetadata.forElements(elements, clazz);
}
接着再来看下postProcessProperties方法,逻辑很简单,就两步:
- 查找注入元信息
- 进行注入
@Override
public PropertyValues postProcessProperties(PropertyValues pvs, Object bean, String beanName) {
  // 2.1 查找注入元信息内部逻辑比较简单,不做展开了。就是通过去缓存中查找,如果找不到就重新构建一遍,否则就返回缓存中的信息
  InjectionMetadata metadata = findAutowiringMetadata(beanName, bean.getClass(), pvs);
  try {
    // 2.2 进行注入,这里面的逻辑就比较复杂了,接下来我们主要围绕该方法来讲解流程
    metadata.inject(bean, beanName, pvs);
  }
  catch (BeanCreationException ex) {
    throw ex;
  }
  catch (Throwable ex) {
    throw new BeanCreationException(beanName, "Injection of autowired dependencies failed", ex);
  }
  return pvs;
}
3、InjectionMetadata
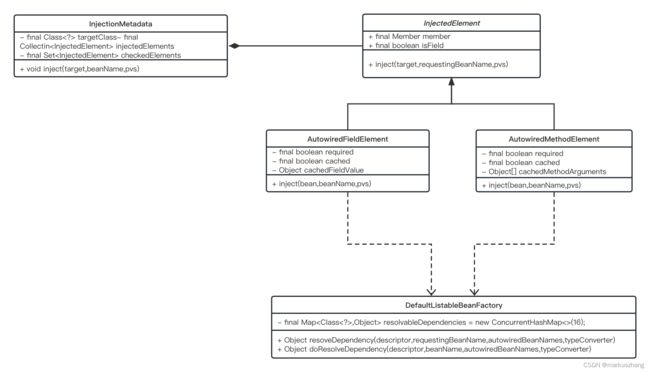
前面我们说到@Autowired的注入流程首先是需要构建一个InjectionMetadata,并通过InjectionMetadata的inject方法来进行注入,所以我们通过下图来熟悉下它的核心依赖项
下面再通过源码来直观解释下上图:
public class InjectionMetadata {
  // <1> 该函数的作用是,将候选注入集依次遍历进行注入
	public void inject(Object target, @Nullable String beanName, @Nullable PropertyValues pvs) throws Throwable {
		Collection<InjectedElement> checkedElements = this.checkedElements;
		Collection<InjectedElement> elementsToIterate =
				(checkedElements != null ? checkedElements : this.injectedElements);
		if (!elementsToIterate.isEmpty()) {
			for (InjectedElement element : elementsToIterate) {
				if (logger.isTraceEnabled()) {
					logger.trace("Processing injected element of bean '" + beanName + "': " + element);
				}
        // <1.1>真正实现注入的函数
				element.inject(target, beanName, pvs);
			}
		}
	}
}
public abstract static class InjectedElement {
  /**
   * 这个方法由子类重写
   */
  protected void inject(Object target, @Nullable String requestingBeanName, @Nullable PropertyValues pvs)
      throws Throwable {

    if (this.isField) {
      Field field = (Field) this.member;
      ReflectionUtils.makeAccessible(field);
      field.set(target, getResourceToInject(target, requestingBeanName));
    }
    else {
      if (checkPropertySkipping(pvs)) {
        return;
      }
      try {
        Method method = (Method) this.member;
        ReflectionUtils.makeAccessible(method);
        method.invoke(target, getResourceToInject(target, requestingBeanName));
      }
      catch (InvocationTargetException ex) {
        throw ex.getTargetException();
      }
    }
  }
}
private class AutowiredFieldElement extends InjectionMetadata.InjectedElement {
  // 字段注入的核心实现
  @Override
  protected void inject(Object bean, @Nullable String beanName, @Nullable PropertyValues pvs) throws Throwable {
    Field field = (Field) this.member;
    Object value;
    if (this.cached) {
      // <2.1> 利用缓存快速返回
      value = resolvedCachedArgument(beanName, this.cachedFieldValue);
    }
    else {
      DependencyDescriptor desc = new DependencyDescriptor(field, this.required);
      desc.setContainingClass(bean.getClass());
      Set<String> autowiredBeanNames = new LinkedHashSet<>(1);
      Assert.state(beanFactory != null, "No BeanFactory available");
      TypeConverter typeConverter = beanFactory.getTypeConverter();
      try {
        // <2.2> 获取指定beanName依赖
        value = beanFactory.resolveDependency(desc, beanName, autowiredBeanNames, typeConverter);
      }
      catch (BeansException ex) {
        throw new UnsatisfiedDependencyException(null, beanName, new InjectionPoint(field), ex);
      }
      // <2.3> 缓存优化
      synchronized (this) {
        if (!this.cached) {
          if (value != null || this.required) {
            this.cachedFieldValue = desc;
            registerDependentBeans(beanName, autowiredBeanNames);
            if (autowiredBeanNames.size() == 1) {
              String autowiredBeanName = autowiredBeanNames.iterator().next();
              if (beanFactory.containsBean(autowiredBeanName) &&
                  beanFactory.isTypeMatch(autowiredBeanName, field.getType())) {
                this.cachedFieldValue = new ShortcutDependencyDescriptor(
                    desc, autowiredBeanName, field.getType());
              }
            }
          }
          else {
            this.cachedFieldValue = null;
          }
          this.cached = true;
        }
      }
    }
    if (value != null) {
      // <2.4> 通过反射实现字段赋值
      ReflectionUtils.makeAccessible(field);
      field.set(bean, value);
    }
  }
}

private class AutowiredMethodElement extends InjectionMetadata.InjectedElement {
  // <3.1> 方法注入的核心实现
  @Override
  protected void inject(Object bean, @Nullable String beanName, @Nullable PropertyValues pvs) throws Throwable {
    if (checkPropertySkipping(pvs)) {
      return;
    }
    Method method = (Method) this.member;
    Object[] arguments;
    if (this.cached) {
      // Shortcut for avoiding synchronization...
      arguments = resolveCachedArguments(beanName);
    }
    else {
      int argumentCount = method.getParameterCount();
      arguments = new Object[argumentCount];
      DependencyDescriptor[] descriptors = new DependencyDescriptor[argumentCount];
      Set<String> autowiredBeans = new LinkedHashSet<>(argumentCount);
      Assert.state(beanFactory != null, "No BeanFactory available");
      TypeConverter typeConverter = beanFactory.getTypeConverter();
      // <3.2> 根据当前方法的参数,遍历依次获取相应参数依赖,然后最终进行注入
      for (int i = 0; i < arguments.length; i++) {
        MethodParameter methodParam = new MethodParameter(method, i);
        DependencyDescriptor currDesc = new DependencyDescriptor(methodParam, this.required);
        currDesc.setContainingClass(bean.getClass());
        descriptors[i] = currDesc;
        try {
          // <3.2.1> 获取指定beanName的依赖对象
          Object arg = beanFactory.resolveDependency(currDesc, beanName, autowiredBeans, typeConverter);
          if (arg == null && !this.required) {
            arguments = null;
            break;
          }
          arguments[i] = arg;
        }
        catch (BeansException ex) {
          throw new UnsatisfiedDependencyException(null, beanName, new InjectionPoint(methodParam), ex);
        }
      }
      // <3.3> 缓存优化
      synchronized (this) {
        if (!this.cached) {
          if (arguments != null) {
            DependencyDescriptor[] cachedMethodArguments = Arrays.copyOf(descriptors, arguments.length);
            registerDependentBeans(beanName, autowiredBeans);
            if (autowiredBeans.size() == argumentCount) {
              Iterator<String> it = autowiredBeans.iterator();
              Class<?>[] paramTypes = method.getParameterTypes();
              for (int i = 0; i < paramTypes.length; i++) {
                String autowiredBeanName = it.next();
                if (beanFactory.containsBean(autowiredBeanName) &&
                    beanFactory.isTypeMatch(autowiredBeanName, paramTypes[i])) {
                  cachedMethodArguments[i] = new ShortcutDependencyDescriptor(
                      descriptors[i], autowiredBeanName, paramTypes[i]);
                }
              }
            }
            this.cachedMethodArguments = cachedMethodArguments;
          }
          else {
            this.cachedMethodArguments = null;
          }
          this.cached = true;
        }
      }
    }
    if (arguments != null) {
      try {
        // <3.4> 通过反射实现方法调用实现依赖注入
        ReflectionUtils.makeAccessible(method);
        method.invoke(bean, arguments);
      }
      catch (InvocationTargetException ex) {
        throw ex.getTargetException();
      }
    }
  }
4、DefaultListableBeanFactory#resolveDependency
通过上面一连串的代码,我们得出一个结论:
- 目标对象通过反射的方式进行字段setter方法赋值或者方法调用进行注入
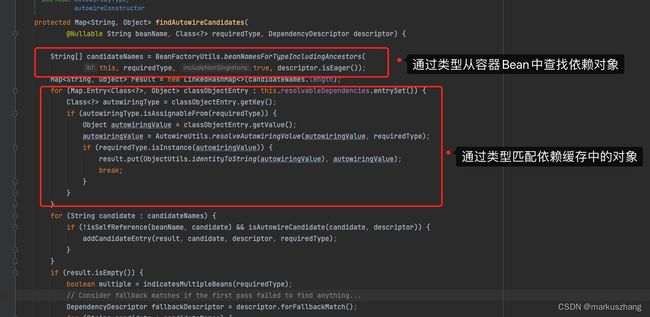
- 目标依赖是通过DefaultListableBeanFactory的resolveDependency方法获取
通过反射调用进行属性赋值或者方法执行这块比较简单,也不赘述了,接下来就开始分析下DefaultListableBeanFactory#resolveDependency的内部流程,这要是@Autowired注解实现原理最核心的一块了。下面我还是通过代码注释的方式进行叙述
@Override
@Nullable
public Object resolveDependency(DependencyDescriptor descriptor, @Nullable String requestingBeanName,
@Nullable Set<String> autowiredBeanNames, @Nullable TypeConverter typeConverter) throws BeansException {
descriptor.initParameterNameDiscovery(getParameterNameDiscoverer());
// <1> 如果依赖对象类型是Optional,则将依赖强转为Optional类型返回
if (Optional.class == descriptor.getDependencyType()) {
return createOptionalDependency(descriptor, requestingBeanName);
}
// <2> 如果ObjectFactory或者ObjectProvider类型的,则转换为对应类型返回
// ObjectFactory和ObjectProvider都是对象工厂,支持延迟加载,前者不包含泛型,后者支持泛型
else if (ObjectFactory.class == descriptor.getDependencyType() ||
ObjectProvider.class == descriptor.getDependencyType()) {
return new DependencyObjectProvider(descriptor, requestingBeanName);
}
// <3> jsr-330规范
else if (javaxInjectProviderClass == descriptor.getDependencyType()) {
return new Jsr330Factory().createDependencyProvider(descriptor, requestingBeanName);
}
else {
// <4.1> 目标依赖对象是否是延迟加载,如果延迟加载,则构造相应代理返回
Object result = getAutowireCandidateResolver().getLazyResolutionProxyIfNecessary(
descriptor, requestingBeanName);
if (result == null) {
// <4.2> 一般情况下都会走到这个流程下,解析依赖的一般流程,我们进入详细看下
result = doResolveDependency(descriptor, requestingBeanName, autowiredBeanNames, typeConverter);
}
// 最后将对象返回
return result;
}
}
@Nullable
public Object doResolveDependency(DependencyDescriptor descriptor, @Nullable String beanName,
@Nullable Set<String> autowiredBeanNames, @Nullable TypeConverter typeConverter) throws BeansException {
// 设置当前注入点 ps 似乎没什么用,我目前没有发现它的作用是什么。
InjectionPoint previousInjectionPoint = ConstructorResolver.setCurrentInjectionPoint(descriptor);
try {
// 删除部分不重要的代码
// ...
// 获取@Value的配置值
Object value = getAutowireCandidateResolver().getSuggestedValue(descriptor);
if (value != null) {
// 下面一段代码就是将@Value获取的配置的值,转换成相应类型的值。TypeConverter就是类型转换器
if (value instanceof String) {
String strVal = resolveEmbeddedValue((String) value);
BeanDefinition bd = (beanName != null && containsBean(beanName) ?
getMergedBeanDefinition(beanName) : null);
value = evaluateBeanDefinitionString(strVal, bd);
}
TypeConverter converter = (typeConverter != null ? typeConverter : getTypeConverter());
try {
return converter.convertIfNecessary(value, type, descriptor.getTypeDescriptor());
}
catch (UnsupportedOperationException ex) {
// A custom TypeConverter which does not support TypeDescriptor resolution...
return (descriptor.getField() != null ?
converter.convertIfNecessary(value, type, descriptor.getField()) :
converter.convertIfNecessary(value, type, descriptor.getMethodParameter()));
}
}
// 解析多Bean的情况,例如被注入的字段为集合、Map、流等
// 进入该方法内部,可以看到它支持一下类型的注入:Stream
// 当是这种类型的时候,就会将所有的候选对象全部注入其中,感兴趣的同学可以深入看看里面的细节
Object multipleBeans = resolveMultipleBeans(descriptor, beanName, autowiredBeanNames, typeConverter);
if (multipleBeans != null) {
return multipleBeans;
}
// 获取到容器中的候选依赖
Map<String, Object> matchingBeans = findAutowireCandidates(beanName, type, descriptor);
// 删除此处不重要的代码
String autowiredBeanName;
Object instanceCandidate;
// 接下来就是解析单Bean的场景了,如果候选依赖数量大于1,那么就需要从候选集中决定出最终的对象进行注入
if (matchingBeans.size() > 1) {
// 这段代码就是选择出最终的bean
// 通过@Primary或者xml配置bean标签的primary=true属性设置,则会挑选出符合这样条件的唯一Bean
autowiredBeanName = determineAutowireCandidate(matchingBeans, descriptor);
// 这段if分支是用来处理没有获取到这样一个bean时的逻辑
if (autowiredBeanName == null) {
if (isRequired(descriptor) || !indicatesMultipleBeans(type)) {
return descriptor.resolveNotUnique(descriptor.getResolvableType(), matchingBeans);
}
else {
// In case of an optional Collection/Map, silently ignore a non-unique case:
// possibly it was meant to be an empty collection of multiple regular beans
// (before 4.3 in particular when we didn't even look for collection beans).
return null;
}
}
// 获取最终指定beanName的对象实例
instanceCandidate = matchingBeans.get(autowiredBeanName);
}
else {
// 精确的匹配到一个Bean,比较好办,直接赋值
Map.Entry<String, Object> entry = matchingBeans.entrySet().iterator().next();
autowiredBeanName = entry.getKey();
instanceCandidate = entry.getValue();
}
if (autowiredBeanNames != null) {
autowiredBeanNames.add(autowiredBeanName);
}
if (instanceCandidate instanceof Class) {
// 对象从Class 到最终Bean对象的转换
instanceCandidate = descriptor.resolveCandidate(autowiredBeanName, type, this);
}
Object result = instanceCandidate;
if (result instanceof NullBean) {
if (isRequired(descriptor)) {
raiseNoMatchingBeanFound(type, descriptor.getResolvableType(), descriptor);
}
result = null;
}
if (!ClassUtils.isAssignableValue(type, result)) {
throw new BeanNotOfRequiredTypeException(autowiredBeanName, type, instanceCandidate.getClass());
}
// 返回最终的对象
return result;
}
finally {
ConstructorResolver.setCurrentInjectionPoint(previousInjectionPoint);
}
}
3、关于原理的总结
我们在原理这一节罗列了大量的代码,乍一看上去可能有些乱,所以在这里我给大家理顺一下思路:
- 关于罗列代码,我的想法是将核心方法的一些核心环节进行一些注释,这样有助于大家在阅读源码的时候能够快速地理解每段代码的用意
- 关于@Autowired原理,我们从Bean生命周期出发,了解@Autowired进行依赖注入发生在生命周期的那几部分环节,接着我们又从几个关键类入手分析这些类的关键方法,具体类我在这里再重新罗列下:
- 从AbstractAutowiredCapableBeanFactory#doCreateBean开始
- 接着执行AutowiredAnnotationBeanPostProcessor#postProcessMergedBeanDefinition构建注入元信息InjectionMetadata
- 再次回到AbstractAutowiredCapableBeanFactory#doCreateBean中执行其他流程
- 接着执行AutowiredAnnotationBeanPostProcessor#postProcessProperties方法,进行相应注入,例如字段注入(通过AutowiredFieldElement实现)以及方法注入(通过AutowiredMethodElement实现)
- 无论是AutowiredFieldElement还是AutowiredMethodElement,他们都会通过DefaultListableBeanFactory#resolveDependency获取依赖对象,然后通过反射进行相应属性赋值或者方法调用
四、其他注解注入方式
以上就是我对@Autowired注解实现原理的理解,下面再来介绍下其他注解的使用,例如@Resource,@Value(基本类似,就不做罗列了)
1、@Resource使用示例
演示代码
package com.markus.spring.injection;

import com.markus.spring.bean.User;
import org.springframework.beans.factory.annotation.Qualifier;
import org.springframework.context.annotation.AnnotationConfigApplicationContext;
import org.springframework.context.annotation.Import;

import javax.annotation.Resource;
import java.util.List;

/**
 * @author: markus
 * @date: 2023/2/12 10:33 PM
 * @Description: @Resource注解使用
 * @Blog: https://markuszhang.com
 * It's my honor to share what I've learned with you!
 */
@Import({
        com.markus.spring.configuration.SameTypeBeanConfiguration.class
})
public class ResourceAnnotationDependencyInjectionDemo {

    @Resource
    private List<User> users;

    @Resource
    private User user;

    @Resource(name = "user2")
    private User userFromName;

    public static void main(String[] args) {
        AnnotationConfigApplicationContext context = new AnnotationConfigApplicationContext();
        context.register(ResourceAnnotationDependencyInjectionDemo.class);
        context.refresh();

        ResourceAnnotationDependencyInjectionDemo demo = context.getBean(ResourceAnnotationDependencyInjectionDemo.class);
        System.out.println("demo.users : " + demo.users);
        System.out.println("demo.user : " + demo.user);
        System.out.println("demo.userFromName : " + demo.userFromName);
    }
}
控制台
其原理以及与@Autowired的区别?
原理就不做展开了,这里就简单介绍@Resource与@Autowired的区别以及如何看@Resource的源码
- 首先说下区别:
- 相同的是@Resource和@Autowired都属于依赖注入的注解,都能放在字段或者方法上
- 不同的是
- @Resource相当于@Autowired+@Qualifier,它可以直接指定bean的名称,而@Autowired不能直接指定,需要和@Qualifier配合使用
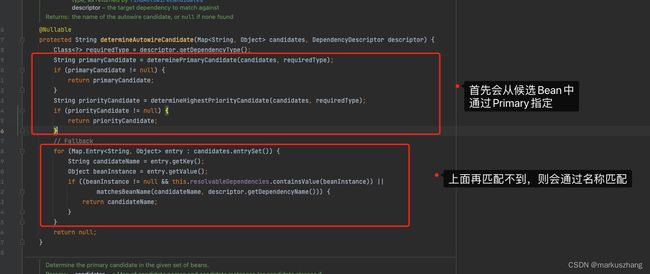
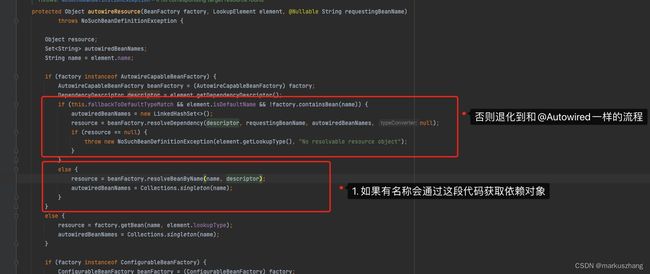
- @Resource进行依赖查找的时候,首先是通过名称查找,如果匹配不到则退化到使用类型匹配;而@Autowired则是先通过类型查找,如果匹配到多个再通过名称查找,这些都是可以通过源码验证的
- @Resource是通过CommonAnnotationBeanPostProcessor实现,至于注入时机什么的均与@Autowired时机一致
先来看下@Autowired的
五、全文总结
本章介绍了@Autowired注解的使用、原理(几个核心类的关键方法)、同功能其他注解的演示(@Resource)并且比较了两者的区别。
读到这里,关于@Autowired的使用以及注入原理相信大家都有了比较充分的了解。
如果有不明白的地方或者我表述不准确的地方,欢迎评论区沟通交流!
