SpringBoot核心技术
1.简单功能分析
1.1静态资源目录
/static(or/publicor/resourcesor/META-INF/resources
项目启动后,在项目根路径放上这个文件目录,都可以访问到静态资源页面
原理:静态映射/**
请求进来,先去找Controller看能不能处理,不能处理的所有请求又都交给静态资源处理器,静态资源也找到404spring: mvc: static-path-pattern: /res/** 配置静态资源文件的请求前缀web: resources: static-locations: [classpath:/re/] 配置静态资源的扫描路径
webjars
将类似jqury之类的文件封装成了jar包,可以打开网站搜索webjars将需要的东西通过maven引入
自动映射 /webjars/**
WebJars - Web Libraries in Jars
            org.webjars
            jquery
            3.5.1
访问地址:http://localhost:8080/webjars/jquery/3.5.1/jquery.js 后面地址要按照依赖里面的包路径
1.2.欢迎页支持
- 静态资源路径下 index.html
- 可以配置静态资源路径
- 但是不可以配置静态资源的访问前缀。否则导致 index.html不能被默认访问
spring:
#  mvc:
#    static-path-pattern: /res/**   这个会导致welcome page功能失效

  resources:
    static-locations: [classpath:/haha/]
1.3 自定义Favicon
favicon.ico 放在静态资源目录下即可
spring:
#  mvc:
#    static-path-pattern: /res/**   这个会导致 Favicon 功能失效
2.请求参数处理
@xxxMapping
Rest风格支持 (使用HttP请求方式动词来表示对资源的操作)
以前 :/getUser 获取用户 /deleteUser 删除用户 /editUser 修改用户 /saveUser保护用户
现在: /user GET-获取用户 DELETE-删除用户 PUT-修改用户 POST-保存用户
核心Filter:HiddenHttpMethodFilter
用法:表单method = post ,隐藏域_method = put
SpringBoot中手动开启
Rest原理(表单提交试用Rest的时候)
表单提交会带上_method=put,并且请求方式为POST
请求过来被HiddenHttpMethodFilter拦截
请求是否正常,并且是POST,获取到_method的值
兼容以下请求:PUT.DELETE.PATCH
原生request(post),包装模式requestWrapper重写了getMethod,返回的是传入的值
过滤器放行的时候用wrapper,以后的方法调用getMethod是调用requestWrapper的
(这个流程是针对form表单请求,因为表单只能使用get和post请求)
Rest使用客户端工具
如PostMan直接发送Put丶delete等方式请求。无需Filter。


3.普通参数与基本注解
3.1.注解
@PathVariable、@RequestHeader、@ModelAttribute、@RequestParam、@MatrixVariable、@CookieValue、@RequestBody
@RestController
public class ParameterTestController {


    //  car/2/owner/zhangsan
    @GetMapping("/car/{id}/owner/{username}")
    public Map getCar(@PathVariable("id") Integer id,
                                     @PathVariable("username") String name,
                                     @PathVariable Map pv,
                                     @RequestHeader("User-Agent") String userAgent,
                                     @RequestHeader Map header,
                                     @RequestParam("age") Integer age,
                                     @RequestParam("inters") List inters,
                                     @RequestParam Map params,
                                     @CookieValue("_ga") String _ga,
                                     @CookieValue("_ga") Cookie cookie){


        Map map = new HashMap<>();

//        map.put("id",id);
//        map.put("name",name);
//        map.put("pv",pv);
//        map.put("userAgent",userAgent);
//        map.put("headers",header);
        map.put("age",age);
        map.put("inters",inters);
        map.put("params",params);
        map.put("_ga",_ga);
        System.out.println(cookie.getName()+"===>"+cookie.getValue());
        return map;
    }


    @PostMapping("/save")
    public Map postMethod(@RequestBody String content){
        Map map = new HashMap<>();
        map.put("content",content);
        return map;
    }


    //1、语法: 请求路径:/cars/sell;low=34;brand=byd,audi,yd
    //2、SpringBoot默认是禁用了矩阵变量的功能
    //      手动开启:原理。对于路径的处理。UrlPathHelper进行解析。
    //              removeSemicolonContent(移除分号内容)支持矩阵变量的
    //3、矩阵变量必须有url路径变量才能被解析
    @GetMapping("/cars/{path}")
    public Map carsSell(@MatrixVariable("low") Integer low,
                        @MatrixVariable("brand") List brand,
                        @PathVariable("path") String path){
        Map map = new HashMap<>();

        map.put("low",low);
        map.put("brand",brand);
        map.put("path",path);
        return map;
    }

    // /boss/1;age=20/2;age=10

    @GetMapping("/boss/{bossId}/{empId}")
    public Map boss(@MatrixVariable(value = "age",pathVar = "bossId") Integer bossAge,
                    @MatrixVariable(value = "age",pathVar = "empId") Integer empAge){
        Map map = new HashMap<>();

        map.put("bossAge",bossAge);
        map.put("empAge",empAge);
        return map;

    }

}
4.复杂参数
Map丶Model(map丶model里面的数据会被放在request的请求域 request.setAtttribute)丶Errors/BindingResult丶RedireAttributes(重定向携带数据)丶ServletReponse(response)丶SessionStats丶UriComponentBuilder丶HttpServletRequest 都是可以给request域中放数据
这里的主要使用在业务中如果需要用到其他接口的数据,进行页面转发时会将请求域中的数据传递过来
5丶整合thymeleaf模板引擎
先在pom中引入依赖
org.springframework.boot spring-boot-starter-thymeleaf 简介:现代化、服务端Java模板引擎
5.1基本语法
1.表达式
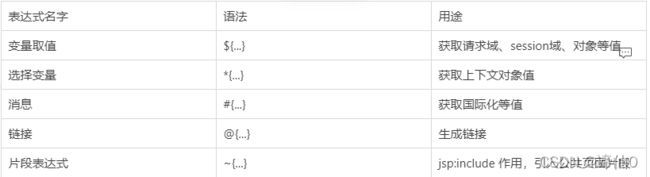
片段表达式类似使用jsp时引入其他页面,抽取头部页面引入
2.字面量
文本值: 'one text' , 'Another one!' ,…数字: 0 , 34 , 3.0 , 12.3 ,…布尔值: true , false
空值: null
变量: one,two,.... 变量不能有空格
3.文本操作
字符串拼接: +
变量替换: |The name is ${name}|
4.数学运算
运算符: + , - , * , / , %
5.布尔运算
运算符: and , or
一元运算: ! , not
6.比较运算
比较: > , < , >= , <= ( gt , lt , ge , le )等式: == , != ( eq , ne )
7.条件运算
If-then: (if) ? (then)
If-then-else: (if) ? (then) : (else)
Default: (value) ?: (defaultvalue)
8.特殊操作
无操作: _
5.2设置属性值-th:attr
设置单个值
设置多个值

以上两个的代替写法
5.3迭代
        Onions
        2.41
        yes
  Onions
  2.41
  yes
5.4.条件运算
view
  User is an administrator
  User is a manager
  User is some other thing
5.5属性优先级

5.5基本使用
我们引入了starter之后,springboot帮我们自动配置好了thymeleaf
@Configuration(proxyBeanMethods = false)
@EnableConfigurationProperties(ThymeleafProperties.class)
@ConditionalOnClass({ TemplateMode.class, SpringTemplateEngine.class })
@AutoConfigureAfter({ WebMvcAutoConfiguration.class, WebFluxAutoConfiguration.class })
public class ThymeleafAutoConfiguration { }
自动配好的策略有:
- 1、所有thymeleaf的配置值都在 ThymeleafProperties
- 2、配置好了 SpringTemplateEngine
- 3、配好了 ThymeleafViewResolver
- 4、我们只需要直接开发页面,将页面放到下面路径下
	public static final String DEFAULT_PREFIX = "classpath:/templates/";

	public static final String DEFAULT_SUFFIX = ".html";  //xxx.html
记住在创建页面的时候引入命名空间
6.拦截器功能
过滤器,拦截器,监听器的区别

在Spring中有这么一个接口
HandlerInterceptor其中有三个方法
一般常用的场景就是登录检查
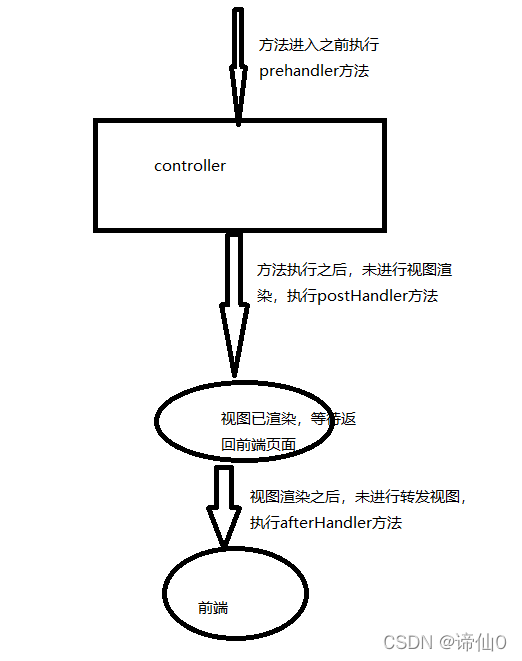
拦截器原理
1.根据当前请求,找到HandlerExecutionChain(可以处理请求的handler以及所有的拦截器)
2.先来顺序执行所有拦截器的preHandle方法
1.如果当前拦截器的prehandler返回true。则执行下一个拦截器的preHandler
2.如果当前拦截器返回false。直接倒叙执行所有已经执行的拦截器的afterCompletion
3.如果任何一个拦截器返回false。直接跳出不执行目标方法
4.所有拦截器都返回true,执行目标方法
5.倒序执行所有拦截器的postHandler方法
6.前面的步骤有任何异常都会直接触发
7.页面成功渲染完成以后,也会倒序触发afterCompletion

7.文件上传
    /**
     * MultipartFile 自动封装上传过来的文件
     * @param email
     * @param username
     * @param headerImg
     * @param photos
     * @return
     */
    @PostMapping("/upload")
    public String upload(@RequestParam("email") String email,
                         @RequestParam("username") String username,
                         @RequestPart("headerImg") MultipartFile headerImg,
                         @RequestPart("photos") MultipartFile[] photos) throws IOException {

        log.info("上传的信息:email={},username={},headerImg={},photos={}",
                email,username,headerImg.getSize(),photos.length);

        if(!headerImg.isEmpty()){
            //保存到文件服务器,OSS服务器
            String originalFilename = headerImg.getOriginalFilename();
            headerImg.transferTo(new File("H:\\cache\\"+originalFilename));
        }

        if(photos.length > 0){
            for (MultipartFile photo : photos) {
                if(!photo.isEmpty()){
                    String originalFilename = photo.getOriginalFilename();
                    photo.transferTo(new File("H:\\cache\\"+originalFilename));
                }
            }
        }


        return "main";
    }
8.异常处理
默认情况下,SpringBoot 提供/error处理所有错误的映射
- 对于机器客户端,它将生成JSON响应,其中包含错误,HTTP状态和异常消息的详细信息。
- 对于浏览器客户端,响应一个“ whitelabel”错误视图,以HTML格式呈现相同的数据

可以在templates下自定义错误页面,实现自定义错误配置
自动配置原理分析套路
pom引入场景starter-xxxxAutoConfiguration--导入xxx组件 --绑定xxxProperties ---绑定配置文件项
9.定制化原理
1.修改配置文件
2.xxxxCustomizer
3.编写自定义的配置类 xxxConfiguration +@Bean替换 丶增加容器中默认组件;视图解析器
4.web应用实现WebMvcConfigurer即可定制化Web功能