Unity Shader 学习笔记(5)Shader变体、Shader属性定义技巧、自定义材质面板
写在之前
Shader变体、Shader属性定义技巧、自定义材质面板,这三个知识点任何一个单拿出来都是一套知识体系,不能一概而论,本文章目的在于将学习和实际工作中遇见的问题进行总结,类似于网络笔记之用,方便后续回顾查看,如有以偏概全、不祥不尽之处,还望海涵。
1、Shader变体
先看一段代码
......
Properties{
	[KeywordEnum(on,off)] USL_USE_COL("Is Use Color Mix Tex?", int) = 0
	[Toggle(IS_RED_ON)]_IsRed("IsRed?", int) = 0
}
......//中间省略,后续会有完整代码
	#pragma multi_compile USL_USE_COL_ON USL_USE_COL_OFF
    //"_" 代表除了ON之外的另外一种情况
    #pragma multi_compile IS_RED_ON _
    ......
要点总结:
1.两种在属性菜单内定义 宏 (变体) 的方式;
2.“#pragma multi_compile” 作为定义变体的一种方式,对比的还有 “#pragma shader_feature”两种方式构建全局变体;
3.二者区别在于:
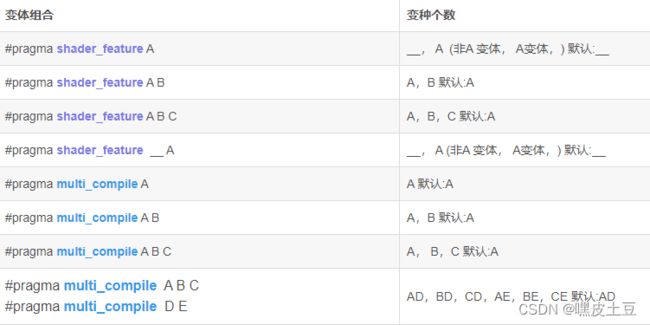
“#pragma multi_compile” 无差别构建Shader,即根据定义的变体数量,排列组合出全部的Shader可能,利用内存的空间,换取加载时间和速度;
此处引用站内的一位朋友的文章,并且借用他的一张图表示一下变体的排列组合方式和规则:在此表示感谢;

“#pragma shader_feature” 在打包之后,材质球用到的变体组合才会打包出来,没有用到的变体组合是不会打包的,但是缺点也是很明显,即导出之后如果想用没有导出的变体组合,是会报错的,相对于 “#pragma multi_compile” 只有内存开销会小一些。
Tips:顺便说一下分支语句:
最常见的分支语句:
a. 动态分支:
if(A){}//动态加载语句
else{}//优点:可以选择条件A进行判断,同时可以在一个 Shader 内实现动态加载,即时切换分支;
//缺点:由于动态加载,所以运算开销会多一些,因为需要全部分支内容走过一遍,才能判断最终需要走的分支,所以时间和开销比较浪费。
b. 静态分支:
此处引用一下本文分享的Shader代码:
......
 #if defined (USL_USE_COL_ON)
 	#if defined (IS_RED_ON)
 		mainColor = fixed4(1,0,0,col.a);
 		col *= mainColor;
 	#else
		 mainColor = fixed4(0,1,0,col.a);
 	col *= mainColor;
 	#endif
 #else
 	col = mainColor;
 #endif
 ......
这里使用了静态分支的嵌套,静态分支的各种属性:
原理:着色器编译时选择代码分支;
使用条件:在编译之前就已经是确定的执行条件,编译之后只会运行已经确定的分支,同时编译器会裁剪没有激活的分支;
小注意:目前Unity的最新版本已经建议使用 “#if defined(A)” 这种方式,所以在选择时也不用过多纠结其余的写法,跟着官方走就好了。
c. 着色器变体
没错,着色器变体其实属于分支语句的一种,是更高级的静态分支;
着色器变体的原理:
编译时,生成多个静态分支的着色器版本;
运行时,根据要使用的Shader功能动态选择要执行的着色器版本;
解释一下这个原理,上面已经说过变体会排列组合的生成很多着色器版本,只是在运行时会选择性使用着色器版本;
所以从涵盖关系上看,每一个变体所排列组合出来的着色器版本,就是某些静态分支的组合;
从灵活度上看,静态分支更像是一个Shader的固定渲染方案,此时想要其他的渲染效果,总不至于重新写Shader,此时利用变体的组合,就可以在一个Shader内创造出另外一种渲染可能,相同的是,新创造出来的着色器版本也是静态分支渲染,只有一种渲染结果。
d.总结
可以这样说,着色器变体是静态分支更高级的用法,为本来需要写很多Shader的工作量集合到一个Shader内,让Unity自动生成着色器版本,自动选择要使用的版本。
而动态分支就是在一个Shader内分出多条不同的渲染路线,根据设置的条件选择最终的渲染方案,可以在编译之后的工作中仍可灵活选择一种方案。
2、Shader属性定义技巧
还是引用一段代码:
		[Enum(UnityEngine.Rendering.CullMode)] _Culling("Cull Mode", int) = 2

        [Enum(UnityEngine.Rendering.BlendMode)] _BleModSour("Blend-Source", int) = 5
        [Enum(UnityEngine.Rendering.BlendMode)] _BleModDest("Blend-Destination", int) = 10

        _MainColor("ColorTest", Color) = (1,1,1,1)
        _MainTex ("Texture", 2D) = "white" {}

        [KeywordEnum(on,off)] USL_USE_COL("Is Use Color Mix Tex?", int) = 0
        //[Toggle]_IsRed("IsRed?", int) = 0
        [Toggle(IS_RED_ON)]_IsRed("IsRed?", int) = 0

        _StencilRef("Stencil Ref ID", int) = 0
        [Enum(UnityEngine.Rendering.CompareFunction)] _StencilComp("Stencil Comp Style", int) = 3
a. Enum 类型
在 Shader 内可以引用Unity的部分API,其中 “UnityEngine.Rendering.CullMode” 就是其中的一种,类似的还有下面的几种引用可以参见Unity官方文档参考,这边不做过多解释。
着重说一下以下两行代码:
//关键词表示变体,在后续的变体引用中,需要将关键字配合“Enum”内的字体变成大写引用
//具体引用结果参见后文全部代码;
[KeywordEnum(on,off)] USL_USE_COL("Is Use Color Mix Tex?", int) = 0
[Toggle(IS_RED_ON)]_IsRed("IsRed?", int) = 0
//上述两行都是创建了变体,但是后者会更加简单一些,同时在Material UI上的显示方式
//也是略有差别,看情况选择性使用;
![]()
第一种方式是一个下拉选择菜单,同时支持多种结果选择;
第二种则是勾选框,只有 是否 两种选择。
b. 属性的引用方式
常见的
在属性内定义,然后在 Shader 的 CG/HLSL 片段内重新定义,然后就可以在后续的顶点片元着色器使用;
......
fixed4 _MainColor;
sampler2D _MainTex;
float4 _MainTex_ST;

//int _IsRed;
......
特别的
......
SubShader
    {
        Tags { "RenderType"="Transparent" "Queue" = "Transparent"}
        LOD 100
        //使用 [] 的方式替换特定的一种选择,这样就可以避免重定义再使用属性的问题,
        //同时这样对于美术同学很是友好。
        Blend [_BleModSour][_BleModDest]
        Cull[_Culling]

        Stencil
        {
            Ref [_StencilRef]
            //Comp Equal
            Comp [_StencilComp]
        }
        Pass
        {......}
        ......
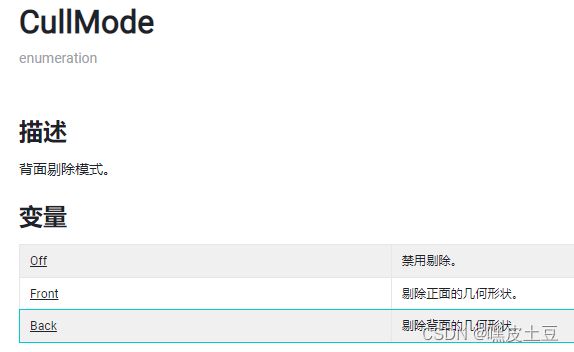
第二种引用方式需要在官方文档内注意引用的属性的顺序,例如:

引用时,默认值 “0” 对应 “Off”,默认值 “1” 对应 “Front”, 默认值 “2” 对应 “Back”,其他的引用属性一样类推。
3、自定义材质面板
在 Shader 内增加一行代码:(最后的位置)
......
                return fixed4(col.rgb, col.a);
            }
            ENDCG
        }
    }
    //就是下面这一行代码:
    //需要注意这个名称对应脚本的名称,一定是对应上的。
    CustomEditor "MainShaderGUI"
}
完整的脚本代码:
using UnityEngine;
using UnityEditor;

//名称和Shader内的名称一一对应,和脚本的文件名完全一致
public class MainShaderGUI : ShaderGUI
{

    static bool TextureColor;
    static bool CullAndBlendMode;
    static bool StencilProperties;

	//定义脚本内需要引用的 Shader 属性名称并赋值;
    MaterialProperty _Culling = null;
    MaterialProperty _BleModSour = null;
    MaterialProperty _BleModDest = null;
    MaterialProperty _MainColor = null;
    MaterialProperty _MainTex = null;
    MaterialProperty USL_USE_COL = null;
    MaterialProperty _IsRed = null;
    MaterialProperty _StencilRef = null;
    MaterialProperty _StencilComp = null;

	// #region 和 #endregion 二者一一对应;
	//作用:
	//1. 分段代码,方便后续的修改和更新,使代码结构清晰;
	//2. 在Material 面板上,可以起到分割和避免重叠的作用;

    public override void OnGUI(MaterialEditor materialEditor, MaterialProperty[] properties)
    {
        #region Shader Properties

		//将Shader属性在脚本内一一对应
        _Culling = ShaderGUI.FindProperty("_Culling", properties);
        _BleModSour = ShaderGUI.FindProperty("_BleModSour", properties);
        _BleModDest = ShaderGUI.FindProperty("_BleModDest", properties);
        _MainColor = ShaderGUI.FindProperty("_MainColor", properties);
        _MainTex = ShaderGUI.FindProperty("_MainTex", properties);
        USL_USE_COL = ShaderGUI.FindProperty("USL_USE_COL", properties);
        _IsRed = ShaderGUI.FindProperty("_IsRed", properties);
        _StencilRef = ShaderGUI.FindProperty("_StencilRef", properties);
        _StencilComp = ShaderGUI.FindProperty("_StencilComp", properties);

        #endregion

        #region Culling And Blend
		//新建一个下拉菜单UI,返回一个 Bool 值;
		//"Cull And Blend" 是这个下拉菜单的名称;
        CullAndBlendMode = EditorGUILayout.Foldout(CullAndBlendMode, "Cull And Blend", true, EditorStyles.foldout);

        if (CullAndBlendMode)//动态分支选择,相当于 if(true){}
        {
            GUILayout.Space(10);//空格(一行)
            //下拉菜单内包含的属性;
            materialEditor.ShaderProperty(_Culling, new GUIContent(_Culling.displayName));
            materialEditor.ShaderProperty(_BleModSour, new GUIContent(_BleModSour.displayName));
            materialEditor.ShaderProperty(_BleModDest, new GUIContent(_BleModDest.displayName));
            GUILayout.Space(10);
        }
        #endregion

        #region Color And Tex

        Rect r_texturecolor = EditorGUILayout.BeginVertical("Button");//增加背景方便分类识别

        TextureColor = EditorGUILayout.Foldout(TextureColor, "Color And Texture", true, EditorStyles.foldout);

        if (TextureColor)
        {
            GUILayout.Space(10);
            materialEditor.ShaderProperty(_MainColor, new GUIContent(_MainColor.displayName));
            materialEditor.ShaderProperty(_MainTex, new GUIContent(_MainTex.displayName));
            materialEditor.ShaderProperty(USL_USE_COL, new GUIContent(USL_USE_COL.displayName));
            materialEditor.ShaderProperty(_IsRed, new GUIContent(_IsRed.displayName));
            GUILayout.Space(10);
        }

        EditorGUILayout.EndVertical();//增加背景的结束语句;

        #endregion

        #region Stencil Properties

        StencilProperties = EditorGUILayout.Foldout(StencilProperties, "Stencil Properties", true, EditorStyles.foldout);

        if (StencilProperties)
        {
            GUILayout.Space(10);
            materialEditor.ShaderProperty(_StencilRef, new GUIContent(_StencilRef.displayName));
            materialEditor.ShaderProperty(_StencilComp, new GUIContent(_StencilComp.displayName));
            GUILayout.Space(10);
        }
        #endregion
    }
}
材质面板对比:(脚本使用之前和之后)
面板折叠收起:
中间的折叠面板是为了跟好的区分不同属性块。
4、完整Shader代码:
Shader "USL/Shader Advanced Writing"
{
    Properties
    {
        [Enum(UnityEngine.Rendering.CullMode)] _Culling("Cull Mode", int) = 2

        [Enum(UnityEngine.Rendering.BlendMode)] _BleModSour("Blend-Source", int) = 5
        [Enum(UnityEngine.Rendering.BlendMode)] _BleModDest("Blend-Destination", int) = 10

        _MainColor("ColorTest", Color) = (1,1,1,1)
        _MainTex ("Texture", 2D) = "white" {}

        [KeywordEnum(on,off)] USL_USE_COL("Is Use Color Mix Tex?", int) = 0
        //[Toggle]_IsRed("IsRed?", int) = 0
        [Toggle(IS_RED_ON)]_IsRed("IsRed?", int) = 0

        _StencilRef("Stencil Ref ID", int) = 0
        [Enum(UnityEngine.Rendering.CompareFunction)] _StencilComp("Stencil Comp Style", int) = 3
    }
    SubShader
    {
        //Tags { "RenderType"="Opaque" }
        Tags { "RenderType"="Transparent" "Queue" = "Transparent"}
        LOD 100

        Blend [_BleModSour][_BleModDest]
        Cull[_Culling]

        Stencil
        {
            Ref [_StencilRef]
            //Comp Equal
            Comp [_StencilComp]
        }

        Pass
        {
            CGPROGRAM
            #pragma vertex vert
            #pragma fragment frag
            // make fog work
            #pragma multi_compile_fog

            #pragma multi_compile USL_USE_COL_ON USL_USE_COL_OFF
            //"_" 代表除了ON之外的另外一种情况
            #pragma multi_compile IS_RED_ON _

            //此双变体形式组合成四种Shader :
            //两两组合,默认不规定 #if 的情况下使用变体的第一种组合,USL_USE_COL_ON + IS_RED_ON
            #include "UnityCG.cginc"

            struct appdata
            {
                float4 vertex : POSITION;
                float2 uv : TEXCOORD0;
            };

            struct v2f
            {
                float2 uv : TEXCOORD0;
                UNITY_FOG_COORDS(1)
                float4 vertex : SV_POSITION;
            };

            fixed4 _MainColor;
            sampler2D _MainTex;
            float4 _MainTex_ST;

            //int _IsRed;


            v2f vert (appdata v)
            {
                v2f o;
                o.vertex = UnityObjectToClipPos(v.vertex);
                o.uv = TRANSFORM_TEX(v.uv, _MainTex);
                UNITY_TRANSFER_FOG(o,o.vertex);
                return o;
            }
            /*
            //变体和动态选择(if + else)可以组合使用。
            fixed4 frag (v2f i) : SV_Target
            {
                // sample the texture
                fixed4 col = tex2D(_MainTex, i.uv);
                fixed4 mainColor = _MainColor;
                // apply fog
                UNITY_APPLY_FOG(i.fogCoord, col);

                #if defined (USL_USE_COL_ON)

                    if (_IsRed)
                    {
                        mainColor = fixed4(1,0,0,1);
                        col *= mainColor;
                    }

                    else if(!_IsRed)
                    {
                        mainColor = fixed4(0,1,0,1);
                        col *= mainColor;
                    }
                    col *= mainColor;

                #else
                    col = mainColor;

                #endif

                return col;
            }
            */
            fixed4 frag (v2f i) : SV_Target
            {
                // sample the texture
                fixed4 col = tex2D(_MainTex, i.uv);
                fixed4 mainColor = _MainColor;
                // apply fog
                UNITY_APPLY_FOG(i.fogCoord, col);

                //变体嵌套的形式结果
                #if defined (USL_USE_COL_ON)
                    #if defined (IS_RED_ON)
                        mainColor = fixed4(1,0,0,col.a);
                        col *= mainColor;
                    #else
                        mainColor = fixed4(0,1,0,col.a);
                        col *= mainColor;
                    #endif
                #else
                    col = mainColor;
                #endif

                return fixed4(col.rgb, col.a);
            }
            ENDCG
        }
    }
    CustomEditor "MainShaderGUI"
}
写在最后:
能看到最后的,估计寥寥无几,如果觉得写的还可以,可以点个赞,让我知道还是有人需要这种比较初级的教程,本文只能简单的陈述一下,并不能完整的将项目经验进行传达,有必要的情况还请留言。
如果有写的不好的地方,还请大佬批评指正,感谢。

