LVS负载均衡的搭建
目录
建立共享存储
关闭防火墙,安装保护机制
配置服务器池
配置两台nginx节点服务器
节点服务器1:192.168.17.55
节点服务器2:1921.68.17.25 (配置与节点服务器1一样)
配置LVS负载均衡器
打开win10更改IP地址
将网关服务器做地址转换
将两台nginx的节点服务器更改网关
切换回负载均衡器(192.168.17.30)
安装工具
启动出现报错
验证访问
建立共享存储
先安装nfs共享文件 (192.168.17.30)
yum install nfs-utils rpcbind -y关闭防火墙,安装保护机制
systemctl stop firewalld
setenforce 0
cd /opt
mkdir aa bb

echo 'this is web1' > /opt/aa/web1.html  #将测试网页放到aa目录下
echo 'this is web2' > /opt/bb/web2.html  #将测试网页放到bb目录下

vim /etc/exports                   #配置如下

/opt/aa  192.168.17.0/24(rw,sync,no_root_squash)
/opt/bb  192.168.17.0/24(rw,sync,no_root_squash)

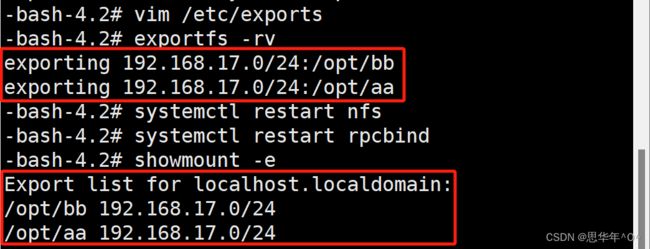
-bash-4.2# exportfs -rv           #刷新并查看
exporting 192.168.17.0/24:/opt/bb
exporting 192.168.17.0/24:/opt/aa

-bash-4.2# systemctl restart nfs         #重启nfs服务
-bash-4.2# systemctl restart rpcbind     #重启rpcbind服务

-bash-4.2# showmount -e                  #查看共享
Export list for localhost.localdomain:
/opt/bb 192.168.17.0/24
/opt/aa 192.168.17.0/24
配置服务器池
配置两台nginx节点服务器
节点服务器1:192.168.17.55
showmount -e 192.168.17.30   #查看共享
Export list for 192.168.17.30:
/opt/bb 192.168.17.0/24
/opt/aa 192.168.17.0/24

mv *.html /opt

vim /etc/fstab  #永久挂载文件
192.168.17.30:/opt/aa  /usr/local/nginx/html nfs defaults,_netdev 0 0
#将该共享文件永久挂载
mount -a #挂载 /etc/fstab文件中的所有


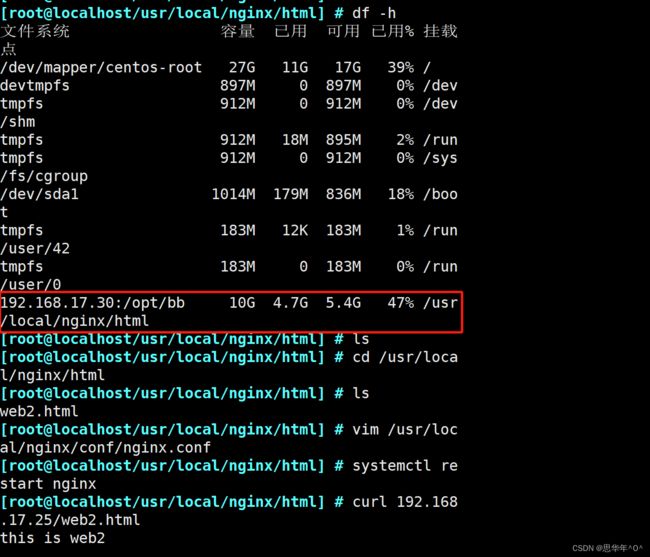
df -h #查看是否成功挂载

ls /usr/local/nginx/html  #查看共享文件是否存在

vim /usr/local/nginx/conf/nginx.conf
keepalive_timeout  0;   #改为0,不启用会话保持连接
systemctl restart nginx  #改完配置重启服务

curl 192.168.17.55/web1.html
this is web1

cd /opt
mv *.html /usr/local/nginx/html  #移动回html目录下
节点服务器2:1921.68.17.25 (配置与节点服务器1一样)
showmount -e 192.168.17.30   #查看共享
Export list for 192.168.17.30:
/opt/bb 192.168.17.0/24
/opt/aa 192.168.17.0/24

cd /usr/local/nginx/html
mv *.html /opt  #将html下的所有文件移动到opt目录下


vim /etc/fstab  #永久挂载文件
192.168.17.30:/opt/bb  /usr/local/nginx/html nfs defaults,_netdev 0 0
#将该共享文件永久挂载
mount -a #挂载 /etc/fstab文件中的所有

df -h #查看是否成功挂载

cd /usr/local/nginx/html  #查看共享文件是否存在

vim /usr/local/nginx/conf/nginx.conf
keepalive_timeout  0;   #改为0,不启用会话保持连接
systemctl restart nginx  #改完配置重启服务

curl 192.168.17.25/web1.html
this is web2

cd /opt
mv *.html /usr/local/nginx/html  #移动回html目录下
配置LVS负载均衡器
负载均衡器(192.168.17.28)
添加一张网卡
ifconfig -a   #查看网卡是否加载成功
cd /etc/sysconfig/network-scripts/
cp ifcfg-ens33 ifcfg-ens36

vim ifcfg-ens36
TYPE=Ethernet
DEVICE=ens36
ONBOOT=yes
BOOTPROTO=static
IPADDR=12.0.0.101     #配置一个任意ip地址
NETMASK=255.255.255.0   #不需要配置网关,自身就是网关服务器

 vim ifcfg-ens33
TYPE=Ethernet
DEVICE=ens33
ONBOOT=yes
BOOTPROTO=static
IPADDR=192.168.17.28
NETMASK=255.255.255.0

systemctl restart network # 重启服务

ifconfig -a  #查看是否配置成功
打开win10更改IP地址
将网关服务器做地址转换
vim /etc/sysctl.conf

net.ipv4.ip_forward = 1   #添加配置项
sysctl -p #加载
net.ipv4.ip_forward = 1
cat /proc/sys/net/ipv4/ip_forward   #查看是否生效
1
将两台nginx的节点服务器更改网关
nginx节点服务器1(192.168.17.13)
使用windows 去ping查看是否可以互通
nginx节点服务器1(192.168.17.25)
使用windows 去ping查看是否可以互通
切换回负载均衡器(192.168.17.30)
modprobe ip_vs #加载ipvs模块 cat /proc/net/ip_vs #查看是否加载安装工具
yum install ipvsadm -y #安装工具启动出现报错
systemctl start ipvsadm  #启动

#启动发现报错查看 ipvsadm 状态,发现却少文件/etc/sysconfig/ipvsadm

解决方法:直接创建一个相同名的文件
touch /etc/sysconfig/ipvsadm

systemctl start ipvsadm  #启动成功
[root@localhost ~]# ipvsadm -C  #清空策略

[root@localhost ~]# ipvsadm -ln
IP Virtual Server version 1.2.1 (size=4096)
Prot LocalAddress:Port Scheduler Flags
  -> RemoteAddress:Port           Forward Weight ActiveConn InActConn

[root@localhost ~]# ipvsadm -A -t 12.0.0.101:80 -s rr
[root@localhost ~]# ipvsadm -a -t 12.0.0.101:80 -r 192.168.17.13 -m
[root@localhost ~]# ipvsadm -a -t 12.0.0.101:80 -r 192.168.17.25 -m
[root@localhost ~]# ipvsadm
IP Virtual Server version 1.2.1 (size=4096)
Prot LocalAddress:Port Scheduler Flags
  -> RemoteAddress:Port           Forward Weight ActiveConn InActConn
TCP  localhost.localdomain:http rr
  -> 192.168.17.13:http           Masq    1      0          0
  -> 192.168.17.25:http           Masq    1      0          0

[root@localhost ~]# ipvsadm -ln -t 12.0.0.101:80
Prot LocalAddress:Port Scheduler Flags
  -> RemoteAddress:Port           Forward Weight ActiveConn InActConn
TCP  12.0.0.101:80 rr
  -> 192.168.17.13:80             Masq    1      0          0
  -> 192.168.17.25:80             Masq    1      0          0


