Vue3 菜鸟入门(三)超详细:引用外部依赖、组件、路由
【学习笔记】Vue3 菜鸟入门(三)超详细:引用外部依赖、组件、路由
- 关键词:Vue 、Vue 3、Java、Spring Boot、Idea、数据库、一对一、培训、教学
- 本文主要内容含Vue 基本框架 模板语法、指令
- 计划1小时完成,请同学尽量提前准备。本部分主要是代码实践。
- 有学习需要请联系:xujian_cq
- 手把手教学、腾讯会议一对一培训,所有代码都要敲一遍,有问题随时暂停解决
- 前置内容:Vue3 菜鸟入门(二)超详细:基本框架 模板语法和指令
重要提示:
本文所用源代码为【Vue3 菜鸟入门(二)超详细:基本框架 模板语法和指令】中的内容,请先看上文
1 引用外部依赖
- vue可利用node.js引用外部依赖,这使得全世界的代码为我所用
- 极大地降低了开发难度
1.1 引入element-plus
- 本文引入element-plus进行示例,这个很厉害
- Element UI 是一套采用 Vue 2.0 作为基础框架实现的组件库,一套为开发者、设计师和产品经理准备的基于 Vue 2.0 的组件库,提供了配套设计资源,帮助网站快速成型
1.1.1 改造main.js
- 这一步不是必须的,element-plus包含很多优秀组件、样式,这样能全局使用
- 可以直接覆盖以前的main.js
import { createApp } from 'vue'
import ElementPlus from 'element-plus'
import 'element-plus/dist/index.css'
import App from './App.vue'

const app = createApp(App)

app.use(ElementPlus)
app.mount('#app')
1.1.2 install
- 终端(命令行)中执行install命令
npm install element-plus
- 成功如下图
1.1.3 验证
- 将Index.vue中的button整体内容改为
<el-button type="danger" v-on:click="onBtnClick()">点我el-button>
1.2 引入axios
- 网络请求非常好用的工具
1.2.1 install
npm install axios
1.2.2 import
import axios from 'axios'
1.2.3 调用
- 下方链接是本人的一个网站监控项目的一个接口,这里用来试验
https://www.xujian.tech/atlapi/web/monitor/user/login/query/83bf11c3afbc1e6a22eb732456ff8fae
- 使用axios进行请求
let url = "https://www.xujian.tech/atlapi/web/monitor/user/login/query/83bf11c3afbc1e6a22eb732456ff8fae";
axios.get(url).then(res=>{
	console.log(res.data);
})
1.2.4 Index.vue完整源码参考
<template>
    <div>
        Hello World!
        {{message}}
        <el-button type="primary" v-on:click="onBtnClick()">点我el-button>
    div>
template>
<script >
    import axios from 'axios'
    import {defineComponent} from "vue";

    export default defineComponent({
        // 初始执行,类似onLoad
        mounted() {
            console.log("Index.vue 已开始执行。");
        },
        // 数据管理
        data(){
            return {
                message: "123"
            }
        },
        // 方法管理
        methods:{
            onBtnClick(){
                this.message = "456";

                // 发起请求
                let url = "https://www.xujian.tech/atlapi/web/monitor/user/login/query/83bf11c3afbc1e6a22eb732456ff8fae";
                axios.get(url).then(res=>{
				    console.log(res.data);
			    })
            }
        }
    })
script>

<style scoped>

style>
2 自定义组件
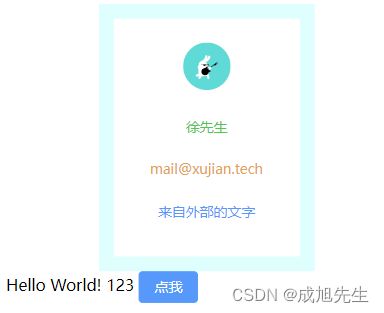
- 这里我们自定义一个用户信息卡用作演示
- 这个用户信息卡显示用户姓名、邮箱、头像
2.1 在components文件夹建一个UserCard.vue
- 新建后,仍是template、scrpit、style标签先写好,script的模板先套好
- 下方这个模板,以后可以直接复制用于新建页面、组件
<template>
    <div>

    div>
template>
<script >
    import axios from 'axios'
    import {defineComponent} from "vue";

    export default defineComponent({
        // 初始执行,类似onLoad
        mounted() {
            console.log("UserCard.vue 已开始执行。");
        },
        // 数据管理
        data(){
            return {

            }
        },
        // 方法管理
        methods:{
        },
        props:[
        ]
    })
script>

<style scoped>

style>
2.2 编写UserCard.vue源码
- 根据HTML、CSS的知识编写一个UserCard界面
- 课上请自行敲一遍
<template>
    <div style="text-align: center;margin-left: 25%;">
        <div class="bg">
            <el-image
                style="width: 48px; height: 48px; border-radius: 50%;"
                :src="user.avatar"
                :fit="fits">
            el-image>
            <div><el-text class="mx-1" type="success">{{user.username}}el-text>div>
            <div><el-text class="mx-1" type="warning">{{user.email}}el-text>div>
            <div><el-text class="mx-1" type="primary">{{outSideText}}el-text>div>
        div>
    div>
template>
<script >
    import axios from 'axios'
    import {defineComponent} from "vue";

    export default defineComponent({
        // 初始执行,类似onLoad
        mounted() {
            console.log("UserCard.vue 已开始执行。");
        },
        // 数据管理
        data(){
            return {
                user:{
                    username: "徐先生",
                    email: "[email protected]",
                    avatar: "https://wpimg.wallstcn.com/f778738c-e4f8-4870-b634-56703b4acafe.gif?imageView2/1/w/80/h/80"
                }
            }
        },
        // 方法管理
        methods:{
        },
        props:[
            'outSideText'
        ]
    })
script>

<style scoped>
    .bg{
        border:15px solid lightcyan;
        padding: 24px;
        color: black;
        line-height: 42px;
        width: 50%;
        text-align: center;
    }
style>
2.3 Index.vue 中调用
- 完整源码如下,注意下方源码中关于“组件”的三个注释处
<template>
    <div>

        <UserCard outSideText="来自外部的文字">UserCard>
        Hello World!
        {{message}}
        <el-button type="primary" v-on:click="onBtnClick()">点我el-button>
    div>
template>
<script >
    import axios from 'axios'
    import {defineComponent} from "vue";

    //引用组件
    import UserCard from '../components/UserCard.vue';

    export default defineComponent({
        //声明组件
        components:{
            UserCard
        },
        // 初始执行,类似onLoad
        mounted() {
            console.log("Index.vue 已开始执行。");
        },
        // 数据管理
        data(){
            return {
                message: "123"
            }
        },
        // 方法管理
        methods:{
            onBtnClick(){
                this.message = "456";

                // 发起请求
                let url = "https://www.xujian.tech/atlapi/web/monitor/user/login/query/83bf11c3afbc1e6a22eb732456ff8fae";
                axios.get(url).then(res=>{
				    console.log(res.data);
			    })
            }
        }
    })
script>

<style scoped>

style>
2.4 运行效果
2.5 组件接收外部参数
- 见上方源码“outSideText”相关内容
3 路由
3.1 install依赖
npm i vue-router
3.2 创建一个登录页
- 创建views/login/Index.vue
- 内容请自行摸索搞定
3.3 修改在Vue.app
- 不再固定内容,改为使用RouterView
<script setup>
import {RouterView } from 'vue-router'
script>

<template>
  <RouterView />
template>

<style scoped>

style>
3.4 修改main.js
- 增加一个use
// 故意不多写,你觉得该放哪儿
app.use(router)
3.5 编辑router规则
- 在views同级处创建router文件夹,再在其中创建index.js
import { createRouter,createWebHistory } from "vue-router";
import LoginVue from '../views/login/Index.vue'
import IndexVue from '../views/Index.vue'
const router = createRouter({
history: createWebHistory(import.meta.env.BASE_URL),
    // 以后路由变化,只需要修改这里就行了
   routes:[
       {
           path:'/',
           name:'index',
           component: IndexVue,
       },
       {
           path:'/login',
           name:'login',
           component: () => import('../views/login/Index.vue')
       },
   ]
})
export default router;
3.6 运行效果
- 查看运行效果
- 访问(注意,你的端口可能不同)
http://localhost:5173/login
4 结语
- 即使作为老司机,把这些东西调通也是不容易的啊!


