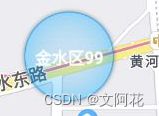
Android集成高德Flutter地图(二)自定义Marker显示
一、地图集成查看上一篇Android集成高德Flutter地图(一)基础地图显示
二、添加自定义Marker
①、 需要先设置一个空的map赋值给AMapWidget的markers,否则后续无法添加marker
  final Map<String, Marker> _markers = <String, Marker>{};
  late List<LatLng> makLocations = [
    LatLng(34.76, 113.78),
    LatLng(34.76, 113.77),
    LatLng(34.76, 113.76),
    LatLng(34.76, 113.75),
    LatLng(34.76, 113.74)
  ];
②、创建地图时,给marker属性赋值一个空的set,否则后续无法添加marker: markers: Set
  ///使用默认属性创建一个地图
    final AMapWidget map = AMapWidget(
      privacyStatement: ConstConfig.amapPrivacyStatement,
      apiKey: ConstConfig.amapApiKeys,
      //地图样式  默认普通地图 普通视图 normal,卫星视图 satellite, 夜间视图 night, 导航视图 navi, 公交视图 bus,
      mapType: MapType.normal,
      //是否显示3D地图
      buildingsEnabled: true,
      //地图创建完成回调,成功后会返回AMapController对象
      onMapCreated: onMapCreated,
      //地图移动回调
      onCameraMove: _onCameraMove,
      // 创建地图时,给marker属性赋值一个空的set,否则后续无法添加marker
      markers: Set<Marker>.of(_markers.values),
    );
③、自定义Marker样式
- 注意:
1、这里如果有Text需要使用Directionality
2、如果自定义Widget里面包含图片的话,一定要先把图片做缓存处理,否则不显示
 //Mark样式
  Future<Widget> buildMarkWidget() async {
    //带图片的时候需要先把图片缓存一下,否则不显示
    AssetImage provider = AssetImage('image/distract_bg.png');
    await precacheImage(provider, context);
    // Image image = Image(image: provider);//下面也可直接使用image展示
    return Container(
      alignment: Alignment.center,
      width: 150,
      height: 150,
      decoration: BoxDecoration(
        image: DecorationImage(image: AssetImage('image/distract_bg.png')),
      ),
      child: Directionality(
          textDirection: TextDirection.ltr,
          child: Text("金水区99",
              style: TextStyle(
                  color: Colors.white,
                  fontSize: 25,
                  fontWeight: FontWeight.bold))),
    );
  }
④、使用此方法把Widget处理成图片
import 'package:flutter/cupertino.dart';
import 'package:flutter/rendering.dart';
import 'dart:typed_data';
import 'dart:ui' as ui;

class MapImageUtil{

  //自定义Marker  需要将Widget成
  static Future<Uint8List?> convertWidgetToImage(Widget widget,
      {Alignment alignment = Alignment.center,
        Size size = const Size(double.maxFinite, double.maxFinite),
        double devicePixelRatio = 1.0,
        double pixelRatio = 1.0}) async {
    RenderRepaintBoundary repaintBoundary = RenderRepaintBoundary();
    RenderView renderView = RenderView(
      child: RenderPositionedBox(alignment: alignment, child: repaintBoundary),
      configuration: ViewConfiguration(
        size: size,
        devicePixelRatio: devicePixelRatio,
      ),
      window: ui.window,
    );

    PipelineOwner pipelineOwner = PipelineOwner();
    pipelineOwner.rootNode = renderView;
    renderView.prepareInitialFrame();

    BuildOwner buildOwner = BuildOwner(focusManager: FocusManager());
    RenderObjectToWidgetElement rootElement = RenderObjectToWidgetAdapter(
      container: repaintBoundary,
      child: widget,
    ).attachToRenderTree(buildOwner);
    buildOwner.buildScope(rootElement);
    buildOwner.finalizeTree();

    pipelineOwner.flushLayout();
    pipelineOwner.flushCompositingBits();
    pipelineOwner.flushPaint();
    ui.Image image = await repaintBoundary.toImage(pixelRatio: pixelRatio);
    ByteData? byteData = await image.toByteData(format: ui.ImageByteFormat.png);
    return byteData!.buffer.asUint8List();
  }
}
⑤、添加Marker
 ///添加一个marker
  Future<void> _addMarker(LatLng mLatLng) async {
    final _markerPosition = mLatLng;
    Widget widget = await buildMarkWidget();
    Uint8List? bd = await MapImageUtil.convertWidgetToImage(widget);
    final Marker marker = Marker(
      position: _markerPosition,
      //使用默认hue的方式设置Marker的图标
      icon: BitmapDescriptor.fromBytes(bd!),
      // icon:  BitmapDescriptor.fromIconPath('image/distract_bg.png')
    );
    //调用setState触发AMapWidget的更新,从而完成marker的添加
    setState(() {
      //将新的marker添加到map里
      _markers[marker.id] = marker;
    });
  }
