spring源码篇(四)依赖注入(控制反转)
文章目录
- 前言
- 上一篇知识回顾
- 源码流程
-
- 注入点
- 填充属性
-
- xml的填充方式
- 注解注入
- 总结
前言
上一篇走了一遍bean的生成过程,而在这个过程中,有一个属性填充的步骤,也就是依赖注入,这个概念不难,但其底层实现其实却有很多复杂的步骤,使得这个依赖注入的功能比较强大,所以这篇就是从源码角度,了解spring的依赖注入功能。
注意:控制反转就是依赖注入,我在《spring应用篇》中提到过,但我发现还有很多人都认为这个概念是两个不同的概念。
上一篇知识回顾
bean的生命周期简单看一下流程,详细的还是要看原文去:bean的生命周期
加载类 ------- Class resolvedClass = resolveBeanClass(mbd, beanName);
实例化前 ----- 调用后置处理器:InstantiationAwareBeanPostProcessor
实例化 -------- 推断构造器,反射调用构造器生成实例对象
实例化后 ----- 执行后置处理器:MergedBeanDefinitionPostProcessor;获取注入点
填充属性 ------ 依赖注入
初始化前 ------ 执行初始化前置处理器:BeanPostProcessor
初始化 --------- 调用初始化方法
初始化后 ------- 执行后置处理器
源码流程
依赖注入发生在bean实例化完了之后,这个过程将我们需要注入的属性按照我们指定的方式进行了填充,那么这篇文章中需要探寻的点是:
- 依赖注入的流程及发生时间
- xml方式的byType和byName注入是怎样的
- 注解方式的注入是怎么样的
注入点
位置:oorg.springframework.beans.factory.support.AbstractAutowireCapableBeanFactory#applyMergedBeanDefinitionPostProcessors
applyMergedBeanDefinitionPostProcessors(mbd, beanType, beanName);
里面也是遍历后置处理器,然后调用对应方法进行处理。
protected void applyMergedBeanDefinitionPostProcessors(RootBeanDefinition mbd, Class<?> beanType, String beanName) {
			for (BeanPostProcessor bp : getBeanPostProcessors()) {
				if (bp instanceof MergedBeanDefinitionPostProcessor) {
					MergedBeanDefinitionPostProcessor bdp = (MergedBeanDefinitionPostProcessor) bp;
					bdp.postProcessMergedBeanDefinition(mbd, beanType, beanName);
				}
			}
		}
而@Autowired注解的解析,是在AutowiredAnnotationBeanPostProcessor这个后置处理器中进行的。
public void postProcessMergedBeanDefinition(RootBeanDefinition beanDefinition, Class<?> beanType, String beanName) {
		// 获取beanType中的注入点
		InjectionMetadata metadata = findAutowiringMetadata(beanName, beanType, null);
		metadata.checkConfigMembers(beanDefinition);
	}
下面有一段在查找注入点前调用了needsRefresh,这个的作用和并发联系起来就比较好理解了:
- 一是判断,缓存中是否存在注入点
InjectionMetadata; - 二是判断,如果缓存中已经有了相同的键,那么对应的value是否是同种类型的;
那么它的作用很明显就是判断将要解析的注入点是否已经解析过了。
private InjectionMetadata findAutowiringMetadata(String beanName, Class<?> clazz, @Nullable PropertyValues pvs) {
		// 通过beanName生成缓存键
		String cacheKey = (StringUtils.hasLength(beanName) ? beanName : clazz.getName());
       // 从缓存中获取注入点(检查)
		InjectionMetadata metadata = this.injectionMetadataCache.get(cacheKey);
		if (InjectionMetadata.needsRefresh(metadata, clazz)) {
            // 注入点不存在,或者注入点已变更
			synchronized (this.injectionMetadataCache) {
                // 加锁,并二次校验,防止进行下面操作时被其他线程更新
				metadata = this.injectionMetadataCache.get(cacheKey);
				if (InjectionMetadata.needsRefresh(metadata, clazz)) {
					if (metadata != null) {
						metadata.clear(pvs);
					}
					// 寻找当前clazz中的注入点,把所有注入点整合成为一个InjectionMetadata对象
					metadata = buildAutowiringMetadata(clazz);
					this.injectionMetadataCache.put(cacheKey, metadata);
				}
			}
		}
		return metadata;
	}
findAutowiringMetadata这个方法被多次调用,这里的逻辑就像懒加载一般,在用到时,才会去查找。
那么接着,如果没有缓存过,进入方法buildAutowiringMetadata,这个方法是就是查找注入点的主要逻辑。
private InjectionMetadata buildAutowiringMetadata(final Class<?> clazz) {

		// 判断是不是候选者类,比如说类名,如果是以"java."开头的则不是候选者类
		if (!AnnotationUtils.isCandidateClass(clazz, this.autowiredAnnotationTypes)) {
			return InjectionMetadata.EMPTY;
		}
       // 用来保存这个clazz bean需要注入的属性的列表(注入点集合)
		List<InjectionMetadata.InjectedElement> elements = new ArrayList<>();
		Class<?> targetClass = clazz;

		do {
            // 遍历中的临时列表
			final List<InjectionMetadata.InjectedElement> currElements = new ArrayList<>();

			// 遍历属性,看是否有@Autowired,@Value,@Inject注解
			ReflectionUtils.doWithLocalFields(targetClass, field -> {
				MergedAnnotation<?> ann = findAutowiredAnnotation(field);
				// 如果存在@Autowired,@Value,@Inject注解其中一个
				if (ann != null) {
					// static字段不注入,返回
					if (Modifier.isStatic(field.getModifiers())) {
						if (logger.isInfoEnabled()) {
							logger.info("Autowired annotation is not supported on static fields: " + field);
						}
						return;
					}
					// 是否required;不存在required注解,默认返回true
					boolean required = determineRequiredStatus(ann);
					// 生成一个注入点AutowiredFieldElement,并添加列表
					currElements.add(new AutowiredFieldElement(field, required));
				}
			});

			// 遍历方法,看是否有@Autowired,@Value,@Inject注解
			ReflectionUtils.doWithLocalMethods(targetClass, method -> {
				Method bridgedMethod = BridgeMethodResolver.findBridgedMethod(method);
				if (!BridgeMethodResolver.isVisibilityBridgeMethodPair(method, bridgedMethod)) {
					return;
				}
				MergedAnnotation<?> ann = findAutowiredAnnotation(bridgedMethod);
				if (ann != null && method.equals(ClassUtils.getMostSpecificMethod(method, clazz))) {
					// 静态方法不能用来注入属性
					if (Modifier.isStatic(method.getModifiers())) {
						if (logger.isInfoEnabled()) {
							logger.info("Autowired annotation is not supported on static methods: " + method);
						}
						return;
					}
					// 方法参数值为0,不能用来注入属性
					if (method.getParameterCount() == 0) {
						if (logger.isInfoEnabled()) {
							logger.info("Autowired annotation should only be used on methods with parameters: " +
									method);
						}
					}
					// 是否required;不存在required注解,默认返回true
					boolean required = determineRequiredStatus(ann);
					// 根据方法找出对应的属性
					PropertyDescriptor pd = BeanUtils.findPropertyForMethod(bridgedMethod, clazz);
					currElements.add(new AutowiredMethodElement(method, required, pd));
				}
			});

			// 添加到最终的容器中
			elements.addAll(0, currElements);
            // 遍历父类设置
			targetClass = targetClass.getSuperclass();
		}
		while (targetClass != null && targetClass != Object.class);

		return InjectionMetadata.forElements(elements, clazz);
	}
上面代码基本都有注释也比较清晰,然后我们看其中一段:
           // 遍历属性,看是否有@Autowired,@Value,@Inject注解
			ReflectionUtils.doWithLocalFields(targetClass, field -> {
				MergedAnnotation<?> ann = findAutowiredAnnotation(field);
				// 如果存在@Autowired,@Value,@Inject注解其中一个
				if (ann != null) {
					// 如果字段是static的,则直接进行返回,不进行注入
					if (Modifier.isStatic(field.getModifiers())) {
						if (logger.isInfoEnabled()) {
							logger.info("Autowired annotation is not supported on static fields: " + field);
						}
						return;
					}
					// 是否required
                    // 不存@required注解则返回true, 否则看对应的值为true还是false
					boolean required = determineRequiredStatus(ann);
					// 生成一个注入点AutowiredFieldElement
					currElements.add(new AutowiredFieldElement(field, required));
				}
			});
findAutowiredAnnotation这个方法能够找到@Autoried @Value @Inject三种注解,我们常用的注入只有@Autowired这一种,其实其他两种也可以实现注入。
首先看一下@Value这个注解,它支持字符串,而我们用得最多的就是类似这样:
  @Value("${remote-file-manager.host}")
    private String host;
那么这里就涉及到了springEl表达式,内容不多,重要的是规则,如下
- #{表达式}
- ${占位符}
那么,要实现注入,可以这样:
// 	menuService 为bean的名称
@Value("#{menuService}")
	private MenuService menuService;
而@inject这个注解,是javax里的JSR330规范,和@Autowired一样的效果;
而@Resource不是在这里处理的,它是在CommonAnnotationBeanPostProcessor里面处理的
还有findAutowiredAnnotation方法中查找注解是只要找到@Autowired,@Value,@Inject中的一个就可以返回了 。
对上面代码的总结:
ReflectionUtils.doWithLocalFields方法,和doWithLocalMethods是直接反射获取到属性和方法列表,然后进行上面代码中的操作:
- 查找被
@Autowired,@Value,@Inject的属性或者方法 - 判断属性或方法是否是static的
- 属性需要判断是否required,方法需要判断方法参数是否0个(必须最少一个)
- 属性就生成一个
AutowiredFieldElement对象并加入集合,而方法还需要进行判断参数对应的属性是否存在propertyDescriptorCache,然后再添加集合
填充属性
位置:org.springframework.beans.factory.support.AbstractAutowireCapableBeanFactory#populateBean
接着上面的代码(注入点方法),下面有populateBean,就是依赖注入的地方。
protected void populateBean(String beanName, RootBeanDefinition mbd, @Nullable BeanWrapper bw) {
		// 省略。。。

		// 可以提供InstantiationAwareBeanPostProcessor,控制对象的属性注入
		// 我们可以自己写一个InstantiationAwareBeanPostProcessor,然后重写postProcessAfterInstantiation方法返回false,那么则不会进行属性填充了
		if (!mbd.isSynthetic() && hasInstantiationAwareBeanPostProcessors()) {
			for (BeanPostProcessor bp : getBeanPostProcessors()) {
				if (bp instanceof InstantiationAwareBeanPostProcessor) {
					InstantiationAwareBeanPostProcessor ibp = (InstantiationAwareBeanPostProcessor) bp;
					if (!ibp.postProcessAfterInstantiation(bw.getWrappedInstance(), beanName)) {
						return;
					}
				}
			}
		}
// xml配置的自动注入
		// 是否在BeanDefinition中设置了属性值
  		// 这里只要我们没有用postProcessor进行干涉,或者xml里不配置property,就是null
		PropertyValues pvs = (mbd.hasPropertyValues() ? mbd.getPropertyValues() : null);

		//  autowireMode属性
		int resolvedAutowireMode = mbd.getResolvedAutowireMode();
		if (resolvedAutowireMode == AUTOWIRE_BY_NAME || resolvedAutowireMode == AUTOWIRE_BY_TYPE) {
			// by_name是根据属性名字找bean
			// by_type是根据属性所对应的set方法的参数类型找bean
			// 找到bean之后都要调用set方法进行注入

			MutablePropertyValues newPvs = new MutablePropertyValues(pvs);
			// Add property values based on autowire by name if applicable.
			if (resolvedAutowireMode == AUTOWIRE_BY_NAME) {
				autowireByName(beanName, mbd, bw, newPvs);
			}
			// Add property values based on autowire by type if applicable.
			if (resolvedAutowireMode == AUTOWIRE_BY_TYPE) {
				autowireByType(beanName, mbd, bw, newPvs);
			}
			pvs = newPvs;
		}
// 配置注解的依赖注入
		// 执行完了Spring的自动注入之后,就开始解析@Autowired,这里叫做实例化回调
		boolean hasInstAwareBpps = hasInstantiationAwareBeanPostProcessors();
		boolean needsDepCheck = (mbd.getDependencyCheck() != AbstractBeanDefinition.DEPENDENCY_CHECK_NONE);

		// @AUtowired注解的 AutowiredAnnotationBeanPostProcessor
		// @Resource注解的 CommonAnnotationBeanPostProcessor
		PropertyDescriptor[] filteredPds = null;
		if (hasInstAwareBpps) {
			if (pvs == null) {
				pvs = mbd.getPropertyValues();
			}
			for (BeanPostProcessor bp : getBeanPostProcessors()) {
				if (bp instanceof InstantiationAwareBeanPostProcessor) {
					InstantiationAwareBeanPostProcessor ibp = (InstantiationAwareBeanPostProcessor) bp;

					// 调用BeanPostProcessor分别解析@Autowired、@Resource、@Value,得到属性值
					PropertyValues pvsToUse = ibp.postProcessProperties(pvs, bw.getWrappedInstance(), beanName);

					if (pvsToUse == null) {
						if (filteredPds == null) {
							filteredPds = filterPropertyDescriptorsForDependencyCheck(bw, mbd.allowCaching);
						}
						pvsToUse = ibp.postProcessPropertyValues(pvs, filteredPds, bw.getWrappedInstance(), beanName);
						if (pvsToUse == null) {
							return;
						}
					}
					pvs = pvsToUse;
				}
			}
		}
		if (needsDepCheck) {
			if (filteredPds == null) {
				filteredPds = filterPropertyDescriptorsForDependencyCheck(bw, mbd.allowCaching);
			}
			checkDependencies(beanName, mbd, filteredPds, pvs);
		}

		if (pvs != null) {
			// pvs存的就是属性已经对应的值
			applyPropertyValues(beanName, mbd, bw, pvs);
		}
	}
xml的填充方式
关于xml这段,在《spring - 应用篇》中,就有提到过AutowireMode,在xml配置中有4中注入模型,对应代码里也有4个常量。
- AUTOWIRE_NO:值为0,默认装配方式,不使用自动装配
- AUTOWIRE_BY_NAME:值为1,按名字装配
- AUTOWIRE_BY_TYPE:值为2,按类型装配
- AUTOWIRE_CONSTRUCTOR:值为3,按构造器装配
//  autowireModel属性
		int resolvedAutowireMode = mbd.getResolvedAutowireMode();
		if (resolvedAutowireMode == AUTOWIRE_BY_NAME || resolvedAutowireMode == AUTOWIRE_BY_TYPE) {
			// by_name是根据根据属性名字找bean
			// by_type是根据属性所对应的set方法的参数类型找bean
			// 找到bean之后都要调用set方法进行注入
			MutablePropertyValues newPvs = new MutablePropertyValues(pvs);

			if (resolvedAutowireMode == AUTOWIRE_BY_NAME) {
				autowireByName(beanName, mbd, bw, newPvs);
			}

			if (resolvedAutowireMode == AUTOWIRE_BY_TYPE) {
				autowireByType(beanName, mbd, bw, newPvs);
			}
			pvs = newPvs;
		}
不看byName,直接看byType的代码,在xml加上配置default-autowire="byType"
protected void autowireByType(
			String beanName, AbstractBeanDefinition mbd, BeanWrapper bw, MutablePropertyValues pvs) {
		// 有定义自定义的类型转换器,在这里会获取
		TypeConverter converter = getCustomTypeConverter();
		if (converter == null) {
			converter = bw;
		}

		Set<String> autowiredBeanNames = new LinkedHashSet<>(4);

		// 找到有对应set方法的属性
		String[] propertyNames = unsatisfiedNonSimpleProperties(mbd, bw);
		for (String propertyName : propertyNames) {
			try {
				PropertyDescriptor pd = bw.getPropertyDescriptor(propertyName);
				if (Object.class != pd.getPropertyType()) {
					// set方法中的参数信息
					MethodParameter methodParam = BeanUtils.getWriteMethodParameter(pd);
					// 当前Bean是否实现了PriorityOrdered
					boolean eager = !(bw.getWrappedInstance() instanceof PriorityOrdered);
					// 返回一个需要被注入的依赖信息
					DependencyDescriptor desc = new AutowireByTypeDependencyDescriptor(methodParam, eager);

					// 根据类型找bean,这就是byType;这个是核心方法
					// 将上面的依赖传入 去解析注入一个bean
					Object autowiredArgument = resolveDependency(desc, beanName, autowiredBeanNames, converter);
					if (autowiredArgument != null) {
						pvs.add(propertyName, autowiredArgument);
					}
					for (String autowiredBeanName : autowiredBeanNames) {
						registerDependentBean(autowiredBeanName, beanName);
						if (logger.isTraceEnabled()) {
							logger.trace("Autowiring by type from bean name '" + beanName + "' via property '" +
									propertyName + "' to bean named '" + autowiredBeanName + "'");
						}
					}
					autowiredBeanNames.clear();
				}
			}
			catch (BeansException ex) {
				throw new UnsatisfiedDependencyException(mbd.getResourceDescription(), beanName, propertyName, ex);
			}
		}
	}
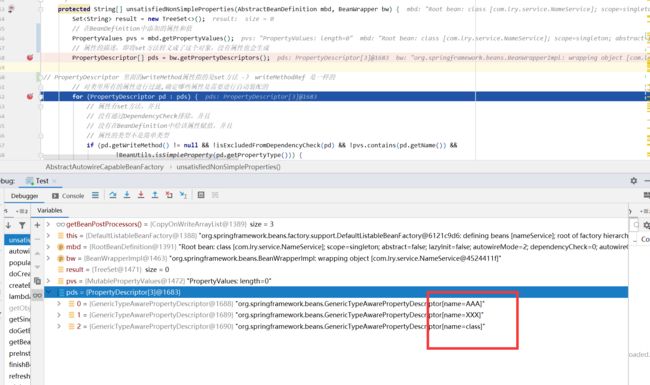
这有个迷惑点:unsatisfiedNonSimpleProperties获取到set方法对应的属性其实不是直接根据属性拿到的。
请看下面:
protected String[] unsatisfiedNonSimpleProperties(AbstractBeanDefinition mbd, BeanWrapper bw) {
		Set<String> result = new TreeSet<>();
		// 在BeanDefinition中添加的属性和值
		PropertyValues pvs = mbd.getPropertyValues();
		// 属性的描述,即将set方法转义成了这个对象,直接获取的是方法进行解析的。
		PropertyDescriptor[] pds = bw.getPropertyDescriptors();

// PropertyDescriptor 里面的writeMethod属性指的是set方法 -》 writeMethodRef 是一样的
		// 对类里所有的属性进行过滤,确定哪些属性是需要进行自动装配的
		for (PropertyDescriptor pd : pds) {
			// 属性有set方法,且
			// 没有通过DependencyCheck排除,且
			// 没有在BeanDefinition中给该属性赋值,且
			// 属性的类型不是简单类型
			if (pd.getWriteMethod() != null && !isExcludedFromDependencyCheck(pd) && !pvs.contains(pd.getName()) &&
					!BeanUtils.isSimpleProperty(pd.getPropertyType())) {
				result.add(pd.getName());
			}
		}

		// 返回过滤之后的结果,后续只对这些属性进行自动装配
		return StringUtils.toStringArray(result);
	}
从上面代码可以看到,它返回的result,是保存了属性名的列表,重点是,PropertyDescriptor[] pds = bw.getPropertyDescriptors();返回的set方法描述,具体可以看这一段,是在最底层的地方抠出来的,
具体在:java.beans.Introspector#getTargetPropertyInfo
// 获取所有的public方法
Method methodList[] = getPublicDeclaredMethods(beanClass);

for (int i = 0; i < methodList.length; i++) {
    Method method = methodList[i];
    if (method == null) {
        continue;
    }
    int mods = method.getModifiers();
    if (Modifier.isStatic(mods)) {
        continue;
    }
    // 临时变量methodName -》name
    String name = method.getName();
   // 省略。。。

    try {

        if (argCount == 0) {
            if (name.startsWith(GET_PREFIX)) {
              // 省略。。。
            }
        } else if (argCount == 1) {
            if (int.class.equals(argTypes[0]) && name.startsWith(GET_PREFIX)) {
               // 省略。。。
            } else if (void.class.equals(resultType) && name.startsWith(SET_PREFIX)) {
                // 看这里的是name.substring(3) 截取的是set后面的部分
                pd = new PropertyDescriptor(this.beanClass, name.substring(3), null, method);
                if (throwsException(method, PropertyVetoException.class)) {
                    pd.setConstrained(true);
                }
            }
        } else if (argCount == 2) {
            // 省略。。。
        }
    } catch (IntrospectionException ex) {

        pd = null;
    }
// 省略。。。
}
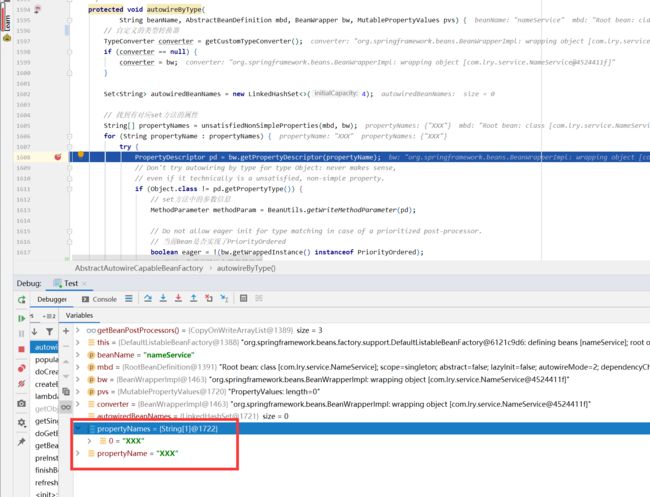
从上面代码就可以看出,在autowireByType方法中,String[] propertyNames = unsatisfiedNonSimpleProperties(mbd, bw);返回的其实是set方法截取的名字数组。
我们做一个验证,创建下面的类,不写属性,看看最后取到的属性有哪些。
public class NameService {

	public void setXXX(Object object) {

	}

	public void setAAA(String aaa) {

	}

    public void setBBB() {}
}
结果可以看到,最后获取到的propertyNames是对应set方法的,名称数组,而且是必须有参数,且参数类型不能是基本类型。
再回到autowireByType方法里,往下走,这里就是具体的byType核心方法了。
获取要注入的对象:
Object autowiredArgument = resolveDependency(desc, beanName, autowiredBeanNames, converter);
public Object resolveDependency(DependencyDescriptor descriptor, @Nullable String requestingBeanName,
			@Nullable Set<String> autowiredBeanNames, @Nullable TypeConverter typeConverter) throws BeansException {

    // descriptor 表示一个依赖的对象,它可以是属性字段、构造方法参数、或者是set方法参数
		descriptor.initParameterNameDiscovery(getParameterNameDiscoverer());

    // 通过依赖的类型创建不同的对象
		if (Optional.class == descriptor.getDependencyType()) {
			return createOptionalDependency(descriptor, requestingBeanName);
		}
		else if (ObjectFactory.class == descriptor.getDependencyType() ||
				ObjectProvider.class == descriptor.getDependencyType()) {
			return new DependencyObjectProvider(descriptor, requestingBeanName);
		}
		else if (javaxInjectProviderClass == descriptor.getDependencyType()) {
			return new Jsr330Factory().createDependencyProvider(descriptor, requestingBeanName);
		}
		else {
			// 在使用@Autowired注解时,也可以使用@Lazy注解,到时候注入的会是一个代理对象,其他返回null
			Object result = getAutowireCandidateResolver().getLazyResolutionProxyIfNecessary(
					descriptor, requestingBeanName);

			if (result == null) {
				// 通过解析descriptor找到bean对象
				result = doResolveDependency(descriptor, requestingBeanName, autowiredBeanNames, typeConverter);
			}
			return result;
		}
	}
最后走到这个doResolveDependency方法,方法有点长。
public Object doResolveDependency(DependencyDescriptor descriptor, @Nullable String beanName,
			@Nullable Set<String> autowiredBeanNames, @Nullable TypeConverter typeConverter) throws BeansException {
// 设定当前注入点在处理中
		InjectionPoint previousInjectionPoint = ConstructorResolver.setCurrentInjectionPoint(descriptor);
		try {
			// 它会先从ShortcutDependencyDescriptor缓存中获取
			Object shortcut = descriptor.resolveShortcut(this);
			if (shortcut != null) {
				return shortcut;
			}

			// 获取descriptor具体的类型,某个Filed的类型或某个方法参数的类型
			Class<?> type = descriptor.getDependencyType();

			// 获取@Value注解中所配置的值
			Object value = getAutowireCandidateResolver().getSuggestedValue(descriptor);
			if (value != null) {
				if (value instanceof String) {
					// 先进行占位符的填充,解析"$"符号
					String strVal = resolveEmbeddedValue((String) value);

					BeanDefinition bd = (beanName != null && containsBean(beanName) ?
							getMergedBeanDefinition(beanName) : null);

					// 解析Spring EL表达式,解析"#"符号(可以进行运算,可以写某个bean的名字)
					value = evaluateBeanDefinitionString(strVal, bd);
				}
                // 类型转化器,用来格式化我们的结果,因为我们value注解取到的可能是字符串,可能是配置文件的key,可能是表达式
				TypeConverter converter = (typeConverter != null ? typeConverter : getTypeConverter());
				try {
					return converter.convertIfNecessary(value, type, descriptor.getTypeDescriptor());
				}
				catch (UnsupportedOperationException ex) {
					// A custom TypeConverter which does not support TypeDescriptor resolution...
					return (descriptor.getField() != null ?
							converter.convertIfNecessary(value, type, descriptor.getField()) :
							converter.convertIfNecessary(value, type, descriptor.getMethodParameter()));
				}
			}

// 下面是没有使用@Value注解

			// 要注入的依赖的类型是不是一个Map、Array、Collection
			Object multipleBeans = resolveMultipleBeans(descriptor, beanName, autowiredBeanNames, typeConverter);
			if (multipleBeans != null) {
				return multipleBeans;
			}

			// 通过type找,可能找到多个,这里的value,可能是具体的实例对象,也有可能暂时只是Class对象
			Map<String, Object> matchingBeans = findAutowireCandidates(beanName, type, descriptor);
			if (matchingBeans.isEmpty()) {
				if (isRequired(descriptor)) {
					raiseNoMatchingBeanFound(type, descriptor.getResolvableType(), descriptor);
				}
				return null;
			}

			String autowiredBeanName;
			Object instanceCandidate;

			// 根据type找到了多个
			if (matchingBeans.size() > 1) {
				// 找到多个,去尝试确定出唯一的一个
				autowiredBeanName = determineAutowireCandidate(matchingBeans, descriptor);
				if (autowiredBeanName == null) {
					if (isRequired(descriptor) || !indicatesMultipleBeans(type)) {
						// 如果找到多个,并且当前依赖是required,或者不是数组或Collection或Map
						return descriptor.resolveNotUnique(descriptor.getResolvableType(), matchingBeans);
					}
					else {
						return null;
					}
				}
				instanceCandidate = matchingBeans.get(autowiredBeanName);
			}
			else {
				// 只找到一个bean
				Map.Entry<String, Object> entry = matchingBeans.entrySet().iterator().next();
				autowiredBeanName = entry.getKey();
				instanceCandidate = entry.getValue();
			}

			if (autowiredBeanNames != null) {
				autowiredBeanNames.add(autowiredBeanName);
			}
			if (instanceCandidate instanceof Class) {
				// 调用beanFactory.getBean(beanName);创建bean对象
				instanceCandidate = descriptor.resolveCandidate(autowiredBeanName, type, this);
			}
			Object result = instanceCandidate;
			if (result instanceof NullBean) {
				if (isRequired(descriptor)) {
					raiseNoMatchingBeanFound(type, descriptor.getResolvableType(), descriptor);
				}
				result = null;
			}
			if (!ClassUtils.isAssignableValue(type, result)) {
				throw new BeanNotOfRequiredTypeException(autowiredBeanName, type, instanceCandidate.getClass());
			}
			return result;
		}
		finally {
			ConstructorResolver.setCurrentInjectionPoint(previousInjectionPoint);
		}
	}
通过类型查找的方法findAutowireCandidates,里面是这样的,它是从当前beanFactory和祖先beanFactory中去找符合类型的bean的名字,如果父类是泛型,那么将会找出所有的bean;
String[] candidateNames = BeanFactoryUtils.beanNamesForTypeIncludingAncestors(
				this, requiredType, true, descriptor.isEager());
然后会先到内部依赖项中去匹配,如beanFactory 等等,
for (Map.Entry<Class<?>, Object> classObjectEntry : this.resolvableDependencies.entrySet()) {
			Class<?> autowiringType = classObjectEntry.getKey();
			// requiredType是autowiringType的子类
			// requiredType类是不是继承或实现了autowiringType, autowiringType为父类或接口,子类对象可以赋值给父类属性
			if (autowiringType.isAssignableFrom(requiredType)) {
				//  是resolvableDependencies中的子类所存的对象
				Object autowiringValue = classObjectEntry.getValue();
				autowiringValue = AutowireUtils.resolveAutowiringValue(autowiringValue, requiredType);
				if (requiredType.isInstance(autowiringValue)) {
					// 把resolvableDependencies中保存的对象作为当前属性的一个候选者
					result.put(ObjectUtils.identityToString(autowiringValue), autowiringValue);
					break;
				}
			}
		}
然后根据从上面拿到的bean的名字进行过滤,要求不是自身,而且是能匹配上要注入的对象
for (String candidate : candidateNames) {
			// isAutowireCandidate方法中会去判断候选者是否和descriptor匹配
			if (!isSelfReference(beanName, candidate) && isAutowireCandidate(candidate, descriptor)) {
				addCandidateEntry(result, candidate, descriptor, requiredType);
			}
		}
如果没有匹配上,会进行备用方案
-
首先不能是array/map/collection,然后查看是否有
Qualifier注解,符合条件则添加;这个和我们通常的写法是一样的:
	@Autowired
	@Qualifier("menuService")
	private MenuService menuService;
// 是否是array、map、collection
boolean multiple = indicatesMultipleBeans(requiredType);
// Consider fallback matches if the first pass failed to find anything...
DependencyDescriptor fallbackDescriptor = descriptor.forFallbackMatch();
for (String candidate : candidateNames) {
    // 非本身、是候选者、不是array/map/collection、并且有Qualifier注解
    if (!isSelfReference(beanName, candidate) && isAutowireCandidate(candidate, fallbackDescriptor) &&
        (!multiple || getAutowireCandidateResolver().hasQualifier(descriptor))) {
        addCandidateEntry(result, candidate, descriptor, requiredType);
    }
}
-
isSelfReference方法结果是:当前bean和按类型查找出来的相同,或者是factoryBean,private boolean isSelfReference(@Nullable String beanName, @Nullable String candidateName) { return (beanName != null && candidateName != null && (beanName.equals(candidateName) || (containsBeanDefinition(candidateName) && beanName.equals(getMergedLocalBeanDefinition(candidateName).getFactoryBeanName())))); }那么下面这段的意思就是要注入的bean是符合元素或者beanName是factoryBean,不是很懂这块的意思。
if (result.isEmpty() && !multiple) {

    for (String candidate : candidateNames) {
        if (isSelfReference(beanName, candidate) &&
            (!(descriptor instanceof MultiElementDescriptor) || !beanName.equals(candidate)) &&
            isAutowireCandidate(candidate, fallbackDescriptor)) {
            addCandidateEntry(result, candidate, descriptor, requiredType);
        }
    }
}
这里还有个是isAutowireCandidate方法,这个方法辨别候选bean的,它对候选bean的判断是执行了3个处理器:SimpleAutowireCandidateResolver->GenericTypeAwareAutowireCandidateResolver -> QualifierAnnotationAutowireCandidateResolver的isAutowireCandidate
判断,
分别进行了如下的判断:
- beanDefinition重点 autowire-candidate属性
- 泛型匹配
- @Qualifier匹配,父子类都要找
回到doResolveDependenc方法,
找到多个bean后,不能确定唯一的bean,走这个方法,通过其他注解信息选择最佳的bean。
protected String determineAutowireCandidate(Map<String, Object> candidates, DependencyDescriptor descriptor) {
		Class<?> requiredType = descriptor.getDependencyType();

		// 取@Primary的bean
		String primaryCandidate = determinePrimaryCandidate(candidates, requiredType);
		if (primaryCandidate != null) {
			return primaryCandidate;
		}

		// 取优先级最高的bean 通过@Priority来定义优先级,数字越小,优先级越高
		String priorityCandidate = determineHighestPriorityCandidate(candidates, requiredType);
		if (priorityCandidate != null) {
			return priorityCandidate;
		}

		// Fallback
		for (Map.Entry<String, Object> entry : candidates.entrySet()) {
			String candidateName = entry.getKey();
			Object beanInstance = entry.getValue();
			if ((beanInstance != null && this.resolvableDependencies.containsValue(beanInstance)) ||
					// 根据属性名确定
					matchesBeanName(candidateName, descriptor.getDependencyName())) {
				return candidateName;
			}
		}
		return null;
	}
所以doResolveDependency方法的逻辑是这样的。
- 先获取字段属性类型
- 获取@Value的值,并转化
- 没有使用value注解,判断是否是array、map、collection
findAutowireCandidates根据type查找对象- 如果找到多个,则通过
determineAutowireCandidate方法,查找@Primary @Priority注解和名称确定要注入的bean。
xml的逻辑如下:
byName:
-
获取到set方法截取后的属性名列表
-
根据拿到的名称从beanFactory中取
-
然后添加到propertyValues
-
最后反射设置
这里的注意点是,set方法要和属性名对应
byType:
- 获取到set方法截取后的属性名列表
- 获取参数信息
- 生成参数的依赖描述
- 根据类型找bean
- 添加propertyValues
- 反射设置值,调用method反射
注解注入
再回到方法populateBean:org.springframework.beans.factory.support.AbstractAutowireCapableBeanFactory#populateBean
,在xml方式的注入后的下面
	boolean hasInstAwareBpps = hasInstantiationAwareBeanPostProcessors();
		boolean needsDepCheck = (mbd.getDependencyCheck() != AbstractBeanDefinition.DEPENDENCY_CHECK_NONE);


		// @AUtowired注解的是 AutowiredAnnotationBeanPostProcessor
		// @Resource注解的是 CommonAnnotationBeanPostProcessor
		PropertyDescriptor[] filteredPds = null;
		if (hasInstAwareBpps) {
			if (pvs == null) {
				pvs = mbd.getPropertyValues();
			}
            // 这里又开始遍历处理器
			for (BeanPostProcessor bp : getBeanPostProcessors()) {
				if (bp instanceof InstantiationAwareBeanPostProcessor) {
					InstantiationAwareBeanPostProcessor ibp = (InstantiationAwareBeanPostProcessor) bp;

					// 调用BeanPostProcessor分别解析@Autowired、@Resource、@Value,得到属性值
					PropertyValues pvsToUse = ibp.postProcessProperties(pvs, bw.getWrappedInstance(), beanName);

					if (pvsToUse == null) {
						if (filteredPds == null) {
							filteredPds = filterPropertyDescriptorsForDependencyCheck(bw, mbd.allowCaching);
						}
						pvsToUse = ibp.postProcessPropertyValues(pvs, filteredPds, bw.getWrappedInstance(), beanName);
						if (pvsToUse == null) {
							return;
						}
					}
					pvs = pvsToUse;
				}
			}
		}
后置处理器的方法如下,findAutowiringMetadata方法和找注入点哪里的代码是一样的。
	public PropertyValues postProcessProperties(PropertyValues pvs, Object bean, String beanName) {
		// InjectionMetadata中保存了所有被@Autowired注解标注的属性/方法并封装成一个个的InjectedElement
		InjectionMetadata metadata = findAutowiringMetadata(beanName, bean.getClass(), pvs);
		try {
			metadata.inject(bean, beanName, pvs);
		}
		catch (BeanCreationException ex) {
			throw ex;
		}
		catch (Throwable ex) {
			throw new BeanCreationException(beanName, "Injection of autowired dependencies failed", ex);
		}
		return pvs;
	}
这里重点看metadata.inject(bean, beanName, pvs);
public void inject(Object target, @Nullable String beanName, @Nullable PropertyValues pvs) throws Throwable {
		Collection<InjectedElement> checkedElements = this.checkedElements;
		Collection<InjectedElement> elementsToIterate =
				(checkedElements != null ? checkedElements : this.injectedElements);
		if (!elementsToIterate.isEmpty()) {
			// 遍历每个能够注入的属性,进行注入
			for (InjectedElement element : elementsToIterate) {
				if (logger.isTraceEnabled()) {
					logger.trace("Processing injected element of bean '" + beanName + "': " + element);
				}
				// element可能是Method,也可能是Field
				element.inject(target, beanName, pvs);
			}
		}
	}
protected void inject(Object bean, @Nullable String beanName, @Nullable PropertyValues pvs) throws Throwable {
			Field field = (Field) this.member;
			Object value;
			if (this.cached) {
				// 当前注入点已经注入过了,有缓存了,则利用cachedFieldValue去找对应的bean
				value = resolvedCachedArgument(beanName, this.cachedFieldValue);
			}
			else {
				//  Spring在真正查找属性对应的对象之前, 会先将该属性的描述封装成一个DependencyDescriptor, 里面保存了Filed、
				//  是否强制需要(required), 以及属性所在的类(即Field所在的类Class对象)
				DependencyDescriptor desc = new DependencyDescriptor(field, this.required);
				desc.setContainingClass(bean.getClass());
				Set<String> autowiredBeanNames = new LinkedHashSet<>(1);
				Assert.state(beanFactory != null, "No BeanFactory available");
				TypeConverter typeConverter = beanFactory.getTypeConverter();
				try {
					// 根据field去寻找合适的bean
					value = beanFactory.resolveDependency(desc, beanName, autowiredBeanNames, typeConverter);
				}
				catch (BeansException ex) {
					throw new UnsatisfiedDependencyException(null, beanName, new InjectionPoint(field), ex);
				}
				synchronized (this) {
					if (!this.cached) {
						if (value != null || this.required) {
							this.cachedFieldValue = desc;
							// 注册当前bean依赖了哪些其他的bean的name
							registerDependentBeans(beanName, autowiredBeanNames);
							if (autowiredBeanNames.size() == 1) {
								String autowiredBeanName = autowiredBeanNames.iterator().next();
								if (beanFactory.containsBean(autowiredBeanName) &&
										beanFactory.isTypeMatch(autowiredBeanName, field.getType())) {
									// 对得到的对象进行缓存
									this.cachedFieldValue = new ShortcutDependencyDescriptor(
											desc, autowiredBeanName, field.getType());
								}
							}
						}
						else {
							this.cachedFieldValue = null;
						}
						this.cached = true;
					}
				}
			}
			// 反射设值
			if (value != null) {
				ReflectionUtils.makeAccessible(field);
				field.set(bean, value);
			}
		}
	}
后面这个方法走过后又是和xml中byType的逻辑一样。
value = beanFactory.resolveDependency(desc, beanName, autowiredBeanNames, typeConverter);
注解方式:
- 如果已经获取bean,就从缓存中拿
- 查看是否有lazy注解
- 查找并解析value注解
- 按类型查找bean
- 候选bean的筛选
- 反射设置值
总结
对于文章开头的3个问题:
-
依赖注入的流程及发生时间
-
xml方式的byType和byName注入是怎样的
-
注解方式的注入是怎么样的
-
xml的自动注入,和注解方式的有哪些不一样
有这样的解答:
**依赖注入的发生的时间:**从对象实例化完之后,开始,到到初始化阶段都是依赖注入的过程
依赖注入的流程:
- 通过后置处理器寻找注入点;
- 他会先寻找是否有找个(缓存中是否存在);
- 遍历反射得到的所有属性;找被
@Autowired,@Value,@Inject标注的属性,忽略static修饰的属性; - 遍历反射得到的所有方法;找被
@Autowired,@Value,@Inject标注的属性,忽略static修饰的方法,并且这样的方法必须最少有一个参数;
- 填充属性,在方法
populateBean中进行InstantiationAwareBeanPostProcessor.postProcessAfterInstantiation判断是否要处理该字段;- 判断xml配置中是否是4中注入模型中的一种,比如:byType;
- autowiredModel = byName时,进入方法
autowireByName;- 获取到set方法对应的属性;是按set方法截取的,并不是真正的属性的名称;
- 按名字查找,并设置属性
- autowiredModel = byType时,进入方法
autowireByType;- 获取自定义类型转换器
- 获取到set方法对应的属性;是按set方法截取的,并不是真正的属性的名称;
- 获取方法中的参数信息
- 创建参数描述信息
- 按类型查找(不解析注解,因为没有保存)
- 如果已经获取bean,就从缓存中拿
- 看是否是:Optional、ObjectFactory、javaxInjectProviderClass,创建对应的对象返回;
- 属性上有@lazy注解,就生成一个代理对象,并返回;
- 如果还是没有
- 获取字段属性的类型
- 获取到@Value注解
- 并解析#{表达式} ${占位符}
- 通过类型转换器转换,并返回
- 判断属性类型是否是复合元素(map、array、collection),是就直接返回
- 按类型查找(可能找到多个)
- 找出所有符合类型的bean(如果是泛型,就是全部)
- 先从内部依赖项中查找(resolvableDependencies)候选bean
- 对候选bean进行过滤;
isAutowireCandidate方法的判断:- beanDefinition重点 autowire-candidate属性
- 泛型匹配
- @Qualifier匹配,父子类都要找
- 类型查找的备用方案,在上面步骤都没找到执行,不太理解;
- 按类型找到了多个
- 取标有@Primary的bean
- 按@Priority取优先级高的bean
- 按名称取值
- 不然返回null
- 找到了1个;生成对象返回
- 如果没找到,看是否是required的
- 当前bean和依赖的bean注册到缓存
- autowiredModel = byName时,进入方法
- 遍历后置处理器开始处理注解;
- @Resource是由:CommonAnnotationBeanPostProcessor 处理;@Autowired是由:AutowiredAnnotationBeanPostProcessor处理;
- 在处理前,还会再调用获取注入点的方法,如果之前获取过,直接取缓存的;
- 遍历属性,寻找匹配的bean(这里的逻辑和byType方式的一样,一样的方法)
- @Resource是由:CommonAnnotationBeanPostProcessor 处理;@Autowired是由:AutowiredAnnotationBeanPostProcessor处理;
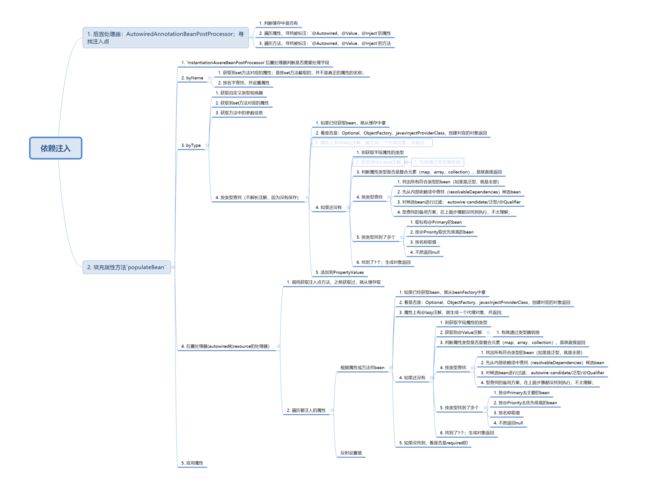
下面是整个流程的思维导图,灰色字体的是没走的,因为都是同一个流程就没有去除掉,怕看不懂。
byName和byType的注入方式
-
byName:
-
获取到set方法截取后的属性名列表
-
根据拿到的名称从beanFactory中取
-
然后添加到propertyValues
-
最后反射设置
这里的注意点是,set方法要和属性名对应
byType:
- 获取到set方法截取后的属性名列表
- 获取参数信息
- 生成参数的依赖描述
- 根据类型找bean
- 添加propertyValues
- 反射设置值,调用method反射
-
注解方式的注入
- 如果已经获取bean,就从缓存中拿
- 查看是否有lazy注解
- 查找并解析value注解
- 按类型查找bean
- 候选bean的筛选
- 反射设置值
xml的自动注入,和注解方式的有哪些不一样
在xml中的注入方式有:byName方式,属性名是以set方法截取的为准,所以在注入时,需要保证属性名和set方法名对应。
byType,直接安装参数类型查找bean,最后反射调用set方法设置的值,跟名称无关。
最主要的是,不需要在类中写注解这些东西,只需要在xml中配置注入的方式,如byType,byName。
而注解方式,都是扫描注解字段和方法,没有注解就不会去注入,而且并不会出现xml中byName方式需要对应set方法名,都是反射设置。
静态方法和静态属性能被注入吗?
不能。在获取注入点时,就有判断是否是静态的,静态的直接忽略


