阶段十-springsecurity总结
jwt认证流程
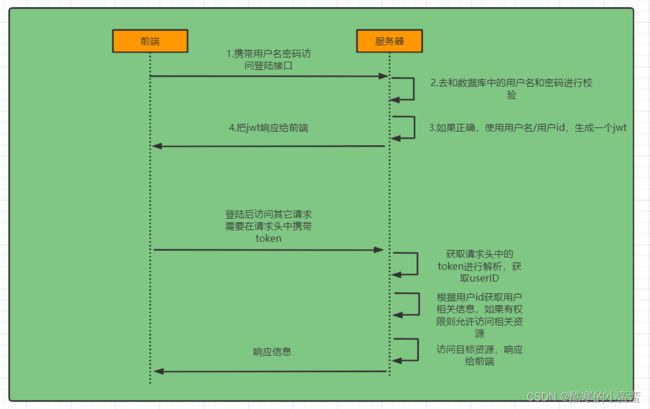
SpringSecurity 认证过程


第一步:
创建一个类实现UserDetailsService接口,重写其中的方法
通过重写 public UserDetails loadUserByUsername(String username) 方法
从数据库校验用户输入的用户名
配置SecurityConfig
@Bean注入 PasswordEncoder 通过BCryptPasswordEncoder();
@Bean注入 DaoAuthenticationProvider
设置setUserDetailsService(userDetailsService); 走我们的UsersDetailsService
setPasswordEncoder(passwordEncoder());走我们注入的密码加密器
第二步:
注入过滤器链 SecurityFilterChain
注入过滤器链忽略资源 WebSecurityCustomizer
@Configuration
public class SecurityConfig {
    @Autowired
    private UserDetailsService userDetailsService;

    @Bean
    public PasswordEncoder passwordEncoder(){
        return new BCryptPasswordEncoder();
    }
    //注入UserDetailsService
    @Bean
    public DaoAuthenticationProvider authenticationProvider(){
        DaoAuthenticationProvider auth = new DaoAuthenticationProvider();
        auth.setUserDetailsService(userDetailsService);
        auth.setPasswordEncoder(passwordEncoder());
        return auth;
    }
    //注入认证管理器
    @Bean
    public AuthenticationManager authenticationManager(AuthenticationConfiguration authenticationConfiguration) throws Exception {
        return authenticationConfiguration.getAuthenticationManager();
    }
    //注入过滤连
    @Bean
    public SecurityFilterChain filterChain(HttpSecurity http) throws Exception {
        //关闭csrf攻击防护
        http.csrf().disable();
        //配置认证请求,所有请求都需要过滤
        http.authorizeRequests().anyRequest().authenticated();
        //关闭session会话
        http.sessionManagement().sessionCreationPolicy(SessionCreationPolicy.STATELESS);
        return http.build();
    }
    //注入过滤链忽略资源
    @Bean
    public WebSecurityCustomizer securityCustomizer() throws Exception{
        return (web )->{
            web.ignoring().antMatchers("/user/login");
        };
    }
}
第三步:
登录实现类
 //认证管理器完成认证
        UsernamePasswordAuthenticationToken authenticationToken = new UsernamePasswordAuthenticationToken(user.getUsername(),user.getPassword());
        Authentication authenticate = authenticationManager.authenticate(authenticationToken);
        if(Objects.isNull(authenticate)){
            throw new RuntimeException("用户名或密码错误");
        }
        //使用userid生成token
        User loginUser = (User) authenticate.getPrincipal();
        String userId = loginUser.getId().toString();
        String token = jwtUtils.generateToken(userId);
        //authenticate存入redis
        stringRedisTemplate.opsForValue().set("login:"+userId, JSON.toJSONString(loginUser));
        //把token响应给前端
        HashMap map = new HashMap<>();
        map.put("token",token);
        return new ResponseResult(200,"登陆成功",map);
第四步:
自己定义认证管理器jwtAuthenticationTokenFilter
最后把读取到的数据存入本地线程中
为什么放行,因为放行之后有人处理
@Component
public class JwtAuthenticationTokenFilter extends OncePerRequestFilter {
    @Autowired
    private StringRedisTemplate stringRedisTemplate;
    @Autowired
    private JwtUtils jwtUtils;
    @Override
    protected void doFilterInternal(HttpServletRequest request, HttpServletResponse response, FilterChain filterChain) throws ServletException, IOException {
        //获取token
        String token = request.getHeader("token");
        if (!StringUtils.hasText(token)) {
            //放行
            filterChain.doFilter(request, response);
            //防止过滤链执行完在执行过滤器。
            return;
        }
        //解析token
        String userId;
        try {
            userId = jwtUtils.getUserIdFromToken(token);
        } catch (Exception e) {
            e.printStackTrace();
            throw new RuntimeException("token非法");
        }
        //从redis中获取用户信息
        String redisKey = "login:" + userId;
        String json = stringRedisTemplate.opsForValue().get(redisKey);
        User loginUser = JSONObject.parseObject(json, User.class);
        if (Objects.isNull(loginUser)) {
            throw new RuntimeException("用户未登录");
        }
        //将用户信息存入SecurityContextHolder中
        //TODO 获取权限信息封装到Authenication中
        UsernamePasswordAuthenticationToken usernamePasswordAuthenticationToken =
                new UsernamePasswordAuthenticationToken(loginUser,null,null);
        SecurityContextHolder.getContext().setAuthentication(usernamePasswordAuthenticationToken);
        //放行
        filterChain.doFilter(request,response);
    }
}
把我们的过滤器放入过滤器链
//配置认证过滤器
        http.addFilterAfter(jwtAuthenticationTokenFilter, UsernamePasswordAuthenticationFilter.class);
因为jwtAuthenticationTokenFilter继承OncePerRequestFilter
为防止SpringBoot的FilterRegistrationBean执行OncePerRequestFilter过滤器
@Configuration
public class WebConfig {
    @Bean
    public FilterRegistrationBean filterRegistrationBean(JwtAuthenticationTokenFilter jwtAuthenticationTokenFilter){
        FilterRegistrationBean filterFilterRegistrationBean = new FilterRegistrationBean<>(jwtAuthenticationTokenFilter);
        filterFilterRegistrationBean.setEnabled(false);
        return filterFilterRegistrationBean;
    }
}
第五步:退出登录
从本地线程中获取数据,直接删除,最彻底的是前后端都删除
授权
在springsecurity配置类中开启注解
@EnableWebSecurity //开启springSecurity框架
@EnableGlobalMethodSecurity(prePostEnabled = true)//开启权限注解开发
在controller上配置权限注解
例如:
@PreAuthorize("hasAuthority('test')")封装权限信息
注意实体类中的权限信息,两个集合
 /*
     * 用户拥有权限
     * */
    @TableField(exist = false)
    private Collection menus;

    @Override
    @JSONField(serialize = false)
    public Collection getAuthorities() {
        Collection collection = new ArrayList();
        for (String str : menus){
            SimpleGrantedAuthority simpleGrantedAuthority = new SimpleGrantedAuthority(str);
            collection.add(simpleGrantedAuthority);
        }
        return collection;
    }
在UserDetailServiceImpl中加入权限,从数据库中获取(多表连接),这里是写死的
//返回user自动会和前台接收的密码比对,这里不用比对密码
        Collection collection = new ArrayList<>();
        collection.add("test");
        user.setMenus(collection);
        return user;
认证过滤器解析权限数据也加入权限信息
//将用户信息存入SecurityContextHolder中
        // 获取权限信息封装到Authenication中
        UsernamePasswordAuthenticationToken usernamePasswordAuthenticationToken =
                new UsernamePasswordAuthenticationToken(loginUser,null,loginUser.getAuthorities());
自定义失败处理
如果是认证过程中出现的异常会被封装成AuthenticationException然后调用AuthenticationEntryPoint对象的方法去进行异常处理。
如果是授权过程中出现的异常会被封装成AccessDeniedException然后调用AccessDeniedHandler对象的方法去进行异常处理。
在SpringSecurity配置信息中注入
    @Autowired
    private AuthenticationEntryPoint authenticationEntryPoint;

    @Autowired
    private AccessDeniedHandler accessDeniedHandler;
http.exceptionHandling().authenticationEntryPoint(authenticationEntryPoint).
accessDeniedHandler(accessDeniedHandler);跨域问题解决
@Configuration
public class CorsConfig implements WebMvcConfigurer {

    @Override
    public void addCorsMappings(CorsRegistry registry) {
        // 设置允许跨域的路径
        registry.addMapping("/**")
                // 设置允许跨域请求的域名
                .allowedOrigins("*")
                // 是否允许cookie
                .allowCredentials(true)
                // 设置允许的请求方式
                .allowedMethods("GET", "POST", "DELETE", "PUT")
                // 设置允许的header属性
                .allowedHeaders("*")
                // 跨域允许时间
                .maxAge(3600);
    }
}
开启SpringSecurity的跨域访问
    @Override
    protected void configure(HttpSecurity http) throws Exception {
        ...
        //允许跨域
        http.cors();
    }