mac m1芯片 pytorch安装及gpu性能测试
pytorch 使用mac的m1芯片进行模型训练。
#小结:在数据量小和模型参数少,batch_size小时,cpu训练更快(原因:每次训练时数据需要放入GPU中,由于batch_size小。数据放入gpu比模型计算时间还长)
在数据量大(或者batch size大)或者模型参数多时,使用GPU训练优势明显
当模型参数大于100时,使用GPU比CPU开始有优势
注意mac gpu device是 mps ,不是cudn. device= torch.device(“mps”)
1 pytorch 安装及gpu验证
1.1 安装
mac需要安装 night 版本的pytorch
mac安装官网地址
conda install pytorch torchvision torchaudio -c pytorch-nightly
# 或者
pip3 install --pre torch torchvision torchaudio --extra-index-url https://download.pytorch.org/whl/nightly/cpu
1.2 gpu验证
主要是执行:torch.backends.mps.is_available()
以下代码输出: tensor([1.], device=‘mps:0’)
import torch
if torch.backends.mps.is_available():
    mps_device = torch.device("mps")
    x = torch.ones(1, device=mps_device)
    print (x)
else:
    print ("MPS device not found.")
2 mac m1芯片验证
实验1 :batch_size=32, 模型参数 parameter_num=476,720
gpu 运行时长: 1min 36s
cpu 运行时长: 37.5s
实验2 :batch_size=512, 模型参数 parameter_num=476,720
gpu 运行时长: 16s
cpu 运行时长: 13.3s
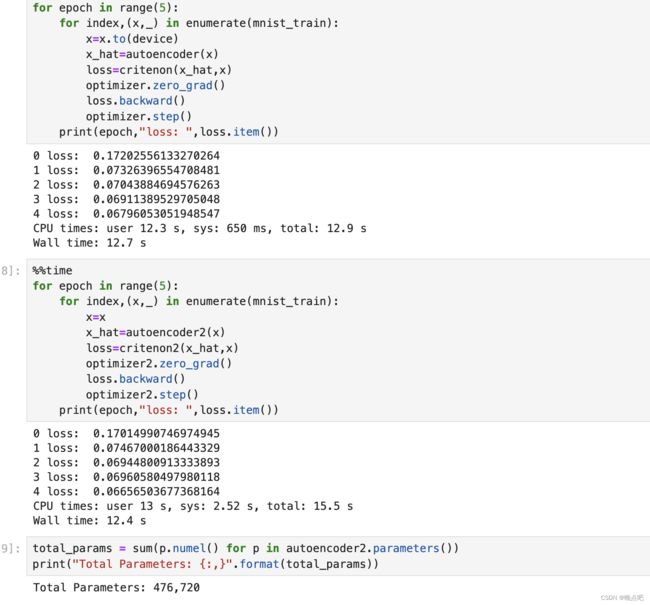
实验3 :batch_size=1024, 模型参数 parameter_num=476,720
gpu 运行时长: 12.7s
cpu 运行时长: 12.4s
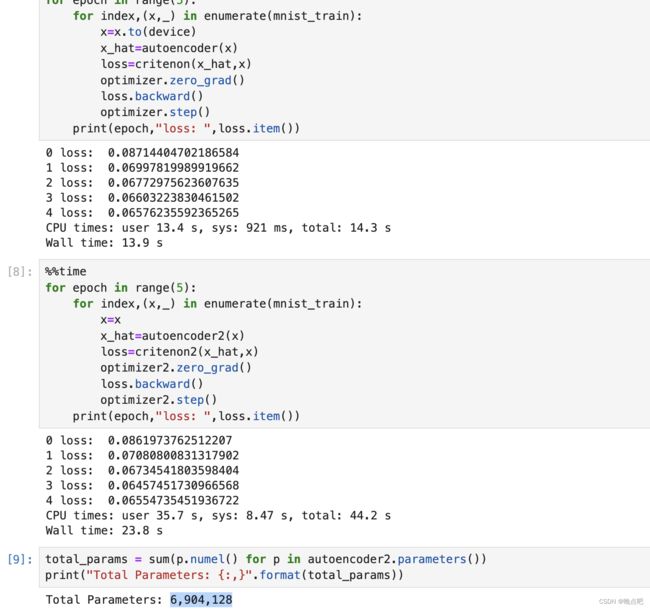
实验4 :batch_size=1024, 模型参数 parameter_num=6,904,128
gpu 运行时长: 13.9s
cpu 运行时长: 23.8s
实验5 :batch_size=1024, 模型参数 parameter_num=23,685,440
gpu 运行时长: 20.5s
cpu 运行时长: 53.5s
实验6 :batch_size=1024, 模型参数 parameter_num=203,618,624
gpu 运行时长: 4min 11s
cpu 运行时长: 6min 49s
附录
测试代码
import torch
from torch.utils.data import DataLoader
from torchvision import datasets,transforms
from  torch import nn,optim
batch_size=1024
mnist_train=datasets.MNIST("mnist",True,transform=transforms.Compose([
    transforms.ToTensor()    ]),download=True)
mnist_train=DataLoader(mnist_train,batch_size=batch_size,shuffle=True)
minst_test=datasets.MNIST("mnist",False,transform=transforms.Compose([
    transforms.ToTensor()  ]),download=True)
minst_test=DataLoader(minst_test,batch_size=batch_size,shuffle=True)
x,lable=next(iter(mnist_train))
print(lable)
x.shape

device=torch.device("mps")
autoencoder=AE().to(device)
critenon=nn.MSELoss()
optimizer=optim.Adam(autoencoder.parameters(),lr=1e-4)

autoencoder2=AE()
critenon2=nn.MSELoss()
optimizer2=optim.Adam(autoencoder2.parameters(),lr=1e-4)

# GPU 训练
#%%time
for epoch in range(5):
    for index,(x,_) in enumerate(mnist_train):
        x=x.to(device)
        x_hat=autoencoder(x)
        loss=critenon(x_hat,x)
        optimizer.zero_grad()
        loss.backward()
        optimizer.step()
    print(epoch,"loss: ",loss.item())

# CPU训练
# %%time
for epoch in range(5):
    for index,(x,_) in enumerate(mnist_train):
        x=x
        x_hat=autoencoder2(x)
        loss=critenon2(x_hat,x)
        optimizer2.zero_grad()
        loss.backward()
        optimizer2.step()
    print(epoch,"loss: ",loss.item())

total_params = sum(p.numel() for p in autoencoder2.parameters())
print("Total Parameters: {:,}".format(total_params))
实验1

实验3
实验4