Hadoop学习笔记(3)——MapReduce入门
一、MapReduce介绍
MapReduce思想在生活中处处可见。或多或少都曾接触过这种思想。MapReduce的思想核心是“分而治之”,适用于大量复杂的任务处理场景(大规模数据处理场景)。
”map"负责分,即把复杂的任务分解为若干简单的任务来处理。前提是这些小任务可以并行计算,彼此间几乎没有依赖关系
“Redude”负责合,即对map阶段的结果进行全局汇总
1.MapReduce 设计构思
MapReduce设计并提供了统一的计算框架,使我们专注于业务,而不用去管太多系统层面的处理细节。
MapReduce中定义了如下的Map和Reduce两个抽象的编程接口,由用户去编程实现.Map和Reduce,MapReduce处理的数据类型是
Map: (k1; v1) → [(k2; v2)]
Reduce: (k2; [v2]) → [(k3; v3)]
一个完整的mapreduce程序在分布式运行时有三类实例进程:
二、MapReduce编程流程
MapReduce的开发一般有八个步骤,其中Map阶段分为2个步骤,Shuffle分为4个步骤,Reduce阶段分为2个步骤
1.Map阶段
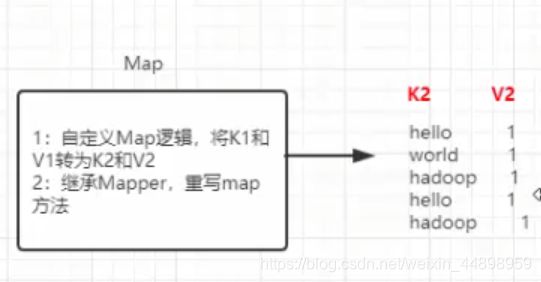
1.设置InputFormat类确定文件读取方式,将数据切分为K1-V1(K1就是每一行相对于文本的偏移量,V1就是这一行的数据)键值对,输入到第二步

2.自定义Map逻辑,将第一步的K1-V1转成另外的K2-V2,输出结果

2.Shuffle阶段
1.对输出的K2-V2进行分区
2.步不同分区的数据按照相同的Key排序
3.(可选)对分组的数据初步规约,降低数据的网络拷贝
4.对数据进行分组

3.Reduce阶段
1.对多个Map任务的结果进行排序以及合并,编写Reduce函数实现自己的逻辑,对输入的K2-V2进行处理,转成新的K3-V3

2.设置OutputFormat确定文件输出方式,处理并保存Reduce输出的K3-V3

三、入门案例WordCount
案例要求:在一堆给定的文本文件中统计输出每一个单词出现的总次数
这个例子只完成了Map和Reduce阶段,Shuffle阶段中的分区,排序,归约,分组我们将单独举例
1.数据格式准备
我们只需准备一个文本文件将他上传到HDFS中即可

我把它上传到了根目录下
![]()
2. 自定义Mapper
//Mapper有四个泛型,分别是K1,V1,K2,V2的类型
//hadoop自己实现了一些基本类型的封装类,便于序列化
public class WordCountMapper extends Mapper<LongWritable, Text,Text,LongWritable> {
    //重写map方法
    @Override
    /*
       参数:
          key:行偏移量
          value:每一行的数据
          context:上下文对象
    */
    protected void map(LongWritable key, Text value, Context context) throws IOException, InterruptedException {
        String[] split = value.toString().split(",");
        Text text = new Text();
        LongWritable longWritable = new LongWritable(1);
        for (String word : split) {
            text.set(word);
            context.write(text,longWritable);
        }
    }
}
3.自定义Reducer
//四个泛型分别是K2,V2,K3,V3
public class WordCountReducer extends Reducer<Text,LongWritable,Text,LongWritable> {
    //reduce作用:将K2,V2转换成K3,V3
    /*
       参数:
           key:K2
           values:V2
     */
    @Override
    protected void reduce(Text key, Iterable<LongWritable> values, Context context) throws IOException, InterruptedException {
        long count = 0;
        for (LongWritable value : values) {
            count +=value.get();
        }
        context.write(key,new LongWritable(count));
    }
}
4.主类,负责创建一个job
public class WordCountJobMain extends Configured implements Tool {

    @Override
    public int run(String[] strings) throws Exception {

        // 指定一个job任务
        Job job = Job.getInstance(super.getConf(), "wordcount");
        //配置job任务
        job.setJarByClass(WordCountJobMain.class);
        job.setInputFormatClass(TextInputFormat.class);
        //指定文件读取方式和路径
        TextInputFormat.addInputPath(job,new Path("hdfs://node01:9000/wordcount.txt"));
        job.setMapperClass(WordCountMapper.class);
        //设置map阶段K2类型
        job.setMapOutputKeyClass(Text.class);
        //设置v2类型
        job.setOutputValueClass(LongWritable.class);
        //这个案例先不设计shuff阶段
        //指定Reduce阶段的处理方式和数据类型
        job.setReducerClass(WordCountReducer.class);
        //设置K3类型
        job.setOutputKeyClass(Text.class);
        //设置V3类型
        job.setOutputValueClass(LongWritable.class);
        //设置结果数据输出类型
        job.setOutputFormatClass(TextOutputFormat.class);
        //设置输出路径,输出路径必须是不存在的
        TextOutputFormat.setOutputPath(job,new Path("hdfs://node01:9000/wordcount_out.txt"));

        //等待任务执行
        boolean b = job.waitForCompletion(true);
        return b ? 0:1;
    }

    public static void main(String[] args) throws Exception {
        Configuration configuration = new Configuration();
        //启动job任务
        int run = ToolRunner.run(configuration, new WordCountJobMain(), args);
        System.exit(run);

    }
}
5.MapReduce运行模式
1.集群运行模式
1.将MapReduce程序提交给Yarn集群,分发到很多的节点上并发执行
2.程序运行结果应该位于HDFS
步骤:打包,上传,使用命令启动
hadoop jar jar包名字 主方法全路径名
2.本地运行模式
四、分区(partition)
分区就是将不同的数据分类,交给不同的Reducer去处理,最后生成不同区的结果文件
这里我们用一个双色球开奖表来学习怎样实现分区

要求:将表按第六列的数字大小进行分区,大于15的为一个分区,其他为另一个分区
分区的步骤:
1.自定义map
import java.io.IOException;

public class PartitionMapper extends Mapper<LongWritable, Text,Text, NullWritable> {

    @Override
    protected void map(LongWritable key, Text value, Context context) throws IOException, InterruptedException {
        context.write(value,NullWritable.get());
    }
}
2.自定义Partitioner
public class MyPartitioner extends Partitioner<Text, NullWritable> {

    //定义分区规则,返回分区编号
    @Override
    public int getPartition(Text text, NullWritable nullWritable, int i) {
        String s = text.toString().split("\t")[5];
        if(Integer.parseInt(s)>15)
        {
            return 1;
        }
        else return 0;
    }
}
3.自定义Reducer
public class PartitionReducer extends Reducer<Text, NullWritable,Text,NullWritable> {
    @Override
    protected void reduce(Text key, Iterable<NullWritable> values, Context context) throws IOException, InterruptedException {
        context.write(key,NullWritable.get());
    }
}
4.主类
public class PartitionJobMain extends Configured implements Tool {
    @Override
    public int run(String[] strings) throws Exception {
        //1.创建job对象
        Job job = Job.getInstance(super.getConf(), "partition");
        job.setJarByClass(PartitionJobMain.class);
        //2.对job任务进行配置
        //2.1设置输入类,输入路径
        job.setInputFormatClass(TextInputFormat.class);
        TextInputFormat.addInputPath(job,new Path("hdfs://node01:9000/partition.csv"));
        //2.2 设置Mapper
        job.setMapperClass(PartitionMapper.class);
        job.setMapOutputKeyClass(Text.class);
        job.setMapOutputValueClass(NullWritable.class);
        //2.3 指定分区类
        job.setPartitionerClass(MyPartitioner.class);
        //2.4 设置Reducer
        job.setReducerClass(PartitionReducer.class);
        job.setOutputKeyClass(Text.class);
        job.setOutputValueClass(NullWritable.class);
        job.setNumReduceTasks(2);//设置Reducer的个数,由于我们是2个分区,所以设为2
        //3. 指定输出类和输出路径
        job.setOutputFormatClass(TextOutputFormat.class);
        TextOutputFormat.setOutputPath(job,new Path("hdfs://node01:9000/partition_out"));
        //4.等待结束
        boolean b = job.waitForCompletion(true);
        return b? 0:1;
    }

    public static void main(String[] args) throws Exception {

        PartitionJobMain partitionJobMain = new PartitionJobMain();
        int run = ToolRunner.run(new Configuration(), partitionJobMain, args);
        System.exit(run);
    }
}
5.运行,查看结果
五.排序和序列化
Hadoop的序列化
- 序列化 (Serialization) 是指把结构化对象转化为字节流
- 反序列化 (Deserialization) 是序列化的逆过程.把字节流转为结构化对象. 当要在进程间传 递对象或持久化对象的时候, 就需要序列化对象成字节流, 反之当要将接收到或从磁盘读取的字节流转换为对象, 就要进行反序列化
- Java 的序列化 (Serializable) 是一个重量级序列化框架, 一个对象被序列化后会附带很多额 外的信息 (各种校验信息, header, 继承体系等), 不便于在网络中高效传输. 所以, Hadoop 自己开发了一套序列化机制(Writable), 精简高效. 不用像 Java 对象类一样传输多层的父子 关系,需要哪个属性就传输哪个属性值, 大大的减少网络传输的开销
- Writable 是 Hadoop 的序列化格式, Hadoop定义了这样一个 Writable 接口. 一个类要支持可 序列化只需实现这个接口即可
- 另外 Writable 有一个子接口是WritableComparable,WritableComparable 是既可实现序列 化, 也可以对key进行比较,我们这里可以通过自定义 Key 实现 WritableComparable 来实现我们的排序功能
排序Demo
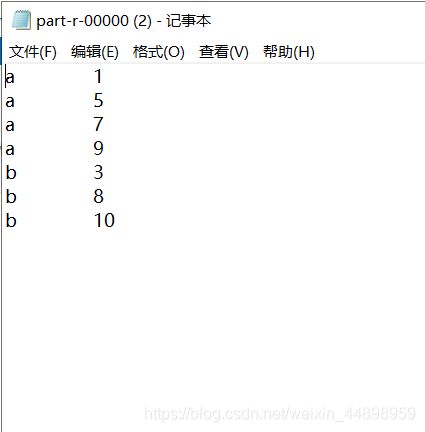
- 第一列按照字典顺序进行排列
- 第一列相同的时候, 第二列按照升序进行排
1.将数据封装成java对象并实现序列化和比较器接口
public class SortBean implements WritableComparable<SortBean> {

    private String word;
    private int number;

    public String getWord() {
        return word;
    }

    public void setWord(String word) {
        this.word = word;
    }

    public int getNumber() {
        return number;
    }

    public void setNumber(int number) {
        this.number = number;
    }

    @Override
    public String toString() {
        return word+"\t"+number;
    }

    //实现比较器
    @Override
    public int compareTo(SortBean o) {
        //利用ASCll码进行比较
        int res = this.word.compareTo(o.getWord());
        if(res == 0)
        {
            return this.number - o.number;
        }
        return res;

    }

    //实现序列化
    @Override
    public void write(DataOutput dataOutput) throws IOException {
        //固定写法,string类型用writeUTF
        dataOutput.writeUTF(word);
        dataOutput.writeInt(number);

    }

    //实现反序列
    @Override
    public void readFields(DataInput dataInput) throws IOException {
        this.word = dataInput.readUTF();
        this.number = dataInput.readInt();

    }
}
2.自定义Mapper
//Mapper的作用是将K1V1转换成K2V2
//这里我们的K1是行文本偏移量,V1是行数据,K2是我们封装的对象,V2没有数据
public class SortMapper extends Mapper<LongWritable, Text,SortBean, NullWritable> {
    @Override
    protected void map(LongWritable key, Text value, Context context) throws IOException, InterruptedException {

        SortBean sortBean = new SortBean();
        String[] split = value.toString().split("\t");
        sortBean.setWord(split[0]);
        sortBean.setNumber(Integer.parseInt(split[1]));
        context.write(sortBean,NullWritable.get());
    }
}
3.自定义Reducer
public class SortReducer extends Reducer<SortBean, NullWritable,SortBean,NullWritable> {
    @Override
    protected void reduce(SortBean key, Iterable<NullWritable> values, Context context) throws IOException, InterruptedException {
        context.write(key,NullWritable.get());
    }
}
4.创建Job任务
public class SortJobMain extends Configured implements Tool {

    @Override
    public int run(String[] strings) throws Exception {
        Job job = Job.getInstance(super.getConf(), "sortJob");
        job.setJarByClass(SortJobMain.class);
        job.setInputFormatClass(TextInputFormat.class);
        TextInputFormat.addInputPath(job,new Path("hdfs://node01:9000/sort.txt"));
        //Mapper阶段
        job.setMapperClass(SortMapper.class);
        job.setMapOutputKeyClass(SortBean.class);
        job.setMapOutputValueClass(NullWritable.class);
        //Shuffle阶段
        //只要是实现了WritableComparable接口的类,MapReduce会自动帮我们排序

        //Reduce阶段
        job.setReducerClass(SortReducer.class);
        job.setOutputKeyClass(SortBean.class);
        job.setOutputValueClass(NullWritable.class);

        job.setOutputFormatClass(TextOutputFormat.class);
        TextOutputFormat.setOutputPath(job,new Path("hdfs://node01:9000/sort_out"));
        boolean b = job.waitForCompletion(true);
        return b? 0:1;
    }


    public static void main(String[] args) throws Exception {
        int run = ToolRunner.run(new Configuration(), new SortJobMain(), args);
        System.exit(run);
    }
}
5.打包运行,查看结果
六、规约(Combiner)
概念
每一个 map 都可能会产生大量的本地输出,Combiner 的作用就是对 map 端的输出先做一次合并,以减少在 map 和 reduce 节点之间的数据传输量,以提高网络IO 性能,是 MapReduce的一种优化手段之一
- combiner 是 MR 程序中 Mapper 和 Reducer 之外的一种组件
- combiner 组件的父类就是 Reducer
- ombiner 和 reducer 的区别在于运行的位置 Combiner 是在每一个 maptask 所在的节点运行 Reducer是接收全局所有 Mapper 的输出结果
- combiner 的意义就是对每一个 maptask 的输出进行局部汇总,以减小网络传输量
Demo
我们给之前的wordcount加一个combiner
combiner和reduce所处理的逻辑时一样的,只不过运行的时间不同
public class WordCountCombiner extends Reducer<Text, LongWritable,Text,LongWritable> {
    @Override
    protected void reduce(Text key, Iterable<LongWritable> values, Context context) throws IOException, InterruptedException {
        long count = 0;
        for (LongWritable value : values) {
            count +=value.get();
        }
        context.write(key,new LongWritable(count));
    }

}
然后在Job任务中添加我们的Combiner
//设置Combiner类
        job.setCombinerClass(WordCountCombiner.class);
观察比较结果

没有Combiner时,Reduce从网络中接收的数据是14条,有了之后,只有8条了。
这样就增加了我们网络传输的性能
补充:计数器
计数器是收集作业统计信息的有效手段之一,用于质量控制或应用级统计。计数器还可辅助诊断系统故障。如果需要将日志信息传输到 map 或 reduce 任务, 更好的方法通常是看能否用一个计数器值来记录某一特定事件的发生。对于大型分布式作业而言,使用计数器更为方便。除了因为获取计数器值比输出日志更方便,还有根据计数器值统计特定事件的发生次数要比分析一堆日志文件容易得多。
hadoop内置计数器列表

每次mapreduce执行完成之后,我们都会看到一些日志记录出来,其中最重要的一些日志记录如下截图

第一种方式定义计数器,通过context上下文对象可以获取我们的计数器,进行记录 通过context上下文对象,在map端使用计数器进行统计
public class PartitionMapper  extends
Mapper<LongWritable,Text,Text,NullWritable>{
    //map方法将K1和V1转为K2和V2
    @Override
    protected void map(LongWritable key, Text value, Context context)
throws Exception{
        Counter counter = context.getCounter("MR_COUNT",
"MyRecordCounter");
        counter.increment(1L);
        context.write(value,NullWritable.get());
   }
}
public class PartitionerReducer extends
Reducer<Text,NullWritable,Text,NullWritable> {
   public static enum Counter{
       MY_REDUCE_INPUT_RECORDS,MY_REDUCE_INPUT_BYTES
   }
    @Override
    protected void reduce(Text key, Iterable<NullWritable> values,
Context context) throws IOException, InterruptedException {
       context.getCounter(Counter.MY_REDUCE_INPUT_RECORDS).increment(1L);
       context.write(key, NullWritable.get());
   }
}
运行程序之后就可以看到我们自定义的计数器在map阶段读取了七条数据
第二种方式
通过enum枚举类型来定义计数器 统计reduce端数据的输入的key有多少个
public class PartitionerReducer extends
Reducer<Text,NullWritable,Text,NullWritable> {
   public static enum Counter{
       MY_REDUCE_INPUT_RECORDS,MY_REDUCE_INPUT_BYTES
   }
    @Override
    protected void reduce(Text key, Iterable<NullWritable> values,
Context context) throws IOException, InterruptedException {
       context.getCounter(Counter.MY_REDUCE_INPUT_RECORDS).increment(1L);
       context.write(key, NullWritable.get());
   }
}


