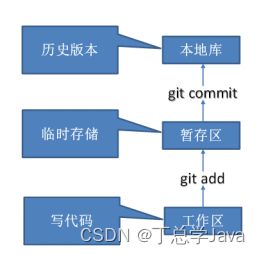
git基本命令
1、安装
介绍
安装
配置
2、git基本命令
2.1 基本操作
#1、查看空目录的git状态
$ git status
fatal: not a git repository (or any of the parent directories): .git

#2、初始化本地仓库:创建一个git的目录管理当前项目的所有文件版本
$ git init
Initialized empty Git repository in D:/gitworkspace/git-test1/.git/

#3、查看本地仓库的状态
$ git status
On branch master  # 当前在master分支开发
No commits yet # 还没有任何提交记录
nothing to commit (create/copy files and use "git add" to track) # 当前git仓库管理的项目 还没有任何内容可以提交  可以创建/拷贝文件 使用git add 追踪文件

# 4、新建文件
$ vim hello1.txt

#5、查看本地仓库的状态
$ git status
On branch master
No commits yet
Untracked files:  # 显示新增的还未被git追踪的文件列表
  (use "git add ..." to include in what will be committed) # git add 文件名 可以添加文件追踪等待后面提交到本地仓库
        hello1.txt
nothing added to commit but untracked files present (use "git add" to track)

# 6、git add 文件: 添加文件到暂存区(等待提交)
$ git add hello1.txt

#7、查看本地仓库状态
$ git status
On branch master
No commits yet
Changes to be committed: # 暂存区有改变等待提交
	# 也可以使用git rm --cached 文件 删除暂存区的文件
  (use "git rm --cached ..." to unstage)
        new file:   hello1.txt # 新创建文件 hello1.txt

#8、删除暂存区管理的指定文件 再查看工作空间的状态
$ git rm --cached hello1.txt
rm 'hello1.txt'

$ git status
On branch master
No commits yet
Untracked files:
  (use "git add ..." to include in what will be committed)
        hello1.txt
nothing added to commit but untracked files present (use "git add" to track)

# 9、添加文件到暂存区
$ git add hello1.txt

#10、提交暂存区内容到本地仓库: 此时文件才被git本地版本仓库记录了当前的版本
$ git commit -m '新增hello1文件'
[master (root-commit) b13ede4] 新增hello1文件
 1 file changed, 1 insertion(+)
 create mode 100644 hello1.txt

#11、查看commit后仓库的状态
$ git status
On branch master
nothing to commit, working tree clean # 工作目录下没有和git版本不一样的文件
2.2 修改&多文件提交
# 修改文件
$ vim hello1.txt
# 新增文件
$ vim hello2.txt
# 添加需要提交的所有文件到暂存区
$ git add .
# 提交更新
$ git commit -m '修改hello1&新增hello2'
2.3 暂存区缓存的使用
# 丢弃暂存区内容
$ git restore --staged
# 使用暂存区文件恢复 覆盖本地修改
git  checkout .
git  checkout 暂存区要恢复的文件名
2.4 版本穿梭&日志查看
git log # 查看提交的历史记录详细日志
git reflog # 查看简要日志
git reset --hard 32746e8  # 穿梭到指定id的版本
1、本地文件修改 添加到暂存区
2、本地文件修改 不添加到暂存区
3、git reset版本穿梭
git reset --hard 32746e8   : 版本穿梭时直接使用指定版本的文件替换本地相同文件   会丢失穿梭版本前的修改
	- 被git管理的文件:
			无论修改后添加到暂存区了 还是修改了没有添加到暂存区
			版本穿梭使用了--hard 数据都会丢失
	- 未被git管理的文件:
			不会被删除
git reset --soft 32746e8:
	穿梭前的文件修改无论有没有添加到暂存区 仍然存在
git init # 初始化本地库
git add .  # 添加修改到暂存区
git commit -m '注释' # 提交暂存区
git log/reflog  # 查看提交记录
git reset --hard/--soft  提交id  #版本穿梭到指定commit_id
3、分支操作
# 列出所有分支: *指向的是正在使用的分支
$ git branch -l
* master
# 新建分支: 基于当前分支所在的版本 新建了分支副本(和现在分支状态一样)
$ git branch dev
# 查看分支详细信息
$ git branch -v
  dev    8257e76 修改hello1-添加3
* master 8257e76 修改hello1-添加3
# 切换分支: 也对应一个提交记录,切换分支时就是找最新的分支的提交id切换过去
$ git checkout dev
$ git checkout master
feature分支只是为了功能开发
dev分支:可能会创建多个feature分支
	- 写好的feature功能分支可以通过分支合并的方式合并到dev分支
# 新建功能分支:并编写代码提交
$ git checkout feature-test1
# 将功能分支合并到dev分支
# 切换到dev分支
$ git checkout dev
Switched to branch 'dev'
# dev合并功能分支
$ git merge feature-test1
#### dev分支没有修改hello3文件,ft分支修改了hello3文件
合并冲突:
# 合并时 文件被多个分支同时修改,会出现合并冲突
# 1、在dev分支修改hello3文件
# 2、切换到feature分支
$ git checkout feature-test1
# 3、ft分支修改hello3文件  提交到本地仓库

#### 分支合并: dev合并ft(dev和ft同时修改了同一个文件)
$ git checkout dev
Switched to branch 'dev'
$ git merge feature-test1
Auto-merging hello3.txt
CONFLICT (content): Merge conflict in hello3.txt #hello3文件出现合并冲突
Automatic merge failed; fix conflicts and then commit the result. # 需要手动解决合并冲突
(dev|MERGING) # 表示dev分支合并其他的分支时 出现了合并冲突
# 查看冲突文件:
$ git status
On branch dev
You have unmerged paths.
  (fix conflicts and run "git commit")
  (use "git merge --abort" to abort the merge)

Unmerged paths:
  (use "git add ..." to mark resolution)
        both modified:   hello3.txt

no changes added to commit (use "git add" and/or "git commit -a")
# 解决冲突:
vim hello3.txt

ft-分支 ....
<<<<<<< HEAD     # 表示当前分支冲突的内容
dev分支---1111
=======			# 结束
ft-分支--222222222222222222
>>>>>>> feature-test1  # 表示合并过来的冲突内容


# 删除git冲突标记行:将需要保留的代码保留
# 添加解决冲突的文件到暂存区
$ git add hello3.txt
# 提交到本地仓库:
$ git commit -m 'dev分支-解决合并ft分支的冲突'
[dev 6d8bb24] dev分支-解决合并ft分支的冲突
删除分支
$ git branch -d feature-test1
Deleted branch feature-test1 (was ac41177).
4、远程仓库
局域网:gitlab(github和gitee都是使用gitlab搭建的) 自己搭需要自己的服务器
公网:gitee / github
4.1 在gitee中创建远程仓库
最好不要初始化仓库(默认会创建文件)
可以拷贝创建后的远程仓库地址
4.2 将本地仓库推送到远程仓库
git remote add origin 远程仓库地址
git push origin master   (推送到远程仓库的master分支)
# 拉取远程仓库最新的更新到本地
git pull origin master
4.3 协作开发
# 新用户可以克隆远程仓库的项目到本地
git clone 远程仓库地址

#新用户基于克隆的项目可以继续开发

# 提交更新到本地仓库
git add .
git commit -m 'xxxx'
# 推送到远程仓库: 克隆的项目默认的远端origin->仓库地址已存在
git push origin master
4.3.1 远程仓库邀请协作开发成员
仓库设置中可以邀请协作开发成员
被邀请的用户在 通知中接收邀请
4.3.2 协作开发冲突解决
多个程序员 同时基于同一个版本的仓库进行修改,如果修改了相同的文件,推送时就会出现版本冲突
A:程序员
clone远程仓库
修改h文件
提交到本地仓库推送
B:程序员
clone远程仓库
修改h文件
提交到本地仓库推送:推送的文件在远程仓库中包含了其他的更新
出现了冲突
$ git push origin master
To https://gitee.com/xgatguigu/git-test1.git
 ! [rejected]        master -> master (fetch first)
error: failed to push some refs to 'https://gitee.com/xgatguigu/git-test1.git'
hint: Updates were rejected because the remote contains work that you do
hint: not have locally. This is usually caused by another repository pushing
hint: to the same ref. You may want to first integrate the remote changes
hint: (e.g., 'git pull ...') before pushing again.
hint: See the 'Note about fast-forwards' in 'git push --help' for details.


解决:三板斧 拉取更新 合并冲突 再提交推送
B程序员推送冲突,需要他解决问题
1、拉取更新:
git pull origin master
2、合并冲突解决
编辑冲突文件 解决
3、提交推送
git add .
git commit -m ''
git push origin master
4.4 gitee配置ssh免密登录
参考课件生成秘钥
拷贝仓库ssh地址进行推送
