SpringBoot依赖收集
---此表示为Springboot项目
SpringBoot基础依赖(最小)
    org.springframework.boot
    spring-boot-starter-web


    org.springframework.boot
    spring-boot-starter-test
    test


    org.springframework.boot
    spring-boot-starter
可添加的其他依赖
    org.springframework.boot
    spring-boot-starter-jdbc


    org.mybatis.spring.boot
    mybatis-spring-boot-starter
    2.1.0


    mysql
    mysql-connector-java
    runtime
MySQL配置
spring:
  datasource:
    username: root
    password: 123456
    url: jdbc:mysql://localhost:3306/security?useUnicode=true&characterEncoding=utf-8&useSSL=true&serverTimezone=UTC
    driver-class-name: com.mysql.cj.jdbc.Driver
druid连接池
            com.alibaba
            druid-spring-boot-starter
            1.1.21
swagger2使用和导出api文档: Swagger2使用及导出api文档_yanzanjie2018的博客-CSDN博客
hutool工具
            cn.hutool
            hutool-all
            5.3.10
poi操作Excel依赖
    org.apache.poi
    poi
    4.1.2


    org.apache.poi
    poi-ooxml
    4.1.2
apache的http包
            org.apache.httpcomponents
            httpclient
            4.5.5


            org.apache.httpcomponents
            httpmime
            4.5.5
获取浏览器信息
            nl.bitwalker
            UserAgentUtils
            1.2.4
elasticsearch引入
            org.springframework.boot
            spring-boot-starter-data-elasticsearch


spring:
 data:
  elasticsearch:
   repositories:
    enabled: true
   #多实例集群扩展时需要配置以下两个参数
   #cluster-name: datab-search
   #cluster-nodes: 127.0.0.1:9300,127.0.0.1:9301
redis引入
            org.springframework.boot
            spring-boot-starter-data-redis


redis:
  host: localhost # Redis服务器地址
  database: 0 # Redis数据库索引(默认为0)
  port: 6379 # Redis服务器连接端口
  password: # Redis服务器连接密码(默认为空)
  jedis:
    pool:
      max-active: 8 # 连接池最大连接数(使用负值表示没有限制)
      max-wait: -1ms # 连接池最大阻塞等待时间(使用负值表示没有限制)
      max-idle: 8 # 连接池中的最大空闲连接
      min-idle: 0 # 连接池中的最小空闲连接
  timeout: 3000ms # 连接超时时间(毫秒)
  defaultTTL: 30 #默认有效期分钟
Redisson分布式锁
		   org.redisson
		   redisson
		   3.5.4
security依赖
    org.springframework.boot
    spring-boot-starter-security
AOP依赖
   org.springframework.boot
   spring-boot-starter-aop
mybatisplus依赖和模板引擎
            com.baomidou
            mybatis-plus-boot-starter
            3.4.2


            com.baomidou
            mybatis-plus-generator
            3.4.1


            org.freemarker
            freemarker
            2.3.30
mybatisplus的使用代码: mybatisplus的使用_yanzanjie2018的博客-CSDN博客
发送邮件依赖
            javax.mail
            javax.mail-api
            1.6.2


            com.sun.mail
            smtp
            1.4.5
案例,使用hutool发送邮件:使用hutool工具进行邮件发送_yanzanjie2018的博客-CSDN博客_hutool发送邮件
jwt依赖
            io.jsonwebtoken
            jjwt
            0.9.0
ailibaba的JSON
            com.alibaba
            fastjson
            2.0.6
测试包
            junit
            junit
            4.13
解析网页
            org.jsoup
            jsoup
            1.11.3
二维码架包
            com.google.zxing
            core
            3.1.0


            com.google.zxing
            javase
            3.1.0


            com.github.liuyueyi.media
            qrcode-plugin
            2.5.2


            commons-lang
            commons-lang
            2.6
Spring Boot服务监控工具
  org.springframework.boot
  spring-boot-starter-actuator
布隆过滤器(Guava )
    com.google.guava
    guava
    23.0
参数校验工具
            org.springframework.boot
            spring-boot-starter-validation
详情 -- https://www.jianshu.com/p/24444f1d784e
安全监控
    org.springframework.boot
    spring-boot-starter-actuator
热部署
    org.springframework.boot
    spring-boot-devtools
    runtime
    true
分布式配置中心
    org.springframework.cloud
    spring-cloud-config-server
服务注册与发现(服务端)
    org.springframework.cloud
    spring-cloud-starter-netflix-eureka-server
eureka:
  instance:
    hostname: localhost #eureka服务端的实例名称
  client:
    #false表示不向注册中心注册自己
    register-with-eureka: false
    #false表示自己端就是注册中心,我的职责就是维护服务实例,并不需要去检索服务
    fetch-registry: false
    service-url:
      #设置与Eureka Server交互的地址查询服务和注册服务都需要依赖这个地址
      defaultZ4 one: http://${eureka.instance.hostname}:${server.port}/eureka/
服务注册与发现(客户端)
	org.springframework.cloud
    spring-cloud-starter-netflix-eureka-client
eureka:
  client:
    #表示是否将自己注册进EurekaServer默认为true
    register-with-eureka: true
    #是否从EurekaServer抓取已有的注册信息,默认为true。单节点无所谓,集群必须设置为true才能配合ribbon使用负载均衡
    fetch-registry: true
    service-url:
      defaultZone: http://localhost:7001/eureka
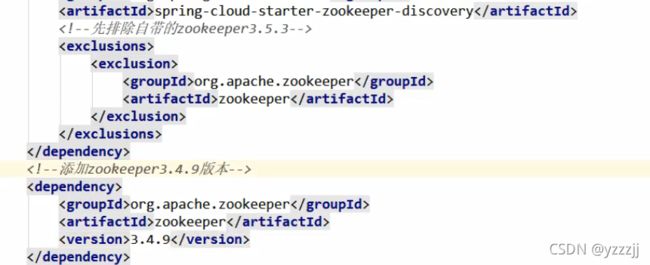
zookeeper依赖
    org.springframework.cloud
    spring-cloud-zookeeper-dependencies
    pom
分布式数据库(分库分表)
            org.apache.shardingsphere
            sharding-jdbc-spring-boot-starter
            4.1.0


            org.apache.shardingsphere
            sharding-core-common
            4.1.0
spring.jackson.date-format=yyyy-MM-dd HH:mm:ss
spring.jackson.time-zone=GMT+8
spring.jackson.serialization.write-dates-as-timestamps=false

spring.main.allow-bean-definition-overriding=true
# 命名数据源  这个是自定义的
spring.shardingsphere.datasource.names=ds-0,ds-1,ds-2
# 配置数据源ds-0
spring.shardingsphere.datasource.ds-0.type=com.alibaba.druid.pool.DruidDataSource
spring.shardingsphere.datasource.ds-0.driverClassName=com.mysql.jdbc.Driver
spring.shardingsphere.datasource.ds-0.url=jdbc:mysql://192.168.0.233:3306/ds-0?serverTimezone=Asia/Shanghai&useUnicode=true&characterEncoding=utf-8&zeroDateTimeBehavior=convertToNull&useSSL=false&allowPublicKeyRetrieval=true
spring.shardingsphere.datasource.ds-0.username=root
spring.shardingsphere.datasource.ds-0.password=root
# 配置数据源ds-1
spring.shardingsphere.datasource.ds-1.type=com.alibaba.druid.pool.DruidDataSource
spring.shardingsphere.datasource.ds-1.driverClassName=com.mysql.jdbc.Driver
spring.shardingsphere.datasource.ds-1.url=jdbc:mysql://192.168.0.233:3306/ds-1?serverTimezone=Asia/Shanghai&useUnicode=true&characterEncoding=utf-8&zeroDateTimeBehavior=convertToNull&useSSL=false&allowPublicKeyRetrieval=true
spring.shardingsphere.datasource.ds-1.username=root
spring.shardingsphere.datasource.ds-1.password=root
# 配置数据源ds-2
spring.shardingsphere.datasource.ds-2.type=com.alibaba.druid.pool.DruidDataSource
spring.shardingsphere.datasource.ds-2.driverClassName=com.mysql.jdbc.Driver
spring.shardingsphere.datasource.ds-2.url=jdbc:mysql://192.168.0.233:3306/ds-user?serverTimezone=Asia/Shanghai&useUnicode=true&characterEncoding=utf-8&zeroDateTimeBehavior=convertToNull&useSSL=false&allowPublicKeyRetrieval=true
spring.shardingsphere.datasource.ds-2.username=root
spring.shardingsphere.datasource.ds-2.password=root
# 配置默认数据源ds-0
spring.shardingsphere.sharding.default-data-source-name=ds-0

# 配置分片表 t_order
# 配置真实数据节点  库:ds-0,ds-1;表:t_order_0,t_order_1,t_order_2
spring.shardingsphere.sharding.tables.t_order.actual-data-nodes=ds-$->{0..1}.t_order_$->{0..2}
# 分库分片建
spring.shardingsphere.sharding.tables.t_order.database-strategy.inline.sharding-column=order_id
# 分库分片算法: 对order_id字段进行取模分库,2代表分片库的个数
spring.shardingsphere.sharding.tables.t_order.database-strategy.inline.algorithm-expression=ds-$->{order_id % 2}
# 分表分片健
spring.shardingsphere.sharding.tables.t_order.table-strategy.inline.sharding-column=order_id
# 分表算法:对order_id字段进行取模分库,3代表分片表的个数
spring.shardingsphere.sharding.tables.t_order.table-strategy.inline.algorithm-expression=t_order_$->{order_id % 3}
# 配置自增主键字段
spring.shardingsphere.sharding.tables.t_order.key-generator.column=order_id
# 自增主键ID 生成方案:雪花算法
spring.shardingsphere.sharding.tables.t_order.key-generator.type=SNOWFLAKE

# 配置分片表 t_order_item
spring.shardingsphere.sharding.tables.t_order_item.actual-data-nodes=ds-$->{0..1}.t_order_item_$->{0..2}
spring.shardingsphere.sharding.tables.t_order_item.database-strategy.inline.sharding-column=order_id
spring.shardingsphere.sharding.tables.t_order_item.database-strategy.inline.algorithm-expression=ds-$->{order_id % 2}
spring.shardingsphere.sharding.tables.t_order_item.table-strategy.inline.sharding-column=order_id
spring.shardingsphere.sharding.tables.t_order_item.table-strategy.inline.algorithm-expression=t_order_item_$->{order_id % 3}


# 配置分片表 t_user_order
spring.shardingsphere.sharding.tables.t_user_order.actual-data-nodes=ds-$->{0..1}.t_user_order_$->{0..2}
spring.shardingsphere.sharding.tables.t_user_order.database-strategy.inline.sharding-column=user_order_id
spring.shardingsphere.sharding.tables.t_user_order.database-strategy.inline.algorithm-expression=ds-$->{user_order_id % 2}
spring.shardingsphere.sharding.tables.t_user_order.table-strategy.inline.sharding-column=user_order_id
spring.shardingsphere.sharding.tables.t_user_order.table-strategy.inline.algorithm-expression=t_user_order_$->{user_order_id % 3}
spring.shardingsphere.sharding.tables.t_user_order.key-generator.column=user_order_id
spring.shardingsphere.sharding.tables.t_user_order.key-generator.type=SNOWFLAKE

#配置专库专表
spring.shardingsphere.sharding.tables.t_user.actual-data-nodes=ds-2.t_user
spring.shardingsphere.sharding.tables.t_user.database-strategy.inline.sharding-column=id
spring.shardingsphere.sharding.tables.t_user.database-strategy.inline.algorithm-expression=ds-2
spring.shardingsphere.sharding.tables.t_user.table-strategy.inline.sharding-column=id
spring.shardingsphere.sharding.tables.t_user.table-strategy.inline.algorithm-expression=t_user
spring.shardingsphere.sharding.tables.t_user.key-generator.column=id
spring.shardingsphere.sharding.tables.t_user.key-generator.type=SNOWFLAKE

# 绑定表关系  不加[0]查询时会导致笛卡尔积
spring.shardingsphere.sharding.binding-tables[0]=t_order,t_order_item
# 配置广播表=公共表(PS:所有数据库中都必须有这张表)
spring.shardingsphere.sharding.broadcast-tables=t_config
# 开启SQL解析日志
spring.shardingsphere.props.sql.show=true

# 配置mybatis-plus
mybatis-plus.configuration.map-underscore-to-camel-case=true
mybatis-plus.configuration.auto-mapping-behavior=full
mybatis-plus.configuration.log-impl=org.apache.ibatis.logging.stdout.StdOutImpl
mybatis-plus.mapper-locations=classpath*:mapper/**/*Mapper.xml
mybatis-plus.global-config.db-config.logic-not-delete-value=0
mybatis-plus.global-config.db-config.logic-delete-value=1
mybatis-plus.global-config.db-config.logic-delete-field=deleted
RabbitMQ依赖
    org.springframework.boot
    spring-boot-starter-amqp
详情参考---RabbitMQ学习笔记_yanzanjie2018的博客-CSDN博客
Apache对字符串封装工具类
    org.apache.commons
    commons-lang3
    3.4
Apache对集合封装工具类
    org.apache.commons
    commons-collections4
    4.1
Apache对IO流进行整合
    commons-io
    commons-io
    2.6
Dubbo依赖
            com.alibaba
            dubbo
            2.6.6


            org.apache.curator
            curator-framework
            2.8.0


            org.apache.curator
            curator-recipes
            2.8.0


-------------alibaba引入---------------


            com.alibaba.cloud
            spring-cloud-alibaba-dubbo

--------------SpringBot引入--------------


            com.alibaba.spring.boot
            dubbo-spring-boot-starter
            2.0.0
nacos依赖
            com.alibaba.cloud
            spring-cloud-starter-alibaba-nacos-discovery
对nacos与dubbo相关配置
spring:
  application:
    name: product-service # 应用名称
  # 配置 Nacos 注册中心
  cloud:
    nacos:
      discovery:
        enabled: true # 如果不想使用 Nacos 进行服务注册和发现,设置为 false 即可
        server-addr: 127.0.0.1:8848 # Nacos 服务器地址,单机版

# Dubbo
dubbo:
  # 提供方应用信息,用于计算依赖关系
  application:
    name: product-service
  # 使用 nacos 注册中心暴露服务地址
  registry:
    protocol: nacos
    address: spring-cloud://localhost
  # 用 dubbo 协议在 20880 端口暴露服务
  protocol:
    name: dubbo
    port: 20880
  # 扫描需要暴露的服务,可以被 @EnableDubbo 注解替代
  #scan:
  #  base-packages: com.example.service
Activiti工作流依赖
        7.1.0.M2


            org.activiti
            activiti-spring
            ${activiti.version}


            org.activiti
            activiti-engine
            ${activiti.version}


            org.activiti
            activiti-bpmn-model
            ${activiti.version}


            org.activiti
            activiti-bpmn-converter
            ${activiti.version}


            org.activiti
            activiti-json-converter
            ${activiti.version}


            org.activiti
            activiti-bpmn-layout
            ${activiti.version}


            org.activiti.cloud
            activiti-cloud-services-api
            ${activiti.version}
-------依赖架包收集-------


