理解SwiftUI中的matchedGeometryEffect
matchedGeometryEffect
SwiftUI 2.0 引入了一个新的修饰符:matchedGeometryEffect 。使用matchedGeometryEffect可以为整个层次结构中的视图创建过渡动画。只需要将它附加到要进行动画处理的两个视图上,并给它们指定相同的标识符。有了 matchedGeometryEffect 修饰器,你不再需要找出两个状态之间的差异了。你只需要描述两个视图:一个是开始的状态,而另一个是结束的状态,matchedGeometryEffect 会自动对两个视图之间的大小和位置差异进行差值动画。
看一下它的定义:
func matchedGeometryEffect(
    id: ID,
    in namespace: Namespace.ID,
    properties: MatchedGeometryProperties = .frame,
    anchor: UnitPoint = .center,
    isSource: Bool = true
) -> some View where ID : Hashable id是在要设置动画或插值的一对视图上设置的唯一标识符。
Namespace是一个属性包装器,用于区分视图之间的ID,基本上可以防止SwiftUI中的名称冲突。不同Namespace中的ID可以相同。
properties是要从source View里拷贝的属性,默认是frame。
anchor是指从视图的哪个位置产生要共享的位置值。
isSource表明该视图是否作为其他视图的初始位置。
properties的作用
我们以前看到的是对整个frame进行动画处理。 但是我们可以通过指定适当的属性来选择仅对size和position进行动画处理:
.matchedGeometryEffect(id: "id", in: nSpace, properties: .size).matchedGeometryEffect(id: "id", in: nSpace, properties: .position)当您只想显示缩放过渡(使用size )或要插入位置时,这非常方便。但是请确保您正确设置了属性。 例如:
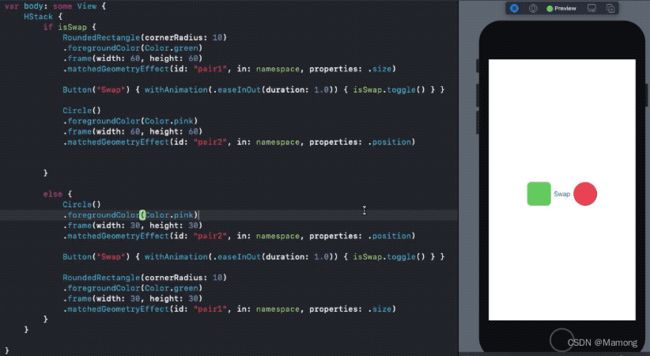
如您所见,圆角矩形仅转换其size 。 因此,它实际上并没有从左向右移动。 同时,在将属性设置为frame之前,圆仅插入其position但不设置其size动画。
anchor的作用
这里通过一个例子来理解anchor的作用。首先我们定义红绿两个600高度的视图和一个按钮:
// 视图一
struct RedView: View {
    var body: some View {
        Rectangle()
            .fill(.red)
            .frame(height: 600)
    }
}

// 视图二
struct GreenView: View {
    var body: some View {
        Rectangle()
            .fill(.green)
            .frame(height: 600)
    }
}

// 状态切换按钮
struct OverlayButton: View {
    @Binding var show: Bool
    var body: some View {
        Button(show ? "Hide" : "Show") {
            show.toggle()
        }
        .buttonStyle(.borderedProminent)
    }
}

extension View {
    func overlayButton(show: Binding) -> some View {
        self
            .overlay(alignment: .bottom) {
                OverlayButton(show: show)
            }
    }
}

// 获取视图尺寸
struct SizeInfoModifier: ViewModifier {
    @Binding var size: CGSize
    func body(content: Content) -> some View {
        content
            .background(
                GeometryReader { proxy in
                    Color.clear
                        .task(id: proxy.size) {
                            size = proxy.size
                        }
                }
            )
    }
}

extension View {
    func sizeInfo(_ size: Binding) -> some View {
        self
            .modifier(SizeInfoModifier(size: size))
    }
}
然后定义两个overlay,底下的overlay是带透明度的600高度的浅绿色视图,并且位于屏幕底部。这里我们通过matchedGeometryEffect保存两个初始位置。一个叫bottom,保存的是这个视图的底部位置,同时也是屏幕的底部。另一个叫top,保存的是视图的顶部位置。位置由anchor指定。上面的overlay中是没有透明度的600高度的绿色视图。由于此时show是false,所以它的anchor是top,也就是说这个视图的顶部和淡绿色视图的顶部共享相同的位置,此时两个视图重合:
struct NameSpaceDemo: View {
    @State var show = false
    @Namespace var placeHolder
    @State var greenSize: CGSize = .zero
    @State var redSize: CGSize = .zero
    var body: some View {
        Color.clear
            .overlay(alignment: .bottom) {
                GreenView().opacity(0.1)
                    .frame(height: greenSize.height)
                    .matchedGeometryEffect(id: "bottom", in: placeHolder, anchor: .bottom, isSource: true)
                    .matchedGeometryEffect(id: "top", in: placeHolder, anchor: .top, isSource: true)
            }
            .overlay(
                GreenView()
                    .sizeInfo($greenSize)
                    .matchedGeometryEffect(id: "top", in: placeHolder, anchor: show ? .bottom : .top, isSource: false)
            )
            .animation(.default, value: show)
            .ignoresSafeArea()
            .overlayButton(show: $show)
    }
}
如果我们点击按钮,show变成true,那么绿色视图的anchor变成bottom,意味着它的底部将跟浅绿色视图的顶部共享位置。此时绿色会出现在浅绿色视图的上方:

正如我们前面所说,anchor指定的是两个视图的各自的什么位置共享位置信息,或者说重合。
参考
ios swiftui_SwiftUI在iOS 14中的matchGeometryEffect-CSDN博客
用 SwiftUI 的方式进行布局 - 知乎