Springboot profile多环境配置
1. 前言
profile用于多环境的激活和配置,用来切换生产,测试,本地等多套不通环境的配置。如果每次去更改配置就非常麻烦,profile就是用来切换多环境配置的。
2. 配置方法
三种方式。
2.1 多profile文件方式
在resource目录下新增三个配置文件,分别用于开发环境、测试环境、生产环境:
- application-dev.properties
- application-test.properties
- application-prod.properties
注意这里如果使用yml配置文件也是一样的思路: - application-dev.yml
- application-test.yml
- application-prod.yml
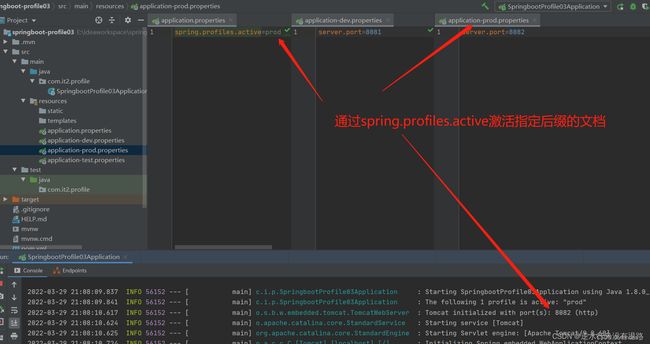
在主配置文件中就可以指定当前使用哪个配置文件,具体例如:
#控制激活指定后缀的文件,此时
#application-prod.properties文件会被激活
spring.profiles.active=prod
这样就激活了生产环境的配置,实际就会使用application-prod.properties(或application-prod.yml)下的配置。(注:yml和properties可以互通,application.properties可以激活yml后缀的配置文件,同样application.yml也可以激活application.properties文件)
2.2 yml多文档方式
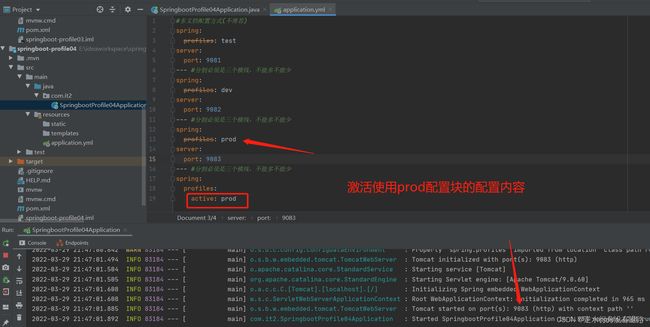
上面是通过创建三个配置文件分离了不同环境下的配置,然后指定哪个就用哪个。而yml多文档实际上就是在一个yml配置文件下同时放了三个配置,用三个横杠分割不同的配置,这在yml中,就叫做多文档。本质上和方式一思路是一样的。
在每个块下指定自己的配置名称spring.profiles。然后再在最后设置spring.profiles.active以选择激活的配置。
#多文档配置方式
spring:
  profiles: test
server:
  port: 9081
--- #分割必须是三个横线,不能多不能少
spring:
  profiles: dev
server:
  port: 9082
--- #分割必须是三个横线,不能多不能少
spring:
  profiles: prod
server:
  port: 9083
--- #分割必须是三个横线,不能多不能少
spring:
  profiles:
    active: prod #激活使用spring.profiles=prod的配置块
2.3 注解方式
在Spring中,可以使用配置文件的方式来指定不同环境下所需要的配置信息。但有时候,我们不通过配置文件,而是通过配置类的方式来指定不同环境下的配置信息,
此时就需要用到@Profile注解。
例如我们封装一个数据库的配置:
1)创建用来封装数据库信息的entity
import lombok.Builder;
import lombok.Data;

@Builder
@Data
public class DBInfoEntity {

    private String url;

    private String port;

    private String userName;

    private String password;
}
2)创建个配置接口:
public interface Config {

	// 获取数据库信息
    DBInfoEntity getDBInfo();

	// 获取系统URL
    String getSystemUrl();
}
3)@Profile注解作用于实现的配置类上:
- 我们使用@Profile注解分别作用于如下所示的两个配置类上,分别指定dev和product环境下才能起作用。
- 我们通过@Configuration注解指定两个配置类的Bean名称都是MyConfig,一般情况下会报错,因为Spring的IOC容器中,Bean的名称是唯一的,但是我们使用了@Profile注解指定了开发环境,不满足指定开发环境的配置类不会被添加到Bean中,所以不会报错。
import org.springframework.context.annotation.Configuration;
import org.springframework.context.annotation.Profile;

@Configuration("MyConfig")
// 指定开发环境为dev
@Profile("dev")
public class MyConfig1 implements Config {

    @Override
    public DBInfoEntity getDBInfo() {
        return DBInfoEntity.builder()
                .url("https://127.0.0.1")
                .port("8080")
                .userName("devUser")
                .password("110120")
                .build();
    }

    @Override
    public String getSystemUrl() {
        return "https://www.dev.com";
    }
}
import org.springframework.context.annotation.Configuration;
import org.springframework.context.annotation.Profile;

@Configuration("MyConfig")
// 指定开发环境为product
@Profile("product")
public class MyConfig2 implements Config {

    @Override
    public DBInfoEntity getDBInfo() {
        return DBInfoEntity.builder()
                .url("https://127.0.0.2")
                .port("8089")
                .userName("prodUser")
                .password("999000")
                .build();
    }

    @Override
    public String getSystemUrl() {
        return "https://www.prod.com";
    }
}
4)测试:
import org.springframework.beans.factory.annotation.Autowired;
import org.springframework.boot.CommandLineRunner;
import org.springframework.stereotype.Component;

@Component
public class Test32Controller implements CommandLineRunner {

	// 注入接口,会自动从IOC容器中获取该接口的实现类
    @Autowired
    private Config config;

    @Override
    public void run(String... args) throws Exception {

        DBInfoEntity dbInfo = config.getDBInfo();
        System.out.println(dbInfo);

        String systemUrl = config.getSystemUrl();
        System.out.println(systemUrl);
    }
}
5)效果
3. 激活方式
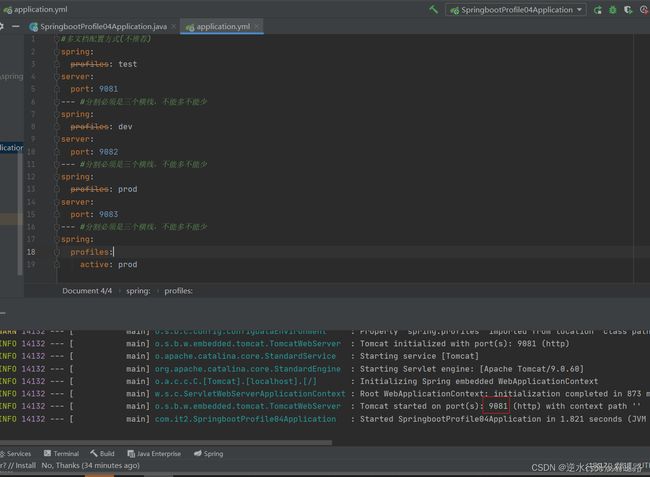
激活方式有以下三种。激活顺序优先级:命令行参数 > 虚拟机参数 > 配置文件
3.1 配置文件内指定激活
就是前面说的,在配置文件中通过设置spring.profiles.active,选择使用哪个配置文件。
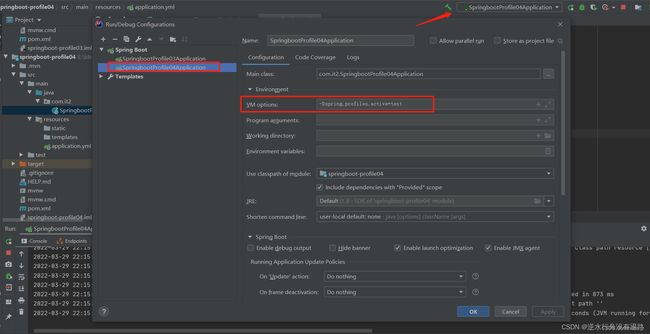
3.2 虚拟机参数VM options
在IDEA中设置
-Dspring.profiles.active=test
3.3 命令行参数(program arguments)
在IDEA中设置
--spring.profiles.active=dev
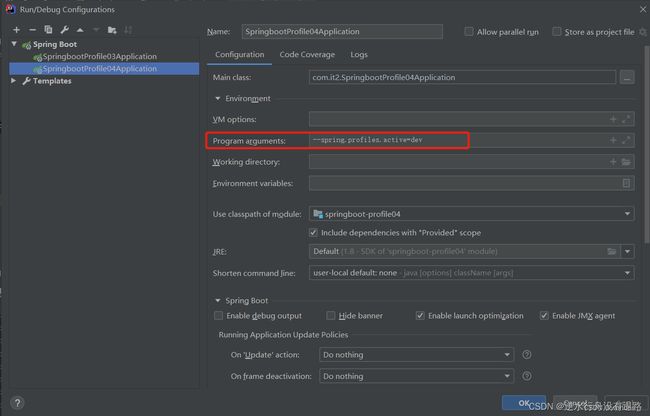
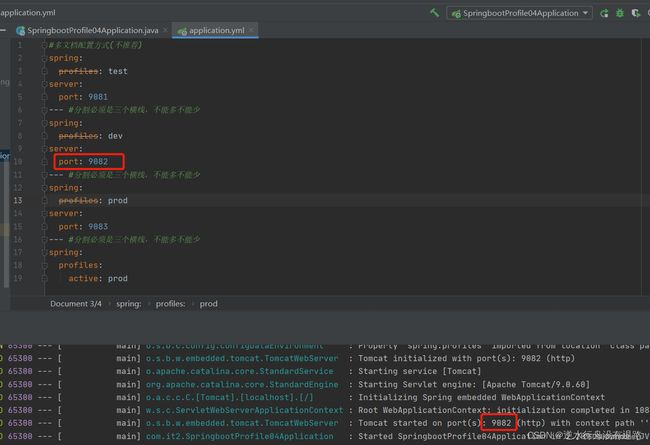
这样就相当于在启动这个jar包时,自动在命令行注入了我们的参数spring.profiles.active=dev
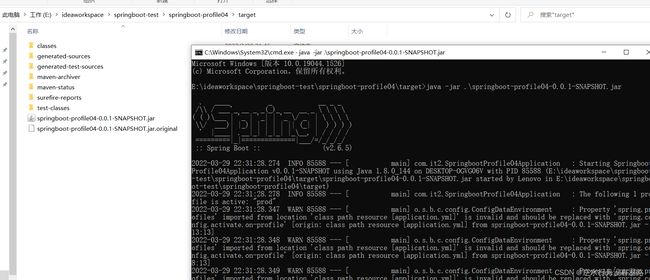
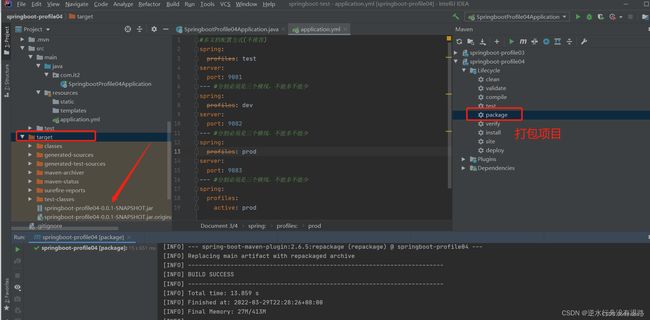
当然也可以我们在生产环境中启动jar包时自己在命令行输入参数。具体如下:
1)打包项目mvn package
2)运行项目(以下三个命令之一即可)
#打包的配置文件里的默认激活方式
java -jar .\springboot-profile04-0.0.1-SNAPSHOT.jar
#激活dev配置文件运行项目(项目参数)
java -jar .\springboot-profile04-0.0.1-SNAPSHOT.jar --spring.profiles.active=dev
#激活test配置文件运行项目(虚拟机参数)
java -jar -Dspring.profiles.active=test .\springboot-profile04-0.0.1-SNAPSHOT.jar
