springboot + websocket + html(获取Linux服务器当前运行jar包的实时日志)
①首先创建websocket服务器
import org.springframework.context.annotation.Bean;
import org.springframework.context.annotation.Configuration;
import org.springframework.web.socket.server.standard.ServerEndpointExporter;

/**
 * @Author YMG
 * @Date 2021/7/16 11:05
 * @Description :
 */
@Configuration
public class WebSocketConfig {
    @Bean
    public ServerEndpointExporter serverEndpointExporter() {
        return new ServerEndpointExporter();
    }
}
import lombok.extern.slf4j.Slf4j;
import org.springframework.stereotype.Component;
import org.thymeleaf.util.StringUtils;
import javax.websocket.*;
import javax.websocket.server.ServerEndpoint;
import java.io.BufferedReader;
import java.io.IOException;
import java.io.InputStream;
import java.io.InputStreamReader;
import java.util.Arrays;
import java.util.Map;
import java.util.concurrent.ConcurrentHashMap;
/**
* @Author YMG
* @Date 2021/7/22 18:37
* @Description :
*/
@SuppressWarnings(value = {"all"})
@Slf4j
@Component
@ServerEndpoint(value = "/websocket/log")
public class WebsocketLoggingServer {
private Process process;
private InputStream inputStream;
/**
* 连接集合
*/
private static final Map SESSION_MAP = new ConcurrentHashMap<>();
private static final Map LENGTH_MAP = new ConcurrentHashMap<>();
/**
* 连接建立成功调用的方法
*/
@OnOpen
public void onOpen(Session session) {
//添加到集合中
SESSION_MAP.put(session.getId(), session);
//默认从第一行开始
LENGTH_MAP.put(session.getId(), 1);
//获取日志信息
new Thread(() -> {
log.info("--------------------log开始--------------------");
boolean first = true;
while (SESSION_MAP.get(session.getId()) != null) {
BufferedReader reader = null;
try {
// 执行 tail -n 命令,填写自己的服务器jar包日志地址,得到流解析
process = Runtime.getRuntime().exec("tail -n 200 nohup.log");
inputStream = process.getInputStream();
//字符流
reader = new BufferedReader(new InputStreamReader(inputStream));
Object[] lines = reader.lines().toArray();
//只取从上次之后产生的日志
Object[] copyOfRange = Arrays.copyOfRange(lines, LENGTH_MAP.get(session.getId()), lines.length);
//对日志关键字加上颜色,可根据自己需求定义
for (int i = 0; i < copyOfRange.length; i++) {
String line = (String) copyOfRange[i];
//先转义
line = line.replaceAll("&", "&")
.replaceAll("<", "<")
.replaceAll(">", ">")
.replaceAll("\"", """);
//处理等级
line = line.replace("DEBUG", "DEBUG");
line = line.replace("INFO", "INFO");
line = line.replace("WARN", "WARN");
line = line.replace("ERROR", "ERROR");
//处理类名
String[] split = line.split("]");
if (split.length >= 2) {
String[] split1 = split[1].split("-");
if (split1.length >= 2) {
line = split[0] + "]" + "" + split1[0] + "" + "-" + split1[1];
}
}
copyOfRange[i] = line;
}
//存储最新一行开始
LENGTH_MAP.put(session.getId(), lines.length);
//截取最新的200行,避免传输的数据太大
if (first && copyOfRange.length > 200) {
copyOfRange = Arrays.copyOfRange(copyOfRange, copyOfRange.length - 200, copyOfRange.length);
first = false;
}
String result = StringUtils.join(copyOfRange, "
");
//发送
send(session, result);
Thread.sleep(1000);
} catch (Exception e) {
e.printStackTrace();
} finally {
try {
reader.close();
} catch (IOException ignored) {
}
}
}
log.info("--------------------log结束--------------------");
}).start();
}
/**
* 连接关闭调用的方法
*/
@OnClose
public void onClose(Session session) {
//从集合中删除
SESSION_MAP.remove(session.getId());
LENGTH_MAP.remove(session.getId());
}
/**
* 发生错误时调用
*/
@OnError
public void onError(Session session, Throwable error) {
error.printStackTrace();
}
/**
* 服务器接收到客户端消息时调用的方法
*/
@OnMessage
public void onMessage(String message, Session session) {
}
/**
* 封装一个send方法,发送消息到前端
*/
private void send(Session session, String message) {
try {
session.getBasicRemote().sendText(message);
} catch (Exception e) {
e.printStackTrace();
}
}
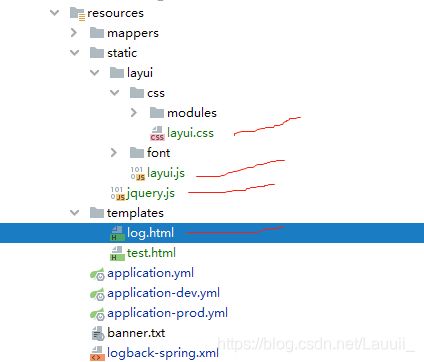
} ②html页面连接websocket服务器获取日志展示,由于我们用的是thymeleaf模版,请注意静态资源的导入方式(用到了jquery+layui)可以自行操作
logging
以下是静态资源+HTML页面地址
由于这个项目用到了拦截器,要配置静态资源及页面放行 地址
import org.springframework.context.annotation.Bean;
import org.springframework.context.annotation.Configuration;
import org.springframework.util.ResourceUtils;
import org.springframework.web.servlet.config.annotation.CorsRegistry;
import org.springframework.web.servlet.config.annotation.InterceptorRegistry;
import org.springframework.web.servlet.config.annotation.ResourceHandlerRegistry;
import org.springframework.web.servlet.config.annotation.WebMvcConfigurationSupport;

/**
 * @Author YMG
 * @Date 2021/6/2 16:35
 * @Description :
 */
@Configuration
public class InterceptorConfig extends WebMvcConfigurationSupport {

    @Override
    public void addInterceptors(InterceptorRegistry registry) {
        registry.addInterceptor(authenticationInterceptor())
                .addPathPatterns("/**")
                /*放行所有请求*/
                .excludePathPatterns("/**");
    }


    @Override
    protected void addResourceHandlers(ResourceHandlerRegistry registry) {
        /*放行静态资源与页面*/
        registry.addResourceHandler("/templates/**").addResourceLocations(ResourceUtils.CLASSPATH_URL_PREFIX+"/templates/");
        registry.addResourceHandler("/static/**").addResourceLocations(ResourceUtils.CLASSPATH_URL_PREFIX+"/static/");
        super.addResourceHandlers(registry);

    }


    @Override
    public void addCorsMappings(CorsRegistry registry) {
        /*解决请求跨域*/
        registry.addMapping("/**")
                .allowedOrigins("*")
                .allowedMethods("POST", "GET", "PUT", "DELETE")
                .allowCredentials(true)
                .allowedHeaders("*")
                .maxAge(3600);
    }

    @Bean
    public AuthenticationInterceptor authenticationInterceptor() {
        return new AuthenticationInterceptor();
    }
}
③编写访问controller
import com.zh.wisdom.config.security.token.PassToken;
import org.springframework.web.bind.annotation.GetMapping;
import org.springframework.web.bind.annotation.RequestMapping;
import org.springframework.web.bind.annotation.RestController;
import org.springframework.web.servlet.ModelAndView;

/**
 * @Author YMG
 * @Date 2021/7/16 11:18
 * @Description :
 */
@RestController
@RequestMapping(value = "/websocket")
public class WebsocketController {

    @PassToken
    @GetMapping("/log")
    public ModelAndView index(){
        return new ModelAndView("log");
    }

}
④项目打包部署到服务器,然后本地访问controller查看日志
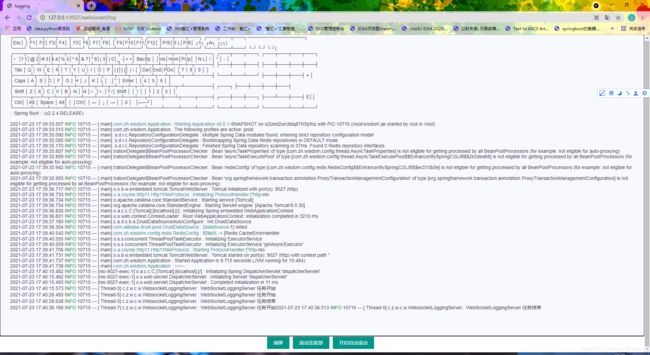
访问地址"服务器ip:端口/websocket/log"
最终呈现效果如下

