ffmpeg+nginx-rtmp转发视频流
本篇博客最早发布于实验室公共博客,但已无人维护,现迁移至个人博客
nginx与nginx-rtmp-module安装
画了好几天图,实在有些乏力,找点有意思的事情做做
觉得视频流传输挺有意思,B站找了些视频,但感觉有些大同小异,讲得不是很清楚
FFmpeg/RTMP/webRTC丨90分钟搞定直播逻辑-推流-流媒体服务器-拉流
流媒体服务器搭建RTMP-RTSP-WebRTC流媒体服务器
也没看太明白,虽然不太需要了解底层原理吧,但感觉还是了解一些为好
总之要在云服务器上安装nginx与nginx-rtmp-module这两个东西,先装一下吧
nginx-RTMP + ffmpeg实现远程图传
主要参考了下面两篇博客,写得还是很详细的
centos7 nginx rtmp转发流媒体服务器
nginx源码编译安装(详解)
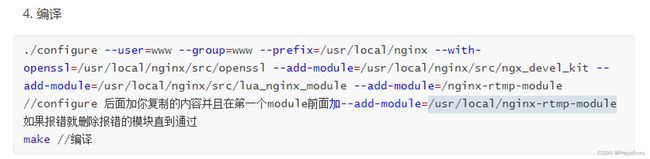
陆师兄编译的时候用了--with-openssl=/usr/local/nginx/src/openssl,帮助文档上
--with-openssl=DIR set path to OpenSSL library sources
后面应该是OpenSSL库文件的路径,我之前二进制装的,因此找不到src文件,硬加编译会报错,提示找不到no such file or directory
[lighthouse@VM-4-11-centos nginx-1.22.0]$ whereis openssl
openssl: /usr/bin/openssl /usr/include/openssl /usr/share/man/man1/openssl.1ssl.gz
第一篇博客中博主没有设置这个参数,所以我也没有设置,大概--with了一些module
安装完成后
[lighthouse@VM-4-11-centos ~]$ whereis nginx
nginx: /usr/local/nginx
[lighthouse@VM-4-11-centos ~]$ cd /usr/local/nginx/sbin/
[lighthouse@VM-4-11-centos sbin]$ ls
nginx
[lighthouse@VM-4-11-centos sbin]$ ./nginx -v
nginx version: nginx/1.22.0
[lighthouse@VM-4-11-centos sbin]$ ./nginx -V
nginx version: nginx/1.22.0
built by gcc 8.5.0 20210514 (Red Hat 8.5.0-4) (GCC)
built with OpenSSL 1.1.1k  FIPS 25 Mar 2021
TLS SNI support enabled
configure arguments: --with-http_stub_status_module --with-http_gzip_static_module --with-http_realip_module --with-http_sub_module --with-http_ssl_module --with-pcre --add-module=/usr/local/src/nginx-rtmp-module
可以看到还是用到了OpenSSL的,同时还给出了configure arguments
查看下/usr/local/nginx/的目录结构
[lighthouse@VM-4-11-centos nginx-1.22.0]$ cd /usr/local/nginx/
[lighthouse@VM-4-11-centos nginx]$ ls
conf  html  logs  sbin
[lighthouse@VM-4-11-centos nginx]$ tree
.
├── conf
│   ├── fastcgi.conf
│   ├── fastcgi.conf.default
│   ├── fastcgi_params
│   ├── fastcgi_params.default
│   ├── koi-utf
│   ├── koi-win
│   ├── mime.types
│   ├── mime.types.default
│   ├── nginx.conf
│   ├── nginx.conf.default
│   ├── scgi_params
│   ├── scgi_params.default
│   ├── uwsgi_params
│   ├── uwsgi_params.default
│   └── win-utf
├── html
│   ├── 50x.html
│   └── index.html
├── logs
└── sbin
    └── nginx

4 directories, 18 files
官方下载地址
https://github.com/arut/nginx-rtmp-module
https://github.com/nginx/nginx
官方的文档及教程
Beginner’s Guide
Linux本地推流-拉流
在装了Ubuntu的笔记本上安装好必要的程序后,修改nginx的配置文件
cd /usr/local/nginx/conf/
sudo vim nginx.conf
只在http前面添加一小部分,及RTAM模块
rtmp {
    server {
       listen 6000;
       application videotest {
           live on;
       }
     }
}
6000是负责推流和拉流的端口live on表示视频流是实时的,而不是每次拉取都是从头开始
然后打开一个终端,重新加载配置文件
cd /usr/local/nginx/sbin/
sudo ./nginx -s reload
将一个视频放到你放的位置,打开终端进行推流
ffmpeg -re -i ~/视频/日落与渔.MP4 -vcodec copy -acodec copy -b:v 800k -b:a 32k -f flv rtmp://localhost:6000/videotest
这里不指定端口的话默认是1935,与配置文件不符的话会报错,通常都需要指定一下
再打开一个终端进行拉流
ffplay rtmp://localhost:6000/videotest
成功播放
将视频推流至服务器并在PC及移动端拉流
同样在服务端安装好必要程序后,修改nginx的配置文件
rtmp {

   server {

      listen 7788;

      chunk_size 6400;

      application videotest {

         live on;

      }
   }
}
chunk_size是数据块大小
打开7788端口的防火墙

同样在笔记本端进行视频推流
ffmpeg -re -i ~/视频/日落与渔.MP4 -vcodec copy -acodec copy -b:v 800k -b:a 32k -f flv rtmp://centos:7788/videotest
在台式机上安装VLC软件,打开网络串流
输入 rtmp://1.116.137.21:7788/videotest,即可拉取播放
同样在手机端安装VLC软件,也可拉取播放