【Springboot WebSocket STOMP使用 2】STOMP使用@SendToUser实现用户个人请求-响应
背景
STOMP协议的模型是“订阅-发布”式的,所以一般场景是同一个主题的广播。而有些场景下用户既想保持当前的WebSocket Session复用,又想消息的响应只有我自己能收到(指定其他某一个用户也行,不过得用其他api方法)不需要别人也收到,即普通的HTTP请求响应这种场景就可以使用@SendToUser注解。
本文基于前文的代码而配置,需要先检查是否已按前文的代码逻辑配好。
前文链接:【Springboot WebSocket STOMP使用】Springboot最小化配置启用STOMP,并实现浏览器JS通信
服务端配置
参考文章:
- 用户登录:STOMP Token Authentication | Spring Docs
- 用户端到端信息:
用户登录拦截器
这里需要登录逻辑是因为STOMP的模型和WebSocket不同,WebSocket是面向连接的,天然就是端到端,也只能端到端;而STOMP是面向消息的,是“发布-订阅”模式的,所以端到端需要额外配置登录相关逻辑。
在拦截器中设置好的用户Principal信息,可以传递到业务处理中使用。
/**
 * Stomp登录拦截器
 *
 * @author Maer
 * @since 2023/04/02
 */
public class StompLoginInterceptor implements ChannelInterceptor {
    /**
     * Invoked before the Message is actually sent to the channel.
     * This allows for modification of the Message if necessary.
     * If this method returns {@code null} then the actual
     * send invocation will not occur.
     */
    @Override
    public Message<?> preSend(Message<?> message, MessageChannel channel) {
        // 从Header中可以读取login和passcode
        StompHeaderAccessor accessor = MessageHeaderAccessor.getAccessor(message, StompHeaderAccessor.class);
        if (StompCommand.CONNECT.equals(accessor.getCommand())) {
            Principal user = new Principal() {
                @Override
                public String getName() {
                    // 这里可以做登录验证逻辑,除了getLogin()可以getPasscode()拿到密码做登录验证。
                    return accessor.getLogin();
                }
            };
            // 设置用户
            accessor.setUser(user);
        }
        return message;
    }
}
配置类中设置拦截器
/**
 * WebSocket子协议STOMP配置
 *
 * @author Maer
 * @since 2023/04/02
 */
@Configuration
@EnableWebSocketMessageBroker
public class StompConfig implements WebSocketMessageBrokerConfigurer {

    /**
     * 注册Stomp端点
     *
     * @param registry 注册中心
     */
    @Override
    public void registerStompEndpoints(StompEndpointRegistry registry) {
        // 配置websocket匹配的路径,并设置所有来源可访问
        registry.addEndpoint("/portfolio").setAllowedOriginPatterns("*");
    }

    /**
     * 配置消息Broker
     *
     * @param config 注册配置
     */
    @Override
    public void configureMessageBroker(MessageBrokerRegistry config) {
        // STOMP的Header字段destination中以/app前缀的会被转发到@MessageMapping中处理
        config.setApplicationDestinationPrefixes("/app");
        // destination中以/topic,/queue前缀的,都会发送到队列中,等待消息消费
        config.enableSimpleBroker("/topic", "/queue");
    }

    /**
     * 配置输入拦截器
     *
     * @param registration 注册器
     */
    @Override
    public void configureClientInboundChannel(ChannelRegistration registration) {
        // 配置登录拦截器
        registration.interceptors(new StompLoginInterceptor());
    }
}
业务响应配置端到端
参考文章:STOMP User Destinations | Spring Docs
/**
* 问候控制器
*
* @author Maer
* @since 2023/04/02
*/
@Controller
public class GreetingController {
/**
* 问候信息处理
* {@link MessageMapping}方法的返回值会被转发到Broker对应的主题中
* 比如向/app/greetings发送的消息,其响应会被转发到/topic/greetings主题中
*
* @param content 内容
* @return 响应信息
*/
@MessageMapping("/greetings")
public String greet(String content) {
return String.format("Server response: %s", content);
}
/**
* 你好信息处理
*
* - 需要使用{@link ChannelInterceptor}在入站处理时,获取用户并设置到上下文中,这样才能获取到用户
* - 客户端需要订阅/user/topic/nihao
* - 点对点发送消息时,向/app/hello进行发送即可
*
*
* @param content 内容
* @return 响应信息
*/
@MessageMapping("/hello")
@SendToUser("/topic/nihao")
public String hello(String content, Principal principal) {
return "Hello from the other side: " + content;
}
}
浏览器客户端代码
<script type="importmap">
    {
      "imports": {
        "@stomp/stompjs": "https://ga.jspm.io/npm:@stomp/[email protected]/esm6/index.js"
      }
    }
  script>


<script async src="https://ga.jspm.io/npm:[email protected]/dist/es-module-shims.js"
  crossorigin="anonymous">script>

<script type="module">
  import { Client } from '@stomp/stompjs';

  var connectedCount = 0;
  const client1 = new Client({
    brokerURL: 'ws://localhost:8080/portfolio',
    connectHeaders: {
      login: "guest1",
      passcode: "guest1"
    },
    onConnect: (frame) => {
      client1.subscribe("/topic/greetings", message =>
        console.log(`Client1 greetings received: ${message.body}`)
      );
      client1.subscribe("/user/topic/nihao", message =>
        console.log(`Client1 hello received: ${message.body}`)
      );
    },
  });

  const client2 = new Client({
    brokerURL: 'ws://localhost:8080/portfolio',
    connectHeaders: {
      login: "guest2",
      passcode: "guest2"
    },
    onConnect: (frame) => {

      client2.subscribe("/topic/greetings", message =>
        console.log(`Client2 greetings received: ${message.body}`)
      );
      client2.subscribe("/user/topic/nihao", message =>
        console.log(`Client2 hello received: ${message.body}`)
      );
      client1.publish({ destination: '/app/greetings', body: "client1 app Message" });
      client2.publish({ destination: '/app/hello', body: "client2 hello Message" });
    },
  });

  client1.activate();
  client2.activate();
script>
效果
服务端接收到/app/hello消息时的调试端点:
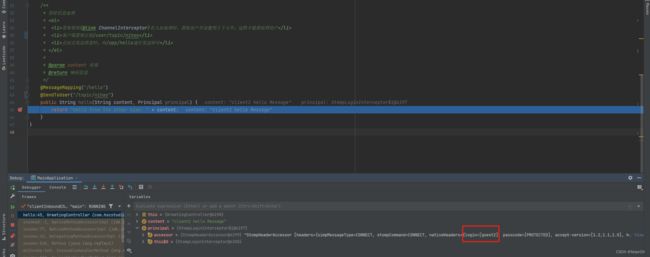
可以看到,用户消息Principal已经从拦截器里传过来了。
浏览器客户端响应:
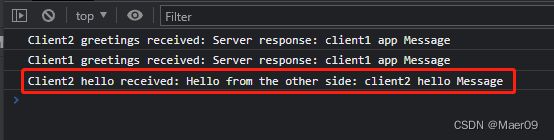
浏览器客户端的代码中,client1和client2都订阅了/user/topic/nihao,但只有client2收到了响应,说明这个响应是端到端的。
而另外的/topic/greetings主题则是client1发送了一个消息,client1和client2都收到了,说明默认是广播的。
原文链接(防盗):https://blog.csdn.net/Truman_Chan/article/details/129916769