SpringBoot 整合 Editormd(完整版)
SpringBoot 整合 Editormd(完整版)
Editormd 下载
去Editormd官网进行下载。

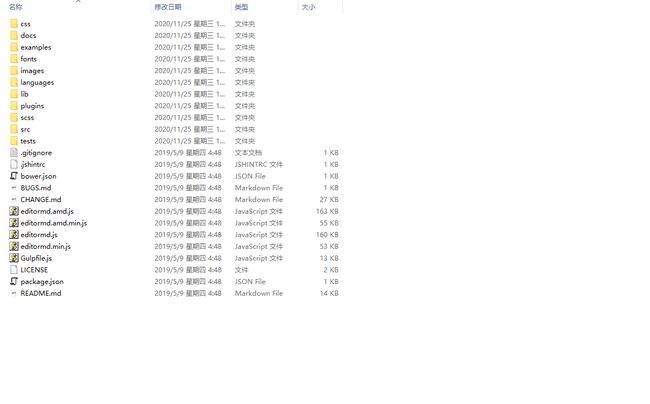
下载好了之后,解压,打开。会发现文件的内容如下图所示
OK,有了这些,我们就可以开始整合项目了。
SpringBoot 创建项目
不同的学者可能采用的IDE不同,在这篇推文中使用的是IntelliJ IDEA。
个人采用的是使用Spring Initializr 进行创建SpringBoot项目。如下图:
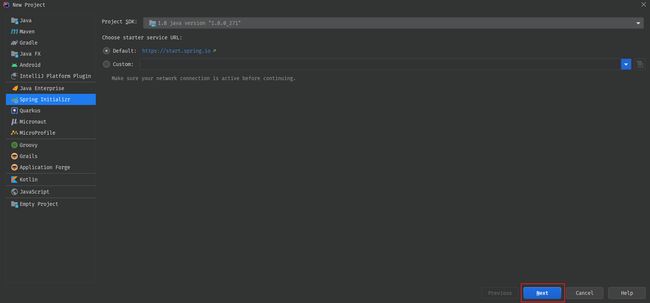
点击Next。
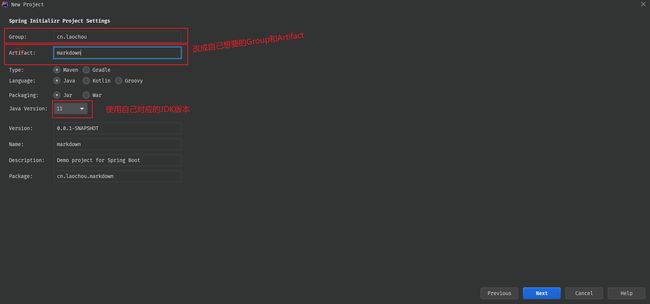
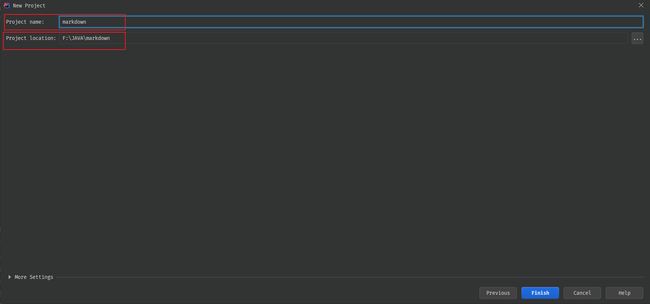
填写具有个人特色的Group和自己想要的Artifact。如下图:
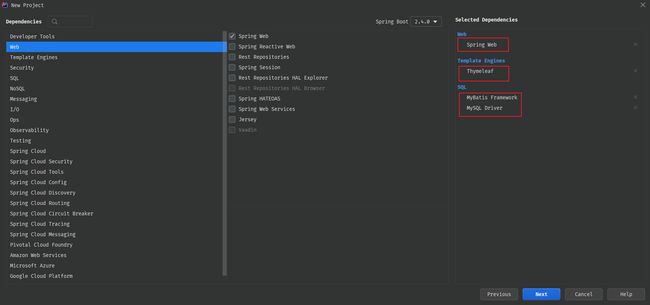
选择依赖,我们只需要添加我们需要用的依赖,后续需要添加一个Alibaba的fastjson依赖即可。如下图:
选择文件Location.如下图:
SpringBoot 项目依赖
            org.springframework.boot
            spring-boot-starter-thymeleaf


            org.springframework.boot
            spring-boot-starter-web


            org.mybatis.spring.boot
            mybatis-spring-boot-starter
            2.1.4


            mysql
            mysql-connector-java
            runtime


            org.springframework.boot
            spring-boot-starter-test
            test


            com.alibaba
            fastjson
            1.2.62
SpringBoot 项目配置
我们在这里使用的是yml配置。
server:
  port: 8081

spring:
  datasource:
    driver-class-name: com.mysql.cj.jdbc.Driver
    # 记得创建自己本地的数据库哦,并修改密码
    url: jdbc:mysql://localhost:3306/markdown?useUnicode=true&characterEncoding=utf-8&useSSL=false&serverTimezone=UTC&allowPublicKeyRetrieval=true
    username: root
    password: laochou
  # 这里的配置主要是用来上传文件映射来使用的,这个location就是我们的存放图像的目录。当然这里还是要看你的数据库图片路径是如何设置的。
  # 大家仔细的话,我在static目录下有个upload目录,这个目录就是我存放上传图片的目录。但是我们在location里面只到了 static这层,因此我的数据库中存放的便是 "/upload/xxxx.png"。拼接在一起就刚好。
  # 图片的绝对路径:F:\JAVA\SpringBoot-MarkDown\src\main\resources\static\upload\0deeac80-6071-45e7-a1f4-d0107173a077.jpg
  servlet:
    multipart:
      location: F:/JAVA/SpringBoot-MarkDown/src/main/resources/static
  web:
    resources:
      static-locations: classpath:static/, file:${spring.servlet.multipart.location}


mybatis:
  mapper-locations: classpath:/mappers/*.xml
  type-aliases-package: cn.laochou.markdown.pojo
  configuration:
    map-underscore-to-camel-case: true
SpringBoot 代码编写
项目会放在百度网盘里面,到时候大家自行下载阅读。这里也会展示,本项目为Demo,所以代码写的比较随意,没有做很多的校验,大家勿怪。
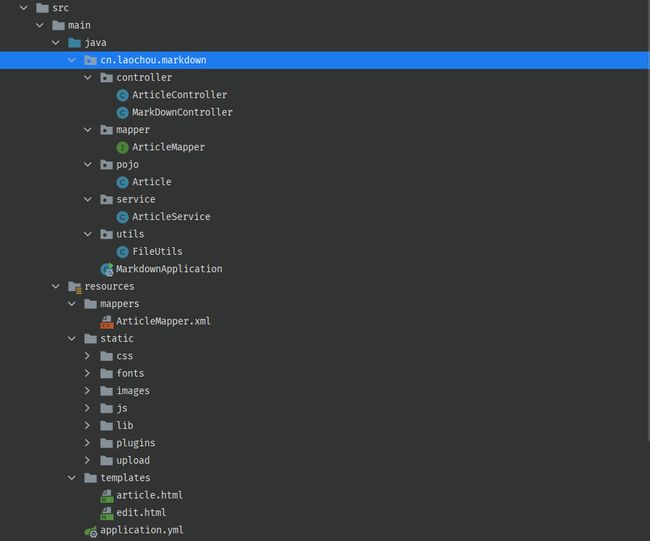
我们先看下代码结构吧
OK,我们先从我们的Article实体来讲
package cn.laochou.markdown.pojo;

public class Article {

    private int id;

    private String title;

    private String author;

    private String content;
    // 省去了 Get和Set方法。在这里个人建议还是使用原生的Get和Set。
}
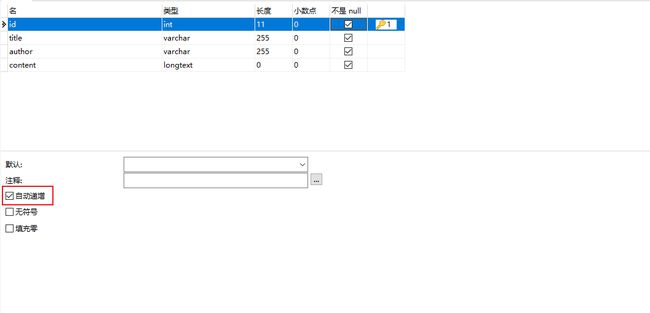
Ok,实体有了,那么数据库表如何设计的呢?
然后就看我们的Mapper吧。因为Mapper来操作数据库的,其实这里只有两个方法,一个是插入文章数据,一个便是根据Id获取文章数据。
package cn.laochou.markdown.mapper;

import cn.laochou.markdown.pojo.Article;
import org.apache.ibatis.annotations.Mapper;

@Mapper
public interface ArticleMapper {

    public int insertArticle(Article article);
    public Article getArticleById(int id);

}
Ok,ArticleMapper的接口大家看到了,因为我们采用的还是MyBatis,那么肯定是由ArticleMapper.xml。这就来:
insert into article (title, author, content) values(#{title}, #{author}, #{content});
接下来,就是我们的Service层了,其实也就是两个方法。没啥很大的区别
package cn.laochou.markdown.service;

import cn.laochou.markdown.mapper.ArticleMapper;
import cn.laochou.markdown.pojo.Article;
import org.springframework.beans.factory.annotation.Autowired;
import org.springframework.stereotype.Service;

@Service
public class ArticleService {


    private final ArticleMapper articleMapper;

    @Autowired
    public ArticleService(ArticleMapper articleMapper) {
        this.articleMapper = articleMapper;
    }

    public boolean publishArticle(Article article) {
        int res = articleMapper.insertArticle(article);
        if(res > 0) {
            return true;
        }
        return false;
    }


    public Article getArticleById(int id) {
        return articleMapper.getArticleById(id);
    }

}
最后就是我们的Controller层了,因为Controller层会用到一个工具类FileUtil,所以先展示我们的FileUtils
package cn.laochou.markdown.utils;

import org.springframework.web.multipart.MultipartFile;

import java.io.File;
import java.io.IOException;
import java.util.UUID;

/**
 * 文件上传工具类
 */
public class FileUtils {

    // static目录下的upload目录可自己建,也可不建。因为在上传的时候,会判断是否存在,若不存在便自动创建
    private static final String prePath = System.getProperty("user.dir") + "/src/main/resources/static/upload/";

    /**
     * 上传文件
     * @param file
     * @return 返回文件路径(以相对路径放回)
     */
    public static String uploadFile(MultipartFile file) {
        if(file.isEmpty()) {
            return "";
        }
        // 获取原文件名
        String originFileName = file.getOriginalFilename();
        // 我们通过UUID 来重新重组文件名
        String uid = UUID.randomUUID().toString();
        assert originFileName != null;
        String suffix = originFileName.substring(originFileName.lastIndexOf('.') + 1);
        String path = prePath + uid + "." + suffix;
        String returnPath = "/upload/" + uid + "." + suffix;
        File newFile = new File(path);
        if(newFile.getParentFile() != null && !newFile.getParentFile().exists()) {
            System.out.println("创建目录ing");
            // 上面的 newFile.getParentFile() 已经保证了不为null.
            if(newFile.getParentFile().mkdirs()) {
                System.out.println("创建目录成功");
            }else {
                System.out.println("创建目录失败");
                return "";
            }
        }
        try {
            file.transferTo(newFile);
        } catch (IOException e) {
            e.printStackTrace();
            return "";
        }
        return returnPath;
    }

}
ArticleController:
package cn.laochou.markdown.controller;

import cn.laochou.markdown.pojo.Article;
import cn.laochou.markdown.service.ArticleService;
import cn.laochou.markdown.utils.FileUtils;
import com.alibaba.fastjson.JSONObject;
import org.springframework.beans.factory.annotation.Autowired;
import org.springframework.stereotype.Controller;
import org.springframework.web.bind.annotation.PathVariable;
import org.springframework.web.bind.annotation.RequestMapping;
import org.springframework.web.bind.annotation.RequestParam;
import org.springframework.web.bind.annotation.ResponseBody;
import org.springframework.web.multipart.MultipartFile;
import org.springframework.web.servlet.ModelAndView;

@Controller
@RequestMapping("/article")
public class ArticleController {


    private final ArticleService articleService;

    @Autowired
    public ArticleController(ArticleService articleService) {
        this.articleService = articleService;
    }

    @RequestMapping("/publish")
    @ResponseBody
    public String publishArticle(Article article) {
        boolean res = articleService.publishArticle(article);
        if(res) {
            return "success";
        }
        return "false";
    }


    @RequestMapping("/image/upload")
    @ResponseBody
    // 注意RequestParam中的name,不可改。
    public JSONObject imageUpload(@RequestParam("editormd-image-file") MultipartFile image) {
        JSONObject jsonObject = new JSONObject();
        if(image != null) {
            String path = FileUtils.uploadFile(image);
            System.out.println(path);
            jsonObject.put("url", path);
            jsonObject.put("success", 1);
            jsonObject.put("message", "upload success!");
            return jsonObject;
        }
        jsonObject.put("success", 0);
        jsonObject.put("message", "upload error!");
        return jsonObject;
    }


    @RequestMapping("/get/{id}")
    public ModelAndView getArticleById(@PathVariable(name = "id")int id) {
        ModelAndView modelAndView = new ModelAndView();
        Article article = articleService.getArticleById(id);
        modelAndView.setViewName("article");
        if(article == null) {
            modelAndView.addObject("article", new Article());
        }
        modelAndView.addObject("article", article);
        return modelAndView;
    }

}
MarkDownController:
package cn.laochou.markdown.controller;

import org.springframework.stereotype.Controller;
import org.springframework.web.bind.annotation.RequestMapping;

@Controller
@RequestMapping("/markdown")
public class MarkDownController {

    // 这个接口,主要是进行跳转页面的。
    @RequestMapping("/edit")
    public String edit() {
        return "edit";
    }

}
前端页面
因为本人是后端研发,所以前端这边,花的时间挺久的,同样也挺丑的。哈哈哈,大家见谅。
首先就是我们的一个静态资源。
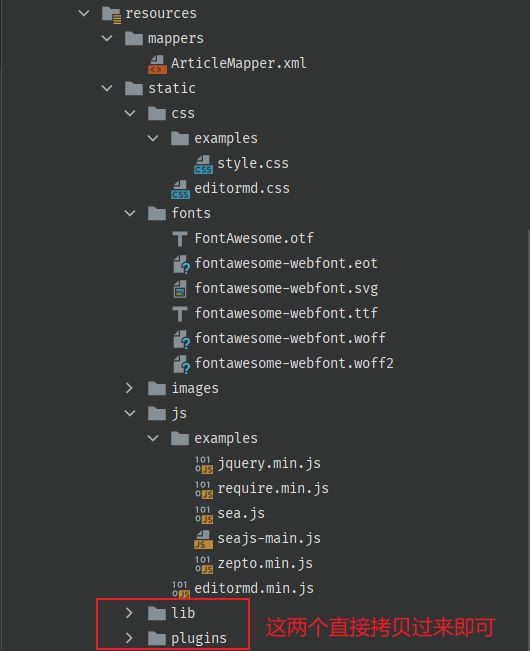
- css : 我们需要将我们下载好的editormd解压后editor.md-master文件夹中的examples目录中的css文件夹中的style.css 拷贝到我们的 static/css/examples/style.css,以及editor.md-master文件夹下的 editormd.css 拷贝到我们的 static/css目录。以上的目录放在哪里,可以根据自己的个性以及想法,但是一定得保证访问的到,你如果觉得有问题,就跟我同样的目录。
- js : 我们需要将我们下载好的editormd解压后editor.md-master文件夹中的examples目录中的js文件夹中的所有js文件 拷贝到我们的 static/css/examples/目录下,以及editor.md-master文件夹下的 editormd.min.js 拷贝到我们的 static/js目录。
- fonts : 这个目录很重要,如果没有这个目录,Markdown的编辑工具栏的icon无法显示。需要将editor.md-master文件夹中的fonts文件夹直接拷贝到static文件夹中。
- lib : 将editor.md-master文件夹中的lib文件拷贝到static文件夹中即可。
- plugins : 将editor.md-master文件夹中的plugin文件拷贝到static文件夹中即可。
接下来就是我们的 HTML文件了
edit.html :
Simple example - Editor.md examples
Simple example
article.html :
文章
// 一个JS文件都不能少,少一个便无法渲染。注意静态资源路径问题
网盘文件
链接:https://pan.baidu.com/s/1eJh-_dnfANQosJqnPCiHUw
提取码:fm15
点解链接前往 提取码:fm15
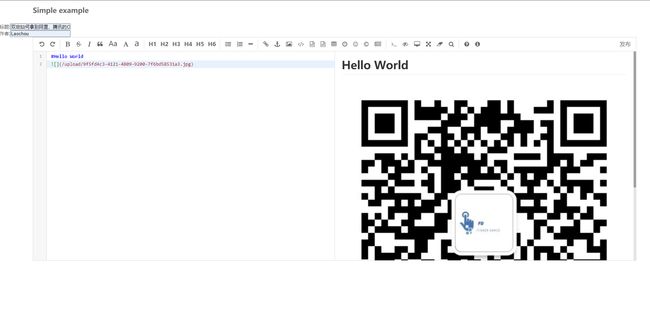
效果截图
点击发布之后,可以看到数据库多了一条数据

然后通过接口访问
最后
以上就是今天的分享了。创作不易,还望点赞支持。
也欢迎大家关注FingerDance,我们在这里谈天说地,一起耍。