es入门(中)
目录
6.Java api 实现es中的文档管理(增删改)
6.1 java 客户端简单获取数据
6.2结合spring-boot测试文档查询
配置环境
配置类
测试代码结构
简单的查询
对查询的请求设置参数
异步查询
6.4 结合spring-boot测试文档新增
6.5结合spring-boot测试文档局部修改
6.6结合spring-boot测试文档删除
6.7结合spring-boot测试文档bulk(批量操作)
7.文档存储机制
7.1数据路由
7.1.1文档存储如何路由到相应分片?
7.1.2路由算法
7.1.3手动指定 routing number
7.1.4主分片数量不可变
7.2文档的增删改内部机制
7.3文档的查询内部机制
7.4bulk api奇特的json格式
8.Mapping映射入门(重点)
8.1什么是mapping映射
8.2精确匹配与全文搜索的对比分析
8.2.1 exact value 精确匹配
8.2.2 full text 全文检索(关键词检索)
8.3全文检索下倒排索引核心原理快速揭秘
8.4分词器 analyzer(了解)
8.4.1什么是分词器 analyzer
8.4.2es内置分词器的介绍
8.5query string根据字段分词策略
8.5.1query string分词
8.5.2测试分词器_analyze
8.6 mapping回顾总结
8.7 mapping的核心数据类型以及dynamic mapping
8.7.1 核心的数据类型
8.7.2 动态映射推测规则
8.7.3 查看mapping
8.8 手动管理mapping
8.8.1查询所有索引的映射
8.8.2 创建映射(重点):包含keyword,text,date,数值类型
8.8.3修改映射
8.8.4删除映射
6.Java api 实现es中的文档管理(增删改)
6.1 java 客户端简单获取数据
java api 文档:Overview | Java REST Client [7.10] | Elastic https://www.elastic.co/guide/en/elasticsearch/client/java-rest/7.10/java-rest-overview.html
low :偏向底层。
high:高级封装。足够。 一般这个封装后的就可以满足我们的需求。
1、导包:
    org.elasticsearch.client
    elasticsearch-rest-high-level-client
    7.3.0


            org.elasticsearch
            elasticsearch


    org.elasticsearch
    elasticsearch
    7.3.0
如果出现下面的图片的这种情况:原因可能是
网络问题导致下载的依赖是残缺的,就是在本地仓库中的文件中可以看见这个依赖包的文件,但是没有具体的jar包,需要把这些文件给删除,然后重新下载依赖。注意maven的镜像环境是否配置。

2、代码步骤
使用java操作es的步骤:
①获取连接客户端
②构建请求
③执行
④获取结果
/**
 * @author LJM
 * @create 2022/12/8
 */
public class TestES {
    public static void main(String[] args) throws IOException {
        //获取连接客户端  获取连接参数还可以使用另外两种方式:在配置文件中获取,或者是在数据库中配置然后读取数据库中的配置
        RestHighLevelClient client = new RestHighLevelClient(
                RestClient.builder(
                        new HttpHost("localhost", 9200, "http")));
        //构建请求 这个请求是建立在 book索引存在的情况下  这里可以自己用代码进行一次判断,没有book索引那么我们就先创建book索引
        GetRequest getRequest = new GetRequest("book", "1");
        // 执行  获取返回的结果
        GetResponse getResponse = client.get(getRequest, RequestOptions.DEFAULT);
        // 获取结果
        if (getResponse.isExists()) {
            long version = getResponse.getVersion();
            String sourceAsString = getResponse.getSourceAsString();//检索文档(String形式)
            System.out.println(sourceAsString);
        }
    }
}
控制台的输出结果:
![]()
6.2结合spring-boot测试文档查询
配置环境
把创建连接交由spring容器,避免每次请求的网络开销。
1、导包
            org.springframework.boot
            spring-boot-starter
            2.0.6.RELEASE


            org.springframework.boot
            spring-boot-starter-test
            test
            2.0.6.RELEASE
2、配置 application.yml
spring:
  application:
    name: service-search
heima:
  elasticsearch:
    hostlist: 127.0.0.1:9200 #多个结点中间用逗号分隔
3、主类代码
@SpringBootApplication
public class SearchApplication {
    public static void main(String[] args) {
        SpringApplication.run(SearchApplication.class,args);
    }
}
配置类
配置类:下面这种写法是考虑到可能会配置多个节点,如果配置文件只是配了一个节点,那么可以不用这么复杂。
package com.learn.es.cofig;

import org.apache.http.HttpHost;
import org.elasticsearch.client.RestClient;
import org.elasticsearch.client.RestHighLevelClient;
import org.springframework.beans.factory.annotation.Value;
import org.springframework.context.annotation.Bean;
import org.springframework.context.annotation.Configuration;

/**
 * @author LJM
 * @create 2022/12/10
 */
@Configuration
public class ElasticSearchConfig {

    @Value("${heima.elasticsearch.hostlist}")
    private String hostList;

    @Bean(destroyMethod = "close") //表示连接使用完成后需要关闭
    public RestHighLevelClient restHighLevelClient(){
        String[] split = hostList.split(",");
        //这种写法是考虑到可能会配置多个es节点
        HttpHost[] httpHosts = new HttpHost[split.length];
        for (int i = 0; i < split.length; i++) {
            String item = split[i];
            httpHosts[i] = new HttpHost(item.split(":")[0],Integer.parseInt(item.split(":")[1]),"http");
        }

        return new RestHighLevelClient(RestClient.builder(httpHosts));
    }

}
测试代码结构

简单的查询
package com.learn.es;

import org.elasticsearch.action.get.GetRequest;
import org.elasticsearch.action.get.GetResponse;
import org.elasticsearch.client.RequestOptions;
import org.elasticsearch.client.RestHighLevelClient;
import org.junit.Test;
import org.junit.runner.RunWith;
import org.springframework.beans.factory.annotation.Autowired;
import org.springframework.boot.test.context.SpringBootTest;
import org.springframework.test.context.junit4.SpringRunner;

import java.io.IOException;

/**
 * @author LJM
 * @create 2022/12/10
 */
//如果这里不指定启动类,那么这个测试类的位置必须要在主启动类对应的包的子包下(测试类的包结构要与java中的包结构一致)
@SpringBootTest(classes = SearchApplication.class)
@RunWith(SpringRunner.class)
public class TestDocument {

    @Autowired
    RestHighLevelClient client;

    @Test
    public  void testGetData() throws IOException {
        //1 构建请求
        GetRequest getRequest = new GetRequest("book","1");

        //2 执行请求
        GetResponse response = client.get(getRequest, RequestOptions.DEFAULT);

        //3 获取结构
        System.out.println(response.getId());
        System.out.println(response.getVersion());
        System.out.println(response.getSourceAsString());

    }
}
对查询的请求设置参数
/**
 * @author LJM
 * @create 2022/12/10
 */
//如果这里不指定启动类,那么这个测试类的位置必须要在主启动类对应的包的子包下(测试类的包结构要与java中的包结构一致)
@SpringBootTest(classes = SearchApplication.class)
@RunWith(SpringRunner.class)
public class TestDocument {

    @Autowired
    RestHighLevelClient client;

    @Test
    public  void testGetData() throws IOException {
        //1 构建请求
        GetRequest getRequest = new GetRequest("book","1");

        //可以对构建请求的时候 设置一些可选参数
        String[] includes = new String[]{"name", "price"}; //想要的字段
        String[] excludes = Strings.EMPTY_ARRAY; //不想要的字段 这里是表示不要空的字段
        //FetchSourceContext获取我们想要的字段  不查询source的全部字段
        FetchSourceContext fetchSourceContext = new FetchSourceContext(true, includes, excludes);
        getRequest.fetchSourceContext(fetchSourceContext);

        //2 执行请求  这个是同步查询
        GetResponse response = client.get(getRequest, RequestOptions.DEFAULT);

        //3 获取结构
        if (response.isExists()){
            System.out.println(response.getId());
            System.out.println(response.getVersion());
            Map source = response.getSourceAsMap();
            System.out.println(source.get("name"));
            System.out.println(source.get("price"));
        }else {
            System.out.println("没有数据存在");
        }
    }
} 
异步查询
//异步获取数据
@Test
public void testSynchronousGetData() throws IOException {
//1 构建请求
GetRequest getRequest = new GetRequest("book","1");
//可以对构建请求的时候 设置一些可选参数
String[] includes = new String[]{"name", "price"}; //想要的字段
String[] excludes = Strings.EMPTY_ARRAY; //不想要的字段
//FetchSourceContext获取我们想要的字段 不查询source的全部字段
FetchSourceContext fetchSourceContext = new FetchSourceContext(true, includes, excludes);
getRequest.fetchSourceContext(fetchSourceContext);
//2 异步执行请求
//异步查询
ActionListener listener = new ActionListener() {
//查询成功时的立马执行的方法
@Override
public void onResponse(GetResponse response) {
//3 获取结构
if (response.isExists()){
System.out.println(response.getId());
System.out.println(response.getVersion());
Map source = response.getSourceAsMap();
System.out.println(source.get("name"));
System.out.println(source.get("price"));
}else {
System.out.println("没有数据存在");
}
}
//查询失败时的立马执行的方法
@Override
public void onFailure(Exception e) {
e.printStackTrace();
}
};
client.getAsync(getRequest, RequestOptions.DEFAULT, listener);
//这里使用多线程进行睡眠 是因为我们测试的客户端连接是执行完就会关闭的 我们让它睡5秒之后再关闭
try {
Thread.sleep(5000);
} catch (InterruptedException e) {
e.printStackTrace();
}
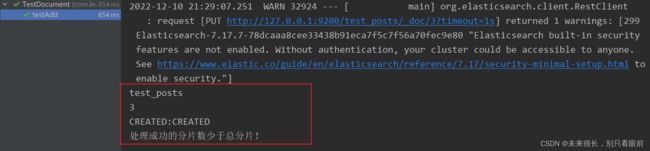
} 6.4 结合spring-boot测试文档新增
rest api:
PUT test_post/_doc/2
{
  "user":"tomas",
  "postDate":"2019-07-18",
  "message":"trying out es1"
}
代码:
//测试新增
@Test
public void testAdd() throws IOException {
    //1构建请求
    IndexRequest request = new IndexRequest("test_posts");
    request.id("3");
    //构建请求体
    //=======================构建文档数据============================
    //构建方法1  使用JSON串的方式来进行构建
    //        String jsonString="{\n" +
    //                "  \"user\":\"tomas J\",\n" +
    //                "  \"postDate\":\"2019-07-18\",\n" +
    //                "  \"message\":\"trying out es3\"\n" +
    //                "}";
    //        request.source(jsonString, XContentType.JSON);


    //        构建方法2  使用map构建 (推荐这个方法)
    Map jsonMap=new HashMap<>();
    jsonMap.put("user", "tomas");
    jsonMap.put("postDate", "2019-07-18");
    jsonMap.put("message", "trying out es2");
    request.source(jsonMap);

    //        构建方法3
    //        XContentBuilder builder= XContentFactory.jsonBuilder();
    //        builder.startObject();
    //        {
    //            builder.field("user", "tomas");
    //            builder.timeField("postDate", new Date());
    //            builder.field("message", "trying out es2");
    //        }
    //        builder.endObject();
    //        request.source(builder);


    //========================可选参数===================================
    //设置超时时间
    request.timeout(TimeValue.timeValueSeconds(1));
    //request.timeout("1s");

    //自己维护版本号  不能与es中的版本冲突 否则会报错
    //request.version(2);
    //request.versionType(VersionType.EXTERNAL);


    //2执行
    //同步执行
    IndexResponse indexResponse = client.index(request, RequestOptions.DEFAULT);
    //异步执行
    //        ActionListener listener=new ActionListener() {
    //            @Override
    //            public void onResponse(IndexResponse indexResponse) {
    //
    //            }
    //
    //            @Override
    //            public void onFailure(Exception e) {
    //
    //            }
    //        };
    //        client.indexAsync(request,RequestOptions.DEFAULT, listener );
    //        try {
    //            Thread.sleep(5000);
    //        } catch (InterruptedException e) {
    //            e.printStackTrace();
    //        }


    //3获取结果
    System.out.println(indexResponse.getIndex());
    System.out.println(indexResponse.getId());

    //获取插入的类型
    if(indexResponse.getResult()== DocWriteResponse.Result.CREATED){
        DocWriteResponse.Result result=indexResponse.getResult();
        System.out.println("CREATED:"+result);
    }else if(indexResponse.getResult()== DocWriteResponse.Result.UPDATED){
        DocWriteResponse.Result result=indexResponse.getResult();
        System.out.println("UPDATED:"+result);
    }

    ReplicationResponse.ShardInfo shardInfo = indexResponse.getShardInfo();
    if(shardInfo.getTotal()!=shardInfo.getSuccessful()){
        System.out.println("处理成功的分片数少于总分片!");
    }
    if(shardInfo.getFailed()>0){
        for (ReplicationResponse.ShardInfo.Failure failure:shardInfo.getFailures()) {
            String reason = failure.reason();//处理潜在的失败原因
            System.out.println(reason);
        }
    }
}
6.5结合spring-boot测试文档局部修改
rest api:
先查询一下  GET /book/_doc/3

post book/_doc/3/_update
{
   "doc": {
    "name":"测试修改1"
   }
}
通过java代码实现:
//测试修改
@Test
public void testUpdate() throws IOException {
    //1构建更新请求
    UpdateRequest request = new UpdateRequest("book", "3");
    Map jsonMap = new HashMap<>();
    jsonMap.put("name", "tomas JJ");
    request.doc(jsonMap);

    //===============================可选参数==========================================
    request.timeout(TimeValue.timeValueSeconds(1)); //设置超时时间

    //重试次数
    request.retryOnConflict(3);

    //设置在继续更新之前,必须激活的分片数
    //request.waitForActiveShards(2);
    //所有分片都是active状态,才更新
    //request.waitForActiveShards(ActiveShardCount.ALL);

    //2执行请求
    //同步执行
    UpdateResponse updateResponse = client.update(request, RequestOptions.DEFAULT);
    //或者是异步执行

    //3获取结果数据
    updateResponse.getId();
    updateResponse.getIndex();

    //判断结果
    if (updateResponse.getResult() == DocWriteResponse.Result.CREATED) {
        DocWriteResponse.Result result = updateResponse.getResult();
        System.out.println("CREATED:" + result);
    } else if (updateResponse.getResult() == DocWriteResponse.Result.UPDATED) {
        DocWriteResponse.Result result = updateResponse.getResult();
        System.out.println("UPDATED:" + result);
    }else if(updateResponse.getResult() == DocWriteResponse.Result.DELETED){
        DocWriteResponse.Result result = updateResponse.getResult();
        System.out.println("DELETED:" + result);
    }else if (updateResponse.getResult() == DocWriteResponse.Result.NOOP){
        //没有操作
        DocWriteResponse.Result result = updateResponse.getResult();
        System.out.println("NOOP:" + result);
    }
}
6.6结合spring-boot测试文档删除
rest api:
DELETE /test_posts/_doc/3代码:
 @Test
public void testDelete() throws IOException {
    //1构建请求
    DeleteRequest request =new DeleteRequest("book","3");
    //可选参数

    //2执行
    DeleteResponse deleteResponse = client.delete(request, RequestOptions.DEFAULT);

    //3获取数据
    deleteResponse.getId();
    deleteResponse.getIndex();

    //获取的执行结果
    DocWriteResponse.Result result = deleteResponse.getResult();
    System.out.println(result);
}
6.7结合spring-boot测试文档bulk(批量操作)
rest api:
POST /_bulk
{"action": {"metadata"}}
{"data"}
代码:
//批量测试
@Test
public void testBulk() throws IOException {
    //1创建请求
    BulkRequest request = new BulkRequest();
    //request.add(new IndexRequest("book").id("1").source(XContentType.JSON, "field", "1"));
    //request.add(new IndexRequest("book").id("2").source(XContentType.JSON, "field", "2"));

    request.add(new UpdateRequest("book","5").doc(XContentType.JSON, "field", "3"));
    request.add(new DeleteRequest("book").id("3"));

    //2执行
    BulkResponse bulkResponse = client.bulk(request, RequestOptions.DEFAULT);

    for (BulkItemResponse itemResponse : bulkResponse) {
        DocWriteResponse itemResponseResponse = itemResponse.getResponse();

        switch (itemResponse.getOpType()) {
            case INDEX:
            case CREATE:
                IndexResponse indexResponse = (IndexResponse) itemResponseResponse;
                indexResponse.getId();
                System.out.println(indexResponse.getResult());
                break;
            case UPDATE:
                UpdateResponse updateResponse = (UpdateResponse) itemResponseResponse;
                updateResponse.getIndex();
                System.out.println(updateResponse.getResult());
                break;
            case DELETE:
                DeleteResponse deleteResponse = (DeleteResponse) itemResponseResponse;
                System.out.println(deleteResponse.getResult());
                break;
        }
    }
}
封装的批量操作的方法: 注意每次批量操作的数据不要太大,否则会占用过多的网络资源,一般是几千条就行了,最多是10兆的数据。
批量新增文档数据:
@Autowired
RestHighLevelClient client; //在配置类中配置好的连接对象
private void createIndex(List> list){
    try {
        if (list.size() > 0){
            BulkRequest request = new BulkRequest();
            //把标准目录卡片中的数据导入es中
            for (int i = 0;i map = list.get(i);
                //这里不能直接对获取到的map对象进行修改,必须要创建一个新的map对象来把数据存储进去  否则会报集合修改错误
                HashMap res = new HashMap<>();
                //这个文档有什么字段就在这里把字段存到map中 ...
                res.put("id",map.get("id").toString());
                res.put("name",map.get("name").toString())==null?"":map.get("name").toString());
                request.timeout(TimeValue.timeValueMinutes(5)).add(new IndexRequest("索引名称").id(res.get("id").toString()).source(res));
            }

            BulkResponse bulkResponse = client.bulk(request, RequestOptions.DEFAULT);
        }
    }catch (Exception e){
        e.printStackTrace();
    }finally {
        //可以执行一下释放资源的操作
    }
}
批量更新文档信息:
@Autowired
RestHighLevelClient client; //在配置类中配置好的连接对象
private void updateIndex(List> list){
    try {
        if (list.size() > 0){
            BulkRequest request = new BulkRequest();
            //把标准目录卡片中的数据导入es中
            for (int i = 0;i map = list.get(i);
                //这里不能直接对获取到的map对象进行修改,必须要创建一个新的map对象来把数据存储进去  否则会报集合修改错误
                HashMap res = new HashMap<>();
                //要更新的数据字段  并且把新数据存储进来
                res.put("id",map.get("id").toString());
                res.put("name",map.get("name").toString())==null?"":map.get("name").toString());
                request.timeout(TimeValue.timeValueMinutes(5)).add(new UpdateRequest("索引名称",res.get("id").toString()).doc(res));
            }

            BulkResponse bulkResponse = client.bulk(request, RequestOptions.DEFAULT);
        }
    }catch (Exception e){
        e.printStackTrace();
    }finally {
        //可以执行一下释放资源的操作
    }
}
批量删除文档信息:
@Autowired
RestHighLevelClient client; //在配置类中配置好的连接对象
/**
     * 删除es中指定的数据
     * @param ids 文档的id标识集合
     */
public void deleteIndexDoc(List ids){
    if(ids.size()>0){
        BulkRequest request = new BulkRequest();
        //删除
        for(String id:ids){
            request.timeout(TimeValue.timeValueMinutes(5)).add(new DeleteRequest("索引名称",id));
        }
        try {
            client.bulk(request, RequestOptions.DEFAULT);
        } catch (Exception e) {
            e.printStackTrace();
        }finally {
            //可以执行一下释放资源的操作
        }
    }
}
7.文档存储机制
7.1数据路由
7.1.1文档存储如何路由到相应分片?
一个文档,最终会落在主分片的一个分片上,那么数据到底应该在哪一个分片呢?这个过程就是 【数据路由】。
7.1.2路由算法
shard = hash(routing) % number_of_primary_shards哈希值对主分片数取模。
举例:
对一个文档经行crud时,都会带一个路由值 routing number。默认为文档_id(可能是手动指定,也可能是自动生成)。
假设存储一个文档,经过哈希计算,假设计算出来的哈希值为2,此索引有3个主分片,那么计算2%3=2,就算出此文档在P2分片上。
决定一个document在哪个shard上,最重要的一个值就是routing值,默认是_id,也可以手动指定,相同的routing值,每次过来,从hash函数中,产出的hash值一定是相同的
无论hash值是几,无论是什么数字,对number_of_primary_shards求余数,结果一定是在0~number_of_primary_shards-1之间这个范围内的。
7.1.3手动指定 routing number
PUT /test_index/_doc/15?routing=num
{
  "num": 0,
  "tags": []
}场景:在程序中,架构师可以手动指定已有数据的一个属性为路由值,好处是可以定制一类文档数据存储到一个分片中。缺点是设计不好,会造成数据倾斜。
所以,不建议手动指定 routing number否则容易导致数据倾斜。不同文档尽量放到不同的索引中,剩下的事情交给es集群自己处理。
7.1.4主分片数量不可变
因为涉及到以往数据的查询搜索,如果此时主分片数发生变化,会导致数据路由的时候找不到我们想要的数据,从而间接的导致数据丢失,所以一旦建立索引,主分片数不可变。
与路由算法有关系:shard = hash(routing) % number_of_primary_shards
7.2文档的增删改内部机制
增删改可以看做update,都是对数据的改动。一个改动请求发送到es集群,经历以下四个步骤:
(1)客户端选择一个node发送请求过去,这个node就是coordinating node(协调节点)
(2)coordinating node,对document进行路由,将请求转发给对应的node(有primary shard)
(3)实际的node上的primary shard处理请求,然后将数据同步到replica node。
(4)coordinating node,如果发现primary node和所有replica node都搞定之后,才会返回响应结果给客户端。
7.3文档的查询内部机制
1、客户端发送请求到任意一个node,成为coordinate node(协调节点)
2、coordinate node对document进行路由,将请求转发到对应的node,此时会使用round-robin随机轮询算法,在primary shard以及其所有replica中随机选择一个,让读请求负载均衡(轮询的方式可以减轻主分片的压力,因为主分片增删改查都可以,但是副分片只能查询,所以把后续的查询请求分发到副分片是可以减轻主分片的压力的)
3、接收请求的node返回document给coordinate node(协调节点)
4、coordinate node(协调节点)返回document给客户端
5、特殊情况:document如果还在建立索引过程中,可能只有primary shard有,任何一个replica shard都没有,此时可能会导致无法读取到document,但是document完成索引建立之后,primary shard和replica shard就都有了。(这种概率非常小)
7.4bulk api奇特的json格式
POST /_bulk
{"action": {"meta"}}\n
{"data"}\n
{"action": {"meta"}}\n
{"data"}\n

[
    {
        "action":{
            "method":"create"
        },
        "data":{
            "id":1,
            "field1":"java",
            "field1":"spring",
        }
    },
      {
        "action":{
            "method":"create"
        },
        "data":{
            "id":2,
            "field1":"java",
            "field1":"spring",
        }
    }
]
1、bulk中的每个操作都可能要转发到不同的node的shard去执行
2、如果采用比较良好的json数组格式
允许任意的换行,整个可读性非常棒,读起来很爽,es拿到那种标准格式的json串以后,要按照下述流程去进行处理
(1)将json数组解析为JSONArray对象,这个时候,整个数据,就会在内存中出现一份一模一样的拷贝,一份数据是json文本,一份数据是JSONArray对象
(2)解析json数组里的每个json,对每个请求中的document进行路由
(3)为路由到同一个shard上的多个请求,创建一个请求数组。100请求中有10个是到P1.
(4)将这个请求数组序列化
(5)将序列化后的请求数组发送到对应的节点上去
3、耗费更多内存,更多的jvm gc开销
我们之前提到过bulk size最佳大小的那个问题,一般建议说在几千条那样,然后大小在10MB左右,所以说,可怕的事情来了。假设说现在100个bulk请求发送到了一个节点上去,然后每个请求是10MB,100个请求,就是1000MB = 1GB,然后每个请求的json都copy一份为jsonarray对象,此时内存中的占用就会翻倍,就会占用2GB的内存,甚至还不止。因为弄成jsonarray之后,还可能会多搞一些其他的数据结构,2GB+的内存占用。
占用更多的内存可能就会积压其他请求的内存使用量,比如说最重要的搜索请求,分析请求,等等,此时就可能会导致其他请求的性能急速下降。
另外的话,占用内存更多,就会导致java虚拟机的垃圾回收次数更多,跟频繁,每次要回收的垃圾对象更多,耗费的时间更多,导致es的java虚拟机停止工作线程的时间更多。
4、现在的奇特格式
POST /_bulk
{ "delete": { "_index": "test_index",  "_id": "5" }} \n
{ "create": { "_index": "test_index",  "_id": "14" }}\n
{ "test_field": "test14" }\n
{ "update": { "_index": "test_index",  "_id": "2"} }\n
{ "doc" : {"test_field" : "bulk test"} }\n
(1)不用将其转换为json对象,不会出现内存中的相同数据的拷贝,直接按照换行符切割json
(2)对每两个一组的json,读取meta,进行document路由
(3)直接将对应的json发送到node上去
5、最大的优势在于,不需要将json数组解析为一个JSONArray对象,形成一份大数据的拷贝,浪费内存空间,尽可能地保证性能。
8.Mapping映射入门(重点)
8.1什么是mapping映射
概念:自动或手动为index中的_doc建立的一种数据结构和相关配置,简称为mapping映射。
插入几条数据,让es自动为我们建立一个索引:
PUT /website/_doc/1
{
  "post_date": "2019-01-01",
  "title": "my first article",
  "content": "this is my first article in this website",
  "author_id": 11400
}

PUT /website/_doc/2
{
  "post_date": "2019-01-02",
  "title": "my second article",
  "content": "this is my second article in this website",
  "author_id": 11400
}

PUT /website/_doc/3
{
  "post_date": "2019-01-03",
  "title": "my third article",
  "content": "this is my third article in this website",
  "author_id": 11400
}对比数据库建表语句:我们可以发现在数据库中创建表的时候是需要为表中的字段指定其数据格式的,这个为字段指定具体的数据格式就是一个映射的创建过程。
create table website(
     post_date date,
     title varchar(50),
     content varchar(100),
     author_id int(11)
 );
动态映射:dynamic mapping,自动为我们建立index,以及对应的mapping,mapping中包含了每个field对应的数据类型,以及如何分词等设置。
查询文档中字段的映射关系  type为字段类型
GET  /website/_mapping/
{
  "website" : {
    "mappings" : {
      "properties" : {
        "author_id" : {
          "type" : "long"
        },
        "content" : {
          "type" : "text",
          "fields" : {
            "keyword" : {
              "type" : "keyword",
              "ignore_above" : 256
            }
          }
        },
        "post_date" : {
          "type" : "date"
        },
        "title" : {
          "type" : "text",
          "fields" : {
            "keyword" : {
              "  " : "keyword",
              "ignore_above" : 256
            }
          }
        }
      }
    }
  }
}
尝试各种搜索:
GET /website/_search
GET /website/_search?q=2019        0条结果     q表示的是query的意思     在所有的字段中进行搜索
GET /website/_search?q=2019-01-01           1条结果  在所有的字段中进行搜索
GET /website/_search?q=post_date:2019-01-01     1条结果  在指定的字段进行搜索
GET /website/_search?q=post_date:2019          0 条结果  在指定的字段进行搜索
搜索结果为什么不一致,因为es自动建立mapping的时候,设置了不同的field不同的data type。不同的data type的分词、搜索等行为是不一样的。所以出现了_all field和post_date field的搜索表现完全不一样。
8.2精确匹配与全文搜索的对比分析
8.2.1 exact value 精确匹配
2019-01-01,exact value,搜索的时候,必须输入2019-01-01,才能搜索出来 必须输入这个字段的完整值才能把数据查询出来(相当于SQL语句中的 = 符号)
如果你输入一个01,是搜索不出来的
select * from book where name = 'java'
8.2.2 full text 全文检索(关键词检索)
搜“笔记电脑”,笔记本电脑词条会不会出现。
select * from book where name like '%java%'
(1)缩写 vs. 全称:cn vs. china
(2)格式转化:like liked likes
(3)大小写:Tom vs tom
(4)同义词:like vs love
2019-01-01,2019 01 01,搜索2019,或者01,都可以搜索出来
china,搜索cn,也可以将china搜索出来
likes,搜索like,也可以将likes搜索出来
Tom,搜索tom,也可以将Tom搜索出来
like,搜索love,同义词,也可以将like搜索出来
就不是说单纯的只是匹配完整的一个值,而是可以对值进行拆分词语后(分词)进行匹配,也可以通过缩写、时态、大小写、同义词等进行匹配。深入 NPL,自然语义处理。
8.3全文检索下倒排索引核心原理快速揭秘
doc1:I really liked my small dogs, and I think my mom also liked them.
doc2:He never liked any dogs, so I hope that my mom will not expect me to liked him.
分词,初步的倒排索引的建立:
| term | doc1 | doc2 |
|---|---|---|
| I | * | * |
| really | * | |
| liked | * | * |
| my | * | * |
| small | * | |
| dogs | * | |
| and | * | |
| think | * | |
| mom | * | * |
| also | * | |
| them | * | |
| He | * | |
| never | * | |
| any | * | |
| so | * | |
| hope | * | |
| that | * | |
| will | * | |
| not | * | |
| expect | * | |
| me | * | |
| to | * | |
| him | * |
演示了一下倒排索引最简单的建立的一个过程:
搜索
搜索 mother like little dog,不可能有任何结果,因为我们的分词表中没有下面的分词数据,但是分词表中有 lieked,dogs,mom。所以我们是希望可以查询出数据来的,因为在我们人类看来,like和liked是一样的,dog和dogs也是一样的,mom和mother也是一样的。
mother like little dog分词后:
mother
like
little
dog
这不是我们想要的结果。同义词mom\mother在我们人类看来是一样。所以我们想要对其进行标准化操作。
理解重建倒排索引
normalization正规化,建立倒排索引的时候,会执行一个操作,会对拆分出的各个单词进行相应的处理,以提升后面搜索的时候能够搜索到相关联的文档的概率,比如
时态的转换,单复数的转换,同义词的转换,大小写的转换等处理
mom ―> mother
liked ―> like
small ―> little
dogs ―> dog
重新建立倒排索引,加入normalization,再次用mother liked little dog搜索,就可以搜索到了
| word | doc1 | doc2 | normalization |
|---|---|---|---|
| I | * | * | |
| really | * | ||
| like | * | * | liked ―> like |
| my | * | * | |
| little | * | small ―> little | |
| dog | * | dogs ―> dog | |
| and | * | ||
| think | * | ||
| mother | * | * | mom ―> mother |
| also | * | ||
| them | * | ||
| He | * | ||
| never | * | ||
| any | * | ||
| so | * | ||
| hope | * | ||
| that | * | ||
| will | * | ||
| not | * | ||
| expect | * | ||
| me | * | ||
| to | * | ||
| him | * |
重新搜索
搜索:mother liked little dog
对搜索条件经行分词 normalization
mother
liked -》like
little
dog
所以最后doc1和doc2都会被搜索出来。
8.4分词器 analyzer(了解)
8.4.1什么是分词器 analyzer
作用:切分词语,normalization(提升recall召回率)
给你一段句子,然后将这段句子拆分成一个一个的单个的单词,同时对每个单词进行normalization(时态转换,单复数转换)
recall,召回率:搜索的时候,增加能够搜索到的结果的数量
analyzer 组成部分:
1、character filter:在一段文本进行分词之前,先进行预处理,比如说最常见的就是,过滤html标签(hello --> hello),& --> and(I&you --> I and you)
2、tokenizer:分词,hello you and me --> hello, you, and, me
3、token filter(标准化转化:大小写,单复数,语义话转换,时态等):lowercase,stop word,synonymom,dogs --> dog,liked --> like,Tom --> tom,a/the/an --> 干掉,mother --> mom,small --> little
stop word 停用词(去掉停用词,因为这些词对我们搜索的结果没有影响): 了 的 呢。
一个分词器将一段文本进行各种处理,最后处理好的结果才会被拿去建立倒排索引。
8.4.2es内置分词器的介绍
例句:Set the shape to semi-transparent by calling set_trans(5)
standard analyzer标准分词器:set, the, shape, to, semi, transparent, by, calling, set_trans, 5(默认的是standard)
simple analyzer简单分词器:set, the, shape, to, semi, transparent, by, calling, set, trans
whitespace analyzer:Set, the, shape, to, semi-transparent, by, calling, set_trans(5)
language analyzer(特定的语言的分词器,比如说,english,英语分词器):set, shape, semi, transpar, call, set_tran, 5
官方文档:
Analyzers | Elasticsearch Guide [7.4] | Elastichttps://www.elastic.co/guide/en/elasticsearch/reference/7.4/analysis-analyzers.html
8.5query string根据字段分词策略
8.5.1query string分词
query string必须以和index建立时相同的analyzer进行分词
query string对不同的映射采用不同的检索方式;
如: date:exact value 精确匹配
text: full text 全文检索
8.5.2测试分词器_analyze
GET /_analyze
{
  "analyzer": "standard",
  "text": "Text to analyze 80"
}
返回值:
{
  "tokens" : [
    {
      "token" : "text",
      "start_offset" : 0,
      "end_offset" : 4,
      "type" : "",
      "position" : 0
    },
    {
      "token" : "to",
      "start_offset" : 5,
      "end_offset" : 7,
      "type" : "",
      "position" : 1
    },
    {
      "token" : "analyze",
      "start_offset" : 8,
      "end_offset" : 15,
      "type" : "",
      "position" : 2
    },
    {
      "token" : "80",
      "start_offset" : 16,
      "end_offset" : 18,
      "type" : "",
      "position" : 3
    }
  ]
}
token 实际存储的term 关键字;
position 在此词条在原文本中的位置;
start_offset/end_offset字符在原始字符串中的位置;
8.6 mapping回顾总结
(1)往es里面直接插入数据,es会自动建立索引,同时建立对应的mapping。(dynamic mapping)
(2)mapping中就自动定义了每个field的数据类型
(3)不同的数据类型(比如说text和date),可能有的是exact value(精确匹配),有的是full text(全文检索)
(4)exact value,在建立倒排索引的时候,分词的时候,是将整个值一起作为一个关键词建立到倒排索引中的;full text,会经历各种各样的处理,分词,normaliztion(时态转换,同义词转换,大小写转换),才会建立到倒排索引中。
(5)同时,是exact value或者是full text类型的检索,在创建field(字段)的映射就决定好了,在一个搜索过来的时候,对exact value field或者是full text field进行搜索的行为也是不一样的,会跟建立倒排索引的行为保持一致;比如说exact value搜索的时候,就是直接按照整个值进行匹配,full text query string,也会进行分词和normalization再去倒排索引中去搜索
(6)可以用es的dynamic mapping,让其自动建立mapping,包括自动设置数据类型;也可以提前手动创建index和tmapping,自己对各个field进行设置,包括数据类型,包括索引行为,包括分词器,等。
8.7 mapping的核心数据类型以及dynamic mapping
8.7.1 核心的数据类型
string :text and keyword
byte,short,integer,long,float,double
boolean
date
详情见官网:Field datatypes | Elasticsearch Guide [7.3] | Elastichttps://www.elastic.co/guide/en/elasticsearch/reference/7.3/mapping-types.html
8.7.2 动态映射推测规则
true or false --> boolean
123 --> long
123.45 --> double
2019-01-01 --> date
"hello world" --> text/keywod
8.7.3 查看mapping
查看指定索引下中各个字段的映射规则:
GET /index/_mapping/
8.8 手动管理mapping
8.8.1查询所有索引的映射
GET /_mapping 获取es集群下所有字段的的映射规则。
查看指定索引下中各个字段的映射规则: GET /index/_mapping/
8.8.2 创建映射(重点):包含keyword,text,date,数值类型
创建索引后,应该立即手动创建映射
PUT book/_mapping
{
	"properties": {
           "name": {
                  "type": "text"
            },
           "description": {
              "type": "text",
              "analyzer":"english",
              "search_analyzer":"english"
           },
           "pic":{
             "type":"text",
             "index":false
           },
           "studymodel":{
             "type":"text"
           }
    }
}
Text文本类型可以设置一些参数
(1)analyzer
通过analyzer属性指定分词器。
上边指定了analyzer是指在索引和搜索都使用english,如果单独想定义搜索时使用的分词器则可以通过search_analyzer属性。
(2)index
index属性指定是否索引。
默认为index=true,即要进行索引,只有进行索引才可以从索引库搜索到。
但是也有一些内容不需要索引,比如:商品图片地址只被用来展示图片,不进行搜索图片,此时可以将index设置为false。
删除索引,重新创建映射,将pic的index设置为false,尝试根据pic去搜索,结果搜索不到数据。
(3)store
是否在source之外存储,每个文档索引后会在 ES中保存一份原始文档,存放在"source"中,一般情况下不需要设置store为true,因为在source中已经有一份原始文档了。
测试:
PUT book/_mapping
{
		"properties": {
           "name": {
                  "type": "text"
            },
           "description": {
              "type": "text",
              "analyzer":"english",
              "search_analyzer":"english"
           },
           "pic":{
             "type":"text",
             "index":false
           },
           "studymodel":{
             "type":"text"
           }
    }
}
插入测试文档:
PUT /book/_doc/1
{
  "name":"Bootstrap开发框架",
  "description":"Bootstrap是由Twitter推出的一个前台页面开发框架,在行业之中使用较为广泛。此开发框架包含了大量的CSS、JS程序代码,可以帮助开发者(尤其是不擅长页面开发的程序人员)轻松的实现一个不受浏览器限制的精美界面效果。",
  "pic":"group1/M00/00/01/wKhlQFqO4MmAOP53AAAcwDwm6SU490.jpg",
  "studymodel":"201002"
}
Get /book/_search?q=name:开发 (可以搜索到)
Get /book/_search?q=description:开发 (可以搜索到)
Get /book/_search?q=pic:group1/M00/00/01/wKhlQFqO4MmAOP53AAAcwDwm6SU490.jpg (搜索不到)
Get /book/_search?q=studymodel:201002 (可以搜索到)
通过测试发现:name和description都支持全文检索,pic不可作为查询条件。
keyword关键字字段
目前已经取代了"index": false(keyword字段不进行分词搜索)。
上边介绍的text文本字段在映射时要设置分词器,keyword字段为关键字字段,通常搜索keyword是按照【整体搜索】,所以创建keyword字段的索引时是不进行分词的,比如:邮政编码、手机号码、身份证等。
keyword字段通常用于过虑、排序、聚合等。
date日期类型
日期类型不用设置分词器。
通常日期类型的字段用于排序。
format:通过format设置日期格式
例子:
下边的设置允许date字段存储年月日时分秒、年月日及毫秒三种格式。
{
   "properties": {
         "timestamp": {
         "type":   "date",
         "format": "yyyy-MM-dd HH:mm:ss||yyyy-MM-dd"
        }
      }
}
插入测试文档:
Post book/doc/3

{

"name": "spring开发基础",

"description": "spring 在java领域非常流行,java程序员都在用。",

"studymodel": "201001",

 "pic":"group1/M00/00/01/wKhlQFqO4MmAOP53AAAcwDwm6SU490.jpg",

 "timestamp":"2018-07-04 18:28:58"

}
数值类型
1、尽量选择范围小的类型,提高搜索效率
2、对于浮点数尽量用比例因子,比如一个价格字段,单位为元,我们将比例因子设置为100这在ES中会按 分 存储,映射如下:
"price": {
        "type": "scaled_float",
        "scaling_factor": 100
  },
由于比例因子为100,如果我们输入的价格是23.45 则ES中会将23.45乘以100存储在ES中。
如果输入的价格是23.456,ES会将23.456乘以100再取一个接近原始值的数,得出2346。
使用比例因子的好处是整型比浮点型更易压缩,节省磁盘空间。
如果比例因子不适合,则从下表选择范围小的去用:
更新已有映射,并插入文档:插入成功后再get这个数据看一下
PUT book/doc/3
{
"name": "spring开发基础",
"description": "spring 在java领域非常流行,java程序员都在用。",
"studymodel": "201001",
 "pic":"group1/M00/00/01/wKhlQFqO4MmAOP53AAAcwDwm6SU490.jpg",
 "timestamp":"2018-07-04 18:28:58",
 "price":38.6
}
8.8.3修改映射
只能创建index时手动建立mapping,或者新增field mapping,但是【不能update field mapping】。
因为已有数据按照映射早已分词存储好。如果修改,那这些存量数据怎么办?
所以如果修改mapping,es是会报错的。
8.8.4删除映射
通过删除索引来删除映射。
delete index