软件测试/测试开发丨Pytest学习笔记
Pytest
格式要求
- 文件: 以
test_开头或以_test结尾 - 类: 以
Test开头 - 方法/函数: 以
_test开头 - 测试类中不可以添加构造函数, 若添加构造函数将导致Pytest无法识别类下的测试方法
断言
与Unittest不同, 在Pytest中我们需要使用python自带的 assert 关键字进行断言
assert <表达式>assert <表达式>, <"描述信息">
def test_demo1(x):
    assert x == 5

def test_demo2(x):
    assert x == 5, f"x当前的值为{x}"
前置与后置
- 全局模块级:
setup_module/teardown_module - 类级:
setup_class/teardown_class - 函数级:
setup_function/teardown_function - 方法级:
setup_method/teardown_method
我们可以通过一段代码来展示各个级别的作用域(对于执行结果做了一些并不改动结构的排版,以便观看)
def setup_module():
print("setup_module")
def teardown_module():
print("teardown_module")
def setup_function():
print("setup_function")
def teardown_function():
print("teardown_function")
def test_function1():
print("测试函数1")
def test_function2():
print("测试函数2")
class TestDemo1:
def setup_class(self):
print("setup_class")
def teardown_class(self):
print("setup_class")
def setup_method(self):
print("setup")
def teardwon_method(self):
print("teardwon")
def test_fun1(self):
print("测试方法1")
def test_fun2(self):
print("测试方法2")
class TestDemo2:
def setup_class(self):
print("setup_class")
def teardown_class(self):
print("setup_class")
def setup_method(self):
print("setup")
def teardown_method(self):
print("teardwon")
def test_fun3(self):
print("测试方法3")
# ============================= test session starts ==============================
# collecting ... collected 5 items
# test_sample.py::test_function1
# setup_module
# setup_function
# PASSED [ 20%]测试函数1
# teardown_function
# test_sample.py::test_function2
# setup_function
# PASSED [ 40%]测试函数2
# teardown_function
# test_sample.py::TestDemo1::test_fun1
# test_sample.py::TestDemo1::test_fun2
# test_sample.py::TestDemo2::test_fun3
# setup_class1
# setup_method1
# PASSED [ 60%]测试方法1
# teardown_method1
# setup_method1
# PASSED [ 80%]测试方法2
# teardown_method1
# teardown_class1
# Process finished with exit code 0
# setup_class2
# setup_method2
# PASSED [100%]测试方法3
# teardown_method2
# teardown_class2
# teardown_module
# ============================== 5 passed in 0.20s ===============================
通过上面简单的框架,我们可以轻易的发现。
- 在整个文件的执行过程中全局模块级作用于整个文件且仅执行一次,
setup_module在文件被执行时首先执行,teardown_module在文件内容全部执行完之后执行。 - 类级仅作用在他的所属类当中且仅伴随类执行一次,
setup_class在类被执行前首先执行,teardown_class在类执行完毕之后执行。 - 我们称每一个不被任何类包含的function为函数, 函数级作用在每一个类外函数前后,
setup_function在每一个类外函数被执行前首先执行,teardown_function在每一个类外函数执行结束之后执行。 - 我们称每一个包含在类内的function为方法, 方法级作用在每一个类内方法前后,
setup_method在每一个类内方法被执行前首先执行,teardown_method在每一个类内方法执行结束之后执行。
参数化
Pytest通过 pytest.mark.paramterize 装饰器帮助我们实现参数化
- 单参数
import pytest

expect_key = ["one", "two", "three"]
keys = ["one", "three", "four"]

@pytest.mark.parametrize("key", keys)
def test_search(key):
    assert key in expect_key
上述代码实现了对元素是否包含在列表中的测试, expect_key是一个存放期望数据的列表, 我们把待验证的数据都存放在列表 key 中并把列表传递给 pytest.mark.parametrize。注意传入 pytest.mark.parametrize 的第一个参数是我们测试函数/方法的参数名,并且注意是字符串类型, 传入的 pytest.mark.parametrize 第二个参数是一个列表即存放我们待验证数据的列表。执行测试函数/方法时 pytest.mark.parametrize 会自行把待验证数据列表中每一个元素传入测试函数/方法中执行。
- 多参数
import pytest

@pytest.mark.parametrize("username, password", [["username", "password"], ["username2", "password2"]])
def test_login(username, password):
    assert username == "username" and password == "password"
上述代码模拟了一个用户名和密码的验证, 原理与单参数相同。但要注意传入 pytest.mark.parametrize 的第一个参数需要将测试函数/方法的所有参数放到同一个字符串中再传入, 第二个是参数是以列表嵌套的形式传入所有的待验证数据。
- 为用例创建别名
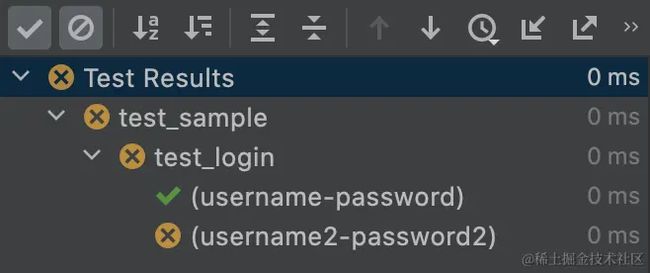
当我们在编译器中执行上述多参数所示的代码之后, 编译前会如何显示结果呢?
是的, 编译器会把每一次传入的数据作为case名, 看起来并不直观。当我们需要一个更直观的case名的时候我们可以做如下的操作进行优化。
import pytest

@pytest.mark.parametrize("username, password", [["username", "password"], ["username2", "password2"]], ids=["correct", "wrong"])
def test_login(username,password):
    assert username == "username" and password == "password"
我们为 pytest.mark.parametrize 加入了第三个参数,这会帮助我们给case命名
需要注意的是 ids 列表的长度需要与数据列表的长度相等, 多或少都会报错。意味着一旦命名就必须每一个case都拥有名字。
- 笛卡尔积形式参数化
我们在多参数过程中所有的参数都是被固定组合传入的, 那如果假设有两个序列, 我们希望两个序列中的元素分别组合进行测试我们要怎么做呢? 我们可以一起来通过代码看看如何实现参数的组合。
import pytest
list_a = [1, 2, 3]
list_b = [4, 5, 6]
@pytest.mark.parametrize("b", list_b, ids=["data_1", "data_2", "data_3"])
@pytest.mark.parametrize("a", list_a, ids=["data_4", "data_5", "data_6"])
def test_sum(a, b):
assert a + b >= 7
上述代码是在判断两个列表中各个元素之和是否大于等于7, 我们利用 pytest.mark.parametrize 的叠加做到了所有组合。
如此叠加 pytest.mark.parametrize 装饰器其实更像是内嵌循环, 在执行过程中优先执行离测试函数/方法最近的装饰器, 并携带数据去执行外侧装饰器, 当外侧数据全部执行完毕再返回内侧装饰器并重复上述步骤直至内外侧数据全部组合完毕。
针对上述代码来说程序会先将 list_a 中的 1 赋值给 a , 带着 a=1 去执行外侧的装饰器, 在外侧会将 list_b 中的 4 赋值给b, 此时 a=1, b=4 执行测试函数内部逻辑, 执行之后继续将 list_b 的下一个数据赋值给 b 并执行测试函数内部逻辑, 此时 a=1, b=5, 以此类推直到list_b所有值都已经赋值给过 b 时程序会回到内侧装饰器, 将 list_a 的下一个数据赋值给 a ,此流程直到各个参数均为对应数据组的最后一个数据被测试函数执行为止。
标记测试用例
当我们希望将符合某一特征的一部分用例打包执行时, 就可以考虑为这些用例标记标签。
@pytest.mark.valid
@pytest.mark.parametrize("x, y, expected", [[99, 99, 198], [-99, -99, -198]])
def test_valid_data(self, x, y, expected):
    assert x + y == expected

def test_demo():
    print("demo")
上面的代码中我们实现了两个测试函数其中之一验证两数字之和, 并通过 pytest.mark.valid 的方式将该用例打上 valid 的标签。另外一个case仅为了验证标签效果。此时我们只需要通过命令行 pytest -m "<标签>" 执行测试即可。
执行后发现我们并没有执行没有标记 valid 标签的用例, 并且可以发现输出的结果中是有警告的, 虽然并不影响结果但这样的显示并不友好。不必为此担心, 我们可以通过设置 pytest.ini 文件来让这个警告消失, 对于此文件的使用我们在本文靠后部分有详细使用方法。
跳过测试
当我们的case由于一些特殊的情况不希望被执行时我们可以选择利用pytest提供的一些装饰器跳过这些case。
- 利用
pytest.mark.skip直接粗暴的跳过整个case
import pytest

@pytest.mark.skip(reason="This case has been skipped")
def test_skip():
    print("down")
当然我们并不是在任何情况都会跳过case, 此时我们可以利用 pytest.mark.skipif 进行一些判断
import pytest
import sys

@pytest.mark.skipif(sys.platform == "darwin", reason="The execution system is Mac, we will skip this case")
def test_skip():
    print("down")
上述代码中的 sys.platform == "darwin" 是在判断是不是mac系统, 如果当前执行的执行代码的系统是mac那么 sys.platform == "darwin" 为 True 该case会被跳过, 反之case正常执行。
上述两种跳过方式都会直接跳过整个case, 其实我们有更灵活的方式进行跳过
- 利用
pytest.skip()实现在代码块中跳过
import sys

def test_skip():
    print("start")
    # some processes
    if sys.platform == "darwin":
        pytest.skip(reason="The execution system is Mac, we will skip the rest of this case")
    print("end")
常用命令行参数
--lf: 只重新运行故障--ff: 先运行故障再运行其余测试-x: 用例一旦失败(fail/error)就停止运行--maxfail=: 允许的最大失败数, 当失败数达到num时停止执行-m: 执行指定标签的用例-k: 执行包含某个关键字的用例-v: 打印详细日志-s: 打印代码中的输出--collect-only: 只收集用例,不运行--help: 帮助文档
fixture的用法
假设我们有5个case在执行前都需要登录操作, 那么我们可以借助 setup 来实现。但假如我们5个case中有3个需要登录剩下的并不需要登录我们应该怎么办呢?pytest为我们提供了解决办法
import pytest

@pytest.fixture()
def login(self):
    print("登录完成")

class TestDemo:
    def test_case1(self, login):
        print("case1")

    def test_case2(self, login):
        print("case2")
在上面的代码块中, 我们为login方法增加了一个 pytest.fixture 的装饰器, 当我们需要使用login方法作为某个case的前置条件时只需要将login的函数名当做参数传入case即可
同样fixture也会有作用域, 我们只需要为 pytest.fixture 设置 scope即可
- 函数级(默认方式): 每一个函数或者方法多会调用
- 类级(scope=“class”): 每一个测试类只运行一次
- 模块级(scope=“module”): 每一个.py文件只调用一次
- 包级(scope=“package”): 每一个python包只调用一次(暂不支持)
- 绘话级(scope=“session”): 每次会话只需要执行一次, 会话内所有方法及类, 模块都共享这个方法
import pytest

@pytest.fixture(scope="class")
def login():
    print("登录完成")

class TestDemo:
    def test_case1(self, login):
        print("case1")

def test_case2(self, login):
    print("case2")
pytest.fixture 其实也可以做到teardwon的功能, 但这需要 yield 的辅助
import pytest
@pytest.fixture(scope="class")
def login():
print("开始登录")
token = "this is a token"
yield token
print("登录已完成")
class TestDemo:
def test_case1(self, login):
print(login)
到了此处需要渐渐开始考虑第一个问题是被 pytest.fixture 装饰的方法如何被更好的共用呢?
我们可以设想一个场景, 我们有多个待测试模块, 执行这些模块下的case前都需要进行登录的操作, 我们是一定不会为每一个模块都写一遍登录方法的。我们会选择新增一个公共模块并将登录方法写入公共模块, 在需要时导入调用即可。是的这是一个可行的方法, 但有没有更简洁的方法呢? Pytest的框架中允许我们添加一个名为 conftext.py 的文件, 被写在这个文件中的方法可以免去导入的过程直接在各个模块下的case中调用
# ---- yaml中数据 -----
- 99
- 99
- 198

# ----- conftext.py -----

import pytest
import yaml

@pytest.fixture()
def get_data_yaml():
    print("开始测试")
    with open("data/data_add.yaml", "r") as f:
        yield yaml.safe_load(f)
    print("测试结束")

# ----- 待测函数 -----

class Calculator:
def add(self, a, b):
    if a > 99 or a < -99 or b > 99 or b < -99:
        print("请输入范围为【-99, 99】的整数或浮点数")
        return "参数大小超出范围"

    return a + b

# ----- 测试用例 -----
calculator = Calculator()

class TestAdd:
    def test_valid_data(self, get_data_yaml):
        assert calculator.add(int(get_data_yaml[0]), int(get_data_yaml[1])) == int(get_data_yaml[2])
pytest.ini
pytest.ini是pytest的配置文件, 可以修改pytest的默认行为
当我们在 pytest.ini 相关内容之后在测试函数/方法之中使用 logging 既可以在指定路径得到日志
@pytest.mark.parametrize("x, y, expected", [[99, 99, 198], [-99, -99, -198]])
def test_valid_data(self, x, y, expected):
    logging.info(f"有效等价类{x}, {y}")
    assert x + y == expected
通过pytest执行上述测试代码之后终端显示结果:
生成 ./log/test.log 日志内容:
- 添加标签, 防止运行过程报警告错误
是否还记得为用例添加标签的时候我们在终端中看到了警告? 此时我们就可以来结果这个警告了, 我们只需要在 pytest.ini 文件中添加 markers = <标签名> 即可
可以注意到图片中的例子, 当我们有多个标签需要添加时, 需要保证每一个标签各占一行。
Pytest插件
推荐可能会用到的插件:
- 分布式插件: pytest-xdist
在实际使用中我们可能希望Pytest可以为我们实现一些专属于当前项目的功能, 那么此时我们可以去自定义的开发Pytest插件实现我们的需求。Pytest为我们提供了很多有顺序但为实现具体功能的hook函数, 这些hook函数被穿插在每一次执行用例的过程中。因此我们可以通过实现这些hook函数的具体功能来进一步开发我们需要的插件。
那么我们就有必要来了解一下这些hook函数, 他们被定义在Pytest源码中的 hookspec.py 中
root
└── pytest_cmdline_main
├── pytest_plugin_registered
├── pytest_configure
│ └── pytest_plugin_registered
├── pytest_sessionstart
│ ├── pytest_plugin_registered
│ └── pytest_report_header
├── pytest_collection
│ ├── pytest_collectstart
│ ├── pytest_make_collect_report
│ │ ├── pytest_collect_file
│ │ │ └── pytest_pycollect_makemodule
│ │ └── pytest_pycollect_makeitem
│ │ └── pytest_generate_tests
│ │ └── pytest_make_parametrize_id
│ ├── pytest_collectreport
│ ├── pytest_itemcollected
│ ├── pytest_collection_modifyitems
│ └── pytest_collection_finish
│ └── pytest_report_collectionfinish
├── pytest_runtestloop
│ └── pytest_runtest_protocol
│ ├── pytest_runtest_logstart
│ ├── pytest_runtest_setup
│ │ └── pytest_fixture_setup
│ ├── pytest_runtest_makereport
│ ├── pytest_runtest_logreport
│ │ └── pytest_report_teststatus
│ ├── pytest_runtest_call
│ │ └── pytest_pyfunc_call
│ ├── pytest_runtest_teardown
│ │ └── pytest_fixture_post_finalizer
│ └── pytest_runtest_logfinish
├── pytest_sessionfinish
│ └── pytest_terminal_summary
└── pytest_unconfigure
当我们具体实现某些hook函数时, 我们只需要将这些hook函数的具体代码实现在项目根目录中的 conftest.py 中即可
# 以下代码实现了通过命令行决定解析数据文件的类型
import pytest
import yaml
import xlrd
import csv
import json
def pytest_addoption(parser: "Parser", pluginmanager: "PytestPluginManager") -> None:
mygroup = parser.getgroup(name="wangyun")
mygroup.addoption("--parse_data", default="yaml", help="Parsing different types of data files")
@pytest.fixture(scope="session")
def parse_data(request):
myenv = request.config.getoption("--parse_data", default="yaml")
if myenv == "yaml":
with open("data/data_add.yaml", "r") as f:
return yaml.safe_load(f)
elif myenv == "excel":
table = xlrd.open_workbook("data/data_add.xls").sheet_by_name(sheet_name='Sheet1')
data = [table.row_values(rowx=i, start_colx=0, end_colx=None) for i in range(table.nrows)]
return data
elif myenv == "csv":
with open("data/data_add.csv", "r") as f:
raw = csv.reader(f)
data = [line for line in raw]
return data
if myenv == "json":
with open("data/data_add.json", "r") as f:
raw = json.loads(f.read())
return list(raw.values())
最后感谢每一个认真阅读我文章的人,礼尚往来总是要有的,虽然不是什么很值钱的东西,如果你用得到的话可以直接拿走:
这些资料,对于【软件测试】的朋友来说应该是最全面最完整的备战仓库,这个仓库也陪伴上万个测试工程师们走过最艰难的路程,希望也能帮助到你!
![]()


