在微服务中如何实现全链路的金丝雀发布?
目录
1. 什么金丝雀发布?它有什么用?
2.如何实现全链路的金丝雀发布
2.1 负载均衡模块
2.2 网关模块
2.3 服务模块
2.3.1 注册为灰色服务实例
2.3.2 设置负载均衡器
2.3.3 传递灰度发布标签
2.4 其他代码
2.4.1 其他业务代码
2.4.2 pom.xml 关键代码
2.4.3 application.yml 相关代码
3. 验证全链路金丝雀发布的实现效果
1. 什么金丝雀发布?它有什么用?
金丝雀发布(Canary Release,也称为灰度发布)是指在软件或服务发布过程中,将新版本的功能或服务以较小的比例引入到生产环境中,仅向部分用户或节点提供新功能的一种发布策略。
而在传统的全量发布中,新版本将会立即部署到所有用户或节点上。金丝雀发布的核心思想是逐步推进,监测新版本的稳定性和性能,以确保在全面发布之前能够解决潜在的问题。
假设某款在线多人游戏决定上线一个全新的多人模式功能。在传统的全量发布中,它会将这个新功能立即部署到所有玩家的游戏客户端中,然后在全面发布后等待用户的反馈。而使用金丝雀发布,它的发布流程就变成了这样:
内测阶段:
- 游戏开发团队首先将新多人模式功能引入到游戏的内测版本中,但仅向少数特定的内测玩家提供。
- 这些内测玩家是经过筛选或自愿参与的,他们了解可能会遇到问题,并愿意分享反馈。
- 内测玩家可以在一定时间内使用新功能,并向开发团队报告问题、提供建议和反馈意见。
监测和改进:
- 游戏开发团队密切关注内测玩家的游戏体验、性能和稳定性。
- 如果在内测期间发现了问题,团队可以及时进行修复和改进,并确保新功能在全面发布前达到高质量标准。
逐步扩展:
- 在确认新功能在内测阶段表现良好后,开发团队逐步扩展金丝雀发布的范围。
- 他们可以将新功能提供给更多的玩家,但仍然限制在一小部分,比如10%的玩家。
- 这一阶段被称为金丝雀发布的初期阶段,新功能仅对一小部分用户可见。
全面发布:
- 在经过一系列逐步扩展和监测后,开发团队最终将新多人模式功能发布给了所有玩家。
- 此时,新功能已经通过了多轮测试和改进,用户体验较好,且潜在问题得到了解决。
从上述游戏上线新功能的金丝雀发布流程中能看出,金丝雀发布相比传统的全量发布有以下好处:
- 逐步引入新功能,降低全面发布的风险。
- 及时获取内测玩家的反馈,加速问题的修复。
- 确保新功能在全面发布时达到高质量标准。
- 提供更好的用户体验,减少潜在问题对所有用户的影响。
2.如何实现全链路的金丝雀发布
Spring Cloud 全链路金丝雀发布的实现思路图如下:
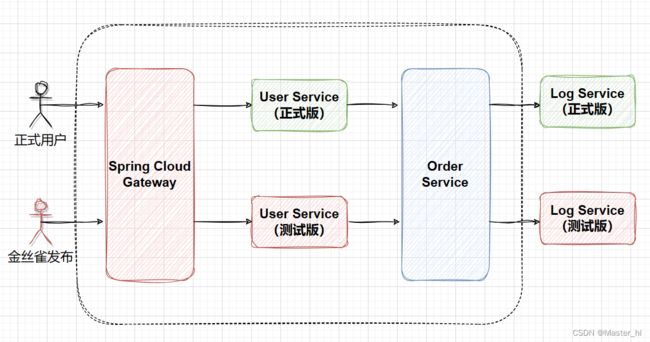
金丝雀发布的具体实现步骤大致分为以下几步:
- 前端程序在灰度测试的用户 Header 头中打上标签,例如在 Header 中添加 "gray-tag:true",表示要访问灰度服务,其他则为正式服务。(前端)
- 在负载均衡器 Spring Cloud LoadBalancer 中,拿到 Header 中的 "gray-tag" 进行判断,如果此标签不为空,并且等于 "true" 的话,则表示要访问灰度发布的服务,否则只访问正式的服务。(客户端负载均衡)
- 在网关 Spring Cloud Gateway 中,将 Header 标签 "gray-tag:true" 传递到下一个调用的服务。(网关)
- 后续的服务调用中,还需要做两件事:(内部服务)
- 在 Spring Cloud LoadBalancer 中,判断灰度发布标签,将请求分发给对应的服务。
- 在内部的服务调用过程中,传递灰度发布标签。
由此可见,全链路的灰色发布只需要解决两个大问题:
1. Gateway 中的问题
- Gateway 的调度转发问题。
- Gateway 灰色发布标签的传递问题。
2. 内部服务中的问题
- 服务的灰度转发问题。
- 服务内部灰色发布标签的传递问题。
【金丝雀发布代码案例】
根据 Spring Cloud 全链路金丝雀发布的实现思路图来编写代码,
创建 Spring 多模块项目,然后准备 7 个模块:user-service、new-user-service、order-service、log-service、new-log-service、gray-loadbalancer、gateway。
2.1 负载均衡模块
操作 gray-loadblancer 模块,这个模块作为一个公共模块,可以不需要启动类。
① 自定义负载均衡器
这里可以参考默认的轮询负载均衡策略里面的实现:
- 实现 ReactorServiceInstanceLoadBalancer 接口
- 复制其他代码,修改关键地方的类名
- 重写 getInstanceResponse 方法
import org.apache.commons.logging.Log;
import org.apache.commons.logging.LogFactory;
import org.springframework.beans.factory.ObjectProvider;
import org.springframework.cloud.client.ServiceInstance;
import org.springframework.cloud.client.loadbalancer.*;
import org.springframework.cloud.loadbalancer.core.*;
import org.springframework.http.HttpHeaders;
import reactor.core.publisher.Mono;
import java.util.List;
import java.util.Random;
import java.util.concurrent.atomic.AtomicInteger;

/**
 * 定义灰度发布的负载均衡算法
 */

public class GrayLoadBalancer implements ReactorServiceInstanceLoadBalancer {
    private static final Log log = LogFactory.getLog(GrayLoadBalancer.class);
    private final String serviceId;
    private AtomicInteger position;  // 下标
    private ObjectProvider serviceInstanceListSupplierProvider;

    public GrayLoadBalancer(ObjectProvider serviceInstanceListSupplierProvider, String serviceId) {
        this.serviceId = serviceId;
        this.serviceInstanceListSupplierProvider = serviceInstanceListSupplierProvider;
        this.position = new AtomicInteger(new Random().nextInt(1000));
    }

    public Mono> choose(Request request) {
        ServiceInstanceListSupplier supplier = (ServiceInstanceListSupplier)this.serviceInstanceListSupplierProvider.getIfAvailable(NoopServiceInstanceListSupplier::new);
        return supplier.get(request).next().map((serviceInstances) -> {
            return this.processInstanceResponse(supplier, serviceInstances,request);
        });
    }

    private Response processInstanceResponse(ServiceInstanceListSupplier supplier,
                                                              List serviceInstances,
                                                              Request request) {
        Response serviceInstanceResponse = this.getInstanceResponse(serviceInstances,request);
        if (supplier instanceof SelectedInstanceCallback && serviceInstanceResponse.hasServer()) {
            ((SelectedInstanceCallback)supplier).selectedServiceInstance((ServiceInstance)serviceInstanceResponse.getServer());
        }

        return serviceInstanceResponse;
    }

    private Response getInstanceResponse(List instances,Request request) {
        if (instances.isEmpty()) {
            if (log.isWarnEnabled()) {
                log.warn("No servers available for service: " + this.serviceId);
            }

            return new EmptyResponse();
        } else {
            // 灰度业务的实现

            // 0.得到 Request 对象 [通过方法参数的传递拿到此对象]

            // 1.从 Request 对象的 Header 中得到灰度标签
            RequestDataContext requestDataContext = (RequestDataContext) request.getContext();
            HttpHeaders headers = requestDataContext.getClientRequest().getHeaders();
            // 获取名为 "gray-tag" 的头部信息的值
            List headersList = headers.get(GlobalVariable.GRAY_TAGE);
            if (headersList != null && !headersList.isEmpty() &&
                    headersList.get(0).equals("true")) { // 灰度请求
                // 灰度列表
                List grayList = instances.stream().
                        filter(i -> i.getMetadata().get(GlobalVariable.GRAY_TAGE) != null &&
                                i.getMetadata().get(GlobalVariable.GRAY_TAGE).equals("true")).
                        toList();
                if(!grayList.isEmpty()) {
                    instances = grayList;
                }
            } else {  // 正式节点
                // 2.将实例进行进行分组 【生产服务列表|灰度服务列表】
                instances = instances.stream(). // 取反
                        filter(i -> i.getMetadata().get(GlobalVariable.GRAY_TAGE) == null ||
                                !i.getMetadata().get(GlobalVariable.GRAY_TAGE).equals("true")).
                        toList();
            }
            // 3.使用负载均衡算法选择上一步列表中的某个节点
            int pos = this.position.incrementAndGet() & Integer.MAX_VALUE;
            ServiceInstance instance = instances.get(pos % instances.size());
            return new DefaultResponse(instance);
        }
    }
}
/**
* 全局变量
*/
public class GlobalVariable {
public static final String GRAY_TAGE = "gray-tag";
}
② 封装负载均衡器
import org.springframework.cloud.client.ServiceInstance;
import org.springframework.cloud.loadbalancer.core.ReactorLoadBalancer;
import org.springframework.cloud.loadbalancer.core.ServiceInstanceListSupplier;
import org.springframework.cloud.loadbalancer.support.LoadBalancerClientFactory;
import org.springframework.context.annotation.Bean;
import org.springframework.core.env.Environment;

/**
 * 封装灰度发布负载均衡器
 */
public class GrayLoadBalancerConfig {
    @Bean
    public ReactorLoadBalancer grayLoadBalancer(Environment environment, LoadBalancerClientFactory loadBalancerClientFactory) {
        String name = environment.getProperty(LoadBalancerClientFactory.PROPERTY_NAME);
        // 灰度发布的负载均衡器
        return new GrayLoadBalancer(
                loadBalancerClientFactory.getLazyProvider(name,
                        ServiceInstanceListSupplier.class), name);
    }
}
2.2 网关模块
通过全局过滤器,来判断或设置灰度标识,
import com.loadbalancer.gray.GlobalVariable;
import org.springframework.cloud.gateway.filter.GatewayFilterChain;
import org.springframework.cloud.gateway.filter.GlobalFilter;
import org.springframework.http.server.reactive.ServerHttpRequest;
import org.springframework.http.server.reactive.ServerHttpResponse;
import org.springframework.stereotype.Component;
import org.springframework.web.server.ServerWebExchange;
import reactor.core.publisher.Mono;

@Component
public class LoadBalancerFilter implements GlobalFilter {

    @Override
    public Mono filter(ServerWebExchange exchange, GatewayFilterChain chain) {
        // 得到 request、response 对象
        ServerHttpRequest request = exchange.getRequest();
        ServerHttpResponse response = exchange.getResponse();

        // 判断灰度标签
        String tag = request.getQueryParams().getFirst(GlobalVariable.GRAY_TAGE);
        if(tag != null) {
            // 设置灰度标识
            response.getHeaders().set(GlobalVariable.GRAY_TAGE,"true");
        }
        // 此步骤正常,执行下一步
        return chain.filter(exchange);
    }
}
2.3 服务模块
2.3.1 注册为灰色服务实例
将测试版的服务,注册为灰色服务实例:new-user-service、new-log-service
spring:
  application:
    name: user-service-gray
  cloud:
    nacos:
      discovery:
        server-addr: localhost:8848
        username: nacos
        password: nacos
        metadata: {"gray-tag": "true"}  # 金丝雀标识
server:
  port: 0
2.3.2 设置负载均衡器
在服务启动类上设置负载均衡和开启 OpenFeign 服务:user-service、new-user-service、order-service。
import com.loadbalancer.gray.GrayLoadBalancerConfig;
import org.springframework.boot.SpringApplication;
import org.springframework.boot.autoconfigure.SpringBootApplication;
import org.springframework.cloud.loadbalancer.annotation.LoadBalancerClients;
import org.springframework.cloud.openfeign.EnableFeignClients;

@SpringBootApplication
@EnableFeignClients
@LoadBalancerClients(defaultConfiguration =
        GrayLoadBalancerConfig.class)
public class UserServiceApplication {

    public static void main(String[] args) {
        SpringApplication.run(UserServiceApplication.class, args);
    }

}
在网关模块中设置负载均衡,
import com.loadbalancer.gray.GrayLoadBalancerConfig;
import org.springframework.boot.SpringApplication;
import org.springframework.boot.autoconfigure.SpringBootApplication;
import org.springframework.cloud.loadbalancer.annotation.LoadBalancerClients;

@SpringBootApplication
@LoadBalancerClients(defaultConfiguration =
        GrayLoadBalancerConfig.class)
public class GatewayApplication {

    public static void main(String[] args) {
        SpringApplication.run(GatewayApplication.class, args);
    }

}
2.3.3 传递灰度发布标签
在服务内部传递灰度发布标签:user-service、new-user-service、order-service
方式一:传递request中所有的header,所有的header中就包含了灰度发布标签。
import feign.RequestInterceptor;
import feign.RequestTemplate;
import jakarta.servlet.http.HttpServletRequest;
import org.springframework.stereotype.Component;
import org.springframework.web.context.request.RequestContextHolder;
import org.springframework.web.context.request.ServletRequestAttributes;

import java.util.Enumeration;

@Component
public class FeignRequestInterceptor implements RequestInterceptor {
    @Override
    public void apply(RequestTemplate requestTemplate) {
        // 从 RequestContextHolder 中获取 HttpServletRequest
        ServletRequestAttributes attributes = (ServletRequestAttributes)
                RequestContextHolder.getRequestAttributes();
        HttpServletRequest request = attributes.getRequest();
        // 传递所有的 header,就包含了灰度发布标签
        Enumeration headerNames = request.getHeaderNames();
        while(headerNames.hasMoreElements()) {
            String key = headerNames.nextElement();
            String value = request.getHeader(key);
            requestTemplate.header(key,value);
        }
    }
} 方式二:只传递header中的灰度发布标签
import feign.RequestInterceptor;
import feign.RequestTemplate;
import jakarta.servlet.http.HttpServletRequest;
import org.springframework.stereotype.Component;
import org.springframework.web.context.request.RequestContextHolder;
import org.springframework.web.context.request.ServletRequestAttributes;

import java.util.Enumeration;
import java.util.LinkedHashMap;
import java.util.Map;

@Component
public class FeignRequestInterceptor implements RequestInterceptor {
    @Override
    public void apply(RequestTemplate requestTemplate) {
        // 从 RequestContextHolder 中获取 HttpServletRequest
        ServletRequestAttributes attributes = (ServletRequestAttributes)
                RequestContextHolder.getRequestAttributes();
        // 获取 RequestContextHolder 中的信息
        Map headers = getHeaders(attributes.getRequest());
        // 放入 openfeign 的 requestTemplate 中
        for(Map.Entry entry : headers.entrySet()) {
            requestTemplate.header(entry.getKey(), entry.getValue());
        }
    }
    /**
     * 获取原请求头
     */
    private Map getHeaders(HttpServletRequest request) {
        Map map = new LinkedHashMap<>();
        Enumeration enumeration = request.getHeaderNames();
        if(enumeration!=null) {
            while(enumeration.hasMoreElements()) {
                String key = enumeration.nextElement();
                String value = request.getHeader(key);
                map.put(key,value);
            }
        }
        return map;
    }
}
2.4 其他代码
2.4.1 其他业务代码
① user-service 模块的 controller
import com.example.userservice.service.OrderService;
import org.springframework.beans.factory.annotation.Autowired;
import org.springframework.web.bind.annotation.RequestMapping;
import org.springframework.web.bind.annotation.RestController;

@RestController
@RequestMapping("/user")
public class UserController {
    @Autowired
    private OrderService orderService;

    @RequestMapping("/getname")
    public String getName() {
        String result = orderService.getOrder();
        return "正式版:User Service getName." +
                result;
    }
}
② user-service 模块的 service
import org.springframework.cloud.openfeign.FeignClient;
import org.springframework.stereotype.Service;
import org.springframework.web.bind.annotation.RequestMapping;

@FeignClient("order-service-gray")
@Service
public interface OrderService {
    @RequestMapping("/order/getorder")
    public String getOrder();
}
③ new-user-service 模块的 controller
import com.example.newuserservice.service.OrderService;
import org.springframework.beans.factory.annotation.Autowired;
import org.springframework.web.bind.annotation.RequestMapping;
import org.springframework.web.bind.annotation.RestController;

@RestController
@RequestMapping("/user")
public class UserController {
    @Autowired
    private OrderService orderService;

    @RequestMapping("/getname")
    public String getName() {
        String result = orderService.getOrder();
        return "测试版:User Service getName." +
                result;
    }
}
④ new-user-service 模块的 service
import org.springframework.cloud.openfeign.FeignClient;
import org.springframework.stereotype.Service;
import org.springframework.web.bind.annotation.RequestMapping;

@FeignClient("order-service-gray")
@Service
public interface OrderService {
    @RequestMapping("/order/getorder")
    public String getOrder();
}
⑤ order-service 模块的 controller
import com.example.orderservice.service.LogService;
import org.springframework.beans.factory.annotation.Autowired;
import org.springframework.web.bind.annotation.RequestMapping;
import org.springframework.web.bind.annotation.RestController;

@RestController
@RequestMapping("/order")
public class OrderController {
    @Autowired
    private LogService logService;

    @RequestMapping("/getorder")
    public String getOrder() {
        String result = logService.getLog();
        return "Do OrderService getOrder Method." +
                result;
    }
}
⑥ order-service 模块的 service
import org.springframework.cloud.openfeign.FeignClient;
import org.springframework.stereotype.Service;
import org.springframework.web.bind.annotation.RequestMapping;

@Service
@FeignClient("log-service-gray")
public interface LogService {
    @RequestMapping("/log/getlog")
    public String getLog();
}
⑦ log-service 模块的 controller
import org.springframework.web.bind.annotation.RequestMapping;
import org.springframework.web.bind.annotation.RestController;

@RestController
@RequestMapping("/log")
public class LogController {
    @RequestMapping("/getlog")
    public String getLog() {
        return "正式版:Log Service getLog";
    }
}
⑧ new-log-service 模块的 controller
import org.springframework.web.bind.annotation.RequestMapping;
import org.springframework.web.bind.annotation.RestController;

@RestController
@RequestMapping("/log")
public class LogController {
    @RequestMapping("/getlog")
    public String getLog() {
        return "测试版:Log Service getLog";
    }
}
2.4.2 pom.xml 关键代码
① 父模块的 pom.xml
modules 中先加载服务调用链中靠后的服务,
pom


    gray-loadbalancer
    gateway
    new-log-service
    log-service
    order-service
    user-service
    new-user-service


        com.alibaba.cloud
        spring-cloud-starter-alibaba-nacos-discovery


        org.springframework.boot
        spring-boot-starter-test
        test


        com.example
        gray-loadbalancer
        0.0.1-SNAPSHOT
② user-service 模块的 pom.xml
    com.example
    gray-demo
    0.0.1-SNAPSHOT


        org.springframework.boot
        spring-boot-starter-web


        org.springframework.cloud
        spring-cloud-starter-openfeign
③ new-user-service 模块的 pom.xml
    com.example
    gray-demo
    0.0.1-SNAPSHOT


        org.springframework.boot
        spring-boot-starter-web


        org.springframework.cloud
        spring-cloud-starter-openfeign


        com.example
        gray-loadbalancer
        0.0.1-SNAPSHOT
③ order-service 模块的 pom.xml
    com.example
    gray-demo
    0.0.1-SNAPSHOT


        org.springframework.boot
        spring-boot-starter-web


        org.springframework.cloud
        spring-cloud-starter-openfeign


        com.example
        gray-loadbalancer
        0.0.1-SNAPSHOT
④ log-service 和 new-log-service 模块的 pom.xml
    com.example
    gray-demo
    0.0.1-SNAPSHOT


        org.springframework.boot
        spring-boot-starter-web
⑤ gray-loadbalancer 模块的 pom.xml
    com.example
    gray-demo
    0.0.1-SNAPSHOT


        org.springframework.cloud
        spring-cloud-starter-loadbalancer


        org.springframework.boot
        spring-boot-starter-web
⑥ gateway 模块的 pom.xml
    com.example
    gray-demo
    0.0.1-SNAPSHOT


        org.springframework.cloud
        spring-cloud-starter-gateway


        com.example
        gray-loadbalancer
        0.0.1-SNAPSHOT
2.4.3 application.yml 相关代码
① user-service 模块的 application.yml
spring:
  application:
    name: user-service-gray
  cloud:
    nacos:
      discovery:
        server-addr: localhost:8848
        username: nacos
        password: nacos
server:
  port: 0
② new-user-servicce 模块的 application.yml
spring:
  application:
    name: user-service-gray
  cloud:
    nacos:
      discovery:
        server-addr: localhost:8848
        username: nacos
        password: nacos
        metadata: {"gray-tag": "true"}  # 金丝雀标识
server:
  port: 0
③ order-servicce 模块的 application.yml
spring:
  application:
    name: order-service-gray
  cloud:
    nacos:
      discovery:
        server-addr: localhost:8848
        username: nacos
        password: nacos
server:
  port: 0
④ log-servicce 模块的 application.yml
spring:
  application:
    name: log-service-gray
  cloud:
    nacos:
      discovery:
        server-addr: localhost:8848
        username: nacos
        password: nacos
server:
  port: 0
⑤ new-log-servicce 模块的 application.yml
spring:
  application:
    name: log-service-gray
  cloud:
    nacos:
      discovery:
        server-addr: localhost:8848
        username: nacos
        password: nacos
        metadata: {"gray-tag": "true"}  # 金丝雀标识
server:
  port: 0
⑥ gateway 模块的 application.yml
spring:
  main:
    web-application-type: reactive  # Spring Web 和 reactive web 冲突
  application:
    name: gateway-gray
  cloud:
    nacos:
      discovery:
        server-addr: localhost:8848
        username: nacos
        password: nacos
        register-enabled: false  # 网关不需要注册到 nacos
    gateway:
      routes:
        - id: user-service
          uri: lb://user-service-gray
          predicates:
            - Path=/user/**
server:
  port: 10086
3. 验证全链路金丝雀发布的实现效果
按顺序启动 log、order、user 的正式及测试服务,以及 gateway 模块,
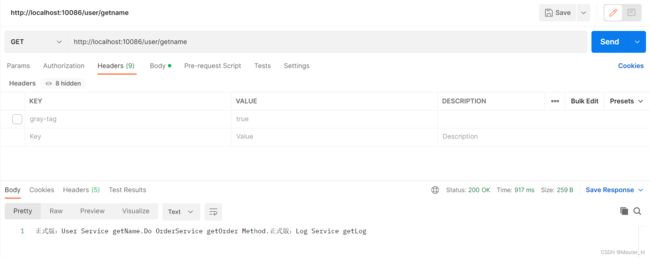
使用 Postman 来验证全链路金丝雀发布的实现效果:
1. 请求头中不带 "gray-tag" 灰度标签,访问正式版服务
验证结果:无论访问多少次,不管是否服务集群,只要请求头中不带 "gray-tag" 灰度标签,只能访问到正式版的服务。
2. 请求头中带上 "gray-tag" 灰度标签,并且值为 true,访问测试版服务

验证结果:无论访问多少次,不管是否服务集群,只要请求头中带上 "gray-tag" 灰度标签,并且值为 true ,就只能访问到测试版的服务。
至此,微服务中全链路的金丝雀发布就实现好了~