springCloud详解
springCloud详解
- 简介
- 五大核心组件
- 1.服务注册中心(eureka)
-
- 简介
-
- 1.创建一个eureka服务端项目
- 2.启动用户服务
- 3.启动调用者服务
- eureka集群
- eureka单机设置密码
- 客户端带密码注册
- 2.负载均衡
-
- Ribbon
-
- 1.写配置类设置
- 2.通过注解在启动类中标明
- 3.在application.yml文件中配置
- feign
-
- 概述
- 使用
- 3.Hystrix
-
- 概述
-
- 概念介绍
- 使用feign实现降级(feign-hystrix模块)
- 4.zuul
-
- 步骤
- 如何访问
-
- 给服务起别名
-
- 方式一
- 方式二
- 网关添加过滤器
-
- 测试前置通知和后置通知的执行顺序
- 校验必传参数参数
- 动态路由
- 请求路径存在变量问题
- 5.配置中心(springcloud config)
-
- 准备
- 步骤
-
- 新建一个配置中心服务端
- 客户端
- 路径搜索
- 独立仓库配置
简介
Spring Cloud是一个服务治理平台,是若干个框架的集合,提供了全套的分布式系统解决方案。它的目标是简化分布式系统基础设施的开发,包含了众多功能模块,让开发者能够快速构建和部署分布式系统。
五大核心组件
1.服务注册中心
允许服务在启动时注册自己的信息,并通过服务注册中心发现其他服务的位置,实现服务之间的通信。
2.负载均衡
在多个服务实例之间均衡地分发请求,提高系统性能和可靠性。
3.熔断降级
在微服务架构中,由于服务之间的调用可能会出现故障或超时,为了防止故障在系统间蔓延,断路器模式可以在服务出现故障时进行熔断,保护整个系统
4.路由网关
实现智能路由功能,根据条件将请求路由到不同的服务实例。
5.配置中心
通过配置中心集中管理配置信息,实现动态调整分布式系统的配置,避免了重启服务的麻烦,使得分布式系统中的配置可以在不重启服务的情况下进行动态调整。
1.服务注册中心(eureka)
简介
Spring Cloud Eureka是Spring Cloud Netflix项目下的服务治理模块。Eureka集群是去中心化方式的集群,集群中保证了只要有一个服务存活,就可以提供服务,这种方式无法保证数据的一致性。
    它主要由两个部分组成:

    服务端:主要是提供服务注册中心,可集群部署。

    客户端:向服务注册中心注册自身服务,进行心跳交互,从服务端获取注册列表,从而消费注册列表中的存活服务。
下面通过代码示例来更好的理解。
首先创建一个maven项目,作为父工程,不需要导入任何依赖
pom如下
<?xml version="1.0" encoding="UTF-8"?>
<project xmlns="http://maven.apache.org/POM/4.0.0"
         xmlns:xsi="http://www.w3.org/2001/XMLSchema-instance"
         xsi:schemaLocation="http://maven.apache.org/POM/4.0.0 http://maven.apache.org/xsd/maven-4.0.0.xsd">
    <modelVersion>4.0.0</modelVersion>

    <groupId>org.example</groupId>
    <artifactId>springCloud</artifactId>
    <packaging>pom</packaging>
    <version>1.0-SNAPSHOT</version>

</project>
然后在父工程下新一个子工程

该服务用来查询用户信息
pom如下
<?xml version="1.0" encoding="UTF-8"?>
<project xmlns="http://maven.apache.org/POM/4.0.0"
         xmlns:xsi="http://www.w3.org/2001/XMLSchema-instance"
         xsi:schemaLocation="http://maven.apache.org/POM/4.0.0 http://maven.apache.org/xsd/maven-4.0.0.xsd">
    <parent>
        <groupId>org.springframework.boot</groupId>
        <artifactId>spring-boot-starter-parent</artifactId>
        <version>2.3.5.RELEASE</version>
    </parent>
    <modelVersion>4.0.0</modelVersion>

    <artifactId>user-service</artifactId>

    <dependencies>
        <dependency>
            <groupId>org.springframework.boot</groupId>
            <artifactId>spring-boot-starter-web</artifactId>
            <version>2.3.5.RELEASE</version>
        </dependency>

        <dependency>
            <groupId>mysql</groupId>
            <artifactId>mysql-connector-java</artifactId>
            <version>8.0.29</version>
        </dependency>

        <dependency>
            <groupId>com.baomidou</groupId>
            <artifactId>mybatis-plus-boot-starter</artifactId>
            <version>3.5.3</version>
        </dependency>

        <dependency>
            <groupId>org.projectlombok</groupId>
            <artifactId>lombok</artifactId>
            <version>1.18.24</version>
        </dependency>

    </dependencies>

</project>
刚开始先不加入eureka的依赖
写个用户接口
package com.test.user.controller;

import com.test.user.entity.User;
import com.test.user.service.UserService;
import org.springframework.beans.factory.annotation.Autowired;
import org.springframework.http.MediaType;
import org.springframework.web.bind.annotation.GetMapping;
import org.springframework.web.bind.annotation.PathVariable;
import org.springframework.web.bind.annotation.RequestMapping;
import org.springframework.web.bind.annotation.RestController;

import java.awt.*;

/**
 * @author清梦
 * @site www.xiaomage.com
 * @company xxx公司
 * @create 2023-11-05 19:41
 */
@RestController
@RequestMapping("user")
public class UserController {

    @Autowired
    private UserService userService;

    @GetMapping(value = "getUserById/{id}",produces = MediaType.APPLICATION_JSON_VALUE)
    public User getUserById(@PathVariable Integer id){
        return userService.getUserById(id);
    }
}
那么当我们启动项目,并在页面请求时,可以看到数据。
那么如果有另一个项目需要调用这个接口该怎么办呢。
下面创建第二个子项目,用来调用user接口
pom文件
<?xml version="1.0" encoding="UTF-8"?>
<project xmlns="http://maven.apache.org/POM/4.0.0"
         xmlns:xsi="http://www.w3.org/2001/XMLSchema-instance"
         xsi:schemaLocation="http://maven.apache.org/POM/4.0.0 http://maven.apache.org/xsd/maven-4.0.0.xsd">
    <parent>
        <groupId>org.springframework.boot</groupId>
        <artifactId>spring-boot-starter-parent</artifactId>
        <version>2.3.5.RELEASE</version>
    </parent>
    <modelVersion>4.0.0</modelVersion>

    <artifactId>consumer-service</artifactId>

    <dependencies>
        <dependency>
            <groupId>org.springframework.boot</groupId>
            <artifactId>spring-boot-starter-web</artifactId>
        </dependency>

        <dependency>
            <groupId>org.projectlombok</groupId>
            <artifactId>lombok</artifactId>
        </dependency>

    </dependencies>
</project>
然后在启动类中注入远程调用的bean
@SpringBootApplication
public class ConsumerService {

    public static void main(String[] args) {
        SpringApplication.run(ConsumerService.class,args);
    }

    @Bean
    RestTemplate restTemplate(){
        return new RestTemplate();
    }
}
然后写一个调用user的接口
package com.test.consumer.api;

import com.netflix.hystrix.contrib.javanica.annotation.HystrixCommand;
import com.test.consumer.client.UserClient;
import com.test.consumer.dto.User;
import org.springframework.beans.factory.annotation.Autowired;
import org.springframework.http.MediaType;
import org.springframework.http.ResponseEntity;
import org.springframework.web.bind.annotation.GetMapping;
import org.springframework.web.bind.annotation.RequestMapping;
import org.springframework.web.bind.annotation.RestController;
import org.springframework.web.client.RestTemplate;

/**
 * @author清梦
 * @site www.xiaomage.com
 * @company xxx公司
 * @create 2023-11-05 20:17
 */
@RestController
@RequestMapping("user")
public class UserController {

    @Autowired
    private RestTemplate restTemplate;

    /**
     * 调用user-service服务的getUserById接口(模块间的通信)
     * 未注册到eureka时,使用restTemplate调用,需要写明ip和接口路径
     * 注意:写明ip和端口时,RestTemplate上面不能加@LoadBalanced,因为他会将localhost当做服务名称去eureka上进行匹配
     * @param id
     * @return
     */
    @GetMapping(value = "getUserById",produces = MediaType.APPLICATION_JSON_VALUE)
    public User getUser(Integer id){
        User user = restTemplate.getForObject("http://localhost:7091/user/getUserById/" + id, User.class);
        user.setUsername("999" +user.getUsername());
        return user;
    }
}
启动user服务后,再启动这个调用者服务,
在浏览器输入请求地址

调用成功!
如果关闭了user服务再去调用,那就会失败。所以为了提高服务的可用性,我们通常会启动多个user服务,搭建一个集群,这样其中一台出问题,可以调用其他服务。
注意:调用服务的ip和端口都是写死的,怎么让他判断服务可用,且有问题后去切换其他服务呢,此时就需要eureka。
创建一个eureka服务端,让所有的user服务都注册到eureka服务端
步骤
1.创建一个eureka服务端项目
pom文件
<?xml version="1.0" encoding="UTF-8"?>
<project xmlns="http://maven.apache.org/POM/4.0.0"
         xmlns:xsi="http://www.w3.org/2001/XMLSchema-instance"
         xsi:schemaLocation="http://maven.apache.org/POM/4.0.0 http://maven.apache.org/xsd/maven-4.0.0.xsd">
    <modelVersion>4.0.0</modelVersion>

    <artifactId>eureka-server01</artifactId>

    <parent>
        <groupId>org.springframework.boot</groupId>
        <artifactId>spring-boot-starter-parent</artifactId>
        <version>2.3.5.RELEASE</version>
    </parent>
    <dependencies>
        <dependency>
            <groupId>org.springframework.cloud</groupId>
            <artifactId>spring-cloud-starter-netflix-eureka-server</artifactId>
            <version>2.2.3.RELEASE</version>
        </dependency>
    </dependencies>
</project>
启动类加上注解@EnableEurekaServer
package com.test.eureka;

import org.springframework.boot.SpringApplication;
import org.springframework.boot.autoconfigure.SpringBootApplication;
import org.springframework.cloud.netflix.eureka.server.EnableEurekaServer;

/**
 * @author清梦
 * @site www.xiaomage.com
 * @company xxx公司
 * @create 2023-11-05 20:27
 */
@SpringBootApplication
@EnableEurekaServer
public class EurekaService01 {
    public static void main(String[] args) {
        SpringApplication.run(EurekaService01.class,args);
    }
}
配置文件写明eureka服务端注册地址
server:
  port: 7090
spring:
  application:
    name: eureka-serverre
eureka:
  client:
    service-url:
      defaultZone: http://localhost:7090/eureka
    fetch-registry: false
    register-with-eureka: false
  server:
    enable-self-preservation: false # 关闭自我保护
    eviction-interval-timer-in-ms: 5000 # 每隔5秒进行一次服务列表清理
fetch-registry和 register-with-eureka这两个属性设置为true,那么这个服务端也会成为客户端,自己注册到自己服务上,搭建eureka集群的时候设置为true,我们目前为单机模式,设计为false。
启动后在浏览器输入 http://localhost:7090,回车即可看到页面

2.启动用户服务
1.用户服务加入eureka客户端的依赖
<dependency>
            <groupId>org.springframework.cloud</groupId>
            <artifactId>spring-cloud-starter-netflix-eureka-client</artifactId>
            <version>2.2.3.RELEASE</version>
        </dependency>
2.添加eureka配置
server:
  port: 7091
spring:
  application:
    name: user-service
  datasource:
    driver-class-name: com.mysql.cj.jdbc.Driver
    url: jdbc:mysql://localhost:3306/user?serverTimezone=Asia/Shanghai&characterEncoding=utf-8
    username: root
    password: root


mybatis-plus: #显示sql日志
  configuration:
    log-impl: org.apache.ibatis.logging.stdout.StdOutImpl
eureka:
  client:
    service-url:
      defaultZone: http://localhost:7090/eureka
3.在启动类添加eureka客户端注解
package com.test.user;

import org.springframework.boot.SpringApplication;
import org.springframework.boot.autoconfigure.SpringBootApplication;
import org.springframework.cloud.client.discovery.EnableDiscoveryClient;

/**
 * @author清梦
 * @site www.xiaomage.com
 * @company xxx公司
 * @create 2023-11-05 19:30
 */
@SpringBootApplication
@EnableDiscoveryClient
public class UserService {

    public static void main(String[] args) {
        SpringApplication.run(UserService.class,args);
    }
}
注意:@EnableEurekaClient和@EnableDiscoveryClient的区别
@EnableEurekaClient只能用于eureka客户端,@EnableDiscoveryClient可用于所有的服务注册中心(如Zookeeper、Consul、Nacos等)。
此时启动user服务,改变端口,多启动几个,刷新eureka页面
注意:idea默认不允许多开,点击配置,编辑

选中允许多开

然后再次点击运行按钮

点击运行,刷新eureka页面,可以看到有3台user服务已启动(本人起了3台)

3.启动调用者服务
同用户服务1,2,3步,添加eureka客户端依赖,添加eureka配置和注解
server:
  port: 7082
spring:
  application:
    name: user-consumer

eureka:
  client:
    service-url:
      defaultZone: http://localhost:7090/eureka/
有eureka后可以
启动类添加注解,RestTemplate上添加@LoadBalanced注解
注意:@LoadBalanced设置负载均衡,会先从注册中心根据提供的服务名去查找相应服务,找到后调用相应的接口。
如果不加@LoadBalanced,也可以注入eureka,从eureka获取url后拼接请求
改为这样:
@Autowired
    private EurekaClient eurekaClient;

    @GetMapping(value = "getUserById2",produces = MediaType.APPLICATION_JSON_VALUE)
    public User getUser2(Integer id){
        //参数1-服务名称,参数2-是否为https请求
        InstanceInfo eureka = eurekaClient.getNextServerFromEureka("user-service", false);
        String url = eureka.getHomePageUrl();//获取当前服务的地址,包含端口
        System.out.println("url:"+url);
        ResponseEntity<User> entity = restTemplate.getForEntity(url + "/user/getUserById/{id}", User.class,  id );
        User user = entity.getBody();
        user.setUsername("888" +user.getUsername());
        return user;
    }
推荐以下写法,减少代码量,只需在RestTemplate上添加@LoadBalanced注解
@EnableDiscoveryClient
@SpringBootApplication
public class ConsumerService {

    public static void main(String[] args) {
        SpringApplication.run(ConsumerService.class,args);
    }

    @Bean
    @LoadBalanced
    RestTemplate restTemplate(){
        return new RestTemplate();
    }
}
然后可以把调用接口的IP和端口改为user服务的服务名
/**
     * 调用user-service服务的getUserById接口(模块间的通信)
     * 需要添加@LoadBalanced注解,该注解会从溽热卡寻找服务,并实现负载均衡
     * @param id
     * @return
     */
    @GetMapping(value = "getUserById1",produces = MediaType.APPLICATION_JSON_VALUE)
    public User getUser1(Integer id){
        ResponseEntity<User> entity = restTemplate.getForEntity("http://user-service/user/getUserById/{id}", User.class,  id );
        User user = entity.getBody();
        user.setUsername("888" +user.getUsername());
        return user;
    }
启动后浏览器输入路径

此时关闭一个user服务,依然能够正常调用成功。
此时我们只有一个eureka服务,如果这个服务出问题了,调用失败。所以一般也会搭建eureka服务集群。
eureka集群
复制一下整个eureka服务,修改父工程pom和复制后的eureka服务名称,别忘了修改端口

此时需要把eureka服务端和客户端的eureka配置都修改成集群模式
eureka-server01
server:
  port: 7090
spring:
  application:
    name: eureka-server-cluter
eureka:
  client:
    service-url:
      defaultZone: http://localhost:7090/eureka,http://localhost:7190/eureka
    fetch-registry: true
    register-with-eureka: true
  server:
    enable-self-preservation: false # 关闭自我保护
    eviction-interval-timer-in-ms: 5000 # 每隔5秒进行一次服务列表清理
eureka-server02
server:
  port: 7190
spring:
  application:
    name: eureka-server-cluter
eureka:
  client:
    service-url:
      defaultZone: http://localhost:7190/eureka,http://localhost:7090/eureka
    fetch-registry: true
    register-with-eureka: true
  server:
    enable-self-preservation: false # 关闭自我保护
    eviction-interval-timer-in-ms: 5000 # 每隔5秒进行一次服务列表清理
客户端加个eureka服务地址就可以

重新启动后,刷新页面
两个页面都显示两个服务

除非两个服务同时挂掉,否则不会出现调用问题。
eureka单机设置密码
知道IP和端口就可以进入eureka页面,为了安全,可以设置密码,登录后进入
eureka服务端添加依赖
        <dependency>
            <groupId>org.springframework.boot</groupId>
            <artifactId>spring-boot-starter-security</artifactId>
            <version>2.3.5.RELEASE</version>
        </dependency>
配置文件设置密码
spring:
  application:
    name: eureka-server-cluter
  security:
    user:
      name: admin
      password: 123456
客户端带密码注册
eureka设置密码后客户端无法注册需要设置

添加的安全设置依赖版本过高,会防止csrf攻击,阻止跨域名访问,所以需要在添加以来的eureka中写个配置类,这样才能注册成功。
package com.test.eureka.config;

import org.springframework.security.config.annotation.web.builders.HttpSecurity;
import org.springframework.security.config.annotation.web.configuration.EnableWebSecurity;
import org.springframework.security.config.annotation.web.configuration.WebSecurityConfigurerAdapter;

/**
 * @author清梦
 * @site www.xiaomage.com
 * @company xxx公司
 * @create 2023-11-09 23:27
 */
@EnableWebSecurity
public class SecurityConfig  extends WebSecurityConfigurerAdapter {
    @Override
    protected void configure(HttpSecurity http) throws Exception {
        //关掉csrf攻击
        http.csrf().disable()
                .authorizeRequests()
                .antMatchers("/eureka/**").permitAll() //放行eureka注册地址
                .anyRequest().authenticated().and().httpBasic(); //其他地址都进行拦截
    }
}
重启eureka,重启客户端进行注册就可以注册成功。
@LoadBalanced注解:负载均衡,从eureka服务寻找服务,并均衡调用每个user服务,这是微服务的另一大核心组件。
2.负载均衡
概述
Ribbon是Netflix发布的云中间层服务开源项目,其主要功能是提供客户端实现负载均衡算法。Ribbon客户端组件提供一系列完善的配置项如连接超时,重试等。简单的说,Ribbon是一个客户端负载均衡器,我们可以在配置文件中Load Balancer后面的所有机器,Ribbon会自动的帮助你基于某种规则(如简单轮询,随机连接等)去连接这些机器,我们也很容易使用Ribbon实现自定义的负载均衡算法。
Ribbon的负载均衡有两种方式
1.和 RestTemplate 结合 Ribbon+RestTemplate
2.和 OpenFeign 结合
Ribbon
ribbon默认为轮询机制,可根据需求自定义为随机,方法有三种
1.写配置类设置
2.通过注解在启动类中标明
3.在application.yml文件中配置
默认轮询:
写个接口验证一下:
@RestController
public class TestController {

    @Autowired
    private LoadBalancerClient client;

    @GetMapping("ribbon")
    public void getPort(){
        ServiceInstance instance = client.choose("user-service");
        int port = instance.getPort();
        System.out.println("port:"+port);
    }
}
修改user-service服务端口,启动多个服务,掉ribbo接口,打印如下

1.写配置类设置
准备:修改user-service服务的名称为user-service1,修改端口号启动三个服务,这样我们就有两个用户集群。
我们让user-service集群为轮询,user-service1为随机
修改代码如下
package com.test.ribbon.controller;

import org.springframework.beans.factory.annotation.Autowired;
import org.springframework.cloud.client.ServiceInstance;
import org.springframework.cloud.client.loadbalancer.LoadBalancerClient;
import org.springframework.web.bind.annotation.GetMapping;
import org.springframework.web.bind.annotation.RestController;

@RestController
public class TestController {

    @Autowired
    private LoadBalancerClient client;

    @GetMapping("ribbon")
    public void getPort(){
        ServiceInstance instance = client.choose("user-service");
        int port = instance.getPort();
        System.out.println("port:"+port);

        ServiceInstance instance1 = client.choose("user-service1");
        int port1 = instance1.getPort();
        System.out.println("port1:=========>"+port1);
    }
}
写个负载均衡机制为随机的配置类
package com.test;

import com.netflix.loadbalancer.IRule;
import com.netflix.loadbalancer.RandomRule;
import org.springframework.context.annotation.Bean;
import org.springframework.context.annotation.Configuration;

@Configuration
public class RibbonConfig {

    @Bean
    public IRule iRule(){
        return new RandomRule();
    }
}
注意 因为我们是要一个服务轮询,一个服务随机,所以这个配置文件是局部配置,必须写在启动类的路径前(还有一种就是在启动类中排除,第二种方法会讲)
如图:

配置类在test包下,启动类在ribbon包下。
在启动类中添加配置,使我们写的配置类生效
package com.test.ribbon;

import com.test.RibbonConfig;
import org.springframework.boot.SpringApplication;
import org.springframework.boot.autoconfigure.SpringBootApplication;
import org.springframework.cloud.client.discovery.EnableDiscoveryClient;
import org.springframework.cloud.netflix.ribbon.RibbonClient;

@SpringBootApplication
@EnableDiscoveryClient
//给名字为user-service1的服务配置一个文件
@RibbonClient(name = "user-service1",configuration = RibbonConfig.class)
public class RibbonService {
    public static void main(String[] args) {
        SpringApplication.run(RibbonService.class,args);
    }
}
启动这个服务,多次请求
http://localhost:8182/ribbon

很明显,user-service是轮询,user-service1是随机
2.通过注解在启动类中标明
1.写一个注解作为随机的标记
package com.test.ribbon.config;

import java.lang.annotation.Retention;
import java.lang.annotation.RetentionPolicy;

@Retention(RetentionPolicy.RUNTIME)
public @interface RandomMark {
}
2.在配置类上加上这个注解
package com.test.ribbon.config;

import com.netflix.loadbalancer.IRule;
import com.netflix.loadbalancer.RandomRule;
import org.springframework.context.annotation.Bean;
import org.springframework.context.annotation.Configuration;

@Configuration
@RandomMark
public class RibbonConfig {

    @Bean
    public IRule iRule(){
        return new RandomRule();
    }
}
注意路径

3.在启动类中排除这个配置类,不然的话两个服务都是随机
package com.test.ribbon;

import com.test.ribbon.config.RandomMark;
import com.test.ribbon.config.RibbonConfig;
import org.springframework.boot.SpringApplication;
import org.springframework.boot.autoconfigure.SpringBootApplication;
import org.springframework.cloud.client.discovery.EnableDiscoveryClient;
import org.springframework.cloud.netflix.ribbon.RibbonClient;
import org.springframework.context.annotation.ComponentScan;

@SpringBootApplication
@EnableDiscoveryClient
@RibbonClient(value = "user-service1",configuration = RibbonConfig.class)
@ComponentScan(excludeFilters = {@ComponentScan.Filter(value = RandomMark.class)})
public class RibbonExcludeService {

    public static void main(String[] args) {
        SpringApplication.run(RibbonExcludeService.class,args);
    }
}
请求结果如下

明显看到user-service是轮询,user-service1是随机
3.在application.yml文件中配置
直接在配置文件添加配置即可
server:
  port: 8382
spring:
  application:
    name: consumer-ribbon-property
eureka:
  client:
    service-url:
      defaultZone: http://localhost:7090/eureka

user-service1:
  ribbon:
    NFLoadBalancerRuleClassName: com.netflix.loadbalancer.RandomRule
启动类
package com.test.ribbon;

import org.springframework.boot.SpringApplication;
import org.springframework.boot.autoconfigure.SpringBootApplication;
import org.springframework.cloud.client.discovery.EnableDiscoveryClient;
import org.springframework.cloud.netflix.ribbon.RibbonClient;

@SpringBootApplication
@EnableDiscoveryClient
@RibbonClient("user-service1")
public class RibbonProperty {
    public static void main(String[] args) {
        SpringApplication.run(RibbonProperty.class,args);
    }
}
效果如下
feign
概述
Feign是Spring Cloud提供的声明式、模板化的HTTP客户端, 它使得调用远程服务就像调用本地服务一样简单,只需要创建一个接口并添加一个注解即可。
Spring Cloud集成Feign并对其进行了增强,使Feign支持了Spring MVC注解;Feign默认集成了Ribbon,所以Fegin默认就实现了负载均衡的效果。
使用
需要导入feign依赖
pom文件
<?xml version="1.0" encoding="UTF-8"?>
<project xmlns="http://maven.apache.org/POM/4.0.0"
         xmlns:xsi="http://www.w3.org/2001/XMLSchema-instance"
         xsi:schemaLocation="http://maven.apache.org/POM/4.0.0 http://maven.apache.org/xsd/maven-4.0.0.xsd">

    <modelVersion>4.0.0</modelVersion>

    <artifactId>consumer-feign</artifactId>

    <properties>
        <maven.compiler.source>8</maven.compiler.source>
        <maven.compiler.target>8</maven.compiler.target>
    </properties>

    <parent>
        <groupId>org.springframework.boot</groupId>
        <artifactId>spring-boot-starter-parent</artifactId>
        <version>2.3.5.RELEASE</version>
        <relativePath />
    </parent>

    <dependencies>
        <dependency>
            <groupId>org.springframework.boot</groupId>
            <artifactId>spring-boot-starter-web</artifactId>
        </dependency>

        <dependency>
            <groupId>org.projectlombok</groupId>
            <artifactId>lombok</artifactId>
        </dependency>

        <dependency>
            <groupId>org.springframework.cloud</groupId>
            <artifactId>spring-cloud-starter-netflix-eureka-client</artifactId>
            <version>2.2.3.RELEASE</version>
        </dependency>

        <dependency>
            <groupId>org.springframework.cloud</groupId>
            <artifactId>spring-cloud-starter-openfeign</artifactId>
            <version>2.2.3.RELEASE</version>
        </dependency>

    </dependencies>
</project>
必须在启动添加注解**@EnableFeignClients**
package com.test.consumer;

import org.springframework.boot.SpringApplication;
import org.springframework.boot.autoconfigure.SpringBootApplication;
import org.springframework.cloud.client.discovery.EnableDiscoveryClient;
import org.springframework.cloud.openfeign.EnableFeignClients;
import org.springframework.context.annotation.Bean;
import org.springframework.web.client.RestTemplate;

@SpringBootApplication
@EnableDiscoveryClient
@EnableFeignClients
public class ConsumerFeign {
    public static void main(String[] args) {
        SpringApplication.run(ConsumerFeign.class,args);
    }

    @Bean
    public RestTemplate restTemplate(){
        return new RestTemplate();
    }
}
调用user-service的接口需要写一个client
@FeignClient("user-service")
public interface UserClient {

    @GetMapping("/user/getUserById/{id}")
    User getUser(@PathVariable Integer id);
}
然后直接在接口中调用
package com.test.consumer.controller;

import com.netflix.appinfo.InstanceInfo;
import com.netflix.discovery.EurekaClient;
import com.test.consumer.dto.User;
import com.test.consumer.feignClient.UserClient;
import org.springframework.beans.factory.annotation.Autowired;
import org.springframework.http.MediaType;
import org.springframework.http.ResponseEntity;
import org.springframework.web.bind.annotation.GetMapping;
import org.springframework.web.bind.annotation.RestController;
import org.springframework.web.client.RestTemplate;

@RestController
public class TestController {

    @Autowired
    private RestTemplate restTemplate;

    @Autowired
    private EurekaClient eurekaClient;

    @Autowired
    private UserClient userClient;

    /**
     * 调用user-service服务的getUserById接口(模块间的通信)
     * 未注册到eureka时,使用restTemplate调用,需要写明ip和接口路径
     * @param id
     * @return
     */
    @GetMapping(value = "getUserById",produces = MediaType.APPLICATION_JSON_VALUE)
    public User getUser(Integer id){
        User user = restTemplate.getForObject("http://localhost:7091/user/getUserById/" + id, User.class);
        user.setUsername("999" +user.getUsername());
        return user;
    }

    @GetMapping(value = "getUserById2",produces = MediaType.APPLICATION_JSON_VALUE)
    public User getUser2(Integer id){
        //参数1-服务名称,参数2-是否为https请求
        InstanceInfo eureka = eurekaClient.getNextServerFromEureka("user-service", false);
        String url = eureka.getHomePageUrl();//获取当前服务的地址,包含端口
        System.out.println("url:"+url);
        ResponseEntity<User> entity = restTemplate.getForEntity(url + "/user/getUserById/{id}", User.class,  id );
        User user = entity.getBody();
        user.setUsername("888" +user.getUsername());
        return user;
    }

    @GetMapping(value = "getUserByFeign",produces = MediaType.APPLICATION_JSON_VALUE)
    public User getUserByFeign(Integer id){
        User user = userClient.getUser(id);
        return user;
    }


}
注意:如果传递的参数为对象,那么接口必须使用@PostMapping,参数使用@RequestBody
3.Hystrix
概述
hystrix是Netlifx开源的一款容错框架,防雪崩利器,具备服务降级,服务熔断,依赖隔离,监控(Hystrix Dashboard)等功能。
hystrix是一个库,通过延迟容忍和容错逻辑,控制分布式服务之间的交互。它通过隔离服务间的访问点、防止级联失败和提供回退选项,保证系统的整体弹性。
Hystrix作用
hystrix被设计的目标是:
1.对通过第三方客户端库访问的依赖项(通常是通过网络)的延迟和故障进行保护和控制。
2.在复杂的分布式系统汇中阻止级联故障。
3.快速失败,快速恢复。
4.回退,尽可能优雅的降级。
5.启用近实时监控、警报和操作控制。
当某个方法调用可能出现问题时,我们可以写一个预案,防止出现网络问题而导致接口报错
实现步骤
1.导入依赖包
<dependency>
            <groupId>org.springframework.cloud</groupId>
            <artifactId>spring-cloud-starter-netflix-hystrix</artifactId>
            <version>2.2.3.RELEASE</version>
        </dependency>
2.在需要预案的方法上添加注解@HystrixCommand(fallbackMethod = “failMethod”),
/**
     * 调用user-service服务的getUserById接口(模块间的通信)
     * 需要添加@LoadBalanced注解,该注解会从溽热卡寻找服务,并实现负载均衡
     * @param id
     * @return
     */
    @GetMapping(value = "getUserById1",produces = MediaType.APPLICATION_JSON_VALUE)
    @HystrixCommand(fallbackMethod = "failMethod")
    public User getUser1(Integer id){
        ResponseEntity<User> entity = restTemplate.getForEntity("http://user-service/user/getUserById/{id}", User.class,  id );
        User user = entity.getBody();
        user.setUsername("888" +user.getUsername());
        return user;
    }
failMethod是我们的预案,需要写这么一个方法
/**
     * getUser1接口调用user-service失败后进入该方法(服务降级)
     * @param id
     * @return
     */
    public User failMethod(Integer id){
        User user = new User();
        user.setUsername("失败后返回");
        user.setPassword("3333");
        user.setType(1);
        return user;
    }
3.必须在启动类上添加断路器注解**@EnableCircuitBreaker**
效果,页面请求getUserById1服务时,停止user-service服务,此时会返回预案处理后的内容

概念介绍
Hystrix
hystrix是一个库,通过延迟容忍和容错逻辑,控制分布式服务之间的交互。它通过隔离服务间的访问点、防止级联失败和提供回退选项,保证系统的整体弹性。
降级
分布式系统中,面对突发流量,系统可能出现负荷的情况,最终导致服务不可用,这个时候我们需要将一些非核心的服务进行降级(置为不可用),以便节省出更多资源保证核心服务正常运行
熔断
在分布式系统中不可避免的会出现服务之间调用异常,一个接口的异常可能导致整个链路异常,服务熔断就是防止这种级联故障的发生,是异常服务快速返回备用数据,顺利完成调用
雪崩
在微服务架构中,一个或多个微服务出现故障或不可用时,导致整个系统的不稳定甚至崩溃
限流
通过对并发/请求进行限速来保护系统,防止系统过载
隔离
@HystrixCommand(fallbackMethod = "failMethod",commandProperties = {@HystrixProperty(name = "execution.isolation.thread.timeoutInMilliseconds",value = "100")})
代码如下
/**
     * 调用user-service服务的getUserById接口(模块间的通信)
     * 需要添加@LoadBalanced注解,该注解会从溽热卡寻找服务,并实现负载均衡
     * @param id
     * @return
     */
    @GetMapping(value = "getUserById1",produces = MediaType.APPLICATION_JSON_VALUE)
    //@HystrixCommand(fallbackMethod = "failMethod")
    //设置为信号量
    @HystrixCommand(fallbackMethod = "failMethod",commandProperties = {@HystrixProperty(name = "execution.isolation.strategy",value = "SEMAPHORE")})
    public User getUser1(Integer id){
        System.out.println("原始方法:"+Thread.currentThread().getName());
        ResponseEntity<User> entity = restTemplate.getForEntity("http://user-service/user/getUserById/{id}", User.class,  id );
        User user = entity.getBody();
        user.setUsername("888" +user.getUsername());
        return user;
    }


    /**
     * getUser1接口调用user-service失败后进入该方法(服务降级)
     * @param id
     * @return
     */
    public User failMethod(Integer id){
        System.out.println("降级方法:"+Thread.currentThread().getName());
        User user = new User();
        user.setUsername("失败后返回");
        user.setPassword("3333");
        user.setType(1);
        return user;
    }

属性介绍
circuitBreaker.sleepWindowInMilliseconds:
当触发熔断后等待多久会重新查看下游请求状态,如果是失败,继续熔断,默认是5秒。
execution.isolation.strategy:
表示HystrixCommand.run()的执行时的隔离策略,有以下两种策略
1 THREAD: 在单独的线程上执行,并发请求受线程池中的线程数限制
2 SEMAPHORE: 在调用线程上执行,并发请求量受信号量计数限制
execution.isolation.thread.timeoutInMilliseconds
设置调用者执行的超时时间(单位毫秒),默认值:1000:
详细属性配置可参考博客
hystrix配置参数详解
使用feign实现降级(feign-hystrix模块)
需要feign和hystrix的依赖
<?xml version="1.0" encoding="UTF-8"?>
<project xmlns="http://maven.apache.org/POM/4.0.0"
         xmlns:xsi="http://www.w3.org/2001/XMLSchema-instance"
         xsi:schemaLocation="http://maven.apache.org/POM/4.0.0 http://maven.apache.org/xsd/maven-4.0.0.xsd">
    <parent>
        <artifactId>spring-boot-starter-parent</artifactId>
        <groupId>org.springframework.boot</groupId>
        <version>2.3.5.RELEASE</version>
        <relativePath/>
    </parent>
    <modelVersion>4.0.0</modelVersion>

    <artifactId>consumer-feign-hystrix</artifactId>

    <properties>
        <maven.compiler.source>8</maven.compiler.source>
        <maven.compiler.target>8</maven.compiler.target>
    </properties>

    <dependencies>
        <dependency>
            <groupId>org.springframework.boot</groupId>
            <artifactId>spring-boot-starter-web</artifactId>
            <version>2.3.5.RELEASE</version>
        </dependency>

        <dependency>
            <groupId>org.springframework.cloud</groupId>
            <artifactId>spring-cloud-starter-netflix-eureka-client</artifactId>
            <version>2.2.3.RELEASE</version>
        </dependency>

        <dependency>
            <groupId>org.springframework.cloud</groupId>
            <artifactId>spring-cloud-starter-openfeign</artifactId>
            <version>2.2.3.RELEASE</version>
        </dependency>

        <dependency>
            <groupId>org.projectlombok</groupId>
            <artifactId>lombok</artifactId>
            <version>1.18.24</version>
        </dependency>

        <dependency>
            <groupId>org.springframework.cloud</groupId>
            <artifactId>spring-cloud-starter-netflix-hystrix</artifactId>
            <version>2.2.3.RELEASE</version>
        </dependency>
    </dependencies>

</project>
启动类添加注解
@SpringBootApplication
@EnableDiscoveryClient
@EnableCircuitBreaker
@EnableFeignClients
public class FeignHystrix {
    public static void main(String[] args) {
        SpringApplication.run(FeignHystrix.class,args);
    }
}
写一个类实现feignClient
@Component //不加该注解可能会出现无法降级的问题
public class UserClientFallback implements UserClient{
    @Override
    public User getUserById(Integer id) {
        User user = new User();
        user.setUsername("fallback降级");
        return user;
    }
}
然后在client上指明降级配置的类
@FeignClient(value = "user-service",fallback = UserClientFallback.class)
public interface UserClient {

    @GetMapping("/user/getUserById/{id}")
    User getUserById(@PathVariable Integer id);
}
4.zuul
步骤
1.添加依赖,因为路由需要知道内部服务,所以也需要添加eureka客户端依赖。
<?xml version="1.0" encoding="UTF-8"?>
<project xmlns="http://maven.apache.org/POM/4.0.0"
         xmlns:xsi="http://www.w3.org/2001/XMLSchema-instance"
         xsi:schemaLocation="http://maven.apache.org/POM/4.0.0 http://maven.apache.org/xsd/maven-4.0.0.xsd">
    <parent>
        <groupId>org.springframework.boot</groupId>
        <artifactId>spring-boot-starter-parent</artifactId>
        <version>2.3.5.RELEASE</version>
        <relativePath />
    </parent>
    <modelVersion>4.0.0</modelVersion>

    <artifactId>user-service</artifactId>

    <dependencies>
        <dependency>
            <groupId>org.springframework.boot</groupId>
            <artifactId>spring-boot-starter-web</artifactId>
            <version>2.3.5.RELEASE</version>
        </dependency>

        <dependency>
            <groupId>mysql</groupId>
            <artifactId>mysql-connector-java</artifactId>
            <version>8.0.29</version>
        </dependency>

        <dependency>
            <groupId>com.baomidou</groupId>
            <artifactId>mybatis-plus-boot-starter</artifactId>
            <version>3.5.3</version>
        </dependency>

        <dependency>
            <groupId>org.projectlombok</groupId>
            <artifactId>lombok</artifactId>
            <version>1.18.24</version>
        </dependency>

        <dependency>
            <groupId>org.springframework.cloud</groupId>
            <artifactId>spring-cloud-starter-netflix-eureka-client</artifactId>
            <version>2.2.3.RELEASE</version>
        </dependency>
    </dependencies>

</project>
2.启动类添加注解
@SpringBootApplication
@EnableDiscoveryClient
@EnableZuulProxy
public class ZuulService {

    public static void main(String[] args) {
        SpringApplication.run(ZuulService.class,args);
    }
}
启动成功后在eureka页面可以看到客户端信息

点击红色框的链接会出现404的页面

注意url地址,端口号后是actuator,这是一个监控系统,需要导入依赖
<dependency>
            <groupId>org.springframework.boot</groupId>
            <artifactId>spring-boot-starter-actuator</artifactId>
            <version>2.3.5.RELEASE</version>
        </dependency>
导入后重启点击链接

我们查看路由接口

发现404,因为routes是默认关闭的,需要在配置文件设置
management:
  endpoints:
    web:
      exposure:
        include: '*' #表示开放所有信息,如果只是开放单个,可以单独写'health','info','routes'
重新启动后刷新
如何访问
地址+路径+具体服务的接口路径
如访问consumer-feign服务的接口
访问地址为:localhost:8082/getUserByFeign?id=1
通过网关访问为http://localhost:7070/consumer-feign/getUserByFeign?id=1

注意:consumer-feign调用user-service服务,所以user-service服务也要启动

给服务起别名
有两种方式
方式一
此时原名服务在,可以过滤掉,只显示配置的
zuul:
  routes:
    consumer-feign: /feign/** #命名规则 服务名: /别名/**,除非接口只有一个才能写具体路径
    user-service: /users/**
  ignored-services: '*'
方式二
zuul:
  routes:
    users: ##值随便写,但是必须唯一
      path: /users/**
      service-id: user-service
    feign:
      path: /feign/**
      service-id: consumer-feign
  ignored-services: '*'
  prefix: qiaoge
还可以配置前缀
zuul:
  routes:
    consumer-feign: /feign/** #命名规则 服务名: /别名/**,除非接口只有一个才能写具体路径
    user-service: /users/**
  ignored-services: '*'
  prefix: /qiaoge/
网关添加过滤器
写一个过滤类,继承ZuulFilter
package com.test.zuul.filter;

import com.netflix.zuul.ZuulFilter;
import com.netflix.zuul.exception.ZuulException;
import org.springframework.stereotype.Component;

@Component
public class ZuulFilter01 extends ZuulFilter {
    @Override
    public String filterType() {
        return "pre";
    }

    @Override
    public int filterOrder() {
        return 10;
    }

    @Override
    public boolean shouldFilter() {
        return true;
    }

    @Override
    public Object run() throws ZuulException {
        System.out.println("优先级为10的前置过滤器执行了");
        return null;
    }
}
filterType是过滤器的类型,pre是前置过滤器,post是后置过滤器,filterOrder是过滤级别,数字越小,级别越高。shouldFilter,返回true则执行Run方法。
测试前置通知和后置通知的执行顺序
分别写翻个过滤器,filterType分别为pre,pre,post,filterOrder分别为10,30,1
运行该程序,调用接口可在控制台看到日志如下

校验必传参数参数
@Override
    public Object run() throws ZuulException {
        System.out.println("优先级为10的前置过滤器执行了");
        //设定必传参数id,不传则无法请求到服务
        RequestContext currentContext = RequestContext.getCurrentContext();
        HttpServletRequest request = currentContext.getRequest();
        String id = request.getParameter("id");
        if (null == id || id.trim().equals("")){
            currentContext.setSendZuulResponse(false);//如果没传id,则拦截请求
            currentContext.getResponse().setContentType("text/html;charset=utf-8");
            currentContext.setResponseBody("没有传递id参数");
        }
        return null;
    }
启动后请求不加id参数

此时发现三个过滤器都执行了

shouldFilter写死为true,那么不管校验是否通过,拦截器都会执行。
问题:如果第一个拦截器校验失败,就直接返回失败,不执行其他的拦截器
解决:先获取前面拦截器的状态
改造其余的拦截器的shouldFilter方法
@Override
    public boolean shouldFilter() {
        /**
         * 如果前面的拦截器拦截了请求,那么此处的拦截器不应该启用,所以先获取前面拦截器的状态
         */
        RequestContext currentContext = RequestContext.getCurrentContext();
        boolean zuulResponse = currentContext.sendZuulResponse();
        return zuulResponse;
    }
动态路由
问题:实际中,我们可能已经有一些服务了,如果出现了新服务就需要修改网关,这部符合设计模式的拓展开发,我们需要设计一种方法,不管服务添加多少,网关都不会做修改。这就需要动态路由。
解决:
将服务信息添加到redis中,动态添加
步骤
1.添加pom
<dependency>
            <groupId>org.springframework.boot</groupId>
            <artifactId>spring-boot-starter-data-redis</artifactId>
            <version>2.2.6.RELEASE</version>
        </dependency>
2.改造第二个拦截器
package com.test.zuul.filter;

import com.netflix.zuul.ZuulFilter;
import com.netflix.zuul.context.RequestContext;
import com.netflix.zuul.exception.ZuulException;
import org.springframework.beans.factory.annotation.Autowired;
import org.springframework.cloud.netflix.zuul.filters.support.FilterConstants;
import org.springframework.data.redis.core.RedisTemplate;
import org.springframework.stereotype.Component;

import javax.servlet.http.HttpServletRequest;
import java.net.URI;
import java.util.Map;

@Component
public class ZuulFilter02 extends ZuulFilter {

    @Autowired
    private RedisTemplate<String,String> redisTemplate;
    @Override
    public String filterType() {
        return "pre";
    }

    @Override
    public int filterOrder() {
        return 30;
    }

    @Override
    public boolean shouldFilter() {
        /**
         * 如果前面的拦截器拦截了请求,那么此处的拦截器不应该启用,所以先获取前面拦截器的状态
         */
        RequestContext currentContext = RequestContext.getCurrentContext();
        boolean zuulResponse = currentContext.sendZuulResponse();
        return zuulResponse;
    }

    @Override
    public Object run() throws ZuulException {
        System.out.println("优先级为30的前置过滤器执行了");

        RequestContext currentContext = RequestContext.getCurrentContext();
        HttpServletRequest request = currentContext.getRequest();
        String id = request.getParameter("id");
        Map<Object, Object> entries = redisTemplate.opsForHash().entries(id);
        //在redis保存key为id的hash,保存key为serviceId,值为服务名,key为url,值为接口清口路径
        String serviceId = (String)entries.get("serviceId");
        if (null != serviceId){
            String url = (String) entries.get("url");
            currentContext.put(FilterConstants.SERVICE_ID_KEY,serviceId);
            currentContext.put(FilterConstants.REQUEST_URI_KEY, url);
        }else {
            currentContext.setSendZuulResponse(false);
            currentContext.getResponse().setContentType("text/html;charset=utf-8");
            currentContext.setResponseBody("没传id参数");
        }
        return null;
    }
}
3.配置文件
server:
  port: 7071
spring:
  application:
    name: zuul-filter
  redis:
    host: localhost
    port: 6379
eureka:
  client:
    service-url:
      defaultZone: http://localhost:7090/eureka
management:
  endpoints:
    web:
      exposure:
        include: '*' #表示开放所有信息,如果只是开放单个,可以单独写'health','info','routes'

zuul:
  routes:
    consumer-feign: /**
注意网关的写法
4.在redis中插入数据。例如我写的接口参数为id,值为1
则在redis中插入值如下,添加key为1,类型为hash的数据,填入服务名和接口路径。

重启后访问
http://localhost:7071/?id=1,结果如下

问题:当请求路径中存在变量怎么办,如user-service
服务中的getUserById/{id}接口
解决:在网关的拦截器中进行替换
请求路径存在变量问题
在第二个拦截器中继续修改
package com.test.zuul.filter;

import com.netflix.zuul.ZuulFilter;
import com.netflix.zuul.context.RequestContext;
import com.netflix.zuul.exception.ZuulException;
import org.springframework.beans.factory.annotation.Autowired;
import org.springframework.cloud.netflix.zuul.filters.support.FilterConstants;
import org.springframework.data.redis.core.RedisTemplate;
import org.springframework.stereotype.Component;

import javax.servlet.http.HttpServletRequest;
import java.net.URI;
import java.util.Enumeration;
import java.util.Map;

@Component
public class ZuulFilter02 extends ZuulFilter {

    @Autowired
    private RedisTemplate<String,String> redisTemplate;
    @Override
    public String filterType() {
        return "pre";
    }

    @Override
    public int filterOrder() {
        return 30;
    }

    @Override
    public boolean shouldFilter() {
        /**
         * 如果前面的拦截器拦截了请求,那么此处的拦截器不应该启用,所以先获取前面拦截器的状态
         */
        RequestContext currentContext = RequestContext.getCurrentContext();
        boolean zuulResponse = currentContext.sendZuulResponse();
        return zuulResponse;
    }

    @Override
    public Object run() throws ZuulException {
        System.out.println("优先级为30的前置过滤器执行了");

        RequestContext currentContext = RequestContext.getCurrentContext();
        HttpServletRequest request = currentContext.getRequest();
        String id = request.getParameter("id");
        Map<Object, Object> entries = redisTemplate.opsForHash().entries(id);
        //在redis保存key为id的hash,保存key为serviceId,值为服务名,key为url,值为接口清口路径
        String serviceId = (String)entries.get("serviceId");
        if (null != serviceId){
            String url = (String) entries.get("url");
            currentContext.put(FilterConstants.SERVICE_ID_KEY,serviceId);
            Enumeration<String> parameterNames = request.getParameterNames();
            while (parameterNames.hasMoreElements()){
                //获取参数名
                String parameter = parameterNames.nextElement();
                //如果请求路径有变量,获取请求中的值替换
                url = url.replace("{" + parameter + "}",request.getParameter(parameter));
            }
            currentContext.put(FilterConstants.REQUEST_URI_KEY, url);
        }else {
            currentContext.setSendZuulResponse(false);
            currentContext.getResponse().setContentType("text/html;charset=utf-8");
            currentContext.setResponseBody("没传id参数");
        }
        return null;
    }
}
在redis中添加user-service的服务名和接口路径,因为我的数据只有id=1和id=3,这次添加key=3的数据

配置文件加一个user服务
zuul:
  routes:
    consumer-feign: /**
    user-service: /**
问题:zuulFilter01中的参数校验是写死的,如何实现动态参数校验?
需要用到springcloud config
5.配置中心(springcloud config)
微服务会有多个模块,每个模块一个或多个配置文件,模块多了,就不好管理。配置中心应运而生。
将所有模块的配置文件都放在配置中心,方便统一管理,一般使用git。
准备
一个仓库:国内用gitee(https://gitee.com/),国外用github。可以自己再gitee上创建一个仓库。
步骤
新建一个配置中心服务端
pom
<dependency>
            <groupId>org.springframework.cloud</groupId>
            <artifactId>spring-cloud-config-server</artifactId>
            <version>2.2.3.RELEASE</version>
        </dependency>
启动类
@SpringBootApplication
@EnableConfigServer
public class CloudConfigService {
    public static void main(String[] args) {
        SpringApplication.run(CloudConfigService.class,args);
    }
}
配置文件
server:
  port: 17000
spring:
  application:
    name: config-service
  cloud:
    config:
      server:
        git:
          uri: https://gitee.com/qfp17393120407/cloud-config #公开的仓库不需要用户名和密码
          #username:
          #passphrase:
启动后访问地址如下

问题:无论dev输入什么,都能显示
原因:gitee中的application.yml是默认配置文件,找配置文件时按照浏览器输入的文件名去找,如果找不到,则会显示默认配置文件
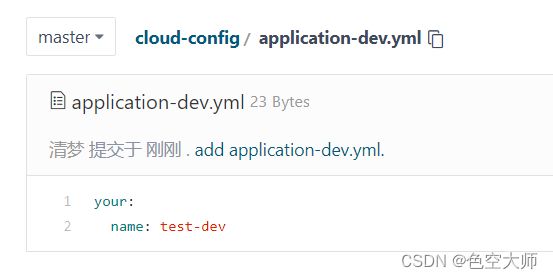
测试:在gitee再建一个dev文件

重启配置中心后再次请求

客户端
使用客户端读取配置中心的数据
pom
<dependencies>
        <dependency>
            <groupId>org.springframework.cloud</groupId>
            <artifactId>spring-cloud-starter-config</artifactId>
            <version>2.2.3.RELEASE</version>
        </dependency>

        <dependency>
            <groupId>org.springframework.boot</groupId>
            <artifactId>spring-boot-starter-web</artifactId>
            <version>2.3.5.RELEASE</version>
        </dependency>
    </dependencies>
启动类
@SpringBootApplication
public class ConfigClientService {
    public static void main(String[] args) {
        SpringApplication.run(ConfigClientService.class,args);
    }
}
配置类
application.yml
server:
  port: 17001
bootstrap.yml
spring:
  application:
    name: cloud-config-client
  cloud:
    config:
      uri: localhost:17000/ #配置中心地址
      label: master #gitee分支名称
      profile: dev #要读取的文件属性,dev,pro等
注意:将配置中心写在bootstrap.yml中,因为在接口中获取配置文件的信息时。会先读取bootstrap.yml的信息,再根据获取的配置中心信息去获取your.name的值
写个controler获取配置文件的用户名
@RestController
public class TestController {

    @Value("${your.name}")
    private String name;

    @GetMapping("getName")
    public String getNAme(){
        return name;
    }
}
启动后控制台报错

原因:配置中心没有这个配置文件
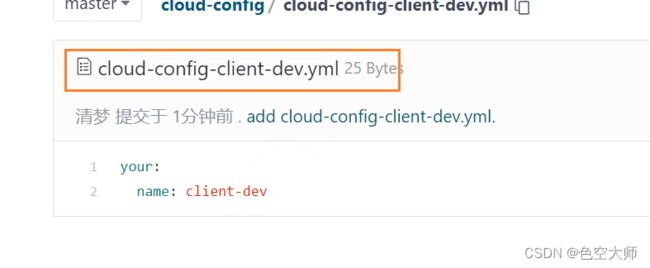
在配置中心添加文件名为{application}-{profile}.yml,即服务名+环境.yml文件
问题:多个模块不可能在一个目录下,怎么解决?
方法:
1.同一个仓库,一个模块一个目录(路径搜索)
2.一个模块一个仓库(独立仓库)
路径搜索
在之前的仓库中给每个模块新建一个文件夹,该模块的所有配置都放在这个目录下
如user和item。
user目录下新建一个配置文件,

item新建文件

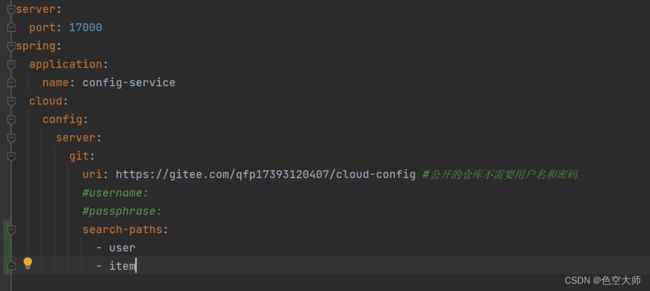
此时配置文件需要添加配置,指明路径
注意:在配置中心添加

然后重启配置中心和客户端
访问user配置

访问item配置
独立仓库配置
给user模块和item模块单独建一个公开的仓库
user:

修改配置中心
spring:
  application:
    name: config-service
  cloud:
    config:
      server:
        git:
          uri: https://gitee.com/qfp17393120407/cloud-config #公开的仓库不需要用户名和密码
          #username:
          #password:
          #search-paths:
            #- user
            #- item
          repos:
            user:
              uri: https://gitee.com/qfp17393120407/user
            item:
              uri: https://gitee.com/qfp17393120407/item


