springboot整合swagger+knife4j
springboot整合swagger+knife4j
参考网址:
https://mp.weixin.qq.com/s/KlYj5JuJSJYQQ47mQu7b1w
swagger配置参考文档
swagger新版本和旧版本的配置以及区别
https://mp.weixin.qq.com/s?__biz=MzU1NTkwODE4Mw==&mid=2247494597&idx=1&sn=2bcd072f05a39345452e11c631973a62&scene=21#wechat_redirect
https://mp.weixin.qq.com/s?__biz=MzU1NTkwODE4Mw==&mid=2247494597&idx=1&sn=2bcd072f05a39345452e11c631973a62&scene=21#wechat_redirect
整体的整合步骤
准备工作
准备一个springboot的单体应用作为测试
1.整合swagger3.0
1.1引入依赖
        <dependency>
            <groupId>io.springfoxgroupId>
            <artifactId>springfox-boot-starterartifactId>
            <version>3.0.0version>
        dependency>
1.2添加配置类
package com.atguigu.yygh.hosp.config;

import org.springframework.context.annotation.Bean;
import org.springframework.context.annotation.Configuration;
import springfox.documentation.builders.ApiInfoBuilder;
import springfox.documentation.builders.PathSelectors;
import springfox.documentation.builders.RequestHandlerSelectors;
import springfox.documentation.service.ApiInfo;
import springfox.documentation.service.Contact;
import springfox.documentation.spi.DocumentationType;
import springfox.documentation.spring.web.plugins.Docket;

/**
 * Swagger2API文档的配置
 * 访问地址
 * http://localhost:端口号/swagger-ui/
 * 我搭建项目喜欢使用springboot默认端口8080
 * http://localhost:8080/swagger-ui/
 *http://项目的ip地址:项目端口号/swagger-ui/
 */
@Configuration
public class Swagger2Config {
    @Bean
    public Docket createRestApi() {
        return new Docket(DocumentationType.SWAGGER_2)
                .apiInfo(apiInfo())
                .select()
                /**
                 * 重点说明:
                 * 其余都是可以默认,但是controller扫描的路径一定要该队,是该项目的controller包路径
                 */
                .apis(RequestHandlerSelectors.basePackage("com.atguigu.yygh.hosp.controller"))
                .paths(PathSelectors.any())
                .build();
    }

    private ApiInfo apiInfo() {
        return new ApiInfoBuilder()
                /**
                 * 指定项目的名称和主题
                 */
                .title("xxxx演示")
                /**
                 * 描述项目的用途
                 */
                .description("xxxxxdescription")
                /**
                 * name:使用者的姓名
                 * url:使用者的相关技术文章
                 * email:使用者的邮箱地址
                 */
                .contact(new Contact("xxx", "xxxxx", "xxxxx"))
                .version("1.0")
                .build();
    }
}
2.整合knife4j
说明:整合knif4j特别简单,引入一个依赖即可
引入依赖
        <dependency>
            <groupId>com.github.xiaoymingroupId>
            <artifactId>knife4j-spring-boot-starterartifactId>
            <version>3.0.2version>
        dependency>
使用
1.访问网址
swagger3的访问网址
http://项目的ip地址:项目端口号/swagger-ui/
示例
localhost:8080/swagger-ui
knife4j访问网址
http://项目的ip地址:项目端口号/doc.html
示例
localhost:8080/doc.html
2.搜索功能
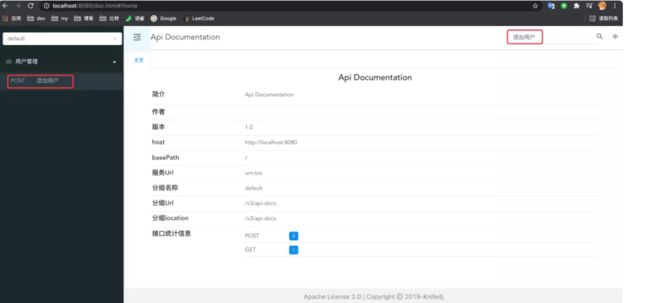
我觉得 Knife4j 最实用的一个功能就是“接口搜索”了,通过这个功能我们可以非常方便的找到我们需要的接口,如下图所示:
3.离线文档下载
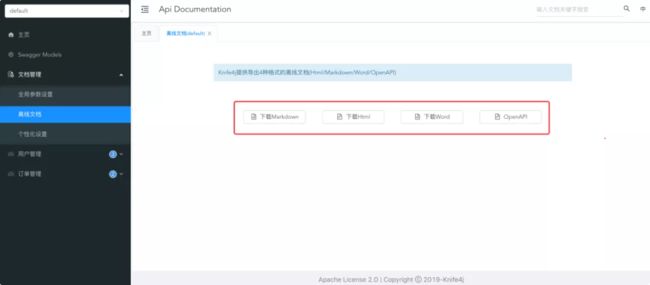
Knife4j 提供了 4 种格式的离线文档下载:Markdown、Html、Word、OpenAPI 等方式,如下图所示:
4.接口过滤
可以通过 Knife4j 过滤某一类型的接口,比如过滤 GET 或者 POST 接口,如下图所示:
5.全局参数设置
如果有公共的请求参数,我们可以通过 Knife4j 轻松搞定,如下图所示:
6.更友好的接口调试
使用 Knife4j 可以更友好的实现接口调试,因为在使用 Knife4j 时,它会将必传的参数以红色边框的方式显示,这样我们就直观的区分开必填参数和非必填参数了,如下图所示:
总结
Swagger 作为非常欢迎的框架同时也存在着一些功能“缺陷”,那么为了弥补 Swagger 的不足,我们引入了 Knife4j 框架,使用 Knife4j 我们可以很方便的实现:接口搜索、离线文档下载、全局参数设置、接口过滤和更加友好的接口测试等功能。然而和它的功能同样令人惊讶的是它的配置,在使用 Knife4j 时,我们只需要在项目中添加它的引用,之后无需任何多余的操作就可以直接使用 Knife4j 了,简直完美
个人csdn博客网址:https://blog.csdn.net/shaoming314
![]()
个人博客网址:www.shaoming.club
![]()
个人gitee地址:https://gitee.com/shao_ming314/note
t/shaoming314
[外链图片转存中…(img-P4oCnzbO-1617852223521)]
个人博客网址:www.shaoming.club
[外链图片转存中…(img-FlKBHxwa-1617852223522)]
个人gitee地址:https://gitee.com/shao_ming314/note
![]()


