转:DotNetNuke 4.0.0 Starter Kit and Templates...
In ASP.NET 2.0, Microsoft has put a lot of focus on making the technology more accessible to the general developer community. A key deliverable in this strategy is the release of an entire suite of low cost ( currently FREE ) "Express" tools. Included in the "Express" line is a tool named "Visual Web Developer" which provides a functional integrated development environment ( IDE ) for ASP.NET 2.0. It also includes features for managing SQL Server 2005 Express, a powerful new database engine for local web development.
You can get Visual Web Developer for FREE here:
http://msdn.microsoft.com/vstudio/express/vwd/
Note: You can install Visual Web Developer on the same machine as Visual Studio 2003 or Visual Studio 2005 and it will not interfere with your development environment for either ASP.NET platform.
Note: Please do not attempt to use DotNetNuke 4.0.0 on the Beta 2 ( Go Live ) release of ASP.NET 2.0 ( distributed last spring ). Microsoft made many modifications between the Beta 2 release and the final release on Nov 7. As such, the Beta 2 ( Go Live ) release is unsupported.
ASP.NET 2.0 comes with its own minimal File system based web server ( also known as "Cassini" ). This is so that developers are not required to have the full IIS web server installed on their development machine. Unfortunately in our testing, we experienced a lot of erratic behavior using Cassini and would recommend that developers continue to rely on the stability and performance of IIS ( which unfortunately requires a Professional license of Windows XP ).
As a fundamental goal, DotNetNuke has always tried to minimize the amount of custom configuration required to get the web application framework up and running. Essentially this meant no reliance on third party services and no custom IIS settings. As a result the number of steps required to install DotNetNuke on ASP.NET 1.1 were minimal. But there is always room for improvement, and anything which can be reliably automated will result in a better first impression for the developer. Visual Web Developer has a number of new features which are designed to streamline the application installation process from a developer perspective. DotNetNuke has been enhanced to take advantage of these improvements.
In terms of development tools, DotNetNuke on ASP.NET 1.1 required a minimum of Visual Studio 2003 Standard Edition - a significant entry barrier in terms of cost and accessibility for many developers. In addition, the default installation was designed to be used with SQL Server 2000 or MSDE. Since the licensing model for SQL Server is so cost prohibitive and MSDE has many limitations in terms of scalability and deployment, this also posed a challenge for many would-be module developers. The availability of Visual Web Developer and SQL Server 2005 Express address both of these limitations on the ASP.NET 2.0 platform.
In ASP.NET 2.0, there is a new concept known as a "Starter Kit" which is designed to enable a developer to configure a fully functional development environment for a specific application within minutes. The Starter Kit automates many of the procedures which you had to perform manually in the past. We have created a DotNetNuke Starter Kit to leverage the benefits of this feature.
You can get the DotNetNuke 4.0.0 Starter Kit here:
http://www.dotnetnuke.com/About/Downloads/tabid/125/Default.aspx
Once you have the DotNetNuke_4.0.0_StarterKit.vsi downloaded, you simply need to double-click the file in order to launch the installer.
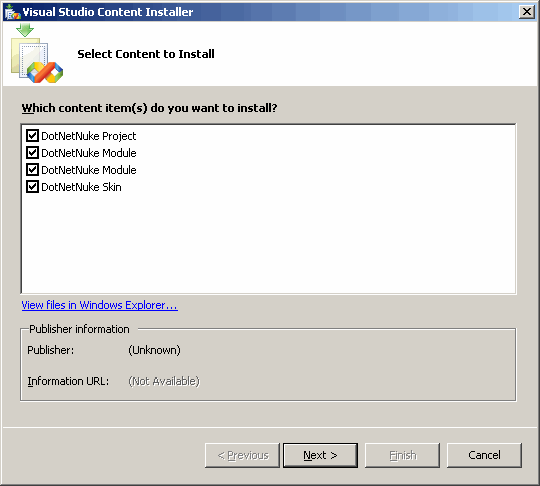
Click Next

Click Ok ( in the future we will likely digitally sign the Starter Kit to avoid this message ).
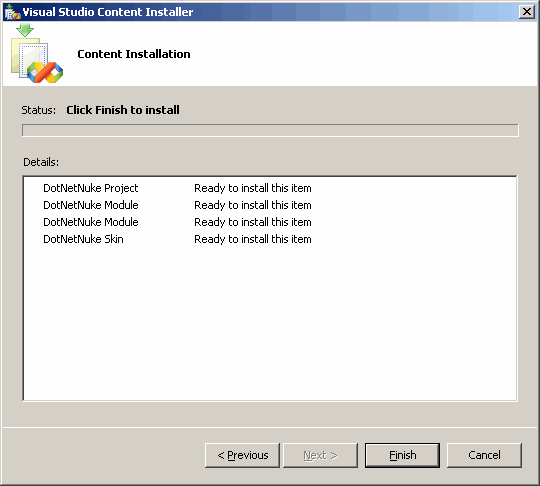
Click Finish

Click Cancel ( you are done ) Now you are ready to create a DotNetNuke application from the Starter Kit using Visual Web Developer. Launch Visual Web Developer and choose New Web Site from the File menu.

In the New Web Site dialog box ( shown below ) select the DotNetNuke Web Application Framework template. In the Location field you should select HTTP ( you can select File System but as per my earlier comments, you may experience some strange behavior ). You will need to specify the location for the website ( if you enter a value of http://localhost/DotNetNuke your website will be created in C:\Inetpub\wwwroot\DotNetNuke and if you select File System your website will be created in C:\Documents and Settings\Administrator\My Documents\Visual Studio 2005\WebSites\DotNetNuke ). Since DotNetNuke is only available in Visual Basic you should select this value from the Language combobox. Select Ok to continue.
This will create a fully functional DotNetNuke web application. It will also display some documentation in your web browser which walks you through the remainder of the installation process. The steps below will walk you through the minimal process. The next step you need to do is create your database. This can be done directly from Visual Web Developer. Right-click the App_Data folder in the Solutions Explorer and select Add New Item.
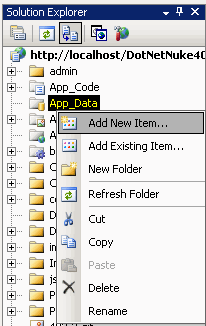
Select SQL Database and click OK ( this will accept the default database name of Database.mdf ).

Make sure the tab in the right-hand pane is set to Solution Explorer. Find the file named release.config. Right-click and select the Rename option from the menu. Rename the file to web.config.

Since DotNetNuke is an extensible platform where a variety of plug-in resources can be installed at run-time, you will need to set the appropriate folder permissions. Locate the folder on your local file system where the site was installed. Right-click and select the Sharing or Properties option from the menu.

Then select the Security tab.
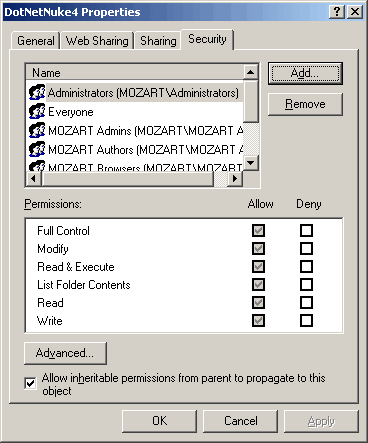
Select Add and enter the name "ASPNET" in Windows 2000 or "NETWORK SERVICE" in Windows 2003. Select Check Name to verify the name and then select Ok once it is verified.
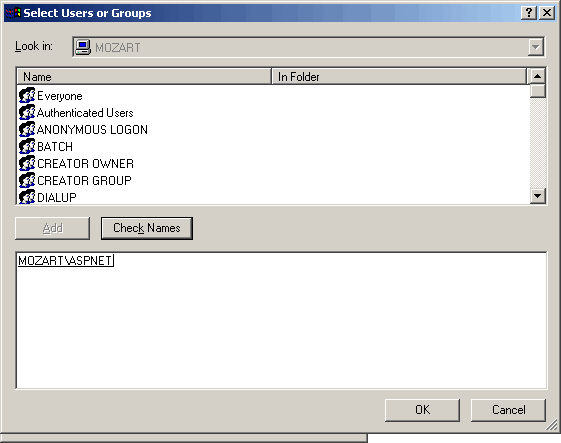
Select the name of the account in the top listbox and then select Allow / Modify permissions from the bottom listbox. Select Apply and then Ok.

If you have completed the steps above, you are now ready to complete the installation of your new DotNetNuke site. In order to view the build progress you should select View / Output ( CTRL-ALT-O ) from the Visual Web Developer menu and select the Output tab.

To install the site, click Ctrl-F5 (ie. hold the Ctrl key down while clicking on the F5 function key). The application may take a few minutes to build if this is your first installation. Your default web browser will launch and will show you the installation progress.

Scroll to the bottom of the installation text in the browser window and select "Click Here To Access Your Portal". The default DotNetNuke application will be displayed.

You are now up and running. Login as the Administrator to add pages and content to your web site.
So lets examine the DotNetNuke 4.0 ( ASP.NET 2.0 ) benefits:
- reduction in the number of developer installation steps
- works with Visual Web Developer ( the lowest cost developer tool ) for a highly productive development experience
- leverages SQL Server 2005 Express ( the lowest cost database engine ) for a totally local development experience
Stay tuned for my next post on Module Development...
In my last article I discussed the installation of Visual Web Developer and the DotNetNuke Starter Kit. In this article I would like to describe Module Development and the new Item Template feature for web projects.
In previous versions of DotNetNuke, the framework had an extensible plug-in model for Modules. However, in order to develop Modules you needed to have access to a functional web development tool like Visual Studio 2003 Standard Edition ( free tools such as Web Matrix were lacking the compilation capabilities required ). You also needed to be fairly knowledgeable in terms of configuring your ASP.NET project and solution configuration files ( since Visual Studio had serious file locking issues when you attempted to use multiple project files ). The default dependency on SQL Server 2000 or MSDE required installation of external components, which were potentially cost prohibitive or restricted based on security concerns ( ie. Slammer ). Lastly, there were not any native templating options to assist developers in bootstrapping their module development efforts ( some third party code generators attempted to fill this gap ).
In Visual Web Developer you will see the Solutions Explorer in the left-hand side of the development environment. Right-click the website root ( labelled http://localhost/DotNetNuke if you are using IIS ) and select Add New Item... from the menu.
The Add New Item dialog box will be displayed. You will notice there is a DotNetNuke Module template displayed in the lower area of the Templates list. Select this template and enter a Name ( note that the Name you enter will be used as a parameter to create customized files, scripts, and classes ). DotNetNuke Modules can be built in both Visual Basic and C#, so you will need to select your preferred language from the combobox. Click Add.
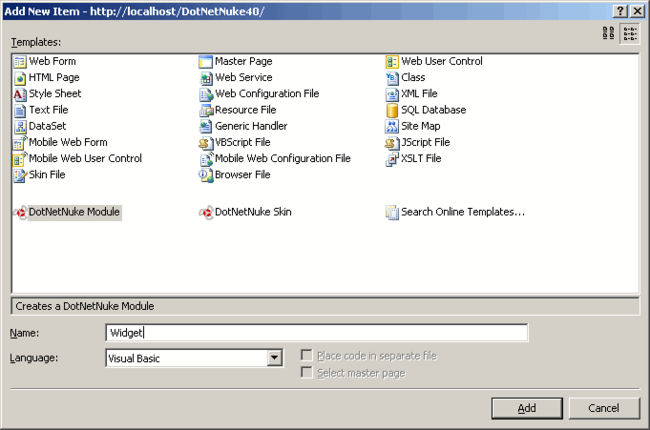
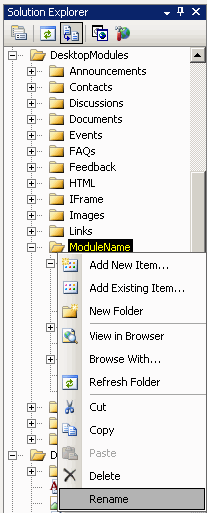
The template will create all of the files necessary to build a custom DotNetNuke Module. This includes your SQL script files, data access layer, business objects, user interface, and deployment manifest. It will also display a page of instructions for your Module in the development environment. Due to limitations in the templating capabilities of Visual Studio 2005, you will need to manually rename a couple of folders before you continue ( this is because there is no way for the system to customize folder names when you create an item from a template ). You will need to rename the /App_Code/ModuleName folder to use the Name you specified in the Add New Item dialog box above ( in this case /App_Code/Widget ). This can be accomplished using the Solution Explorer in Visual Web Developer.

You will also need to rename the /DesktopModules/ModuleName folder.
In order to register the Module in your DotNetNuke framework, you need to add some entries to the database. This can be accomplished using the Module Definitions option in the Host menu or, for development simplicity, you can also use the Module SQL script created using the Item Template. This script will be locacted in the DesktopModules folder and will have the same name as the value entered in the Add New Item dialog box ( in this case named Widget.SqlDataProvider ).

The SQL scripts for DotNetNuke use a special syntax which enables the system integrator to dynamically substitute unique names for objects and custom values for object owners. The simplest way to execute these scripts is to run the DotNetNuke application. In Visual Web Developer, press Ctrl-F5 to launch the application and login as the Host user ( by default the username and password for the Host account is "host" ). Select the SQL option from the Host menu.
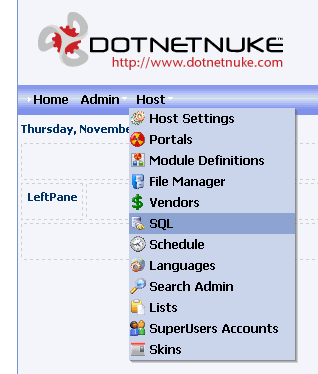
Paste the script from the Module SQL script into the textbox, select the Run As Script option, and click Execute.
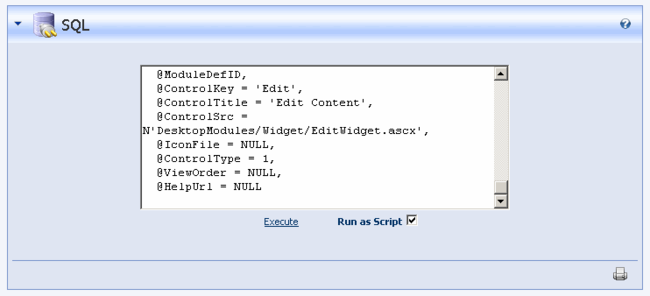
Modules typically store their content in the database. The 01.00.00.SqlDataProvider SQL script created by the DotNetNuke Module template is designed to add all of the necessary tables and stored procedures to the database. This script is located in the DesktopModules folder. Paste the script from the 01.00.00.SqlDataProvider SQL script into the textbox, select the Run As Script option, and click Execute.

The Module should now be fully configured in your web application. To add an instance of the Module to a Page, you should browse to the Home page and select the Module from the combobox in the Control Panel at the top of your browser window. Select Add.

This will add a fully functional instance of the Module to your page. The Module is intended to be a reference example and includes the ability to manage multiple content items within the module. Content is limited to a single text field which can be managed using the standard rich text editor. A default content item is created the first time you add the module to a page. The text for this item comes from the associated ViewModule.ascx.resx file in the App_LocalResources folder. You can leverage the standard DotNetNuke usability model to add new content to the module. Hover over the down-arrow icon to the left of the module title and a popup menu will appear. Click the Add Content option. Alternatively you can select the Add Content link at the bottom of the module as well.

This will display the Edit Module control where you can enter content using a rich text editor. Select Update to save the content.
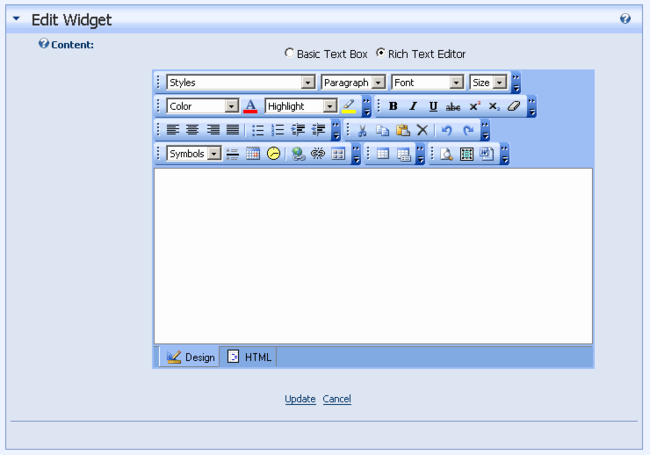
In order to manage the content items for the module, you need to click the pencil icon to the left of the specific item. The Edit Module control will allow you to modify or delete the content item. Another interesting feature of the module is the ability to add Settings which affect the view characteristics of the module instance on a page. To modify thge view characteristics, hover over the down-arrow icon to the left of the module title and select Settings from the popup menu ( or select the Settings icon at the bottom-left corner of the module ). Scroll down to locate the Settings which are specific to the module.

The module has a templating option for content. This provides the Administrator the flexibility to manage the display of the content according to their needs. An example of a display template may be:
<b>Created By:</b> [CREATEDBYUSERNAME] <b>On</b> [CREATEDDATE] <br/>[CONTENT]<br/><hr/>
Notice that the fields in the business layer Info class are specified as tokens which will be replaced with content at run-time. This provides some skinning capabilities for the module. Click Update once you have entered the template.

So lets examine the DotNetNuke 4.0 ( ASP.NET 2.0 ) benefits:
- works with Visual Web Developer ( the lowest cost developer tool ) for a highly productive development experience
- leverages SQL Server 2005 Express ( the lowest cost database engine ) for a totally local development experience
- contains templating capabilities which allow you to create a parameterized, fully functional module based on DotNetNuke development standards ( including portable data access layer, business layer, localization, etc... ).
- modules can easily be created in either Visual Basic or C# ( using the item templates )
Stay tuned for my next post on Module Architecture...
In my last article I discussed DotNetNuke Module Development using Visual Web Developer, SQL Server 2005 Express, the DotNetNuke Starter Kit, and Item Templates. In this article I would like to describe the changes in architecture in ASP.NET 2.0 and how it affects DotNetNuke module developers.
In ASP.NET 1.1 using Visual Studio 2003 Standard Edition ( or higher ) you could create Modules as "Private Assemblies". Essentially what this meant is that we were leveraging a hybrid approach for ASP.NET development - combining the compilation benefits of Class Libraries within the standard Web Project model. So a module would typically have a class library project file for its business layer classes as well as its user control ( code-behind ) classes. It may also have a class library project for its data access layer provider class. In order to acheive an integrated development and debugging experience, these class library project files would need to be added to the main DotNetNuke solution file and configured so that they could build assemblies into the local /bin folder. Once you were satisfied with the stability of a module, you could package the user control files, the associated assemblies in the /bin folder, SQL scripts, and an installation manifest file into a single ZIP file which other users could install into their DotNetNuke web application framework at run-time.
ASP.NET 2.0 significantly changed the compilation model for web projects. The new model is referred to as "dynamic compilation" and essentially means that the framework just-in-time compiles your code at the time it is requested by a user. In addition, ASP.NET 2.0 deprecated the use of project files within a master web project. What this means is that you no longer have a way to group module source code files so that they compile into their own private assembly. Initially, these changes appeared to be showstoppers for DotNetNuke module development. But once some of the nuances of the new platform were better understood, there emerged some interesting new module development options.
So lets talk about the new "dynamic" module development option. In ASP.NET 2.0 there is now a special root folder named "App_Code". Source code class files which exist in this folder are dynamically compiled at run-time to create local assemblies in the /bin folder. If you created a module using the Item Template concept from my previous post, you will see that it created a series of files in both the App_Code folder and DesktopModules folder:

Files located in the App_Code folder are source code class files which are designed to be compiled into the /bin. Files located in the DesktopModules folder are user interface and resource files which do not require compilation ( except for the new "code-beside" files which we will discuss later ).
You will notice that in order to add a new Module to the DotNetNuke web application framework, we did not need to configure project files or add them to the main DotNetNuke solution file. The fact that the module files are located in the correct location under the master web project, allows the module to integrate seamlessly with the Visual Web Developer environment.
I think it is beyond the purpose of this post to go into the details of each module file created ( there are a number of articles and books which cover this topic in depth ). It is safe to say that the list of module files created with the Item Template are equivalent in structure and content to module files used to develop "private assembly" modules in ASP.NET 1.1. The only difference is they may have been relocated to a new folder location in ASP.NET 2.0.
In previous versions of DotNetNuke running on ASP.NET 1.1, new developers often found the DotNetNuke Data Provider concept to be challenging. This was partly because of the advanced project configuration required. You will notice that in DotNetNuke 4.0.0, this is completely simplified. The SqlDataProvider class exists in the same App_Code folder as the DataProvider for the module ( and if you plan on supporting other database platforms as well, you can simply add these providers here as well ).
For module developers who have more of an expert understanding of the DotNetNuke core architecture, you are probably wondering how the framework is able to work with dynamically compiled classes in the the App_Code folder. This area definitely posed the biggest problem when we were investigating our platform migration strategy. The problem is that DotNetNuke uses Reflection in many places to dynamically create objects based on TypeNames. In ASP.NET 1.1, you needed to know both the classname as well as the assembly name in order to determine the Type. Since the assembly name is not known in ASP.NET 2.0, it is impossible to use the same Reflection logic we used in ASP.NET 1.1 ( for dynamic modules anyways ). Well, the engineers at Microsoft must have foreseen this problem as they created a new framework method called BuildManager.GetType() which allows you to simply specify a class name as a parameter. This new method will interrogate the /bin as well as files in the App_Code folder to find a suitable match.
In terms of module development, you have a fully functional code editor in Visual Web Developer including features such as Intellisense, collapsible code regions, code highlighting, a visual designer for user interface construction, automatic syntax verification, etc... It also contains the Database Explorer which allows you to manage your database objects and scripts from directly within the IDE. It is important to note that since SQL Server 2005 Express is based on the same engine as the enterprise version of SQL Server 2005, the scripts you create can be targeted at both deployment platforms.
So once you have a fully working module ( which we do in this case because we created it from an Item Template ), we need a way to package the Module for portability. There are two distinct scenarios to consider for packaging:
1. The module was developed internally by an individual or organization who has no intent of making it available for public distribution. In this case the protection of intellectual property is not an issue because it is not critical for them to control who has access to the source code. They simply want a standard method for deploying the module into a production environment. In ASP.NET 2.0 they could simply XCOPY deploy individual files, but creating a module package has the distinct benefit of versioning, running database scripts, and providing an audit trail.
2. The module was developed for public distribution ( ie. a commercial module developer ). In this case, the protection of intellectual property is important because the source code may contain valuable concepts which are critical to the market value of the module.
In scenario #1, it would be acceptable to package source code with the module, but in #2 it would not. In ASP.NET 2.0, it is now possible to accomodate both scenarios:
Lets look at scenario #1 first...
DotNetNuke has a module installation manifest file ( *.dnn ) which is an XML file that provides configuration instructions when a module is installed into DotNetNuke. The schema for this file has not changed between DotNetNuke 4.0 and 3.0; however, we have added a new token to support the App_Code folder. You will notice the Solutions Explorer that the Item Template created a *.dnn file based on the name you specified in the Add New Item... dialog box ( in this case Widget.dnn ).
<dotnetnuke version="3.0" type="Module">
<folders>
<folder>
<name>Widget</name>
<friendlyname>Widget</friendlyname>
<foldername>Widget</foldername>
<modulename>Widget</modulename>
<description>A Widget module</description>
<version>01.00.00</version>
<businesscontrollerclass>YourCompany.Modules.Widget.WidgetController</businesscontroller
class>
<modules>
<module>
<friendlyname>Widget</friendlyname>
<cachetime>0</cachetime>
<controls>
<control>
<src>DesktopModules/Widget/ViewWidget.ascx</src>
<type>View</type>
<helpurl></helpurl>
</control>
<control>
<key>Edit</key>
<title>Edit Content</title>
<src>DesktopModules/Widget/EditWidget.ascx</src>
<type>Edit</type>
<helpurl></helpurl>
</control>
<control>
<key>Settings</key>
<title>Widget Settings</title>
<src>DesktopModules/Widget/Settings.ascx</src>
<type>Edit</type>
<helpurl></helpurl>
</control>
</controls>
</module>
</modules>
<files>
<file>
<name>ViewWidget.ascx</name>
</file>
<file>
<name>ViewWidget.ascx.vb</name>
</file>
<file>
<name>EditWidget.ascx</name>
</file>
<file>
<name>EditWidget.ascx.vb</name>
</file>
<file>
<name>Settings.ascx</name>
</file>
<file>
<name>Settings.ascx.vb</name>
</file>
<file>
<path>App_LocalResources</path>
<name>ViewWidget.ascx.resx</name>
</file>
<file>
<path>App_LocalResources</path>
<name>EditWidget.ascx.resx</name>
</file>
<file>
<path>App_LocalResources</path>
<name>Settings.ascx.resx</name>
</file>
<file>
<path>[app_code]</path>
<name>DataProvider.vb</name>
</file>
<file>
<path>[app_code]</path>
<name>WidgetController.vb</name>
</file>
<file>
<path>[app_code]</path>
<name>WidgetInfo.vb</name>
</file>
<file>
<path>[app_code]</path>
<name>SqlDataProvider.vb</name>
</file>
<file>
<name>01.00.00.SqlDataProvider</name>
</file>
<file>
<name>Uninstall.SqlDataProvider</name>
</file>
</files>
</folder>
</folders>
</dotnetnuke>
In the path node of the file collection you will notice a [app_code] token. This instructs the DotNetNuke web application framework that when the module is installed, it needs to create the file in the App_Code folder related to the module. Essentially this is providing an alternative method to pre-compiling the module as a private assembly and including it in the package ( a procedure which is not possible using Visual Web Developer ). But you need to realize that if you are using this method, you are including full source code with your module. There is also a difference in the BusinessControllerClass node as it now only specifies a class name ( rather than an assembly-qualified class name ).
To package the module into a ZIP file you will need to create a temporary folder to assemble all of the required files. This includes the files from both the App_Code and DesktopModules folder related to the module.
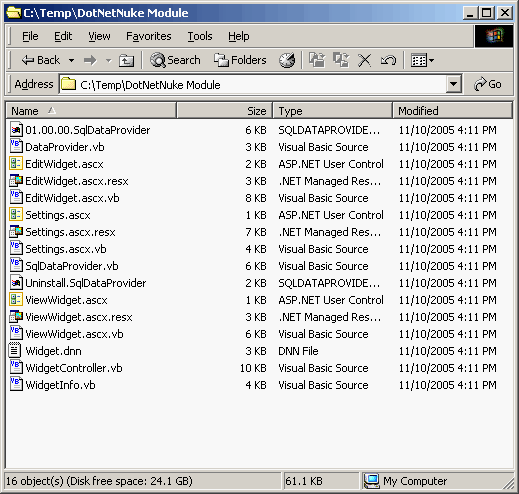
Compress the files into a standard ZIP file.

This package can now be installed into a DotNetNuke application ( this can be accomplished using the Upload option in the Module Definitions interface in the Host menu ).
Now lets look at scenario #2...
Unfortunately, Visual Web Developer does not have the ability to perform pre-compilation. Therefore, if you need to protect your source code intellectual property and compile it into a binary assembly, you will need at least Visual Studio 2005 Standard Edition.
In order to instruct the ASP.NET 2.0 compiler to produce a granular assembly for the module class code located in the App_Code folder, you will need to make a modification to the web.config file:
<compilation>
<codeSubDirectories>
<add directoryName="Widget"/>
</codeSubDirectories>
</compilation>
To pre-compile a module in Visual Studio 2005, you in fact have to pre-compile your entire web application ( which is less than optimal, but there is no alternative at the time ).
In Visual Studio 2005 you will see the Solutions Explorer in the left-hand side of the development environment. Right-click the website root ( labelled http://localhost/DotNetNuke if you are using IIS ) and select Publish Web Site... from the menu ( do not get confused with the Build Web Site option as it serves a completely different purpose in ASP.NET 2.0 ).

Enter a Target Location ( this is a folder where your pre-compiled web will be built ). Select the "Allow this precompiled site to be updateable" checkbox ( this preserves the legacy behavior from ASP.NET 1.1 where you can make run-time modifications to your *.ascx files ). Select the "Use fixed naming and single page assemblies" checkbox ( this instructs the compiler to create granular assemblies for user controls and code folders which have human-friendly names rather than hash codes ). click OK.
Visual Studio will display its progress in the Output window. Once it is complete, browse to the Target Location specified above and open the /bin folder. You will notice that there are a number of files which have strange names ( that is, if you are used to developing DotNetNuke on ASP.NET 1.1 ).
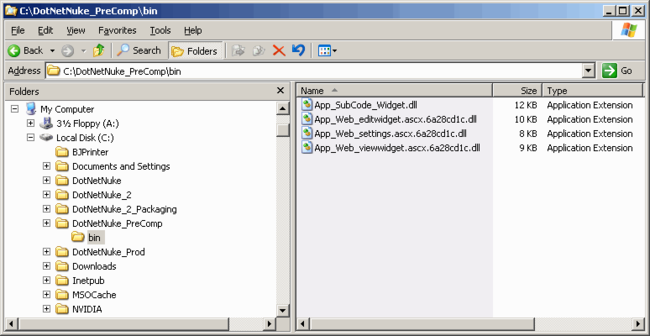
The /bin directory contains assemblies for all of the class libraries, App_Code source files, and user control code-beside files ( *.ascx.vb ). The screen shot above has reduced the number of files to only those which relate to the module we are packaging ( you can identify them by the file name as well as by the hashcode, as it will be consistent for all code-beside assemblies which exist in the same folder ).
To package the module into a ZIP file you will need to create a temporary folder to assemble all of the required files. This includes the assemblies, the user controls, and any resources in the DesktopModules folder related to the module.

The DotNetNuke installation manifest file will need to be modified to remove the references to the App_Code source files as well as the DesktopModules code-beside files, and include the compiled assemblies instead.
<dotnetnuke version="3.0" type="Module">
<folders>
<folder>
<name>Widget</name>
<friendlyname>Widget</friendlyname>
<foldername>Widget</foldername>
<modulename>Widget</modulename>
<description>A Widget module</description>
<version>01.00.00</version>
<businesscontrollerclass>YourCompany.Modules.Widget.WidgetController</businesscontroller
class>
<modules>
<module>
<friendlyname>Widget</friendlyname>
<cachetime>0</cachetime>
<controls>
<control>
<src>DesktopModules/Widget/ViewWidget.ascx</src>
<type>View</type>
<helpurl></helpurl>
</control>
<control>
<key>Edit</key>
<title>Edit Content</title>
<src>DesktopModules/Widget/EditWidget.ascx</src>
<type>Edit</type>
<helpurl></helpurl>
</control>
<control>
<key>Settings</key>
<title>Widget Settings</title>
<src>DesktopModules/Widget/Settings.ascx</src>
<type>Edit</type>
<helpurl></helpurl>
</control>
</controls>
</module>
</modules>
<files>
<file>
<name>ViewWidget.ascx</name>
</file>
<file>
<name>EditWidget.ascx</name>
</file>
<file>
<name>Settings.ascx</name>
</file>
<file>
<path>App_LocalResources</path>
<name>ViewWidget.ascx.resx</name>
</file>
<file>
<path>App_LocalResources</path>
<name>EditWidget.ascx.resx</name>
</file>
<file>
<path>App_LocalResources</path>
<name>Settings.ascx.resx</name>
</file>
<file>
<name>App_SubCode_Widget.dll</name>
</file>
<file>
<name>App_Web_editwidget.ascx.6a28cd1c.dll</name>
</file>
<file>
<name>App_Web_settings.ascx.6a28cd1c.dll</name>
</file>
<file>
<name>App_Web_viewwidget.ascx.6a28cd1c.dll</name>
</file>
<file>
<name>01.00.00.SqlDataProvider</name>
</file>
<file>
<name>Uninstall.SqlDataProvider</name>
</file>
</files>
</folder>
</folders>
</dotnetnuke>
Compress the files into a standard ZIP file.

This package can now be installed into a DotNetNuke application ( this can be accomplished using the Upload option in the Module Definitions interface in the Host menu ).
So lets examine the DotNetNuke 4.0 ( ASP.NET 2.0 ) benefits:
- extremely simple configuration to integrate a new module into the development environment
- powerful web development and debugging experience using Visual Web Developer
- integrated database management tools for SQL Server 2005 Express inside Visual Web Developer
- ability to package a "dynamic" module without requiring pre-compilation
- ability to pre-compile and package a module using Visual Studio 2005 for source code protection.