深度学习:在图像上找到手势
情感手势检测 (Emotion Gesture Detection)
Has anyone ever wondered looking at someone and tried to analyze what kind of emotion they had or what kind of gesture they were trying to perform but you ended up being confused. Maybe once you tried to approach a baby which looked like this:
有没有人想知道看着某人并试图分析他们有什么样的情感或他们试图执行哪种手势,但最终却感到困惑。 也许一旦您尝试接近这样的婴儿:
You thought it likes you and just wants a cuddle and then you ended up carrying it and then this happened!
您以为它喜欢您,只想要一个拥抱,然后您最终携带它,然后发生了!

Oops! That did not work out as planned. But real-life uses may not be as simple as the above situation and may require more precise human emotion analysis as well as gesture analysis. This field of application is especially useful in any department where customer satisfaction or just knowing what the customer wants is extremely important.
糟糕! 那没有按计划进行。 但是现实生活中的使用可能不像上述情况那么简单,并且可能需要更精确的人类情感分析以及手势分析。 在客户满意度或仅了解客户需求至关重要的任何部门中,此应用领域特别有用。
Today we will be uncovering a couple of Deep Learning models which does exactly that. The models we will be developing today can identify some human emotions as well as a few gestures. We will be trying to identify 6 emotions namely angry, happy, neutral, fear, sad and surprise. We will also be identifying 4 types of gestures which are loser, victory, super, and punch. We will be performing a real-time performance and we will be getting a real-time vocal response from the model.
今天,我们将揭露一些可以做到这一点的深度学习模型。 我们今天将要开发的模型可以识别一些人类情感以及一些手势。 我们将尝试识别6种情绪,即愤怒,快乐,中立,恐惧,悲伤和惊奇。 我们还将确定4种手势类型,即失败者,胜利,超级手势和拳打手势。 我们将进行实时表演,并从模型中获得实时的声音响应。
The emotions model will be built using convolution neural networks from scratch and for finger gestures, I will be using transfer learning with VGG-16 architecture and adding custom layers to improve the performance of the model to get better and higher accuracy. The emotion analysis and finger gestures will provide an appropriate vocal as well as text response for each of the actions. The metric we will be using is accuracy and we will try to achieve a validation accuracy of at least 50% for the emotions model-1, over 65% for emotions model-2, and a validation accuracy of over 90% for the gestures model.
情绪模型将从头开始使用卷积神经网络构建,并用于手指手势,我将在VGG-16架构中使用转移学习,并添加自定义图层以改善模型的性能以获得更好和更高的准确性。 情绪分析和手指手势将为每个动作提供适当的声音和文本响应。 我们将使用的度量标准是准确性,我们将努力使情感模型1的验证精度至少达到50%,情感模型2的验证精度至少达到65%,手势模型的验证精度达到90%以上。
数据集: (Datasets:)
Let us now look at the dataset choices we have available to us.
现在让我们看一下可供选择的数据集。
1. Kaggle’s fer2013 dataset — The dataset is an open-source dataset that contains 35,887 grayscale images of various emotions which are all labeled and are of size 48x48. The Facial Expression Recognition Dataset was published during the International Conference on Machine Learning (ICML). This Kaggle dataset will be the more primary and important dataset that will be used for emotion analysis in this case study.
1. Kaggle的fer2013数据集 —该数据集是一个开源数据集,其中包含35887张各种情绪的灰度图像,这些图像均已标记且大小为48x48。 面部表情识别数据集在国际机器学习大会(ICML)期间发布。 该Kaggle数据集将是更主要和重要的数据集,在本案例研究中将用于情感分析。
The dataset is given in an excel sheet in .csv format and the pixels are to be extracted and after extraction of the pixels and pre-processing of data, the dataset looks like the image posted below:
数据集以.csv格式在excel工作表中给出,并且要提取像素,并且在提取像素并进行数据预处理之后,数据集看起来像下面发布的图像:

(Refer this link in case the first link is not working).
(如果第一个链接不起作用,请参考此链接 )。
2. The first affect in the wild challenge — This can be a secondary dataset considered for this case study. The First Affect-in-the-wild Challenge is a design on state of the art Deep Neural Architectures including the AffWildNet which allows us to exploit the AffWild database for learning features, which can be used as priors for achieving the best performances for dimensional and categorical emotion recognition. In the download link, we will find a tar.gz file, which contains 4 folders named: videos, annotations, boxes, and landmarks. However, for our emotions recognition model, we will be strictly considering only the fer2013 dataset.
2. 野外挑战中的第一个影响 -这可以是本案例研究考虑的第二个数据集。 “第一个自然情感挑战”是对包括AffWildNet在内的最先进的深度神经架构进行的设计,该设计使我们能够利用AffWild数据库获取学习功能,可以将其用作获得最佳尺寸和性能的先验条件。分类情感识别。 在下载链接中,我们将找到一个tar.gz文件,该文件包含4个文件夹,名称分别为:视频,注释,框和地标。 但是,对于我们的情绪识别模型,我们将严格只考虑fer2013数据集。
3. ASL Alphabet dataset — This will be the primary dataset for finger gesture detection. The “American Sign Language” Alphabet dataset consists of the collection of images of alphabets from the American Sign Language, separated into 29 folders which represent the various classes. The training data set contains 87,000 images which are 200x200 pixels.
3. ASL字母数据集 -这将是手指手势检测的主要数据集。 “美国手语”字母表数据集由来自美国手语的字母表图像集合组成,分为29个文件夹,分别代表各个类别。 训练数据集包含87,000张200x200像素的图像。
There are 29 classes, of which 26 are for the letters A-Z and 3 classes for SPACE, DELETE, and NOTHING. These 3 classes are very helpful in real-time applications and classification. However, for our gesture recognition, we will be using 4 classes from A-Z from this data for some of the appropriate required actions with the fingers. The Model will be trained to recognize 4 of these specific hand gestures which are A (punch), F (Super), L (Loser), and V (Victory). We will then train our model to recognize these gestures and give an appropriate vocal response for each of the following accordingly.
有29个类,其中26个是字母AZ,3个类是SPACE,DELETE和NOTHING。 这3个类在实时应用程序和分类中非常有帮助。 但是,为了进行手势识别,我们将使用来自该数据的AZ中的4个类,用手指进行一些适当的必要操作。 该模型将接受训练以识别其中4种特定手势,即A(打Kong),F(超级),L(失败者)和V(胜利)。 然后,我们将训练我们的模型以识别这些手势,并相应地对以下每个手势做出适当的声音响应。
4. Custom Datasets — For both of these i.e. emotion analysis and finger gesture detection we can also use custom datasets of yourself or friends or even family for the recognition of various sentiments as well as hand gestures. The images taken will be grayscaled and then resized according to our requirements.
4.自定义数据集-对于这两种情感分析和手指手势检测,我们还可以使用您自己或朋友甚至家人的自定义数据集来识别各种情绪以及手势。 拍摄的图像将被灰度化,然后根据我们的要求调整大小。
预处理: (Pre-processing:)
For our emotions model, we will be using Kaggle’s fer2013 dataset and we will be using ASL dataset for gesture identification. We can begin performing the required pre-processing required for the models. For the emotions dataset, we will look at the libraries required for pre-processing.
对于我们的情感模型,我们将使用Kaggle的fer2013数据集,并将使用ASL数据集进行手势识别。 我们可以开始执行模型所需的预处理。 对于情绪数据集,我们将研究预处理所需的库。
Pandas is a fast, flexible open-source data analysis library that we will be using for accessing the .csv files.
Pandas是一个快速,灵活的开源数据分析库,我们将使用它来访问.csv文件。
Numpy is used for processing on multi-dimensional arrays. For our Data Pre-Processing, we will use numpy for making an array of the pixel features.
Numpy用于处理多维数组。 对于我们的数据预处理,我们将使用numpy制作像素特征数组。
The OS module provides us a way to interact with the operating system.
操作系统模块为我们提供了一种与操作系统进行交互的方式。
The cv2 module is the computer vision/open-cv module we will be using to convert the numpy arrays of pixels into visual images.
cv2模块是计算机视觉/ open-cv模块,我们将使用它将像素的numpy数组转换为视觉图像。
tqdm is an optional library that we can use for visualizing the speed of processing and the number of bits/second.
tqdm是一个可选库,我们可以使用它来可视化处理速度和每秒位数。
Now let us read the fer2013.csv file using pandas.
现在,让我们使用熊猫读取fer2013.csv文件。

We read the fer2013.csv file using pandas. The fer2013 is the facial expressions recognition .csv file from Kaggle. In the .csv file we have 3 main columns — emotion, pixels and Usage. The emotion column consists of labels 0–6. The pixels row contains the pixel images in an array format. The Usage column contains of Training, Public Test and Private Test. Let us have a closer look at this.
我们使用熊猫读取了fer2013.csv文件。 fer2013是来自Kaggle的面部表情识别.csv文件。 在.csv文件中,我们有3个主要列-情感,像素和使用情况。 情绪栏包含标签0–6。 像素行包含阵列格式的像素图像。 “用法”列包含“培训”,“公共测试”和“私人测试”。 让我们仔细看看。
The Labels are in the range 0–6 where:
标签的范围是0–6,其中:
0 = Angry, 1 = Disgust, 2 = Fear, 3 = Happy,
0 =生气,1 =厌恶,2 =恐惧,3 =开心,
4 = Sad, 5 = Surprise, 6 = Neutral.
4 =悲伤,5 =惊喜,6 =中立。
The pixels consists of the pixel values which we can convert into an array form and then use open cv module cv2 to convert the pixel array into an actual image we can visualize. The Usage column consists of Training, PublicTest, and PrivateTest. We will use the Training to store the locations of the training dataset and the remaining PublicTest and PrivateTest will be used for storing the images in a validation folder.
像素由像素值组成,我们可以将其转换为数组形式,然后使用开放式cv模块cv2将像素数组转换为可以可视化的实际图像。 “使用情况”列包括培训,PublicTest和PrivateTest。 我们将使用培训来存储培训数据集的位置,其余的PublicTest和PrivateTest将用于将图像存储在验证文件夹中。
Now let us extract these images accordingly. In the below code blocks I will be showing for one class for both train and validation. In this code block, we will be extracting the images from the pixel’s column and then we will be creating a train and validation folder which can be tracked from the Usage column. For each of the train and validation directories, we will be creating all the 7 folders which will contain the Angry, Disgust, Fear, Happy, Sad, Surprise, and Neutral.
现在让我们相应地提取这些图像。 在下面的代码块中,我将显示针对训练和验证的一门课程。 在此代码块中,我们将从像素的列中提取图像,然后创建可从“用法”列中进行跟踪的训练和验证文件夹。 对于每个火车和验证目录,我们将创建所有7个文件夹,其中包含“愤怒”,“厌恶”,“恐惧”,“快乐”,“悲伤”,“惊喜”和“中立”。
We are looping through the dataset and we are converting the pixels from string to float and then storing all the float values in a numpy array. We are converting the image of size 48x48 which is our desired image size. (This step is optional because the given pixels are already of the desired size.)
我们正在遍历数据集,并将像素从字符串转换为float,然后将所有float值存储在numpy数组中。 我们正在转换大小为48x48的图像,这是我们所需的图像尺寸。 (此步骤是可选的,因为给定的像素已经具有所需的大小。)
If the Usage is given as Training then we make a train directory as well as the separate directories for each of the emotions. We store the images in the right emotion directory which can be found by the labels of the emotion column.
如果“用法”作为“培训”给出,那么我们将为每个情感创建一个培训目录以及单独的目录。 我们将图像存储在正确的情感目录中,该目录可通过情感列的标签找到。
These steps are similarly repeated for the validation directory for which we consider the Usage values as PublicTest and PrivateTest. The emotions are categorized by the labels from the emotion column similar to how the train directory works.
对于验证目录,我们将类似地重复执行这些步骤,我们将其“用法”值视为PublicTest和PrivateTest。 情绪由“情绪”列中的标签进行分类,类似于火车目录的工作方式。
After this step, all the Data Pre-Processing for the training of the emotions is now completed and we have successfully extracted all the images required for the emotions recognition model and now we can proceed with the further steps. Luckily we don’t have to do a lot of pre-processing for the gestures data. Download the ASL dataset and then create the train1 and validation1 folders as below:
完成此步骤之后,用于情感训练的所有数据预处理均已完成,并且我们已经成功提取了情感识别模型所需的所有图像,现在我们可以继续执行其他步骤。 幸运的是,我们无需对手势数据进行大量预处理。 下载ASL数据集,然后按如下所示创建train1和validation1文件夹:

The train1 and validation1 directories have 4 sub-directories labeled as shown. We will use the letter ‘L’ for loser, ‘A’ for punch, ‘F’ for super, and ‘V’ for Victory. Summarizing the letters and gestures below:
train1和validation1目录具有4个子目录,如图所示。 我们将使用字母“ L”代表失败者,“ A”代表拳,“ F”代表超级,“ V”代表胜利。 总结以下字母和手势:
L = Loser | A = Punch | F = Super | V = Victory
L =失败者| A =打Kong| F =超级| V =胜利
The ASL data set contains 3000 images for each letter. So we will use the first 2400 images for the training process and the rest 600 images for validation purposes. This way we are splitting the data into 80:20, train: validation ratio. Paste the first 2400 images of each of the alphabets ‘L’, ‘A’, ‘F,’ and ‘V’ into their respective sub-directories in the train1 folder and paste the remaining 600 images of the alphabets into their respective sub-directories in the validation1 folder.
ASL数据集每个字母包含3000张图像。 因此,我们将使用前2400张图像进行训练,将其余600张图像用于验证。 通过这种方式,我们将数据分为80:20,即训练:验证比率。 将每个字母“ L”,“ A”,“ F”和“ V”的前2400张图像粘贴到train1文件夹中各自的子目录中,并将其余600张字母图像粘贴到其各自的子目录中。验证文件夹中的目录。
探索性数据分析(EDA): (EXPLORATORY DATA ANALYSIS (EDA):)
Before starting to train our emotion and gesture models let us look at images and the overall data we have in our hands after the pre-processing step. Firstly, we will be looking into EDA for emotions data and then we will look into the gestures data. Starting with the emotions data, we will plot a bar graph and scatter plot to see if the dataset is balanced or fairly balanced or totally unbalanced. We will be referring to the train directory.
在开始训练我们的情绪和手势模型之前,让我们先看一下图像和预处理步骤之后手中的全部数据。 首先,我们将研究EDA中的情感数据,然后研究手势数据。 从情绪数据开始,我们将绘制条形图和散点图,以查看数据集是平衡的还是相当平衡的或完全不平衡的。 我们将参考火车目录。
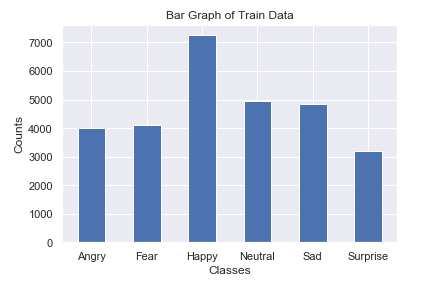
条状图: (Bar Graph:)

散点图: (Scatter Plot:)
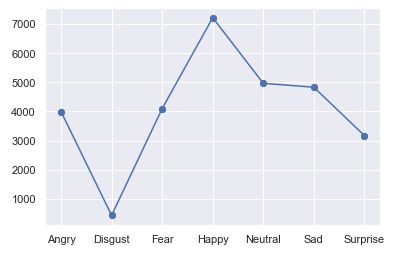
We can notice that this is a fairly balanced model except the images for “disgust” is comparatively less. For our first emotions model, we will be dropping this emotion completely and we will only consider the remaining the remaining 6 emotions. Now let us look at how the train and validation directories for our emotions dataset look like.
我们可以注意到,这是一个相当均衡的模型,只是“厌恶”的图像相对较少。 对于我们的第一个情绪模型,我们将完全删除该情绪,并且仅考虑剩余的6种情绪。 现在让我们看一下情绪数据集的训练目录和验证目录。
培养: (Train:)
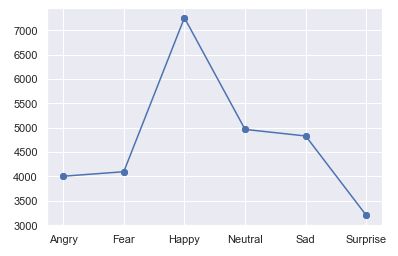
The Bar Graph and the scatter plot of the train data are as shown below:
火车数据的条形图和散点图如下所示:
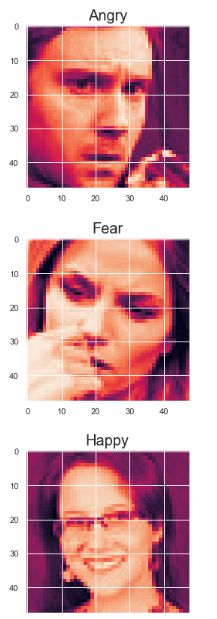
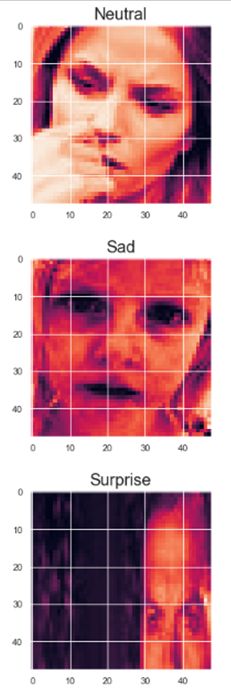
The Train images of each of the dataset is as shown below:
每个数据集的训练图像如下所示:

验证: (Validation:)
The Bar Graph and the scatter plot of the train data are as shown below:
火车数据的条形图和散点图如下所示:


The Validation images of each of the dataset is as shown below:
每个数据集的验证图像如下所示:

With our emotions dataset analyzed, we can move on to the gestures dataset and perform a similar analysis as above and understand the gestures dataset as well. Since the dataset for our gestures data for both train and validation is completely balanced it is easier to analyze them. Both the train and validation data for gestures dataset will be analyzed in the next part and similar images will be displayed as well.
通过分析情绪数据集,我们可以继续进行手势数据集并执行与上述类似的分析,并理解手势数据集。 由于用于训练和验证的手势数据的数据集是完全平衡的,因此更易于分析它们。 手势数据集的训练数据和验证数据将在下一部分中进行分析,并且还将显示类似的图像。
This completes our exploratory data analysis for emotions model. We can now start building our models for emotion recognition. Firstly, we will build an emotions model using image data augmentation and then we will build the gestures model. Later, we will build a second emotions model directly from the .csv file and try to obtain a higher accuracy. In the end, we will create a final model to run the entire script.
这样就完成了我们对情绪模型的探索性数据分析。 现在,我们可以开始建立情感识别模型。 首先,我们将使用图像数据增强来构建情感模型,然后将构建手势模型。 稍后,我们将直接从.csv文件构建第二个情绪模型,并尝试获得更高的准确性。 最后,我们将创建一个最终模型以运行整个脚本。
情感模型1: (Emotion Model-1:)
In this model-1, we will be using techniques of data augmentation. The formal definition of data augmentation is as follows-
在这个model-1中,我们将使用数据扩充技术。 数据扩充的正式定义如下:
Data augmentation is a strategy that enables practitioners to significantly increase the diversity of data available for training models, without actually collecting new data. Data augmentation techniques such as cropping, padding, and horizontal flipping are commonly used to train large neural networks.
数据扩充是一种策略,使从业人员可以显着增加可用于训练模型的数据的多样性,而无需实际收集新数据 。 诸如裁剪,填充和水平翻转之类的数据增强技术通常用于训练大型神经网络。
Reference: bair.berkeley.edu
参考: bair.berkeley.edu
We will now proceed to import the required libraries and specify some parameters which will be needed for training the model.
现在,我们将继续导入所需的库,并指定一些训练模型所需的参数。
Import all the important required Deep Learning Libraries to train the emotions model.Keras is an Application Programming Interface (API) that can run on top of Tensorflow.Tensorflow will be the main deep learning module we will use to build our deep learning model.The ImageDataGenerator is used for Data augmentation where the model can see more copies of the model. Data Augmentation is used for creating replications of the original images and using those transformations in each epoch. The layers for training which will be used are as follows:1. Input = The input layer in which we pass the input shape.2. Conv2D = The Convolutional layer combined with Input to provide an output of tensors3. Maxpool2D = Downsampling the Data from the convolutional layer.4. Batch normalization = It is a technique for training very deep neural networks that standardizes the inputs to a layer for each mini-batch. This has the effect of stabilizing the learning process and dramatically reducing the number of training epochs required to train deep networks.5. Dropout = Dropout is a technique where randomly selected neurons are ignored during training. They are “dropped-out” randomly and this prevents over-fitting.6. Dense = Fully Connected layers.7. Flatten = Flatten the entire structure to a 1-D array.The Models can be built in a model like structure or can be built in a sequential manner.Use of l2 regularization for fine-tuning.The optimizer used will be Adam as it performs better than the other optimizers on this model.Numpy for numerical array-like operations.pydot_ng and Graphviz are used for making plots.We are also importing the os module to make it compatible with the Windows environment.
导入所有必需的重要深度学习库以训练情绪模型.Keras是一个可在Tensorflow之上运行的应用程序编程接口(API),Tensorflow将是我们用于构建深度学习模型的主要深度学习模块。 ImageDataGenerator用于数据增强,其中模型可以查看模型的更多副本。 数据增强用于创建原始图像的复制并在每个时期中使用这些转换。 将使用的训练层如下:1.。 输入 =我们在其中传递输入形状的输入层2。 Conv2D =卷积层与Input组合以提供张量的输出3。 Maxpool2D =从卷积层对数据进行下采样4。 批次归一化 =这是一种用于训练非常深的神经网络的技术,该技术可以将每个微型批次的输入标准化。 这具有稳定学习过程并显着减少训练深度网络所需的训练时期的数量的作用。5。 辍学 =辍学是一种在训练过程中忽略随机选择的神经元的技术。 它们是随机“脱落”的,这可以防止过拟合6。 密集 =完全连接的图层7。 Flatten =将整个结构展平为一维数组,这些模型可以以类似结构的模型构建,也可以以顺序方式构建。使用l2正则化进行微调,执行时使用的优化器将是Adam比该模型上的其他优化器更好.Numpy用于类似数字数组的操作.pydot_ng和Graphviz用于绘制图;我们还导入了os模块以使其与Windows环境兼容。
num_classes defines the number of classes we have to predict which are namely Angry, Fear, Happy, Neutral, Surprise, and Neutral.From the exploratory Data Analysis we know that The Dimensions of the image are: Image Height = 48 pixels Image Width = 48 pixels Number of classes = 1 because the images are gray-scale images.We will consider a batch size of 32 for the training of the image augmentation.
num_classes定义了我们必须预测的类别数,即愤怒,恐惧,快乐,中立,惊奇和中立。根据探索性数据分析,我们知道图像的尺寸为:图像高度= 48像素图像宽度= 48像素类别数= 1,因为图像是灰度图像。我们将考虑批量大小为32的图像增强训练。
Specify the train and the validation directory for the stored images.train_dir is the directory that will contain the set of images for training.validation_dir is the directory that will contain the set of validation images.
为存储的图像指定火车和验证目录.train_dir是将包含用于训练的图像集的目录.validation_dir是将包含验证图像集的目录。
数据扩充 (DATA AUGMENTATION:)
We will look at the data augmentation code now:
我们现在来看一下数据增强代码:
The ImageDataGenerator is used for data augmentation of images. We will be replicating and making copies of the transformations of theoriginal images. The Keras Data Generator will use the copies andnot the original ones. This will be useful for training at each epoch. We will be rescaling the image and updating all the parameters to suit our model. The parameters are as follows:1. rescale = Rescaling by 1./255 to normalize each of the pixel values2. rotation_range = specifies the random range of rotation3. shear_range = Specifies the intensity of each angle in the counter-clockwise range.4. zoom_range = Specifies the zoom range. 5. width_shift_range = specify the width of the extension.6. height_shift_range = Specify the height of the extension.7. horizontal_flip = Flip the images horizontally.8. fill_mode = Fill according to the closest boundaries. train_datagen.flow_from_directory Takes the path to a directory & generates batches of augmented data. The callable properties are as follows:1. train dir = Specifies the directory where we have stored the image data.2. color_mode = Important feature which we need to specify how our images are categorized i.e. grayscale or RGB format. The default is RGB.3. target_size = The Dimensions of the image.4. batch_size = The number of batches of data for the flow operation.5. class_mode = Determines the type of label arrays that are returned.“categorical” will be 2D one-hot encoded labels.6. shuffle = shuffle: Whether to shuffle the data (default: True) If set to False, sorts the data in alphanumeric order.
ImageDataGenerator用于图像的数据扩充。 我们将复制和复制原始图像的转换。 Keras数据生成器将使用副本而不是原始副本。 这对于每个时期的训练都是有用的。 我们将重新缩放图像并更新所有参数以适合我们的模型。 主要参数如下:1。 重新调整 =重标度由1./255归一化每个像素values2的。 rotation_range =指定旋转的随机范围3。 shear_range =指定逆时针范围内每个角度的强度4。 zoom_range =指定缩放范围。 5. width_shift_range =指定扩展名的宽度。6 。 height_shift_range =指定扩展的高度7。 horizontal_flip = 水平翻转图像8。 fill_mode =根据最接近的边界填充。 train_datagen.flow_from_directory取得目录的路径并生成批次的扩充数据。 可调用的属性如下:1。 train dir =指定我们存储图像数据的目录2。 color_mode =重要功能,我们需要指定图像的分类方式,即灰度或RGB格式。 默认值为RGB.3。 target_size =图片的尺寸4。 batch_size =流操作的数据批数5。 class_mode =确定返回的标签数组的类型。“ categorical”将是二维一键编码的标签。6。 shuffle = shuffle:是否随机播放数据(默认值:True)如果设置为False,则按字母数字顺序对数据进行排序。
情绪模型-1: (EMOTIONS MODEL-1:)
Now we will proceed towards building the model.
现在,我们将继续构建模型。
We will be using a sequential type of architecture for our model. Our Sequential model will have a total of 5 blocks i.e. three convolutional blocks, one fully connected layer, and one output layer.We will have 3 convolutional blocks with filters of increasing size like 32, 64, and 128 respectively. The kernel_size will be (3,3) and the kernel_initializer will be he_normal. We can also use a kernel_regularizer with l2 normalization. Our Preferred choice of activation is elu because it usually performs better on images. The Input shape will be the same as the size of each of our train and validation images.The Batch Normalization layer — Batch normalization is a technique for improving the speed, performance, and stability of artificial neural networks. Max pooling is used to downsample the data. The Dropout layer is used for the prevention of over-fitting.The fully connected block consists of a Dense layer of 64 filters and a batch normalization followed by a dropout layer. Before passing through the Dense layer the data is flattened to match the dimensions.Finally, the output layer consists of a Dense layer with a softmax activation to give probabilities according to the num_classes which represents the number of predictions to be made.
我们将为模型使用顺序类型的体系结构。 我们的序列模型总共有5个块,即3个卷积块,1个完全连接层和1个输出层;我们将有3个卷积块,其滤波器的大小分别为32、64和128。 kernel_size将为(3,3),kernel_initializer将为he_normal。 我们还可以使用带有l2归一化的kernel_regularizer。 我们首选的激活方式是elu,因为它通常在图像上表现更好。 输入的形状将与我们每个训练和验证图像的大小相同。批归一化层—批归一化是一种用于提高人工神经网络的速度,性能和稳定性的技术。 最大池用于减少数据采样。 Dropout层用于防止过度拟合。完全连接的块由64个过滤器的Dense层和批处理归一化后接dropout层组成。 在通过Dense层之前,数据将被展平以匹配尺寸。最后,输出层由具有softmax激活的Dense层组成,以根据num_classes给出表示要进行的预测的次数的概率。
模型图: (Model Plot:)
This is how our overall model which we built looks like:
这就是我们构建的整体模型的样子:

回调: (Callbacks:)
We will be importing the 3 required callbacks for training our model. The 3 important callbacks are ModelCheckpoint, ReduceLROnPlateau, and Tensorboard. Let us look at what task each of these individual callbacks performs.
我们将导入3个必需的回调以训练模型。 3个重要的回调是ModelCheckpoint,ReduceLROnPlateau和Tensorboard。 让我们看看这些单独的回调分别执行什么任务。
ModelCheckpoint — This callback is used for storing the weights of our model after training. We save only the best weights of our model by specifying save_best_only=True. We will monitor our training by using the accuracy metric.
ModelCheckpoint —此回调用于训练后存储模型的权重。 通过指定save_best_only = True,我们仅保存模型的最佳权重。 我们将使用准确性指标来监控我们的培训。
ReduceLROnPlateau — This callback is used for reducing the learning rate of the optimizer after a specified number of epochs. Here, we have specified the patience as 10. If the accuracy does not improve after 10 epochs, then our learning rate is reduced accordingly by a factor of 0.2. The metric used for monitoring here is accuracy as well.
ReduceLROnPlateau-此回调用于在指定的时期数之后降低优化器的学习率。 在这里,我们将耐心性指定为10。如果在10个周期后精度没有提高,那么我们的学习率将相应降低0.2倍。 此处用于监视的指标也是准确性。
Tensorboard — The tensorboard callback is used for plotting the visualization of the graphs, namely the graph plots for accuracy and the loss.
Tensorboard — tensorboard回调用于绘制图形的可视化效果,即准确性和损失的图形图。
编译并拟合模型: (Compile and fit the model:)
We are compiling and fitting our model in the final step. Here, we are training the model and saving the best weights to emotions.h5 so that we don’t have to re-train the model repeatedly and we can use our saved model when required. We will be training on both the training and validation data. The loss we have used is categorical_crossentropy which computes the cross-entropy loss between the labels and predictions. The optimizer we will be using is Adam with a learning rate of 0.001 and we will compile our model on the metric accuracy. We will fit the data on the augmented training and validation images. After the fitting step, these are the results we are able to achieve on train and validation loss and accuracy.
我们将在最后一步中编译和拟合模型。 在这里,我们正在训练模型,并保存对情绪的最佳权重。因此,我们不必重复训练模型,可以在需要时使用保存的模型。 我们将在培训和验证数据上进行培训。 我们使用的损失是categorical_crossentropy,它计算标签和预测之间的交叉熵损失。 我们将使用的优化器是Adam,学习率为0.001,我们将根据度量精度来编译我们的模型。 我们将把数据拟合在增强的训练和验证图像上。 拟合步骤完成之后,这些就是我们在训练中以及验证损失和准确性上能够实现的结果。

图形: (Graph:)

观察: (Observation:)
The Model is able to perform quite well. We can notice that the train and validation losses are decreasing constantly and the train as well as validation accuracy increases constantly. There is no over-fitting in the deep learning model and we are able to achieve an accuracy of about about 51% and validation accuracy of about 53%.
该模型能够执行得很好。 我们可以注意到,训练和验证损失不断减少,训练和验证准确性也在不断增加。 深度学习模型中没有过度拟合的问题,我们能够实现约51%的准确性和约53%的验证准确性。
This is it for the first part guys! I hope all of you enjoyed reading this as much as I did writing this article. In the next part, we will cover the gestures train model and then also look into a second emotions train model which we can use to achieve a higher accuracy. In the end, we will create a final pipeline to access the models in real time and get a vocal response from the model about the particular emotion or gesture. I will also be posting the GitHub repository for the entire code, scripts and building blocks. Stay tuned for the next part and have a wonderful day!
这是第一部分的家伙! 我希望大家像我写这篇文章一样喜欢阅读本文。 在下一部分中,我们将介绍手势训练模型,然后研究第二个情绪训练模型,我们可以使用该模型来获得更高的准确性。 最后,我们将创建最终的管道以实时访问模型,并从模型中获得关于特定情绪或手势的声音响应。 我还将发布有关整个代码,脚本和构建块的GitHub存储库。 敬请期待下一部分,祝您有美好的一天!
翻译自: https://towardsdatascience.com/human-emotion-and-gesture-detector-using-deep-learning-part-1-d0023008d0eb
深度学习:在图像上找到手势