微信小程序-阿里云部署
参考 :阿里云文档_文档中心_云计算文档-阿里云帮助中心
阿里云开发者社区-云计算社区-阿里云
下载
微信开发者工具下载地址与更新日志 | 微信开放文档
一. 申请账号
申请账号
1. 进入小程序注册页根据指引填写信息和提交相应的资料,完成账号申请。
说明: 如果跳转后页面出现错误,请刷新访问。
2. 使用申请的微信公众平台账号登录小程序后台,单击开发 > 开发设置,可以看到小程序的AppID,请记录AppID,后续操作中需要使用。
3. 在开发设置 > 服务器域名 > request合法域名中填入您的已备案域名。
2. 安装小程序开发环境并创建项目
二,安装小程序开发环境并创建项目
1. 安装Node.js开发环境,请到Node.js页面下载并安装Node.js环境。
2. 下载并安装微信小程序开发工具。详细信息请参见开发工具下载。
3. 打开小程序开发工具,然后使用微信扫码登录。
4. 单击加号创建微信小程序示例项目。
5. 参考以下填写项目信息,最后单击新建。
- 项目名称:例如ECSAssistant。
- 目录:例如D:\workspace\wechat\ECSAssistant。
- AppID:小程序的唯一标识,从小程序控制台获取,参见步骤一。
- 开发模式:小程序。
- 后端服务:不使用云服务。
3. 初识小程序项目结构
三,初识小程序项目结构
生成的的小程序示例项目结构如下。
ECSAssistant
├── app.js
├── app.json
├── app.wxss
├── pages
│   ├── index
│   │   ├── index.js
│   │   ├── index.json
│   │   ├── index.wxml
│   │   └── index.wxss
│   └── logs
│       ├── logs.js
│       ├── logs.json
│       ├── logs.wxml
│       └── logs.wxss
├── project.config.json
├── sitemap.json
└── utils
    └── util.js
可以看到小程序的项目结构中有三种前缀为app的文件,它们定义了小程序的一些全局配置。
- app.json 是小程序的全局配置,用于配置小程序的页面列表、默认窗口标题、导航栏背景色等。更多请参见全局配置。
- app.acss 定义了全局样式,作用于当前小程序的所有页面。
- app.js 用于注册小程序应用,可配置小程序的生命周期,声明全局数据,调用丰富的 API。
小程序所有的页面文件都在pages/路径下,页面文件有四种文件类型,分别是.js、.wxml、.wcss、和.json后缀的文件。相比全局配置文件,页面配置文件只对当前页面生效。其中.wxml文件定义了当前页面的页面结构。小程序中的所有页面都需要在app.json文件中声明。更多请参见代码构成。
此外,项目顶层还有开发工具配置文件project.config.json和爬虫索引文件sitemap.json。
四. 开发小程序
1. 编辑app.json文件,将小程序页面Title修改为ECS小助手,修改后的app.json文件内容如下。
{
  "pages":[
    "pages/index/index",
    "pages/logs/logs"
  ],
  "window":{
    "backgroundTextStyle":"light",
    "navigationBarBackgroundColor": "#fff",
    "navigationBarTitleText": "ECS小助手",
    "navigationBarTextStyle":"black"
  },
  "style": "v2",
  "sitemapLocation": "sitemap.json"
}
2. 编辑pages/index/index.wxml文件,定义index页面的页面结构,修改后的index.wxml文件内容如下。
    CPU数:{{queryResult.Cpu}} 核
    内存大小:{{queryResult.Memory}} MB
    操作系统:{{queryResult.OSName}}
    实例规格:{{queryResult.InstanceType}}
    公网IP地址:{{queryResult.IpAddress}}
    网络带宽:{{queryResult.InternetMaxBandwidthOut}} MB/s
    在线状态:{{queryResult.instanceStatus == 'Running' ? '运行中':'已关机'}}
3. 编辑pages/index/index.wxss文件,定义index的页面样式,修改后的index.wxss文件内容如下。
.search-input {
  position: relative;
  margin-bottom: 50rpx;
  padding-left:80rpx;
  line-height: 70rpx;
  height: 80rpx;
  box-sizing: border-box;
  border: 2px solid #ff8f0e;
  border-radius: 100rpx;
  overflow: hidden;
  text-overflow: ellipsis;
  transition: border 0.2s;
}

.resultView {
  margin-top: 70rpx;
}
.result {
  position: relative;
  left: 30rpx;
  display: list-item;
  font-size: small;
}
4. 编辑pages/index/index.js文件,定义搜索框的失去焦点事件,修改后的index.js文件内容如下。
Page({
  data: {
    queryResult: null,
    showView: 'false',
  },


  bindblur: function(e) {
    let that = this;
    wx.request({
      url: 'http://127.0.0.1:5000/ecs/getServerInfo',
      method: 'GET',
      data: {
        instanceId: e.detail.value
      },
      success(res) {
        if(res.statusCode == 200){
          that.setData({
            queryResult: res.data,
            showView: !that.data.showView,
          });
        }else{
          that.setData({
            showView: 'false',
          });
          wx.showToast({
            title: '请输入正确的实例ID',
            duration: 1500,
            icon: 'none',
            mask: true
          })
        }
      }

    })
  }
})
说明: 微信小程序提供了丰富的前端API和服务端API,您可以基于这些API来实现您的小程序功能,更多请参见小程序 API 使用说明。
五,. 安装Python开发环境并创建项目
1. 下载安装Python开发包。
2. 打开本地命令行终端,使用pip安装以下依赖。
说明: 按下快捷键win+r,在运行窗口输入powershell后回车可打开命令行终端。
# 阿里云SDK核心库
pip install aliyun-python-sdk-core
# 阿里云ECS SDK
pip install aliyun-python-sdk-ecs
# 轻量级Web框架flask
pip install flask
3. 下载安装Python开发的集成环境Pycharm。
4. 打开PyCharm。
5. 单击Create New Project。
6. 选择项目路径,然后单击Create完成项目创建。
六,开发后端服务
1. 右键单击PyCharm项目根目录,依次选择New > Python File。
2. 输入Python File文件名,例如:GetServerInfo,然后选择Python File完成文件创建。
3. 在新建的Python文件中新增以下内容,并将代码中的accessKeyId、accessSecret修改为您自己的AK信息。
# -*- coding: utf-8 -*-
from flask import Flask, jsonify, request
from aliyunsdkcore.client import AcsClient
import json
from aliyunsdkecs.request.v20140526 import DescribeInstancesRequest, DescribeInstanceStatusRequest

app = Flask(__name__)

accessKeyId = 'LTAI4G4dnpbmKBCgug4*****'
accessSecret = 'gBivN1nYujUGTBgM448Nt5xex*****'
region = 'cn-shenzhen'
client = AcsClient(accessKeyId, accessSecret, region)

# 在app.route装饰器中声明响应的URL和请求方法
@app.route('/ecs/getServerInfo', methods=['GET'])
def getServerInfo():
    # GET方式获取请求参数
    instanceId = request.args.get("instanceId")
    if instanceId is None:
        return "Invalid Parameter"
    # 查询实例信息
    describeInstancesRequest = DescribeInstancesRequest.DescribeInstancesRequest()
    describeInstancesRequest.set_InstanceIds([instanceId])
    describeInstancesResponse = client.do_action_with_exception(describeInstancesRequest)
    # 返回数据为bytes类型,需要将bytes类型转换为str然后反序列化为json对象
    describeInstancesResponse = json.loads(str(describeInstancesResponse, 'utf-8'))
    instanceInfo = describeInstancesResponse['Instances']['Instance'][0]

    # 查询实例状态
    describeInstanceStatusRequest = DescribeInstanceStatusRequest.DescribeInstanceStatusRequest()
    describeInstanceStatusRequest.set_InstanceIds([instanceId])
    describeInstanceStatusResponse = client.do_action_with_exception(describeInstanceStatusRequest)
    describeInstanceStatusResponse = json.loads(str(describeInstanceStatusResponse, 'utf-8'))
    instanceStatus = describeInstanceStatusResponse['InstanceStatuses']['InstanceStatus'][0]['Status']

    # 封装结果
    result = {
        # cpu数
        'Cpu': instanceInfo['Cpu'],
        # 内存大小
        'Memory': instanceInfo['Memory'],
        # 操作系统名称
        'OSName': instanceInfo['OSName'],
        # 实例规格
        'InstanceType': instanceInfo['InstanceType'],
        # 实例公网IP地址
        'IpAddress': instanceInfo['PublicIpAddress']['IpAddress'][0],
        # 公网出带宽最大值
        'InternetMaxBandwidthOut': instanceInfo['InternetMaxBandwidthOut'],
        # 实例状态
        'instanceStatus': instanceStatus
    }
    return jsonify(result)


if __name__ == "__main__":
    app.run()
说明: 您可以访问AccessKey 管理创建和查看您的AccessKey。代码中涉及到的API的更多参数说明请参见DescribeInstances和DescribeInstanceStatus。
七,本地调试
1. 本地运行后端服务。在GetServerInfo.py文件空白处右键单击选择Run 'GetServerInfo',或者使用快捷键Ctrl+Shift+F10快速运行Python文件。
2. 关闭小程序开发者工具的HTTPS安全性校验。
a. 单击工具栏设置 > 项目设置 > 本地设置。
b. 在本地设置中勾选不校验合法域名、web-view(业务域名)、TLS版本以及HTTPS证书。
3. 接下来您可以调用本地后端服务进行小程序的调试。
8. 部署uWSGI Server
八,部署uWSGI Server
本教程使用的服务器操作系统版本为Ubuntu Server 18.04 LTS,该版本内置了Python3环境。如果您在使用其他版本的操作系统,例如CentOS6.x、CentOS7.x,需要您自行配置Python3环境。
1. 在终端中输入命令ssh -V。
如果显示SSH版本则表示已安装,如下图所示。
如果未安装,请下载安装OpenSSH工具。
2. 在终端中输入命令以下命令,将服务端程序上传到服务器上。
scp D:\workspace\python\ECSAssistant\GetServerInfo.py [email protected]:/root/说明:
scp命令的第一个参数为源文件路径,此处为本地文件路径;第二个参数分为三部分,分别是远程服务器的认证用户名、IP地址和要上传到的远程目录。
3. 输入以下命令连接服务器,然后根据提示输入您的服务器密码。
登录成功后会显示如下信息。
4. 执行以下命令安装Python依赖。
# 阿里云SDK核心库
pip3 install aliyun-python-sdk-core
# 阿里云ECS SDK
pip3 install aliyun-python-sdk-ecs
# 轻量级Web框架flask
pip3 install flask
# Web Server
pip3 install uwsgi
5. 新建uwsgi配置文件。
mkdir /data&&cd /data &&vim uwsgi.ini
按下i键进入编辑模式,新增以下内容。
[uwsgi]
#uwsgi启动时所使用的地址和端口
socket=127.0.0.1:5000
#指向网站目录
chdir=/data

#python启动程序文件
wsgi-file=GetServerInfo.py
#python程序内用以启动的application变量名
callable=app

#处理器数
processes=4

#线程数
threads=2

#状态检测地址
stats=127.0.0.1:9191

#保存启动之后主进程的pid
pidfile=uwsgi.pid

#设置uwsgi后台运行,uwsgi.log保存日志信息 自动生成
daemonize=uwsgi.log 编辑完成后按Esc键退出编辑模式,然后输入:wq退出编辑器。
6. 运行uwsgi server。
mv /root/GetServerInfo.py /data
uwsgi uwsgi.ini
7. 执行以下命令验证HTTPS服务部署情况。
说明:请将api.aliyuntest.com改为您的服务器域名。
curl https://api.aliyuntest.com/ecs/getServerInfo
命令执行结果如下表示HTTPS服务部署成功。
九. 部署Nginx并配置HTTPS
1. 支付宝小程序要求正式环境中小程序与服务端通信必须使用HTTPS,所以您需要申请一个SSL证书。阿里云为个人开发者提供免费的SSL证书分发服务,请参考文档申请免费DV证书,申请一个SSL证书并进行域名验证。
2. SSL证书申请审核通过后,将证书上传到您的服务器上,证书文件包括一个.pem和一个.key文件。文件上传命令请参见步骤9.2。
3. 在服务器上执行以下命令安装Nginx。
apt-get update
apt-get -y install nginx
4. 新建Nginx配置文件。
vim /etc/nginx/sites-available/app.example.com
您可以将文件名修改为自己的域名。在文件中新增以下内容。
注意: 请替换下面文件内容中的域名和证书存放地址。
server {
    # ssl证书使用443
    listen 443 ssl default_server;
    # listen [::]:443 ssl default_server;
    # 后面是域名
    server_name app.example.com;

    # 证书.pem的存放地址
    ssl_certificate   /data/ssl/1752675_app.example.com.pem;
    # 证书.key的存放地址
    ssl_certificate_key  /data/ssl/1752675_app.example.com.key;
    ssl_session_timeout  5m;
    ssl_ciphers ECDHE-RSA-AES128-GCM-SHA256:ECDHE:ECDH:AES:HIGH:!NULL:!aNULL:!MD5:!ADH:!RC4;
    ssl_protocols TLSv1 TLSv1.1 TLSv1.2;
    ssl_prefer_server_ciphers on;

    root /var/www/html;

    # Add index.php to the list if you are using PHP
    index index.html index.htm index.nginx-debian.html;

    server_name _;

    location / {
        # 转发端口
        uwsgi_pass  127.0.0.1:5000;
        include uwsgi_params;
    }
}
5. 将配置文件拷贝到/etc/nginx/sites-enabled/目录下。
ln -s /etc/nginx/sites-available/app.example.com /etc/nginx/sites-enabled/app.example.com
6. 启动Nginx。
service nginx start十,上线小程序
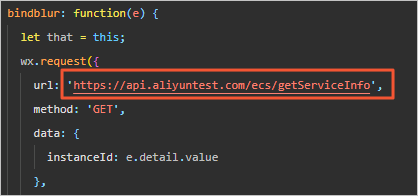
1. 请将小程序pages/index/index.js代码中的本地后端服务地址改为您的后端服务器域名,通信协议改为HTTPS,例如:
https://api.aliyuntest.com/ecs/getServiceInfo2. 单击右上角工具栏上传,然后在弹出的对话框中单击上传,根据提示输入上传版本号并完成上传。
上传成功后会弹出如下提示。
3. 在微信开放平台中,单击开发服务 > 版本管理,查看已上传的开发版本。
4. 单击提交审核,填写审核信息。
5. 审核通过后,管理员的微信中会收到小程序通过审核的通知。在审核版本右边单击上线,就可以在微信客户端中查看小程序了。 上架之后即为线上版本。有关小程序生命周期的更多信息请参见小程序协同工作和发布。


