Python处理PDF——PyMuPDF中图像的使用(2)
文章目录
- 1、从文档页面生成图像
-
- page.get_pixmap()参数
- 2、提升图像分辨率
- 3、创建部分像素贴图(`Clips`)
- 4、PDF文档提取图像
-
- 如何获取`xref`的值呢?
- 5、处理模板蒙版
- 6、将图像制作为PDF文件
-
- 方法1:将图像作为页面插入
- 方法2:嵌入文件
- 方法3:附加文件
- 7、创建矢量图
- 8、转换图像
- 9、与Numpy接口
- 10、将图像添加到PDF页面
本文记录
PyMuPDF库中有关Image的使用方法
关于PyMuPDF库的安装、介绍及基本使用可参考博客:
Python处理PDF——PyMuPDF的安装与使用(1)_ling620的专栏-CSDN博客
1、从文档页面生成图像
这个脚本将获取一个文档文件名,并将每个页面生成一个PNG文件保存在脚本目录中。
文档可以是任何受支持的类型,如PDF、XPS等。
该脚本作为命令行工具使用,它希望文件名作为参数提供。生成的图像文件(每页1个)存储在脚本的目录中:
import sys, fitz # import the binding

fname = sys.argv[1] # 从命令行获取文件名
doc = fitz.open(fname) # 打开文件
for page in doc: # iterate through the pages
    pix = page.get_pixmap() # render page to an image
    pix.save("page-%i.png" % page.number) # store image as a PNG
脚本目录现在将包含名为page-0.PNG、page-1.PNG等的PNG图像文件。
当前page.gete_pixmap()使用的是默认参数,得到的信息如下:
- 图片的页面尺寸将宽度和高度四舍五入为整数,例如,对于A4大小的页面,为
595 x 842像素 - 在
x和y维度的分辨率为96 dpi - 没有透明度
page.get_pixmap()参数
def get_pixmap(
        self,
        matrix: AnyType = None,
        colorspace: "Colorspace" = None,
        alpha: False,
        clip: rect_like = None,
        annots: (bool)
    ) -> "Pixmap":
参数:
matrix:矩阵,可以控制缩放、旋转、镜像等结果colorsapce:颜色空间,cmyk,rgb,gray忽略大小写,默认是csRGBalpha:是否包含alpha通道,默认不包含clip:只渲染此矩形区域annots:是否同时渲染注释,为False表示不渲染注释
2、提升图像分辨率
文档页面的图像由一个Pixmap表示,创建Pixmap的最简单方法是通过方法page.get_Pixmap()。
此方法有许多影响结果的选项。其中最重要的是矩阵,它允许您缩放、旋转、扭曲或镜像结果。
默认情况下,Page.get_pixmap()将使用不起任何作用的标识矩阵。
在下面的例子中,我们对每个维度应用2的缩放因子,这将生成一幅分辨率提高四倍(也是大小的四倍)的图像:
zoom_x = 2.0 # horizontal zoom
zomm_y = 2.0 # vertical zoom
mat = fitz.Matrix(zoom_x, zomm_y) # zoom factor 2 in each dimension
pix = page.get_pixmap(matrix=mat) # use 'mat' instead of the identity matrix
由上面的例子可以看出,通过参数matrix可以实现结果矩阵的缩放。
3、创建部分像素贴图(Clips)
该部分应用于当只需要部分页面区域的图像,而不是整个页面的完整图像时。
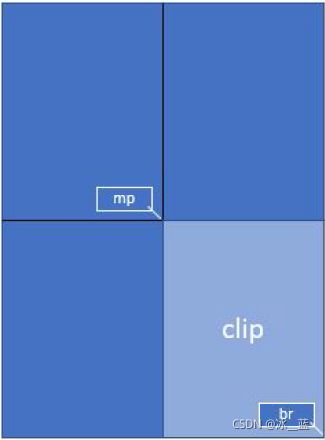
使用示例:假设我们需要整个页面的右下角1/4处,且将其扩大4倍。
为了实现这一点,我们定义了一个矩形,该矩形等于我们希望在GUI中显示的区域,并将其称为“clip”。在PyMuPDF中构造矩形的一种方法是提供两个对角。

mat = fitz.Matrix(2, 2) # zoom factor 2 in each direction
rect = page.rect # the page rectangle
mp = (rect.tl + rect.br) / 2 # its middle point, becomes top-left of clip
clip = fitz.Rect(mp, rect.br) # 想要的区域
pix = page.get_pixmap(matrix=mat, clip=clip)
上面例子中,rect表示页面的矩形区域,rect.tl表示矩形区域的左上角,rect.br表示矩形区域的右下角。
参数clip使用fitz.Rect()类型表示。
4、PDF文档提取图像
与PDF中的任何其他“object”一样,图像由交叉参考号(xref,整数)标识。如果您知道此号码,则有两种方法可以访问图像数据:
- 使用
pix = fitz.Pixmap(doc, xref)创建一个Pixmap图像- 这种方法非常快。
pixmap的属性(宽度、高度等)将反应图像的内容。在这种情况下,无法判断嵌入的原始图像具有哪种图像格式。
- 这种方法非常快。
- 使用
img = doc.extract_image(xref)提取图像- 这是一个 包含二进制图像数据
img["image"]的字典。还提供了大量元数据,大部分与图片的pixmap中找到的相同 - 主要区别在于
img["ext"]字符串,他指定了图像格式:除了"png"以外,还可以指定"jpeg", "bmp", "tiff"等字符串,将以指定格式存储在应按中 - 这个方法的执行速度与
pix=fitz.Pixmap(doc, xref)和pix.tobytes()的组合速度相比。如果嵌入的图像是PNG格式,则Document.extract_image()的速度大致相同(其二进制图像数据相同),否则,这种方法的速度要快上千倍,且图像数据要小的多。
- 这是一个 包含二进制图像数据
如何获取xref的值呢?
-
检查页面对象:遍历
Page.get_images()的items,得到一个列表的列表,其项类似于[xref, smask, ...],包含图像的xref。这个xref可以与上述方法一起使用。如果
PDF没有损坏,则使用这个方法。请注意:同一图像可能会被多次引用(由不同页面引用)
-
“无需知道”:循环浏览文档的所有
xref并为每一个执行Document.extract_image()。如果返回的字典是空的(表示这个xref没有图像),继续。如果
PDF已损坏,则使用这个方法。
>>>page = doc[0]
>>>page.get_images()
[(10, 0, 414, 83, 8, 'DeviceRGB', '', 'Im5', 'DCTDecode'),
 (14, 0, 39, 41, 8, 'DeviceRGB', '', 'Im10', 'DCTDecode'),
 (15, 0, 34, 34, 8, 'DeviceRGB', '', 'Im11', 'DCTDecode'),
 (13, 0, 30, 30, 8, 'DeviceRGB', '', 'Im9', 'DCTDecode')]


>>>doc.get_page_images(0)
[(10, 0, 414, 83, 8, 'DeviceRGB', '', 'Im5', 'DCTDecode'),
 (14, 0, 39, 41, 8, 'DeviceRGB', '', 'Im10', 'DCTDecode'),
 (15, 0, 34, 34, 8, 'DeviceRGB', '', 'Im11', 'DCTDecode'),
 (13, 0, 30, 30, 8, 'DeviceRGB', '', 'Im9', 'DCTDecode')]
如上所示,使用page.get_images()或者doc.get_page_images(pno)就可以得到图像的列表值。列表中,每个元素为元组,元组的第一位就是xref值。
5、处理模板蒙版
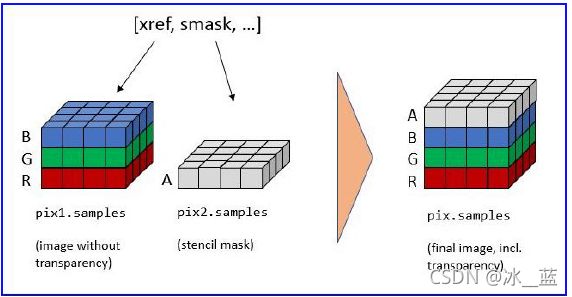
PDF中的某些图像带有模板遮罩。在最简单的形式中,模具蒙版表示作为单独图像存储的alpha(透明度)字节。为了重建具有模具蒙版的图像的原始图像,必须使用从其模具蒙版中提取的透明度字节“丰富”图像。
在PyMuPDF中,可以通过以下两种方式之一识别图像是否具有这样的模板掩码:
Document.get_page_images()的结果具有常规格式[xref,smask,…],其中,xref是图像的外部参照,smask(如果为正)是模具遮罩的外部参照。Document.extract_image()的(字典)结果有一个键“smask”,如果为正,该键还包含任何模具掩码的外部参照。
如果smask==0,则可以按原样处理通过xref遇到的图像。
要使用PyMuPDF恢复原始图像,必须执行以下步骤:

>>> pix1 = fitz.Pixmap(doc, xref) # (1) pixmap of image w/o alpha
>>> pix2 = fitz.Pixmap(doc, smask) # (2) stencil pixmap
>>> pix = fitz.Pixmap(pix1) # (3) copy of pix1, empty alpha channel added
>>> pix.set_alpha(pix2.samples) # (4) fill alpha channel
步骤(1)创建“netto”图像的pixmap。步骤(2)对模板掩码执行相同的操作。请注意,pix2的Pixmap.samples属性包含必须存储在最终Pixmap中的alpha字节。这就是步骤(3)和(4)中发生的情况。
6、将图像制作为PDF文件
我们在这里展示了三个脚本,它们获取(图像和其他)文件的列表,并将它们全部放在一个PDF中。
方法1:将图像作为页面插入
第一个方法将每个图像转换为具有相同尺寸的PDF页面。结果将是一个PDF,每个图像一页。它仅适用于支持的图像文件格式:
import os, fitz
import PySimpleGUI as psg # for showing a progress bar

doc = fitz.open() # PDF with the pictures
imgdir = "D:/2012_10_05" # where the pics are
imglist = os.listdir(imgdir) # list of them
imgcount = len(imglist) # pic count
for i, f in enumerate(imglist):
    img = fitz.open(os.path.join(imgdir, f)) # 以document形式打开图片
    rect = img[0].rect # pic dimension
    pdfbytes = img.convert_to_pdf() # make a PDF stream
    img.close() # no longer needed
    imgPDF = fitz.open("pdf", pdfbytes) # open stream as PDF
    page = doc.new_page(width = rect.width, height = rect.height) # new page with pic dimension
    page.show_pdf_page(rect, imgPDF, 0) # image fills the page图像填充页面
    psg.EasyProgressMeter("Import Images", i+1, imgcount) # show our progress
doc.save("all-my-pics.pdf")
这将生成一个仅略大于合并图片大小的PDF。
注意:我们可能使用了Page.insert_image()而不是Page.show_pdf_Page(),结果会是一个类似的文件。但是,根据图像类型,它可能存储未压缩的图像。
因此,必须使用save选项deflate=True来实现合理的文件大小,这将极大地增加大量图像的运行时间。因此,这里不能推荐这种替代方案。
方法2:嵌入文件
第二个脚本嵌入任意文件,而不仅仅是图像。由于技术原因,生成的PDF只有一个(空)页面。要在以后再次访问嵌入文件,您需要一个合适的PDF查看器,可以显示和/或提取嵌入文件:
import os, fitz
import PySimpleGUI as psg # for showing progress bar

doc = fitz.open() # PDF with the pictures
imgdir = "D:/2012_10_05" # where my files are
imglist = os.listdir(imgdir) # list of pictures
imgcount = len(imglist) # pic count
imglist.sort() # nicely sort them
for i, f in enumerate(imglist):
    img = open(os.path.join(imgdir,f), "rb").read() # make pic stream
    doc.embfile_add(img, f, filename=f, ufilename=f, desc=f) # and embed it
    psg.EasyProgressMeter("Embedding Files", i+1, imgcount)  # show our progress
page = doc.new_page() # at least 1 page is needed
doc.save("all-my-pics-embedded.pdf")
这是迄今为止最快的方法,而且它还产生尽可能小的输出文件大小。
方法3:附加文件
实现此任务的第三种方法是通过页面注释附加文件。
这与上一个脚本具有相似的性能,并且它还生成相似的文件大小。它将生成PDF页面,显示每个附加文件的“文件附件”图标。
import os, fitz
import PySimpleGUI as psg # for showing progress bar

doc = fitz.open()  # open empty PDF
page = doc.new_page(width=width, height=height)  # make new page
imglist = os.listdir(imgdir)  # directory listing
imgcount = len(imglist)  # number of files
for i, f in enumerate(imglist):
    path = os.path.join(imgdir, f)
    img = open(path, "rb").read()  # file content
    page.add_file_annot(point, img, filename=f)  # add as attachment
doc.save("all-my-pics-attached.pdf")
嵌入和附加方法都可以用于任意文件,而不仅仅是图像。
Note: 我们强烈建议使用PySimpleGUI包为可能运行较长时间的任务显示进度表。它是纯Python,使用Tkinter(没有额外的GUI包),并且只需要多出一行代码!
7、创建矢量图
从文档页面创建图像的常用方法是page.get_pixmap()。pixmap表示光栅图像,因此您必须在创建时决定其质量(即分辨率),以后不能更改。
PyMuPDF还提供了一种以SVG格式创建页面矢量图像的方法(可缩放矢量图形,用XML语法定义)。SVG图像在缩放级别上保持精确(当然,嵌入其中的任何光栅图形元素除外)。
指令svg=page.get_svg_image(matrix=fitz.Identity) 提供了一个UTF-8字符串svg,可以用扩展名“.svg”存储。
8、转换图像
与其他功能一样,PyMuPDF的图像转换也很容易。在许多情况下,它可能避免使用其他图形软件包,如PIL/Pillow。
总体方案如下两行:
pix = fitz.Pixmap("input.xxx") # any supported input format
pix.save("output.yyy") # any supported output format
备注
fitz.Pixmap(arg)的输入参数可以是包含图像的文件或bytes/io.BytesIO对象。- 您也可以通过
pix.tobytes(“yyy”)创建一个bytes对象,而不是输出文件,并传递该对象。 - 当然,输入和输出格式必须在颜色空间和透明度方面兼容。
将JPEG转换为Photoshop:
pix = fitz.Pixmap("myfamily.jpg")
pix.save("myfamily.psd")
使用PIL/Pillow保存为JPEG:
from PIL import Image

pix = fitz.Pixmap(...)
img = Image.frombytes("RGB", [pix.width, pix.height], pix.samples)
img.save("output.jpg", "JPEG")
9、与Numpy接口
这显示了如何从numpy数组创建PNG文件(比大多数其他方法快几倍):
import numpy as np
import fitz
#==============================================================================
# create a fun-colored width * height PNG with fitz and numpy
#==============================================================================
height = 150
width = 100
bild = np.ndarray((height, width, 3), dtype=np.uint8)
for i in range(height):
    for j in range(width):
        # one pixel (some fun coloring)
        bild[i, j] = [(i+j)%256, i%256, j%256]
samples = bytearray(bild.tostring()) # get plain pixel data from numpy array
pix = fitz.Pixmap(fitz.csRGB, width, height, samples, alpha=False)
pix.save("test.png")
10、将图像添加到PDF页面
有两种方法可以将图像添加到PDF页面:page.insert_image()和page.show_PDF_page()。
这两种方法有共同之处,但也存在差异。
| Criterion | Page.insert_image() |
Page.show_pdf_page() |
|---|---|---|
| displayable content | image file, image in memory, pixmap | PDF page |
| display resolution | image resolution | vectorized (except raster page content) |
| rotation | 0, 90, 180 or 270 degrees |
any angle |
| clipping | no (full image only) |
yes |
| keep aspect ratio | yes (default option) |
yes (default option) |
| transparency (water marking) | depends on the image | depends on the page |
| location / placement | scaled to fit target rectangle | scaled to fit target rectangle |
| performance | automatic prevention of duplicates; | automatic prevention of duplicates; |
| multi-page image support | no |
yes |
| ease of use | simple, intuitive; | simple, intuitive; usable for all document types (including images!) after conversion to PDF via Document.convert_to |
待续。。。