SpringBoot开发快速入门
推荐个视频,老师讲的很不错:
1天搞定SpringBoot+Vue全栈开发 1.课程介绍及环境准备_哔哩哔哩_bilibili
基本概念介绍
Web技术基础
目前市面上的软件主要可分为两种:
BS:(Browser/Server,浏览器/服务器架构模式)
CS:(Client/Server,客户端/服务器架构模式)
随着互联网的兴起,CS架构不适合Web,最大的原因是Web应用程序的修改和升级非常迅速,而CS架构需要每个客户端逐个升级桌面App,因此,Browser/Server模式开始流行,简称BS架构。B/S架构的主要特点是分散性高、维护方便、开发简单、共享性高、总拥有成本低。
SpringBoot
Spring Boot是由Pivotal团队提供的基于Spring的全新框架,旨在简化Spring应用的初始搭建和开发过程。Spring Boot尽可能地简化应用开发的门槛,让应用开发、测试、部署变得更加简单。
特点
- “约定优于配置”的原则
- 内嵌Tomcat、Jetty服务器
- 提供定制化的启动器Starters,简化Maven配置
- 纯Java配置,无代码生成与XML
构建SpringBoot应用
Java EE企业级框架:SpringBoot+MyBatisPlus
Web前端核心框架 :Vue+ElementUI
创建项目
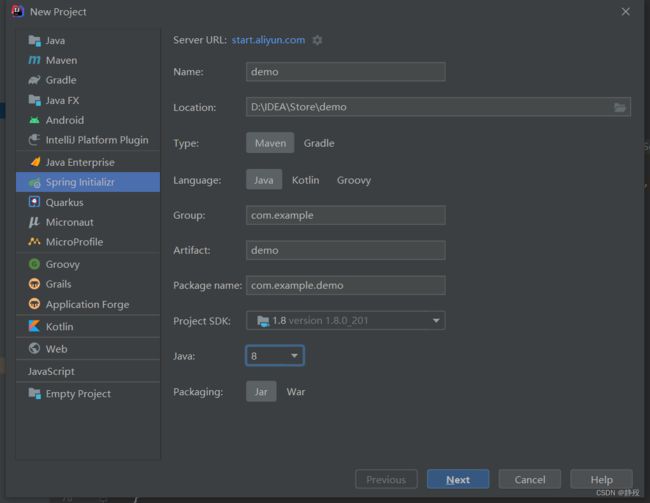
通常,我们使用1.8版本的jdk,当然,更高版本的也可以,但不建议低于Java8

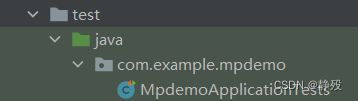
项目结构说明
java用于构建后端项目代码

resources用于存放资源
application.properties用于设置声明配置
static用于存储静态资源,如图片等

test用于测试
pom.xml用于配置依赖

与前端交互
Controller
Spring Boot提供了@Controller和@RestController两种注解来标识此类负责接收和处理HTTP请求。
//请求的是页面和数据
@Controller
//只是请求数据
@RestController
@Controller的用法
示例中返回了hello页面和name的数据,在前端页面中可以通过${name}参数获取后台返回的数据并显示。
@Controller通常与Thymeleaf模板引结合使用。
@Controller
public class HelloController{
	@RequestMapping ("/hello")
	public String index (ModeLMap map){
		map.addAttribute(attributeName: "name",attributeValue: "zhangsan");
		return "hello";
	}
}
@RestController的用法
默认情况下,@RestController注解会将返回的对象数据转换为JSON格式。
@RestController
public class HelloController{
	@RequestMapping ("/user")
	public User getUser (){
		User user = new User ();
		user.setUsername (" zhangsan");
		user.setPassword ("123");
		return user;
	}
}
@RequesMapping
-
@RequestMapping注解主要负责URL的路由映射。
-
它可以添加在Controller类或者具体的方法上。
-
如果添加在Controller类上,则这个Controller中的所有路由映射都将会加上此映射规则,如果添加在方法上,则只对当前方法生效。
-
@RequestMapping注解包含很多属性参数来定义HTTP的请求映射规则。常用的属性参数如下(通常只需考虑value和method):
-
value: 请求URL的路径,支持URL模板、正则表达式
-
method: HTTP请求方法
-
consumes: 请求的媒体类型(Content-Type),如application/json
-
produces: 响应的媒体类型params
-
headers: 请求的参数及请求头的值
value映射规则
value属性用于匹配URL映射,value支持简单表达式,如
@RequestMapping("/user")支持使用通配符匹配URL,有通配符的优先级低于没有通配符的,用于统一映射某些URL规则类似的请求,如:
@RequestMapping("/getJson/*.json")通配符支持 *, ?, ** 等通配符,符号“*”匹配任意字符,符号“**”匹配任意路径,符号“?”匹配单个字符。
有 ** 通配符的优先级低于有 * 通配符的。
method匹配规则
HTTP请求Method有GET、POST、PUT、DELETE等方式。HTTP支持的全部Method。
Method匹配也可以使用@GetMapping、@PostMapping等注解代替。
参数传递
@RequestParam将请求参数绑定到控制器的方法参数上,接收的参数来自HTTP请求体或请求url的QueryString,当请求的参数名称与Controller的业务方法参数名称一致时,@RequestParam可以省略
Get方法
//http://localhost:8080/hello?name=lty&tel=123
@RequestMapping ("/user")
	public String getUser (String name,String tel){
		return "GET请求";
	}

//如果参数名不同,需要给参数添加注解(required默认为true,即必须传递该参数)
//http://localhost:8080/getTest2?nickname=xxx
	@RequestMapping(value = "/getTest2",method = RequestMethod.GET)
    public String getTest3(@RequestParam(value = "nickname",required = false) String name){
        System.out.println("nickname:"+name);
        return "GET请求";
    }
Post方法
@RequestMapping(value = "/postTest2",method = RequestMethod.POST)
    public String postTest2(String username,String password){
        System.out.println("username:"+username);
        System.out.println("password:"+password);
        return "POST请求";
    }

    @RequestMapping(value = "/postTest3",method = RequestMethod.POST)
    public String postTest3(User user){
        System.out.println(user);
        return "POST请求";
    }

//JSON格式传递参数需要添加注解
    @RequestMapping(value = "/postTest4",method = RequestMethod.POST)
    public String postTest4(@RequestBody User user){
        System.out.println(user);
        return "POST请求";
    }
与数据库交互(MybatisPlus)
依赖
            com.baomidou
            mybatis-plus-boot-starter
            3.4.2


            mysql
            mysql-connector-java
            5.1.47


            com.alibaba
            druid-spring-boot-starter
            1.1.20
配置
spring.datasource.type=com.alibaba.druid.pool.DruidDataSource
spring.datasource.driver-class-name=com.mysql.jdbc.Driver
spring.datasource.url=jdbc:mysql://localhost:3306/数据库名字?useSSL=false
spring.datasource.username=账号
spring.datasource.password=密码
mybatis-plus.configuration.log-impl=org.apache.ibatis.logging.stdout.StdOutImpl
启动项注解
@SpringBootApplication
@MapperScan("com.xx.mapper")
public class Main {
    public static void main(String[] args) {
        SpringApplication.run(MpdemoApplication.class, args);
    }
}
接口的声明
数据传递时如果缺失,则赋为默认值
@Mapper
public interface UserMapper{
        @Insert("insert into user values (#{id},#{username},#{password))")
        int add (User user);

        @Update("update user set username=#{username}, password=#{password} where id=#{id}")
        int update (User user);

        @Delete("delete from user where id=#{id}")
        int delete (int id);

        @Select("select * from user where id=#{id}")
        User findById (int id);
}
上述为Mybatis实例,如果使用MybatisPlus,则可继承接口BaseMapper
//用于操作用户表,MyBaits会根据Mapper注解,动态实现UserMapper接口(实现类),动态代理技术
//Spring会自动创建UserMapper接口实现类对应的实例
@Mapper
public interface UserMapper extends BaseMapper {

//   查询用户,根据用户id查询信息   select * from user where id =
    @Select("select * from t_user where id = #{id}")
    User selectById(int id);

//   查询用户及其所有的订单(多表查询)
    @Select("select * from t_user")
    @Results({
    //column:表属性,property:类属性
            @Result(column = "id",property = "id"),
            @Result(column = "username",property = "username"),
            @Result(column = "password",property = "password"),
            @Result(column = "birthday",property = "birthday"),
           	//many=@Many代表一个参数对应多个查询值
           	//one=@One代表一个参数对应一个查询值
            @Result(column = "id",property = "orders",javaType = List.class,
            many=@Many(select = "OrderMapper.selectByUid"))
            })
    List selectAllUserAndOrders();
}
调用
@RestController
public class OrderController {

    @Autowired
    private OrderMapper orderMapper;

    @GetMapping("/order/findAll")
    public List findAll(){
        List orders = orderMapper.selectAllOrdersAndUser();
        return orders;
    }

//  条件查询
    @GetMapping("/user/find")
    public List findByCond(){
        QueryWrapper queryWrapper = new QueryWrapper();
        //eq,lt等条件,使用时建议参考官方文档
        queryWrapper.eq("username","zhangsan");
        return userMapper.selectList(queryWrapper);
    }

//  分页查询
    @GetMapping("/user/findByPage")
    public IPage findByPage(){
        //设置起始值及每页条数
        Page page = new Page<>(0,2);
        IPage iPage = userMapper.selectPage(page,null);
        return iPage;
    }

//  插入数据
    @PostMapping("/user")
    public String save(User user){
        int r= userMapper.insert(user);
        if(r > 0){
            return "插入成功";
        }else{
            return "插入失败";
        }
    }
}
部分常用注解
注:以下注解仅使用于MybatisPlus
//如果表名和实体类名不一致,则可在实体类前添加注解:
@TableName("表名")
//如果表中属性和类中属性名不一致,则可在属性前添加注解:
@TableField("表中属性名")
//如果表中属性在类中不存在,则可以在属性前添加注解:
@TableField(exist = false)
分页
配置
import com.baomidou.mybatisplus.annotation.DbType;
import com.baomidou.mybatisplus.extension.plugins.MybatisPlusInterceptor;
import com.baomidou.mybatisplus.extension.plugins.inner.PaginationInnerInterceptor;
import org.springframework.context.annotation.Bean;
import org.springframework.context.annotation.Configuration;

@Configuration
public class MyBatisPlusConfig {
    @Bean
    public MybatisPlusInterceptor paginationInterceptor() {
        MybatisPlusInterceptor interceptor = new MybatisPlusInterceptor();
        PaginationInnerInterceptor paginationInterceptor = new PaginationInnerInterceptor(DbType.MYSQL);
        interceptor.addInnerInterceptor(paginationInterceptor);
        return interceptor;
    }
}
具体调用代码见前文
文件上传
静态资源访问
使用IDEA创建Spring Boot项目,会默认创建出classpath:/static/目录,静态资源一般放在这个目录下即可。
如果默认的静态资源过滤策略不能满足开发需求,也可以自定义静态资源过滤策略。在application.properties中直接定义过滤规则和静态资源位置:
spring.mvc.static-path-pattern=/static/**
spring.web.resources.static-locations=classpath:/static/
上传原理
表单的enctype 属性规定在发送到服务器之前应该如何对表单数据进行编码。
-
当表单的enctype="application/x-www-form-urlencoded"(默认)时,form表单中的数据格式为:key=value&key=value
-
当表单的enctype="multipart/form-data"时,其传输数据形式如下:

Spring Boot工程嵌入的tomcat限制了请求的文件大小,每个文件的配置最大为1Mb,单次请求的文件的总数不能大于10Mb。要更改这个默认值需要在配置文件(如application.properties)中加入两个配置:
spring.servlet.multipart.max-file-size=10MB
spring.servlet.multipart.max-request-size=10MB
实现
当表单的enctype="multipart/form-data"时,可以使用MultipartFile 获取上传的文件数据,再通过transferTo方法将其写入到磁盘中:
@RestController
public class FileUploadController {
    @PostMapping("/upload")
    public String up(String nickname, MultipartFile file, HttpServletRequest request) throws IOException {
        System.out.println(nickname);
        // 获取图片的原始名称
        System.out.println(file.getOriginalFilename());
        // 获取文件类型
        System.out.println(file.getContentType());
        //获取动态路径
        String path = request.getServletContext().getRealPath("/upload/");
        System.out.println(path);
        saveFile(file,path);
        return "上传成功";
    }

    public void saveFile(MultipartFile file, String path) throws IOException {
//       判断存储的目录是否存在,如果不存在则创建
        File dir = new File(path);
        if(!dir.exists()){
            dir.mkdir();
        }

        File pathfile = new File(path+file.getOriginalFilename());
        file.transferTo(pathfile);
    }
}