Ant Design Pro Vue 动态导航及动态路由实现
前言:作者本人用vue-antd-pro过程中,有动态路由的需求,看了下官方文档实在是写的比较不清楚,参考了一些博客,发现我使用的版本,有一些改动出入,所以写下这篇博文,希望能帮到有需要的人。
npm包 使用的版本如下:
{

"name": "vue-antd-pro",

"version": "3.0.2",

"ant-design-vue": "^1.7.6",

"vue": "^2.6.14"

}
参考:
Ant Design Pro 2(动态路由和菜单) - 简书
一共要修改的文件
src/router/index.js
src/router/generator-routers.js
src/permission.js
src/main.js
src/store/modules/async-router.js
src/layouts/BasicLayout.vue
src/config/router.config.js
大概思路及步骤:
先把默认的mock数据注释,对接上自己的api接口 ,根据差异调整生成路由方法
1.src/router/index.js设置成动态路由模式

2. src/permission.js根据自己情况调整,简单说明一下我这边的改动,set_name只是用户名,getParts那里是内容分区列表请求,跟本文核心无关,GenerateRoutes以后才是重点,我把原本的请求roles(角色权限)去掉了,因为我后端那边处理了,大家看情况来弄,这里变动不大。
router.beforeEach((to, from, next) => {
  NProgress.start() // start progress bar
  to.meta && typeof to.meta.title !== 'undefined' && setDocumentTitle(`${i18nRender(to.meta.title)} - ${domTitle}`)
  /* has token */
  // console.log(store);
  if (storage.get(ACCESS_TOKEN) && storage.get(USER_INFO)) {  //是否存在token和UserInfo

    // 每次变动都存储到vuex中
    store.commit('SET_INFO', storage.get(USER_INFO))
    store.commit('SET_TOKEN', storage.get(ACCESS_TOKEN))
    store.commit('SET_NAME', { name: storage.get(USER_INFO).userName, welcome: welcome() })

    if (to.path === loginRoutePath) {
      next({ path: defaultRoutePath })
      NProgress.done()
    }
    // 获取分区列表,如果没有则请求接口
    if (store.getters.parts.length == 0) {
      store.dispatch('GetParts')
        .then(res => {
          console.log("parts" + store.getters.parts);
        })
    }
    // generate dynamic router
    // 是否有动态路由vuex,如果没有则请求接口
    if (store.getters.addRouters.length == 0) {
      store.dispatch('GenerateRoutes').then(() => {
        // 动态添加可访问路由表
        // [email protected]+ New API
        store.getters.addRouters.forEach(r => {
          router.addRoute(r)
        })
        // 请求带有 redirect 重定向时,登录自动重定向到该地址
        const redirect = decodeURIComponent(from.query.redirect || to.path)
        if (to.path === redirect) {
          // set the replace: true so the navigation will not leave a history record
          next({ ...to, replace: true })
        } else {
          // 跳转到目的路由
          next({ path: redirect })
        }
      }).catch((res) => {
        notification.error({
          message: '错误',
          description: res
        })
      })
    }

    next()
  } else {
    if (allowList.includes(to.name)) {
      // 在免登录名单,直接进入
      next()
    } else {
      next({ path: loginRoutePath, query: { redirect: to.fullPath } })
      NProgress.done() // if current page is login will not trigger afterEach hook, so manually handle it
    }
    // if (to.path === '/user/login') { // 如果是登录页面路径,就直接next()
    //   next()
  }
})
3.我们接下来看src/store/modules/async-router.js,这个文件不用改,我们找到这个方法本体。
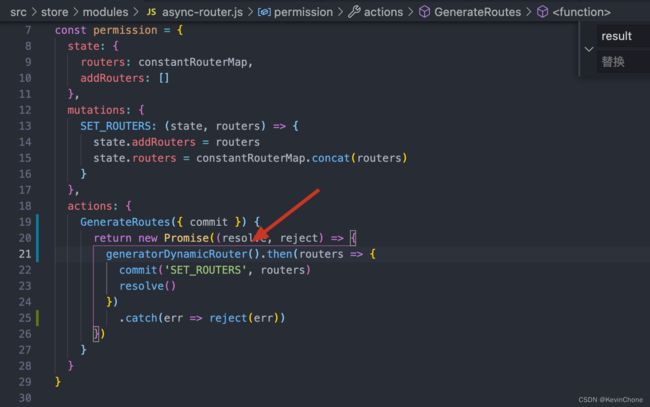
4.这里是自己写的请求后台动态路由api的方法,这个方法我把原本的const {result} = res里的result改成data了,因为我后台统一返回的data,listToTree方法里有个parentId字段,如果你不是这么定义的需要去改一下,我这边也是parentId就不改了。 5. 生成路由方法改动
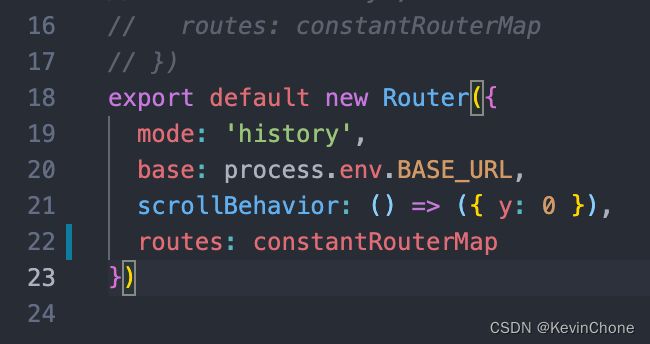
6.src/router/index.js,将原本的routes:constantRouterMap.concat(asyncRouterMap)改成constantRouterMap,没改动之前,我访问什么路由都是404,我猜测是当时路由没加载出来前,他认为没有这些路由,全都跳转到那个通配符*的404页面去了
下面是数据库字段,返回字段,效果。

{
"code": 200,
"data": [
{
"id": 11,
"name": "dashboard",
"title": "仪表盘",
"icon": "dashboard",
"component": "RouteView",
"redirect": "/dashboard/workplace",
"path": "",
"status": 1,
"type": 1,
"parentId": 0,
"sort": 99
},
{
"id": 1,
"name": "menu",
"title": "菜单管理",
"icon": "menu",
"component": "RouteView",
"redirect": null,
"path": null,
"status": 1,
"type": 1,
"parentId": 0,
"sort": 0
},
{
"id": 12,
"name": "workplace",
"title": "工作空间",
"icon": null,
"component": "Workplace",
"redirect": null,
"path": "/dashboard/workplace",
"status": 1,
"type": 1,
"parentId": 11,
"sort": 0
},
],
"msg": "请求成功"
}