目标检测——数据增强处理【Data Agumentation + Mosaic】
Contents
-
- 1 普通数据增强方法
-
- 1.1 图片的RGB和HSV格式介绍
-
- 1.1.1 RGB格式
- 1.1.2 HSV格式
- 1.2 普通数据增强结果及代码
- 2 Mosaic数据增强
-
- 2.1 Mosaic数据增强的过程
- 2.2 实现代码
1 普通数据增强方法
使用数据增强方法对于训练神经网络非常有帮助,可以对有限的数据集进行扩增,增加神经网络的鲁棒性。相比于再去获得更多标记好的数据集,数据增强降低了数据及获取的成本,这是一种廉价且有效的数据预处理方法。
普通数据增强方法,即对于一张图片进行一些类似于在各种修图软件中进行的操作。无外乎是:
- 改变图片宽高比;
- 对图片进行左右反转;
- 对图片进行整体放大 / 缩小;
- 对于图片的HSV格式,可以改变色调(H, Hue)、饱和度(S,Saturation)、明度(V, Value);
- 不要忘记对于目标检测中的数据增强方法,改变图片后需要对相应的标注框进行相应改变。
1.1 图片的RGB和HSV格式介绍
1.1.1 RGB格式
RGB是从颜色发光的原理来设计定的,通俗点说它的颜色混合方式就好像有红、绿、蓝三盏灯,当它们的光相互叠合的时候,色彩相混,而亮度却等于三者亮度之总和,总和越高图片的亮度越高。
红、绿、蓝三个颜色通道每种色各分为256阶亮度,在0时“灯”最弱——是关掉的,而在255时“灯”最亮。三个颜色通道的灰度值的不同组成了各种各样的颜色。当三色灰度都为0时,是最暗的黑色调;三色灰度都为255时,是最亮的白色调。
我们通常见到的255×255×255即表示白色。RGB的所谓“多少”就是指亮度,并使用整数来表示。通常情况下,RGB各有256级亮度,用数字表示为从0、1、2…直到255。

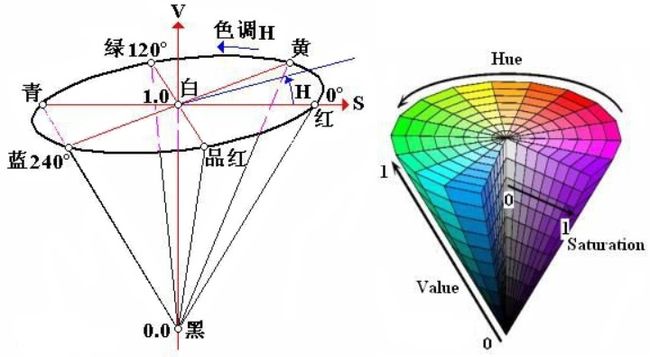
1.1.2 HSV格式
HSV是一种比较直观的颜色模型,所以在许多图像编辑工具中应用比较广泛,这个模型中颜色的参数分别是:色调(H, Hue),饱和度(S,Saturation),明度(V, Value)。
色调H: 用角度度量,取值范围为0°~360°,从红色开始按逆时针方向计算,红色为0°,绿色为120°,蓝色为240°。它们的补色是:黄色为60°,青色为180°,品红为300°。
饱和度S:饱和度S表示颜色接近光谱色的程度。一种颜色,可以看成是某种光谱色与白色混合的结果。其中光谱色所占的比例愈大,颜色接近光谱色的程度就愈高,颜色的饱和度也就愈高。饱和度高,颜色则深而艳。光谱色的白光成分为0,饱和度达到最高。通常取值范围为0%~100%,值越大,颜色越饱和。
明度V:明度表示颜色明亮的程度,对于光源色,明度值与发光体的光亮度有关;对于物体色,此值和物体的透射比或反射比有关。通常取值范围为0%(黑)到100%(白)。
1.2 普通数据增强结果及代码
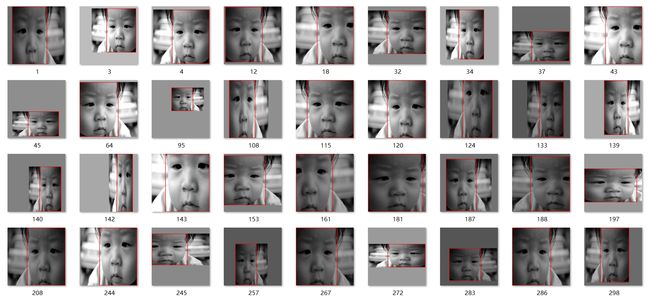
首先仍以这张VOC数据集中的帅哥为例,看一下对该图片进行普通数据增强后的结果。

 代码如下,代码中有详细注释。
from PIL import Image, ImageDraw
import numpy as np
from matplotlib.colors import rgb_to_hsv, hsv_to_rgb
import random

def rand(a=0, b=1):
    return np.random.rand() * (b - a) + a

def get_random_data(annotation_line, input_shape, max_boxes=20, jitter=.5, hue=.3, sat=1.5, val=1.5,):
    '''random preprocessing for real-time data augmentation'''
    line = annotation_line.split()
    image = Image.open(line[0])
    iw, ih = image.size
    h, w = input_shape
    box = np.array([np.array(list(map(int, box.split(',')))) for box in line[1:]])

    # 对图像进行缩放并且进行长和宽的扭曲
    new_ar = w / h * rand(1 - jitter, 1 + jitter) / rand(1 - jitter, 1 + jitter)
    scale = rand(0.5, 1.5)
    if new_ar < 1:
        nh = int(scale * h)
        nw = int(nh * new_ar)
    else:
        nw = int(scale * w)
        nh = int(nw / new_ar)
    image = image.resize((nw, nh), Image.BICUBIC)

    # 将图像多余的部分加上灰条
    dx = int(rand(0, w - nw))
    dy = int(rand(0, h - nh))
    new_image = Image.new('RGB', (w, h), (128, 128, 128))
    new_image.paste(image, (dx, dy))
    image = new_image

    # 翻转图像
    flip = rand() < .5
    if flip: image = image.transpose(Image.FLIP_LEFT_RIGHT)

    # 色域扭曲
    hue = rand(-hue, hue)
    sat = rand(1, sat) if rand() < .5 else 1 / rand(1, sat)
    val = rand(1, val) if rand() < .5 else 1 / rand(1, val)
    x = rgb_to_hsv(np.array(image) / 255.)
    x[..., 0] += hue
    x[..., 0][x[..., 0] > 1] -= 1
    x[..., 0][x[..., 0] < 0] += 1
    x[..., 1] *= sat
    x[..., 2] *= val
    x[x > 1] = 1
    x[x < 0] = 0
    image_data = hsv_to_rgb(x)  # numpy array, 0 to 1

    # 将box进行调整
    box_data = np.zeros((max_boxes, 5))
    if len(box) > 0:
        np.random.shuffle(box)
        box[:, [0, 2]] = box[:, [0, 2]] * nw / iw + dx
        box[:, [1, 3]] = box[:, [1, 3]] * nh / ih + dy
        if flip: box[:, [0, 2]] = w - box[:, [2, 0]]
        box[:, 0:2][box[:, 0:2] < 0] = 0
        box[:, 2][box[:, 2] > w] = w
        box[:, 3][box[:, 3] > h] = h
        box_w = box[:, 2] - box[:, 0]
        box_h = box[:, 3] - box[:, 1]
        box = box[np.logical_and(box_w > 1, box_h > 1)]  # discard invalid box
        if len(box) > max_boxes: box = box[:max_boxes]
        box_data[:len(box)] = box

    return image_data, box_data

i=0
if __name__ == "__main__":
    while(i<50):
        i=i+1
        with open("man/man.txt") as f:
            lines = f.readlines()
        line = lines[0]

        image_data, box_data = get_random_data(line, [416, 416])
        img = Image.fromarray((image_data * 255).astype(np.uint8))
        for j in range(len(box_data)):
            thickness = 3
            left, top, right, bottom = box_data[j][0:4]
            draw = ImageDraw.Draw(img)
            for i in range(thickness):
                draw.rectangle([left + i, top + i, right - i, bottom - i], outline=(255, 0, 0))
        img.save("man/{}.jpg".format(random.randrange(1, 1000, 1)))
        #img.show()
2 Mosaic数据增强
Mosaic数据增强是在YOLOv4中提出来的,该方法参考了CutMix数据增强方式,CutMix数据增强方式利用两张图片进行拼接,而Mosaic数据增强利用了四张图片进行拼接。YOLOv4论文中提到Mosaic使得网络可以检测正常环境外部的物体,并且在BN计算的时候一下子会计算四张图片的数据,极大地减少了对于论文中提到的large mini-batch size的需求。
2.1 Mosaic数据增强的过程
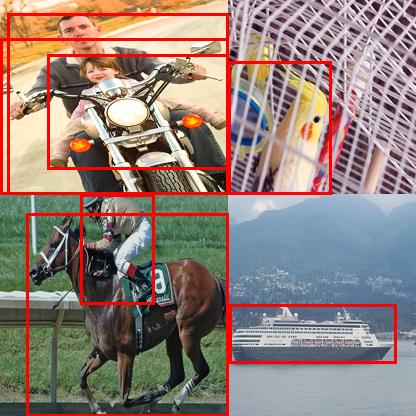
对于下面的四张原图片:

Mosaic数据增强的过程共分为三步:
- 取出四张图片并进行之前提到的普通数据增强,比如改变宽高比、放大/ 缩小、反转、改变HSV等操作;
- 将四张图片分别按照四个方向位置摆好;

- 将四张图片组合到一张图片中,并筛除掉一些没用的框;
2.2 实现代码
from PIL import Image, ImageDraw
import numpy as np
from matplotlib.colors import rgb_to_hsv, hsv_to_rgb

def get_random_data_mosaic(annotation_line, input_shape, hue=.1, sat=1.5, val=1.5):
    '''random preprocessing for real-time data augmentation'''
    h, w = input_shape
    # 四张图片最终的划分边界比例
    min_offset_x = 0.4
    min_offset_y = 0.4
    scale_low = 1 - min(min_offset_x, min_offset_y)
    scale_high = scale_low + 0.2

    image_datas = []
    box_datas = []
    index = 0

    place_x = [0, 0, int(w * min_offset_x), int(w * min_offset_x)]
    place_y = [0, int(h * min_offset_y), int(w * min_offset_y), 0]
    for line in annotation_line:
        # 每一行进行分割
        line_content = line.split()
        # 打开图片
        image = Image.open(line_content[0])
        image = image.convert("RGB")
        # 图片的大小
        iw, ih = image.size
        # 保存框的位置
        box = np.array([np.array(list(map(int, box.split(',')))) for box in line_content[1:]])

        image.save(str(index)+".jpg")
        # 是否翻转图片
        flip = rand() < .5
        if flip and len(box) > 0:
            image = image.transpose(Image.FLIP_LEFT_RIGHT)
            box[:, [0, 2]] = iw - box[:, [2, 0]]

        # 对输入进来的图片进行缩放
        new_ar = w / h
        scale = rand(scale_low, scale_high)
        if new_ar < 1:
            nh = int(scale * h)
            nw = int(nh * new_ar)
        else:
            nw = int(scale * w)
            nh = int(nw / new_ar)
        image = image.resize((nw, nh), Image.BICUBIC)

        # 进行色域变换
        hue = rand(-hue, hue)
        sat = rand(1, sat) if rand() < .5 else 1 / rand(1, sat)
        val = rand(1, val) if rand() < .5 else 1 / rand(1, val)
        x = rgb_to_hsv(np.array(image) / 255.)
        x[..., 0] += hue
        x[..., 0][x[..., 0] > 1] -= 1
        x[..., 0][x[..., 0] < 0] += 1
        x[..., 1] *= sat
        x[..., 2] *= val
        x[x > 1] = 1
        x[x < 0] = 0
        image = hsv_to_rgb(x)

        image = Image.fromarray((image * 255).astype(np.uint8))
        # 将图片进行放置,分别对应四张分割图片的位置
        dx = place_x[index]
        dy = place_y[index]
        new_image = Image.new('RGB', (w, h), (128, 128, 128))
        new_image.paste(image, (dx, dy))
        image_data = np.array(new_image) / 255

        Image.fromarray((image_data*255).astype(np.uint8)).save(str(index)+"distort.jpg")

        index = index + 1
        box_data = []
        # 对box进行重新处理
        if len(box) > 0:
            np.random.shuffle(box)
            box[:, [0, 2]] = box[:, [0, 2]] * nw / iw + dx
            box[:, [1, 3]] = box[:, [1, 3]] * nh / ih + dy
            box[:, 0:2][box[:, 0:2] < 0] = 0
            box[:, 2][box[:, 2] > w] = w
            box[:, 3][box[:, 3] > h] = h
            box_w = box[:, 2] - box[:, 0]
            box_h = box[:, 3] - box[:, 1]
            box = box[np.logical_and(box_w > 1, box_h > 1)]
            box_data = np.zeros((len(box), 5))
            box_data[:len(box)] = box

        image_datas.append(image_data)
        box_datas.append(box_data)

        img = Image.fromarray((image_data * 255).astype(np.uint8))
        for j in range(len(box_data)):
            thickness = 3
            left, top, right, bottom = box_data[j][0:4]
            draw = ImageDraw.Draw(img)
            for i in range(thickness):
                draw.rectangle([left + i, top + i, right - i, bottom - i], outline=(255, 0, 0))
        img.show()

    # 将图片分割,放在一起
    cutx = np.random.randint(int(w * min_offset_x), int(w * (1 - min_offset_x)))
    cuty = np.random.randint(int(h * min_offset_y), int(h * (1 - min_offset_y)))

    new_image = np.zeros([h, w, 3])
    new_image[:cuty, :cutx, :] = image_datas[0][:cuty, :cutx, :]
    new_image[cuty:, :cutx, :] = image_datas[1][cuty:, :cutx, :]
    new_image[cuty:, cutx:, :] = image_datas[2][cuty:, cutx:, :]
    new_image[:cuty, cutx:, :] = image_datas[3][:cuty, cutx:, :]

    # 对框进行进一步的处理
    new_boxes = merge_bboxes(box_datas, cutx, cuty)
    return new_image, new_boxes

def merge_bboxes(bboxes, cutx, cuty):
    merge_bbox = []
    for i in range(len(bboxes)):
        for box in bboxes[i]:
            tmp_box = []
            x1, y1, x2, y2 = box[0], box[1], box[2], box[3]

            if i == 0:
                if y1 > cuty or x1 > cutx:
                    continue
                if y2 >= cuty and y1 <= cuty:
                    y2 = cuty
                    if y2 - y1 < 5:
                        continue
                if x2 >= cutx and x1 <= cutx:
                    x2 = cutx
                    if x2 - x1 < 5:
                        continue

            if i == 1:
                if y2 < cuty or x1 > cutx:
                    continue

                if y2 >= cuty and y1 <= cuty:
                    y1 = cuty
                    if y2 - y1 < 5:
                        continue

                if x2 >= cutx and x1 <= cutx:
                    x2 = cutx
                    if x2 - x1 < 5:
                        continue

            if i == 2:
                if y2 < cuty or x2 < cutx:
                    continue

                if y2 >= cuty and y1 <= cuty:
                    y1 = cuty
                    if y2 - y1 < 5:
                        continue

                if x2 >= cutx and x1 <= cutx:
                    x1 = cutx
                    if x2 - x1 < 5:
                        continue

            if i == 3:
                if y1 > cuty or x2 < cutx:
                    continue

                if y2 >= cuty and y1 <= cuty:
                    y2 = cuty
                    if y2 - y1 < 5:
                        continue

                if x2 >= cutx and x1 <= cutx:
                    x1 = cutx
                    if x2 - x1 < 5:
                        continue

            tmp_box.append(x1)
            tmp_box.append(y1)
            tmp_box.append(x2)
            tmp_box.append(y2)
            tmp_box.append(box[-1])
            merge_bbox.append(tmp_box)
    return merge_bbox

if __name__ == "__main__":
    with open("2007_train.txt") as f:
        lines = f.readlines()
    a = np.random.randint(0, len(lines))
    line = lines[a:a + 4]
    image_data, box_data = get_random_data_mosaic(line, [416, 416])
    img = Image.fromarray((image_data * 255).astype(np.uint8))
    for j in range(len(box_data)):
        thickness = 3
        left, top, right, bottom = box_data[j][0:4]
        draw = ImageDraw.Draw(img)
        for i in range(thickness):
            draw.rectangle([left + i, top + i, right - i, bottom - i], outline=(255, 0, 0))
    img.show()
    img.save("box_all.jpg")
参考博客1
参考中科大大兄弟!
欢迎关注【OAOA】
