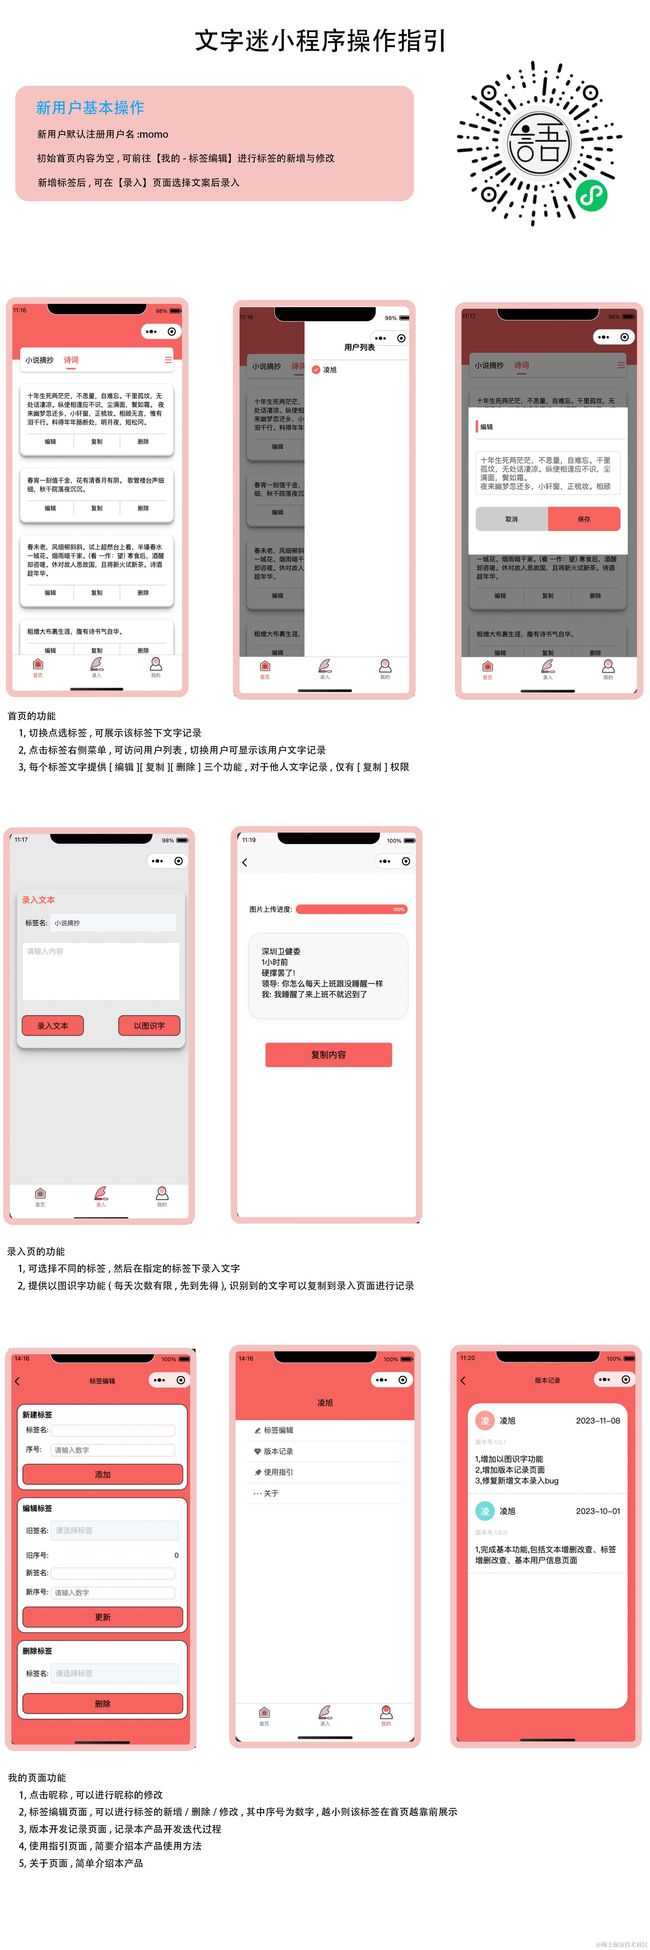
手把手云开发小程序-(四)-uniclould增删改查业务开发
一,导入uView
在开发小程序的时候,我习惯使用uView这个ui库。主要是直接用当然比自己写省时间。
它的官网:uView - 多平台快速开发的UI框架 - uni-app UI框架 (gitee.io)
导入:
npm install [email protected]
然后按照官网进行配置:
1. 引入uView主JS库
在项目根目录中的main.js中,引入并使用uView的JS库,注意这两行要放在import Vue之后。
// main.js
import uView from "uview-ui";
Vue.use(uView);
2. 在引入uView的全局SCSS主题文件
在项目根目录的uni.scss中引入此文件。
/* uni.scss */
@import 'uview-ui/theme.scss';
3. 引入uView基础样式
注意!
在App.vue中首行的位置引入,注意给style标签加入lang="scss"属性
4. 配置easycom组件模式
easycom功能可以让用户无需安装、引用、注册,三个步骤后才能使用组。uni-app为了调试性能的原因,修改easycom规则不会实时生效,配置完后,需要重启HX或者重新编译项目才能正常使用uView的功能。
// pages.json
{
  "easycom": {
    "^u-(.*)": "uview-ui/components/u-$1/u-$1.vue"
  },

  // 此为本身已有的内容
  "pages": [
    // ......
  ]
}
二,使用unicluld完成增删改查的业务功能
页面开发就不说了,无非就是html+css,这里主要讲讲如何使用uniclould进行增删改查.
为了简化篇幅,我拿我小程序的标签来做讲解,增删改查各讲一个例子,通过这四个例子,大家也能很快学会uniclould的云对象使用,其他业务开发大差不差的.
2.1,新建标签数据表
第一步肯定是需要在云服务器新建数据表,如下图所示,新建一个即可:
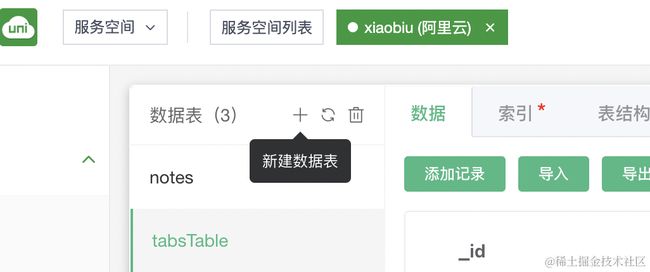
啥也不用选,初始空表就行,就取名为tabsTable.
2.2,增加标签
新建完数据表,就需要往数据库中新增标签.
于是先画好前端ui,然后新建云对象tab:

前端调用接口:
async addTabs(){
  let num=Number(this.tabsNum)
  if(!num ||typeof num != 'number'){
    uni.showToast({
      title: "请输入有效值",
      icon:'error',
      duration: 1500
    });
    return
  }
  const tabs = uniCloud.importObject('tab') // 导入云对象
  const res2 = await tabs.addTabs({
    token:this.token,
    tabsName:this.tabsName,
    tabsNum:num
  })
  this.tabsName=''
  this.tabsNum=''
  this.getTabs()
  uni.showToast({
    title: res2.msg,
    icon:'error',
    duration: 2000
  });
},
主要就是这两行代码:
  const tabs = uniCloud.importObject('tab') // 导入云对象
  const res2 = await tabs.addTabs({
    token:this.token,
    tabsName:this.tabsName,
    tabsNum:num
  })
不用去纠结uniCloud从哪来的,编译的时候,框架会给我们自己引入的.这里直接这么用就行了,可以暂时把它理解成一个全局的对象.只要这样引入tab云对象,就能调用该云对象的addTabs方法啦.
前端调用这个接口后,我们的后端也就是我们的tab云对象就需要去接收,它的写法如下:
// 云对象教程: https://uniapp.dcloud.net.cn/uniCloud/cloud-obj
// jsdoc语法提示教程:https://ask.dcloud.net.cn/docs/#//ask.dcloud.net.cn/article/129
const db = uniCloud.database();
const userTable = db.collection('user');
const notesTable = db.collection('notes');
const tabsTable = db.collection('tabsTable');//这几个是在引入数据表,因为要对数据表做增删改查
const dbCmd = db.command
const {encrypt,decrypt} =require("common-object");
module.exports = {
_before: function () { // 通用预处理器
},
/**
* method1方法描述
* @param {string} param1 参数1描述
* @returns {object} 返回值描述
*/
async addTabs(param) {
// 业务逻辑
const {token,tabsName,tabsNum}=param
let result=JSON.parse(decrypt(token))
const openId=result.openid
//增加标签,首先要用该账户来判断有没有同名的标签
let res=await tabsTable.where({openId:dbCmd.eq(openId)}).get()
let res2=res.data.filter(item=>{
return item.tabsName==tabsName
})
if(res2.length>0){
return {
code:10001,
msg:'该标签名已存在'
}
}else{
//新增标签
await tabsTable.add({tabsName:tabsName,openId:openId,tabsNum:tabsNum})
return {
code:10000,
msg:'新增成功'
}
}
}
}
这样就完成了增加标签的业务逻辑啦.
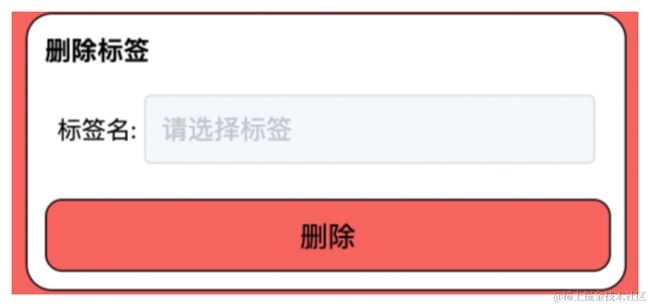
2.3,删除标签
删除标签也是类似的操作流程,先画好页面:
在页面调用接口:
      //删除标签
      deleteTabs(){
        const that=this
        uni.showModal({
          title: '提示',
          content: '删除该标签的同时会删除该标签下的笔记,确定要继续?',
          success:async  function (res) {
            if (res.confirm) {
              let params={
                token:that.token,
                tabsSelect:that.deletetabsSelect
              }
              const tabs = uniCloud.importObject('tab')
              const res = await tabs.delTabs(params)
              that.deletetabsSelect=''
              that.getTabs()
              uni.showToast({//提示
                title:res.msg
              })
            } else if (res.cancel) {
              console.log('用户点击取消');
              return
            }
          }
        });
      }
对应的云对象删除标签接口:
// 云对象教程: https://uniapp.dcloud.net.cn/uniCloud/cloud-obj
// jsdoc语法提示教程:https://ask.dcloud.net.cn/docs/#//ask.dcloud.net.cn/article/129
const db = uniCloud.database();
const userTable = db.collection('user');
const notesTable = db.collection('notes');
const tabsTable = db.collection('tabsTable');
const dbCmd = db.command
const {encrypt,decrypt} =require("common-object");
module.exports = {
_before: function () { // 通用预处理器
},
//删除标签
async delTabs(param){
const {token,tabsSelect}=param
let result=JSON.parse(decrypt(token))
const openId=result.openid
//先删除该标签下的所有笔记
let res = await notesTable.where({
openId:dbCmd.eq(openId),
tabsSelect:tabsSelect
}).remove()
//然后删除对应的标签
let res2=await tabsTable.where({
openId:dbCmd.eq(openId),
tabsName:tabsSelect
}).remove()
return {
code:10000,
msg:'更新成功'
}
},
}
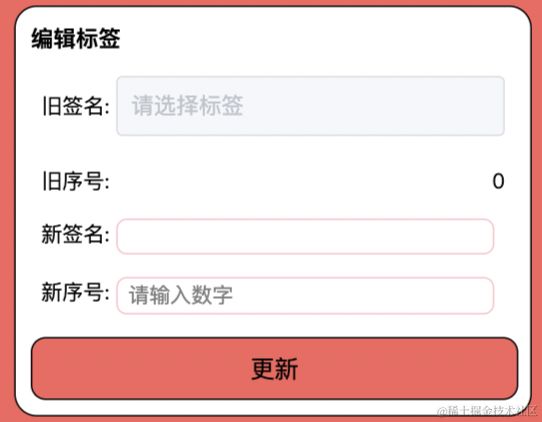
2.4,修改标签
先画好页面:
前端的接口调用:
      //更新标签名
      async updateTabs(){
        let num=Number(this.newTabsNum)
        let params={
          token:this.token,
          oldTabsName:this.updatetabsSelect,
          newTabsName:this.newTabsName,
          newTabsNum:num
        }
        if(this.updatetabsSelect||!this.newTabsName || typeof num != 'number'){
          uni.showToast({
            title: "请输入合法值",
            duration: 1500
          });
        }
        const tabs = uniCloud.importObject('tab') // 导入云对象
        const res = await tabs.updateTabs(params)
        this.updatetabsSelect=this.newTabsName=this.newTabsNum=''
        this.getTabs()
        uni.showToast({
          title: res.msg,
          duration: 1500
        });
      },
后端对应的接口,当然这个updateTabs方法和前文两个接口一样,我为了统一管理,放在同一个云对象里面了,这里为了减少篇幅,只复制了该方法出来.
  //更新标签名
  async updateTabs(param){
    const {token,oldTabsName,newTabsName,newTabsNum}=param
    let result=JSON.parse(decrypt(token))
    const openId=result.openid
    let res=await tabsTable.where({openId:dbCmd.eq(openId)}).get()
    let res2=res.data.filter(item=>{
      return item.tabsName==newTabsName
    })
    if(res2.length>0&&newTabsName!=oldTabsName){
      return {
        code:10001,
        msg:'该标签名已存在'
      }
    }else{
      //更新标签对应的文本为新标签
      //第一步:先找到该用户该标签的所有数据
      let resTabnotes = await notesTable.where({
        openId:dbCmd.eq(openId),
        tabsSelect:oldTabsName
      }).update(
        {
          tabsSelect:newTabsName
        }
      )
      //更新-标签
      let resTabs = await tabsTable.where({
        openId:dbCmd.eq(openId),
        tabsName:oldTabsName
      }).update(
        {
          tabsName:newTabsName,
          tabsNum:newTabsNum
        }
      )
      return {
        code:10000,
        msg:'更新成功'
      }
    }
  }
2.5,查询标签
前端的接口调用:
//获取所有的标签
async getTabs(){
  const tabs = uniCloud.importObject('tab') // 导入云对象
  const res = await tabs.getTabs({
     token:this.token
  })
  this.tabsList=res.data
  this.columns[0]=res.data.map(item=>item.tabsName)
},
后端的接口调用:
  async getTabs(param){
    const {token}=param
    let result=JSON.parse(decrypt(token))
    let openId=result.openid
    //需要排序
    let res=await tabsTable.where({openId:dbCmd.eq(openId)}).orderBy('tabsNum','asc').get()
    let result2=res.data.map(item=>{
      return {
        tabsName:item.tabsName,
        tabsNum:item.tabsNum
      }
    })
    return {
      code:10000,
      data:result2
    }
  },
其他的业务开发大同小异,就不多说啦.其他功能可以扫描我文章开头的二维码,体验一下,这个小程序是我自己将一直使用的,这里就当打个小广告吧,也会持续维护迭代.有啥优化意见大家也可以提哈.
三,我的小程序体验
我对应这个教程的小程序,可以看下图,扫码体验: