【Spring Cloud Alibaba 实战】Nacos 、Sentinel、Gateway、Seata、Feign
Spring Cloud Alibaba 是什么
Spring Cloud Alibaba 是阿里巴巴提供的微服务开发一站式解决方案,是阿里巴巴开源中间件与 Spring Cloud 体系的融合。
Spring Cloud Alibaba真实应用场景
大型复杂的系统,例如大型电商系统
高并发系统,例如大型门户,秒杀系统
需求不明确,且变更很快的系统,例如初创公司业务系统。
1.1. 主要功能
- 服务限流降级:默认支持 WebServlet、WebFlux, OpenFeign、RestTemplate、Spring Cloud Gateway, Zuul, Dubbo 和 RocketMQ 限流降级功能的接入,可以在运行时通过控制台实时修改限流降级规则,还支持查看限流降级 Metrics 监控。
- 服务注册与发现:适配 Spring Cloud 服务注册与发现标准,默认集成了 Ribbon 的支持。
- 分布式配置管理:支持分布式系统中的外部化配置,配置更改时自动刷新。
- 消息驱动能力:基于 Spring Cloud Stream 为微服务应用构建消息驱动能力。
- 分布式事务:使用
@GlobalTransactional注解, 高效并且对业务零侵入地解决分布式事务问题。 - 阿里云对象存储:阿里云提供的海量、安全、低成本、高可靠的云存储服务。支持在任何应用、任何时间、任何地点存储和访问任意类型的数据。
- 分布式任务调度:提供秒级、精准、高可靠、高可用的定时(基于 Cron 表达式)任务调度服务。同时提供分布式的任务执行模型,如网格任务。网格任务支持海量子任务均匀分配到所有 Worker(schedulerx-client)上执行。
- 阿里云短信服务:覆盖全球的短信服务,友好、高效、智能的互联化通讯能力,帮助企业迅速搭建客户触达通道。
1.2. 主要组件
Sentinel:把流量作为切入点,从流量控制、熔断降级、系统负载保护等多个维度保护服务的稳定性。
Nacos:一个更易于构建云原生应用的动态服务发现、配置管理和服务管理平台。
RocketMQ:一款开源的分布式消息系统,基于高可用分布式集群技术,提供低延时的、高可靠的消息发布与订阅服务。
Dubbo:Apache Dubbo™ 是一款高性能 Java RPC 框架。
Seata:阿里巴巴开源产品,一个易于使用的高性能微服务分布式事务解决方案。
Alibaba Cloud OSS: 阿里云对象存储服务(Object Storage Service,简称 OSS),是阿里云提供的海量、安全、低成本、高可靠的云存储服务。您可以在任何应用、任何时间、任何地点存储和访问任意类型的数据。
Alibaba Cloud SchedulerX: 阿里中间件团队开发的一款分布式任务调度产品,提供秒级、精准、高可靠、高可用的定时(基于 Cron 表达式)任务调度服务。
Alibaba Cloud SMS: 覆盖全球的短信服务,友好、高效、智能的互联化通讯能力,帮助企业迅速搭建客户触达通道。
以上内容参考白菜说技术——Spring Cloud Alibaba 实战博客
一、Nacos Discovery–服务治理
1、 nacos简介
Nacos 致力于帮助您发现、配置和管理微服务。Nacos 提供了一组简单易用的特性集,帮助您快速
实现动态服务发现、服务配置、服务元数据及流量管理。
从上面的介绍就可以看出, nacos的作用就是一个注册中心 ,用来管理注册上来的各个微服务。
nacos帮助我们完成了两个功能
1.服务自动注册与发现
2.集群
自己手动实现了负载均衡
注意: 负载均衡是在服务调用方那块进行的
什么是服务治理
服务治理是微服务架构中最核心最基本的模块。用于实现各个微服务的 自动化注册与发现 。
服务注册: 在服务治理框架中,都会构建一个注册中心,每个服务单元向注册中心登记自己提供服
务的详细信息。并在注册中心形成一张服务的清单,服务注册中心需要以心跳的方式去监测清单中
的服务是否可用,如果不可用,需要在服务清单中剔除不可用的服务。
服务发现: 服务调用方向服务注册中心咨询服务,并获取所有服务的实例清单,实现对具体服务实例的访问。
2、nacos实战入门
2.1 搭建nacos环境
第 1 步: 安装nacos
下载地址: https://github.com/alibaba/nacos/releases
下载zip格式的安装包,然后进行解压缩操作
第 2 步: 启动nacos
进入nacos的bin目录中, 双击点击startup.cmd即可启动
第 3 步: 访问nacos
打开浏览器输入http://localhost:8848/nacos,即可访问服务, 默认用户名和密码是nacos/nacos

在 Spring 项目中引入 Nacos 客户端
2.2 将商品微服务注册到nacos
接下来开始修改shop-product模块的代码, 将其注册到nacos服务上
1 在pom.xml中添加nacos的依赖
        <dependency>
            <groupId>com.alibaba.cloudgroupId>
            <artifactId>spring-cloud-starter-alibaba-nacos-discoveryartifactId>
        dependency>
 <spring-cloud-alibaba.version>2.1.0.RELEASEspring-cloud-alibaba.version>


            <dependency>
                <groupId>com.alibaba.cloudgroupId>
                <artifactId>spring-cloud-alibaba-dependenciesartifactId>
                <version>${spring-cloud-alibaba.version}version>
                <type>pomtype>
                <scope>importscope>
            dependency>
2 在主类上添加 @EnableDiscoveryClient 注解开启服务注册发现功能
@SpringBootApplication
@EnableDiscoveryClient
public class ProductApplication{}
3 在application.yml中添加nacos服务的地址
# nacos将会把application.name作为注册中心的代表该服务的键
spring:
  application:
    name: shop-product
  cloud:
    nacos:
      discovery:
        server-addr: 127.0.0.1:8848
4 启动服务, 观察nacos的控制面板中是否有注册上来的商品微服务
2.3 将订单微服务注册到nacos
接下来开始修改shop_order模块的代码, 将其注册到nacos服务上
1 在pom.xml中添加nacos的依赖
        <dependency>
            <groupId>com.alibaba.cloudgroupId>
            <artifactId>spring-cloud-starter-alibaba-nacos-discoveryartifactId>
        dependency>
2 在主类上添加 @EnableDiscoveryClient 注解
@SpringBootApplication
@EnableDiscoveryClient
public class OrderApplication
3 在application.yml中添加nacos服务的地址
spring:
  application:
    name: shop-order
  cloud:
    nacos:
      discovery:
        server-addr: 127.0.0.1:8848
4 修改OrderController, 实现微服务调用
		/**
     * 2.0版本, 通过discoveryClient, 动态的获取服务提供方(商品)的ip+port
     * @param pid
     * @return
     */
    @GetMapping("/order/{productid}")
    public ShopOrder addOrder(@PathVariable("productid") Integer pid){

        //创建一个订单
        ShopOrder order = new ShopOrder();
        order.setPid(pid);

        RestTemplate restTemplate = new RestTemplate();

        //根据服务名称, 想nacos注册中心索要对应的ip+port信息
        List<ServiceInstance> shopProductInfoList = discoveryClient.getInstances("shop-product");
        ServiceInstance serviceInstance = shopProductInfoList.get(0);
        String ip = serviceInstance.getHost();
        int port = serviceInstance.getPort();
        System.out.println("ip = " + ip);
        System.out.println("port = " + port);

        ResponseEntity<ShopProduct> productResponseEntity = restTemplate.getForEntity("http://"+ip + ":" + port+"/product/" + pid, ShopProduct.class);
        ShopProduct product = productResponseEntity.getBody();
        System.out.println("我是服务调用方, 我查询到了服务提共方返回给我的商品所有数据" + product);

        order.setPprice(product.getPprice());
        order.setPname(product.getPname());

        return order;
    }
DiscoveryClient是专门负责服务注册和发现的,我们可以通过它获取到注册到注册中心的所有服务
5 启动服务, 观察nacos的控制面板中是否有注册上来的订单微服务,然后通过访问消费者服务验证调用是否成功
(一) 什么是Feign
在SpringCloud中,服务之间的调用涉及的组件主要有Feign。
Nacos很好的兼容了Feign, Feign 默认集成了 Ribbon, 所以在Nacos下使用Fegin默认就实现了负载均衡的效果。
Feign是一个声明式的Web Service客户端(伪Http客户端),它使得写HTTP客户端变得更简单,调用远程服务就像调用本地服务一样简单。使用Feign,只需要创建一个接口并添加一个注解即可。
它具有可插拔的注解特性,包括Feign注解和JAX-RS注解。Feign也支持可插拔的编码器和解码器。Spring Cloud增加了对Spring MVC的绑定,以便使用Spring MVC的注解和HttpMessageConverters。Feign默认集成了Ribbon,所以在使用Feign时,默认也会实现负载均衡的效果。
一般来说,在Spring Cloud中,使用Feign进行服务间的调用,可以简化开发,提高效率。在实际应用中,开发者只需关注服务提供方定义的接口,并通过Feign进行调用,而不需要关注底层的HTTP请求细节,这样可以将更多的精力放在业务逻辑的实现上。
(二) Feign的使用 [重要]
注意: feign是http调用, 自然是配置在http的调用方
1 加入Fegin的依赖
        <dependency>
            <groupId>org.springframework.cloudgroupId>
            <artifactId>spring-cloud-starter-openfeignartifactId>
        dependency>


            <dependency>
                <groupId>org.springframework.cloudgroupId>
                <artifactId>spring-cloud-dependenciesartifactId>
                <version>Greenwich.RELEASEversion>
                <type>pomtype>
                <scope>importscope>
            dependency>
2 在主类上添加Fegin的注解
@SpringBootApplication
@EnableDiscoveryClient
@EnableFeignClients//开启Fegin
public class OrderApplication {}
3 创建一个service, 并使用Fegin实现微服务调用
4 修改controller代码,并启动验证
import org.springframework.cloud.openfeign.FeignClient;
import org.springframework.web.bind.annotation.GetMapping;
import org.springframework.web.bind.annotation.PathVariable;

@FeignClient("shop-product")//声明调用的提供者的name
public interface ProductService {
    //指定调用提供者的哪个方法
//@FeignClient+@GetMapping 就是一个完整的请求路径 http://shop-product/product/{pid}
    @GetMapping(value = "/product/{pid}")
    Product findByPid(@PathVariable("pid") Integer pid);
}
import lombok.extern.slf4j.Slf4j;
import org.springframework.beans.factory.annotation.Autowired;
import org.springframework.web.bind.annotation.GetMapping;
import org.springframework.web.bind.annotation.PathVariable;
import org.springframework.web.bind.annotation.RestController;

@RestController
@Slf4j
public class OrderController {
    @Autowired
    private IOrderService orderService;
    @Autowired
    private IProductService productService;

    @GetMapping("/order/prod/{pid}")
    public Order order(@PathVariable("pid") Integer pid) {
        log.info(">>客户下单,这时候要调用商品微服务查询商品信息");
//通过fegin调用商品微服务
        Product product = productService.findByPid(pid);
        log.info(">>商品信息,查询结果:" + product);
        Order order = new Order();
        order.setUid(1);
        order.setUsername("测试用户");
        order.setPid(product.getPid());
        order.setPname(product.getPname());
        order.setPprice(product.getPprice());
        order.setNumber(1);
        orderService.save(order);
        return order;
    }
}
5 重启order微服务,查看效果
二、微服务集成Sentinel–服务容错
作为稳定性的核心要素之一,服务限流和降级是微服务领域特别重要的一环,Spring Cloud Alibaba 基于 Sentinel,对 Spring 体系内基本所有的客户端,网关进行了适配,
1、高并发带来的问题
在微服务架构中,我们将业务拆分成一个个的服务,服务与服务之间可以相互调用,但是由于网络原因或者自身的原因,服务并不能保证服务的100%可用,如果单个服务出现问题,调用这个服务就会出现网络延迟,此时若有大量的网络涌入,会形成任务堆积,最终导致服务瘫痪。
由于服务与服务之间的依赖性,故障会传播,会对整个微服务系统造成灾难性的严重后果,这就是服务故障的 “雪崩效应” 。
2、常见容错方案
要防止雪崩的扩散,我们就要做好服务的容错,容错说白了就是保护自己不被猪队友拖垮的一些措施。
常见的容错思路
常见的容错思路有隔离、超时、限流、熔断、降级这几种。
1.什么是Sentinel
Sentinel是阿里开源的一套服务容错解决方案,以流量为切入点,从流量控制、熔断降级、系统负载保护等多个维度来保护服务的稳定性。Sentinel具有以下特征:
- 丰富的应用场景,包括秒杀、消息削峰填谷、集群流量控制、实时熔断下游不可用应用等。
- 实时监控,提供单台机器秒级数据监控和小规模集群的汇总运行情况监控。
- 广泛的开源生态,提供与Spring Cloud、Dubbo、gRPC的整合。
- 完善的SPI扩展点,提供简单易用、完善的SPI扩展接口,例如定制规则管理、适配动态数据源等。
Sentinel分为两个部分:核心库(Java客户端)和控制台(Dashboard)。
2.微服务集成Sentinel
为微服务集成Sentinel非常简单, 只需要加入Sentinel的依赖即可
1 在pom.xml中加入下面依赖
在商品模块添加依赖
<dependency>
	<groupId>com.alibaba.cloudgroupId>
	<artifactId>spring-cloud-starter-alibaba-sentinelartifactId>
dependency>
2 编写一个Controller测试使用
import org.springframework.web.bind.annotation.RequestMapping;
import org.springframework.web.bind.annotation.RestController;

@RestController
public class Product1Controller {
    @RequestMapping("/product/message1")
    public String message1() {
        return "message1";
    }
}
在product的配置文件中添加如下配置
设置sentinel启动的端口号为9999
  cloud:
    sentinel:
      transport:
        port: 18080 #跟控制台交流的端口,随意指定一个未使用的端口即可
        dashboard: 127.0.0.1:9999 # 指定控制台服务的地址
3.安装Sentinel控制台
Sentinel 提供一个轻量级的控制台, 它提供机器发现、单机资源实时监控以及规则管理等功能。
1 下载jar包,解压到文件夹
https://github.com/alibaba/Sentinel/releases
![]()
2 启动控制台
在黑窗口里面启动jar包
# 简单启动 指明端口号为9999
java -Dserver.port=9999 -jar sentinel-dashboard-1.7.0.jar
通过浏览器访问http://localhost:9999/进入控制台
( 默认用户名密码是 sentinel/sentinel )
3、Sentinel规则
3.1 流控规则
流量控制,其原理是监控应用流量的QPS(每秒查询率) 或并发线程数等指标,当达到指定的阈值时对流量进行控制,以避免被瞬时的流量高峰冲垮,从而保障应用的高可用性。
QPS:全名 Queries Per Second,意思是“每秒查询率”,是一台服务器每秒能够响应的查询次数,是对一个特定的查询服务器在规定时间内所处理流量多少的衡量标准。
第 1 步: 点击簇点链路,我们就可以看到访问过的接口地址,然后点击对应的流控按钮,进入流控规则配置页面。新增流控规则界面如下:
-
资源名 :唯一名称,默认是请求路径,可自定义
-
针对来源 :指定对哪个微服务进行限流,默认指default,意思是不区分来源,全部限制
-
阈值类型/单机阈值 :
-
QPS(每秒请求数量): 当调用该接口的QPS达到阈值的时候,进行限流
-
线程数:当调用该接口的线程数达到阈值的时候,进行限流。(同一个方法的并发次数,实际上概率很低)
-
-
是否集群 :暂不需要集群
接下来我们以QPS为例来研究限流规则的配置。
4.6 .1 .1 简单配置
我们先做一个简单配置,设置阈值类型为QPS,单机阈值为 3 。即每秒请求量大于 3 的时候开始限流。

接下来,在流控规则页面就可以看到这个配置。
然后快速访问/order/message1接口,观察效果。

此时发现,当QPS > 3的时候,服务就不能正常响应,而是返回Blocked by Sentinel (flow limiting)结果。

4.6 .1 .2 配置流控模式
点击上面设置流控规则的 编辑 按钮,然后在编辑页面点击 高级选项 ,会看到有流控模式一栏。
sentinel共有三种流控模式,分别是:
直接(默认):接口达到限流条件时,开启限流
关联:当关联的资源达到限流条件时,开启限流 [适合做应用让步]
链路:当从某个接口过来的资源达到限流条件时,开启限流
下面呢分别演示三种模式:
直接流控模式
直接流控模式是最简单的模式,当指定的接口达到限流条件时开启限流。上面案例使用的就是直接流控模式。
关联流控模式
关联流控模式指的是,当指定接口关联的接口达到限流条件时,开启对指定接口开启限流。
第 1 步:配置限流规则, 将流控模式设置为关联,关联资源设置为的 /product/message2。

第 2 步:向/product/message2连续发送请求
第 3 步:访问/product/message1,会发现已经被限流

以上的步骤手速需要稍微快一点
链路流控模式
链路流控模式指的是,当从某个接口过来的资源达到限流条件时,开启限流。它的功能有点类似于针对来源配置项,区别在于: 针对来源是针对上级微服务,而链路流控是针对上级接口,也就是说它的粒度更细。
第0 步: 添加依赖和配置
(1) 确保SpringCloud Alibaba的版本调整为2.1.0.RELEASE,
<spring-cloud-alibaba.version>2.1.0.RELEASE</spring-cloud-alibaba.version>

			<dependency>
                <groupId>com.alibaba.cloud</groupId>
                <artifactId>spring-cloud-alibaba-dependencies</artifactId>
                <version>${spring-cloud-alibaba.version}</version>
                <type>pom</type>
                <scope>import</scope>
            </dependency>
被限流的模块引入依赖(必须携带版本号1.7.0)
        <dependency>
            <groupId>com.alibaba.cspgroupId>
            <artifactId>sentinel-web-servletartifactId>
            <version>1.7.0version>
        dependency>
(2) 配置文件中关闭sentinel的CommonFilter实例化
spring:
  cloud:
    sentinel:
      filter:
        enabled: false  #为了支持链路规则添加的配置
(3) 添加一个配置类,自己构建CommonFilter实例
在config包下面新建配置类
import com.alibaba.csp.sentinel.adapter.servlet.CommonFilter;
import org.springframework.boot.web.servlet.FilterRegistrationBean;
import org.springframework.context.annotation.Bean;
import org.springframework.context.annotation.Configuration;

@Configuration
public class FilterContextConfig {
    @Bean
    public FilterRegistrationBean sentinelFilterRegistration() {
        FilterRegistrationBean registration = new FilterRegistrationBean();
        registration.setFilter(new CommonFilter());
        registration.addUrlPatterns("/*");
// 入口资源关闭聚合
        registration.addInitParameter(CommonFilter.WEB_CONTEXT_UNIFY, "false");
        registration.setName("sentinelFilter");
        registration.setOrder(1);
        return registration;
    }
}
第 1 步: 编写一个service,在里面添加一个方法message
import com.alibaba.csp.sentinel.annotation.SentinelResource;
import org.springframework.stereotype.Service;

@Service
public class ProductService {

    @SentinelResource("hello")
    public void hello(){
        System.out.println("ProductService.hello");
    }
}
第 2 步: 在Controller中声明两个方法,分别调用service中的方法
import com.itszt22.springcloud22.shopproduct.service.ProductService;
import org.springframework.web.bind.annotation.GetMapping;
import org.springframework.web.bind.annotation.RestController;

import javax.annotation.Resource;

@RestController
public class Product1Controller {

    @Resource
    private ProductService productService;

    @RequestMapping("/product/message3")
    public String message3(){
        productService.hello();
        return "message3";
    }

    @RequestMapping("/product/message4")
    public String message4(){
        productService.hello();
        return "message4";
    }
}
第 5 步: 分别通过/product/message3和/product/message4访问, 发现 3 没问题, 4的被限流了
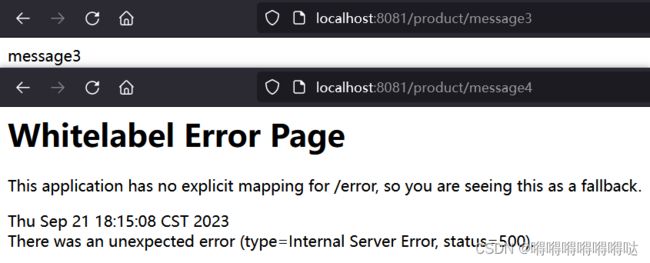
注意:Sentinel默认只标记Controller中的方法为资源,如果要标记其它方法,需要利用
@SentinelResource注解
比如:@SentinelResource("hello")
4.6 .1 .3 配置流控效果
快速失败(默认) : 直接失败,抛出异常,不做任何额外的处理,是最简单的效果
Warm Up :它从开始阈值到最大QPS阈值会有一个缓冲阶段,一开始的阈值是最大QPS阈值的1/3,然后慢慢增长,直到最大阈值,适用于将突然增大的流量转换为缓步增长的场景。
排队等待 :让请求以均匀的速度通过,单机阈值为每秒通过数量,其余的排队等待; 它还会让设置一个超时时间,当请求超过超时间时间还未处理,则会被丢弃。

3.2 降级规则
降级规则就是设置当满足什么条件的时候,对服务进行降级。
Sentinel提供了三个衡量条件:
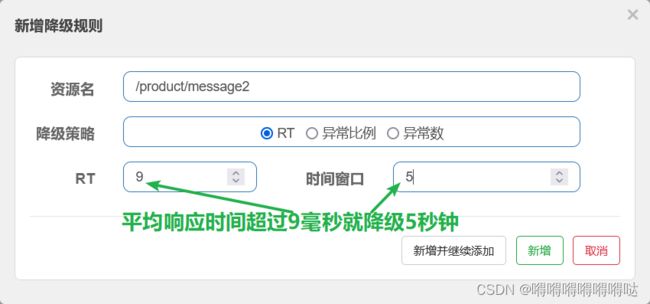
- 平均响应时间 :当资源的平均响应时间超过阈值(以 ms 为单位)之后,资源进入准降级状态。
如果接下来 1s 内持续进入 5 个请求,它们的 RT(Response-time,响应时间)都持续超过这个阈值,那么在接下的时间窗口(以 s 为单位)之内,就会对这个方法进行服务降级。
注意:Sentinel 默认统计的 RT 上限是 4900 ms,超出此阈值的都会算作 4900 ms,若需要变更此上限可以通过启动配置项-Dcsp.sentinel.statistic.max.rt=xxx 来配置。
    @RequestMapping("/product/message2")
    public String message2() throws InterruptedException {
        TimeUnit.MILLISECONDS.sleep(10);
        return "message2";
    }
- 异常比例:当资源的每秒异常总数占通过量的比值超过阈值之后,资源进入降级状态,即在接下的时间窗口(以 s 为单位)之内,对这个方法的调用都会自动地返回。异常比率的阈值范围是 [0.0,1.0]。
第 1 步: 首先模拟一个异常
第 2 步: 设置异常比例为0.33
    @RequestMapping("/product/message2")
    public String message2() throws InterruptedException {
        //0, 1, 2
        int i = new Random().nextInt(3);

        if (i == 1){异常比例为 0 .333
            throw new RuntimeException("程序出现错误");
        }
        return "message2";
    }
- 异常数 :当资源近 1 分钟的异常数目超过阈值之后会进行服务降级。
3.3 热点规则***
热点参数流控规则是一种更细粒度的流控规则, 它允许将规则具体到参数上。
热点规则简单使用
第 1 步: 编写代码
    @RequestMapping("/product/message5")
    @SentinelResource(value = "m5")//注意这里必须使用这个注解标识,热点规则不生效
    public String message5(String name, Integer age){
        return name + age;
    }
第 2 步: 配置热点规则
第 3 步: 分别用两个参数访问,会发现只对第一个参数限流了
http://localhost:8081/product/message5?name=haha

http://localhost:8081/product/message5?age=11

热点规则增强使用
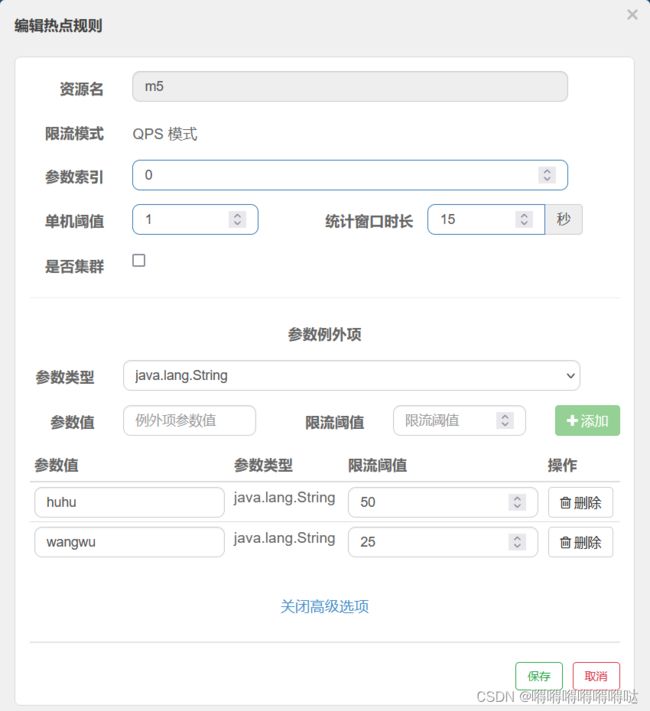
参数例外项允许对一个参数的具体值进行流控
编辑刚才定义的规则,增加参数例外项
注意:此处在“热点规则”界面打开才可以看见“高级选项”,在“簇点链路”界面里不展示“高级选项”按钮
热点规则面对的参数仍然是索引0(name),如果说name的值为huhu与wangwu,则满足参数例外项,此时阈值达到50与25,也就是说此时1秒内访问huhu达到50次才会触发降级。所以下面在浏览器中访问,就可以得到该方法的返回值了。
如果说name的值不是huhu与wangwu,那么它的阈值仍然是上面的1,只要1秒内超过1次的访问,则直接触发降级。
3.4 授权规则
很多时候,我们需要根据调用来源来判断该次请求是否允许放行,这时候可以使用 Sentinel 的来源
访问控制的功能。来源访问控制根据资源的请求来源(origin)限制资源是否通过:
若配置白名单,则只有请求来源位于白名单内时才可通过;
若配置黑名单,则请求来源位于黑名单时不通过,其余的请求通过。

上面的资源名和授权类型不难理解,但是流控应用怎么填写呢?
其实这个位置要填写的是来源标识,Sentinel提供了RequestOriginParser接口来处理来源。
只要Sentinel保护的接口资源被访问,Sentinel就会调用RequestOriginParser的实现类去解析访问来源。
第 1 步: 自定义来源处理规则
import com.alibaba.csp.sentinel.adapter.servlet.callback.RequestOriginParser;
import org.springframework.stereotype.Component;

import javax.servlet.http.HttpServletRequest;

@Component
public class RequestOriginParserDefinition implements RequestOriginParser {
    @Override
    public String parseOrigin(HttpServletRequest request) {
        String serviceName = request.getParameter("serviceName");
        return serviceName;
    }
}
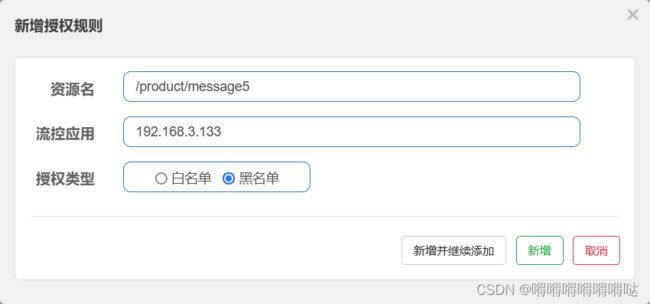
第 2 步: 授权规则配置
这个配置的意思是只有192.168.3.133不能访问/product/message5(黑名单)
流控应用指调用方,多个调用方名称用半角英文逗号(,)分隔
第 3 步: 192.168.3.133访问 http://localhost:8081/product/message5观察结果
3.5 系统规则**
控制所有资源
系统保护规则是从应用级别的入口流量进行控制,从单台机器的总体 Load、RT、入口 QPS 、CPU,使用率和线程数五个维度监控应用数据,让系统尽可能跑在最大吞吐量的同时保证系统整体的稳定性。
系统保护规则是应用整体维度的,而不是资源维度的,并且仅对入口流量 (进入应用的流量) 生效。
Load(仅对 Linux/Unix-like 机器生效):当系统 load1 超过阈值,且系统当前的并发线程数超过系统容量时才会触发系统保护。系统容量由系统的 maxQps * minRt 计算得出。设定参考值一般是 CPU cores * 2.5。
RT:当单台机器上所有入口流量的平均 RT 达到阈值即触发系统保护,单位是毫秒。
线程数:当单台机器上所有入口流量的并发线程数达到阈值即触发系统保护。
入口 QPS:当单台机器上所有入口流量的 QPS 达到阈值即触发系统保护。
CPU使用率:当单台机器上所有入口流量的 CPU使用率达到阈值即触发系统保护。
4、自定义资源名称@SentinelResource(“hello”)
@RequestMapping("/product/message1")
@SentinelResource("m1")
对service层的hello资源进行限制
import com.alibaba.csp.sentinel.annotation.SentinelResource;
import org.springframework.stereotype.Service;

@Service
public class ProductService {

    @SentinelResource("hello")
    public void hello(){
        System.out.println("ProductService.hello");
    }
}
    @RequestMapping("/product/message3")
    public String message3(){
        productService.hello();
        return "message3";
    }

访问http://localhost:8081/product/message3

5、扩展: 自定义默认异常返回
对于不同的异常进行自定义默认异常返回:
public class SentinelExceptionHandler implements UrlBlockHandler {
    @Override
    public void blocked(HttpServletRequest httpServletRequest, HttpServletResponse httpServletResponse, BlockException e) throws IOException {
        httpServletResponse.setContentType("application/json;charset=utf-8");
        String result = "自定义异常";
        if(e instanceof FlowException){
            result = "限流异常";
        }else if(e instanceof DegradeException){
            result = "降级异常";
        }else if(e instanceof AuthorityException){
            result = "授权异常";
        }else if(e instanceof ParamFlowException){
            result = "参数限流异常";
        }else if(e instanceof SystemBlockException){
            result = "系统异常";
        }
        httpServletResponse.getWriter().write(result);
    }
}
6、特定资源异常处理
在定义了资源点之后,我们可以通过Dashboard来设置限流和降级策略来对资源点进行保护。同时还能通过@SentinelResource来指定出现异常时的处理策略。
@SentinelResource 注解
@SentinelResource 用于定义资源,并提供可选的异常处理和 fallback 配置项。
其主要参数如下:
7、定义限流和降级后的处理方法
方式一:直接将限流和降级方法定义在本类的方法中 (了解)
    @RequestMapping("/product/message1")
    @SentinelResource(value = "m1", blockHandler = "")
    public String message1() throws InterruptedException {
        String name = Thread.currentThread().getName();
        System.out.println("name = " + name);
        TimeUnit.MILLISECONDS.sleep(10);
        return "message1";
    }

    public String message1Block(BlockException blockException){
        if (blockException instanceof FlowException){
            return "特定资源的流控异常处理";
        }
        return null;
    }
    @RequestMapping("/product/message5")
    @SentinelResource(value = "m5", fallback = "message5Fallback")
    public String message5(String name, Integer age){
        System.out.println("m5方法,即将出现除零异常");
        int i = 1/0;
        System.out.println("m5中异常之后的代码");
        return name + age;
    }

    public String message5Fallback(String name, Integer age){
        System.out.println("此处是m5同一个类中的备份解决方案");
        return "m5应急处理结果";
    }
方式二: 将限流和降级方法外置到单独的类中
import com.alibaba.csp.sentinel.slots.block.BlockException;
import com.alibaba.csp.sentinel.slots.block.flow.FlowException;

public class BlockExceptionHandler {

    //此处必须使用static修饰
    public static String blockHandler(BlockException blockException){
        if (blockException instanceof FlowException){
            return "单独一个类进行特定资源的流控异常处理";
        }
        return null;
    }
}
public class FallBackExceptionHandler {
    public static String fallbackHandler(){
        System.out.println("单独一个类处理fallback中的备份解决方案");
        return "单独一个类 fallback应急处理结果";
    }
}
    @RequestMapping("/product/message4")
    @SentinelResource(value = "m4",
                        blockHandlerClass = BlockExceptionHandler.class, blockHandler = "blockHandler",
                        fallbackClass = FallBackExceptionHandler.class, fallback = "fallbackHandler")
    public String message4(){
        productService.hello();
        return "message4";
    }
@SentinelResource注解用于定义资源,并配置流量控制规则。
这个注解的参数包括:
value:资源的名称,必需。blockHandlerClass:处理流量控制异常的类,必需。这个类需要实现BlockExceptionHandler接口。blockHandler:在blockHandlerClass中定义的方法名,用于处理流量控制异常,必需。fallbackClass:处理业务异常的类,可选。这个类需要实现定义的FallBackExceptionHandler接口。fallback:在fallbackClass中定义的方法名,用于处理业务异常,可选。
blockHandler和fallback指定的方法需要正确实现。确保在BlockExceptionHandler类中定义了名为blockHandler的方法,并且在FallBackExceptionHandler类中定义了名为fallbackHandler的方法。
此外,还需要确保Sentinel能够正确识别和处理这两个异常处理器。确保这两个类都在Spring的组件扫描范围内,或者被Spring显式声明为Bean。
8、Sentinel规则持久化
通过nacos实现Sentinel规则持久化
依赖
<dependency>
    <groupId>com.alibaba.cspgroupId>
    <artifactId>sentinel-datasource-nacosartifactId>
dependency>
配置
spring:
  cloud:
    sentinel:
      datasource:
        ds1:
          nacos:
            username: nacos
            password: nacos
            server-addr: 127.0.0.1:8848
            dataId: cloudalibaba-sentinel-service-hh
            groupId: DEFAULT_GROUP
            data-type: json
            rule-type: flow
dataId的名称随意起,保证与nacos界面一致即可
在nacos界面(http://localhost:8848/nacos/ )中添加规则

[
    {
         "resource":"/product/message1",
         "limitApp":"default",
         "grade":1,
         "count":2,
         "strategy":0,
         "controlBehavior":0,
         "clusterMode":false
    }
]
-
resource: 资源名称
-
limitApp: 来源应用
-
grade: 阈值类型,0表示线程,1表示QPS
-
count: 单机阈值
-
strategy: 流控模式,0表示直接,1表示关联,2表示链路
-
controlBehavior: 流控效果,0表示快速失败,1表示Warm Up,2表示排队等待
-
clusterMode: 是否集群
(三) Feign整合Sentinel [比较重要]
订单模块中添加依赖
		<dependency>
            <groupId>com.alibaba.cloudgroupId>
            <artifactId>spring-cloud-starter-alibaba-sentinelartifactId>
        dependency>
添加sentinel配置
spring:
  cloud:
    sentinel:
      transport:
        port: 18090 #跟控制台交流的端口,随意指定一个未使用的端口即可
        dashboard: 127.0.0.1:9999 # 指定sentinel控制台服务的地址
第 1 步: 在配置文件中开启Feign对Sentinel的支持
第 2 步: 创建容错类
第 3 步: 为被容器的接口指定容错类
第 4 步: 修改controller
第 5 步: 停止所有shop-product服务,重启shop-order服务,访问请求,观察容错效果
feign:
  sentinel:
    enabled: true #开启feign对sentinel的支持
容错类要求必须实现被容错的接口,并为每个方法实现容错方案
@FeignClient(value = "shop-product", fallback = ShopProductFallBack.class)
public interface IShopProductFeign {

    @GetMapping("/product/{id}")
    ShopProduct getProduct(@PathVariable("id") Integer id);
}
@Component
public class ShopProductFallBack implements IShopProductFeign {
    @Override
    public ShopProduct getProduct(Integer id) {
        System.out.println("我是订单里的ShopProductFallBack,当商品服务无法正确调用时,这里是备份方案");

        ShopProduct shopProduct = new ShopProduct();
        shopProduct.setPname("未知...");
        shopProduct.setStock(-1);
        return shopProduct;
    }
}
之后启动订单服务和商品服务
我们手动停止商品服务,模拟发生意外时商品服务挂掉,继续测试访问订单服务

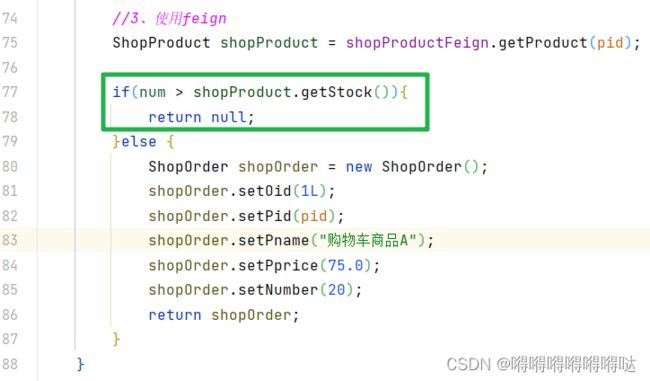
符合代码逻辑,返回空值
扩展 : 如果想在容错类中拿到具体的错误,可以使用下面的方式
第二种方法
@FeignClient(value = "shop-product", fallbackFactory = ShopProductFactory.class)
public interface IShopProductFeign {

    @GetMapping("/product/{id}")
    ShopProduct getProduct(@PathVariable("id") Integer id);
}
@FeignClient注解在Spring Cloud中用于声明一个远程客户端,使得开发者可以调用其他服务提供的接口。定义了一个IShopProductFeign接口,并通过@FeignClient注解指定了服务名称和fallback工厂。
Fallback工厂是用于在远程调用失败时提供一个本地的替代实现。确保ShopProductFactory类实现了FallbackFactory接口,并正确重写了create方法。同时,保证fallback工厂被Spring容器管理,比如通过@Component注解。
@Component
public class ShopProductFactory implements FallbackFactory<IShopProductFeign> {

    //这个方法告知了服务提供方调用失败的具体原因
    //需要自行提供一个feign的实现类
    @Override
    public IShopProductFeign create(Throwable throwable) {
        //可以根据不同的异常进行不同的处理方案
        System.out.println("throwable = " + throwable);

        return new ShopProductFallBack();
    }
}
return new ShopProductFallBack();也可以用匿名内部类来实现。
当调用 IShopProductFeign 的远程服务失败时,会创建这个回退实例来执行一些默认的逻辑。
@Component
public class ShopProductFactory implements FallbackFactory<IShopProductFeign> {

    @Override
    public IShopProductFeign create(Throwable throwable) {
        IShopProductFeign iShopProductFeign = new IShopProductFeign() {
            @Override
            public ShopProduct getProduct(Integer id) {
                ShopProduct shopProduct = new ShopProduct();
                ......
                return shopProduct;
            }
        };
        return iShopProductFeign;
    }
}
注意: fallback和fallbackFactory只能使用其中一种方式
三、Gateway–服务网关
**服务网关(Gateway)**是一个重要的微服务组件,它是微服务的统一入口,负责请求路由、权限控制、负载均衡等功能。
Gateway是一个基于Spring Cloud的网关框架,它提供了统一的API路由管理功能。Gateway可以与Sentinel配合使用,通过在路由规则中配置Sentinel的过滤器,实现对请求的限流功能。
Gateway的实现方式是通过定义一系列的过滤器(Filter),这些过滤器可以对请求进行各种处理,包括限流、权限校验、日志记录等。在配置路由规则时,可以指定需要应用的过滤器,从而对请求进行相应的处理。
- 请求路由:网关作为所有微服务的统一入口,根据请求的路径、参数等信息,将请求路由到相应的微服务。
- 权限控制:网关可以校验用户的身份和权限,对没有权限的请求进行拦截。
- 负载均衡:当请求的目标服务有多个实例时,网关可以根据一定的策略,将请求分发到合适的实例上,避免服务压力过大。
搭建配置:
- 选择合适的网关实现:常见的网关实现包括Zuul和Spring Cloud Gateway。
- 配置路由规则:根据具体的业务需求,配置网关的路由规则,将请求路由到相应的微服务。
- 配置权限校验:根据业务需求,配置网关的权限校验规则,实现对用户身份的校验。
作用:
服务网关的作用主要是简化客户端与服务端的交互,提供统一的入口和出口,实现请求的路由、权限控制、负载均衡等功能,提高系统的可维护性和可扩展性。
1、Gateway快速入门
要求: 通过浏览器访问api网关,然后通过网关将请求转发到商品微服务
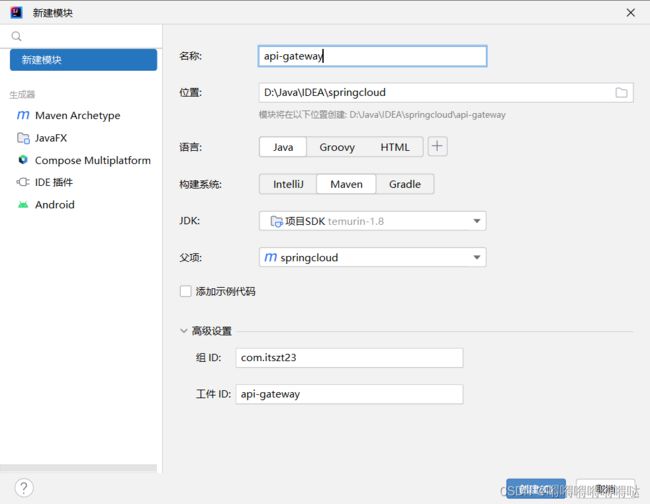
第 1 步:创建一个api-gateway的模块,导入相关依赖
注意: spring cloud gateway 不兼容 tomcat
    <dependencies>

        <dependency>
            <groupId>org.springframework.cloudgroupId>
            <artifactId>spring-cloud-starter-gatewayartifactId>
        dependency>


        <dependency>
            <groupId>com.alibaba.cloudgroupId>
            <artifactId>spring-cloud-starter-alibaba-nacos-discoveryartifactId>
        dependency>
    dependencies>

    <dependencyManagement>
        <dependencies>
            <dependency>
                <groupId>org.springframework.bootgroupId>
                <artifactId>spring-boot-dependenciesartifactId>
                <version>2.1.3.RELEASEversion>
                <type>pomtype>
                <scope>importscope>
            dependency>
        dependencies>
    dependencyManagement>
第 2 步: 创建主类
import org.springframework.boot.SpringApplication;
import org.springframework.boot.autoconfigure.SpringBootApplication;

@SpringBootApplication
public class GatewayApplication {
    public static void main(String[] args) {
        SpringApplication.run(GatewayApplication.class, args);
    }
}
第 3 步: 添加配置文件
端口号配置7000
server:
  port: 7000

spring:
  application:
    name: gateway
  cloud:
    nacos:
      discovery:
        server-addr: 127.0.0.1:8848
    gateway:
      discovery:
        locator:
          enabled: true
第 4 步: 启动项目, 并通过网关去访问微服务
然后访问
http://localhost:7000/shop-product/product/message1
2、网关限流
网关是所有请求的公共入口,所以可以在网关进行限流,而且限流的方式也很多,我们本次采用前面学过的Sentinel组件来实现网关的限流。Sentinel支持对SpringCloud Gateway、Zuul等主流网关进行限流。
从1.6.0版本开始,Sentinel提供了SpringCloud Gateway的适配模块,可以提供两种资源维度的限流:
-
route维度:即在Spring配置文件中配置的路由条目,资源名为对应的routeId。
-
自定义API维度:用户可以利用Sentinel提供的API来自定义一些API分组。
1.导入依赖
        <dependency>
            <groupId>com.alibaba.cspgroupId>
            <artifactId>sentinel-spring-cloud-gateway-adapterartifactId>
        dependency>

        <dependency>
            <groupId>com.alibaba.cloudgroupId>
            <artifactId>spring-cloud-starter-alibaba-sentinelartifactId>
        dependency>
注意: 导入了sentinel依赖后, 需要在gateway得springboot配置中, 添加对于sentinel服务得ip地址的配置
2.编写配置类
基于Sentinel 的Gateway限流是通过其提供的Filter来完成的,使用时只需注入对应的SentinelGatewayFilter实例以及SentinelGatewayBlockExceptionHandler 实例即可。
spring:
  application:
    name: gateway
  cloud:
    sentinel:
      transport:
        port: 17000 #跟控制台交流的端口,随意指定一个未使用的端口即可
        dashboard: 127.0.0.1:9999 # 指定控制台服务的地址
3.测试
在一秒钟内多次访问http://localhost:7000/product-serv/product/1就可以看到限流功能已经发挥作用了。

4.自定义API分组
自定义API分组是一种更细粒度的限流规则定义
import com.alibaba.csp.sentinel.adapter.gateway.common.SentinelGatewayConstants;
import com.alibaba.csp.sentinel.adapter.gateway.common.api.ApiDefinition;
import com.alibaba.csp.sentinel.adapter.gateway.common.api.ApiPathPredicateItem;
import com.alibaba.csp.sentinel.adapter.gateway.common.api.ApiPredicateItem;
import com.alibaba.csp.sentinel.adapter.gateway.common.api.GatewayApiDefinitionManager;
import com.alibaba.csp.sentinel.adapter.gateway.common.rule.GatewayFlowRule;
import com.alibaba.csp.sentinel.adapter.gateway.common.rule.GatewayRuleManager;
import com.alibaba.csp.sentinel.adapter.gateway.sc.SentinelGatewayFilter;
import com.alibaba.csp.sentinel.adapter.gateway.sc.callback.BlockRequestHandler;
import com.alibaba.csp.sentinel.adapter.gateway.sc.callback.GatewayCallbackManager;
import com.alibaba.csp.sentinel.adapter.gateway.sc.exception.SentinelGatewayBlockExceptionHandler;
import org.springframework.beans.factory.ObjectProvider;
import org.springframework.cloud.gateway.filter.GlobalFilter;
import org.springframework.context.annotation.Bean;
import org.springframework.context.annotation.Configuration;
import org.springframework.core.Ordered;
import org.springframework.core.annotation.Order;
import org.springframework.http.HttpStatus;
import org.springframework.http.MediaType;
import org.springframework.http.codec.ServerCodecConfigurer;
import org.springframework.web.reactive.function.BodyInserters;
import org.springframework.web.reactive.function.server.ServerResponse;
import org.springframework.web.reactive.result.view.ViewResolver;
import org.springframework.web.server.ServerWebExchange;
import reactor.core.publisher.Mono;

import javax.annotation.PostConstruct;
import java.util.*;

@Configuration
public class GatewayConfiguration {

    private final List<ViewResolver> viewResolvers;
    private final ServerCodecConfigurer serverCodecConfigurer;


    public GatewayConfiguration(ObjectProvider<List<ViewResolver>> viewResolversProvider,
                                ServerCodecConfigurer serverCodecConfigurer) {
        this.viewResolvers = viewResolversProvider.getIfAvailable(Collections::emptyList);
        this.serverCodecConfigurer = serverCodecConfigurer;
    }

    //配置限流的异常处理
    @Bean
    @Order(Ordered.HIGHEST_PRECEDENCE)
    public SentinelGatewayBlockExceptionHandler sentinelGatewayBlockExceptionHandler() {
        return new SentinelGatewayBlockExceptionHandler(viewResolvers, serverCodecConfigurer);
    }

    //配置初始化的限流参数
    //定义被保护资源的保护规则
    @PostConstruct
    public void initGatewayRules(){
        Set<GatewayFlowRule> rules = new HashSet<>();
        //为分组进行限流 一秒一次 这里名字是自定义的 与下面映射
        rules.add(new GatewayFlowRule("provider_api1").setCount(1).setIntervalSec(1));
        rules.add(new GatewayFlowRule("provider_api2").setCount(1).setIntervalSec(1));
        GatewayRuleManager.loadRules(rules);
    }

    //初始化限流过滤器
    @Bean
    @Order(Ordered.HIGHEST_PRECEDENCE)
    public GlobalFilter sentinelGatewayFilter() {
        return new SentinelGatewayFilter();
    }

    //自定义限流异常页面
    @PostConstruct
    public void initBlockHandlers(){
        BlockRequestHandler blockRequestHandler = new BlockRequestHandler() {
            @Override
            public Mono<ServerResponse> handleRequest(ServerWebExchange serverWebExchange, Throwable throwable) {
                Map map = new HashMap();
                map.put("code",0);
                map.put("msg","被限流了");
                return ServerResponse.status(HttpStatus.OK)
                        .contentType(MediaType.APPLICATION_JSON)
                        .body(BodyInserters.fromObject(map));
            }
        };
        GatewayCallbackManager.setBlockHandler(blockRequestHandler);
    }

    //自定义API分组
    //定义sentinel资源
    @PostConstruct
    private void initCustomizedApis(){
        Set<ApiDefinition> definitions = new HashSet<>();
        //为上面自定义组名字匹配是映射哪些请求
        ApiDefinition api1 = new ApiDefinition("provider_api1")
                .setPredicateItems(new HashSet<ApiPredicateItem>(){{
                    add(new ApiPathPredicateItem().setPattern("/shop-product/**")
                            .setMatchStrategy(SentinelGatewayConstants.URL_MATCH_STRATEGY_PREFIX));
                }});
        ApiDefinition api2 = new ApiDefinition("provider_api2")
                .setPredicateItems(new HashSet<ApiPredicateItem>(){{
                    add(new ApiPathPredicateItem().setPattern("/shop-order/**")
                            .setMatchStrategy(SentinelGatewayConstants.URL_MATCH_STRATEGY_PREFIX));
                }});
        definitions.add(api1);
        definitions.add(api2);
        GatewayApiDefinitionManager.loadApiDefinitions(definitions);
    }
}
四、Seata–分布式事务
分布式事务
分布式事务指事务的参与者、支持事务的服务器、资源服务器以及事务管理器分别位于不同的分布式系统的不同节点之上。
简单的说,就是一次大的操作由不同的小操作组成,这些小的操作分布在不同的服务器上,且属于不同的应用,分布式事务需要保证这些小操作要么全部成功,要么全部失败。
本质上来说,分布式事务就是为了保证不同数据库的数据一致性。
Seata主要组件与执行流程
Seata(Simple Extensible Autonomous Transaction Architecture)是一个分布式事务解决方案,由阿里巴巴中间件团队于2019年1月发起,其愿景是让分布式事务的使用像本地事务的使用一样,简单和高效。它从业务无侵入的2PC方案着手,把一个分布式事务理解成一个包含若干分支事务的全局事务。
Seata的主要组件包括:
- TC(Transaction Coordinator):事务协调者,负责管理全局的分支事务的状态,用于全局性事务的提交和回滚。
- TM(Transaction Manager):事务管理器,用于开启、提交或者回滚全局事务。
- RM(Resource Manager):资源管理器,用于分支事务上的资源管理,向TC注册分支事务,上报分支事务的状态,接受TC的命令来提交或者回滚分支事务。
Seata的执行流程是:
- A服务的TM向TC申请开启一个全局事务,TC便会创建一个全局事务并返回一个唯一的XID。
- A服务的RM向TC注册分支事务,并将其纳入XID对应全局事务的管辖。
- A服务执行分支事务,向数据库实施操作。
- A服务开始远程调用B服务,此时XID会在微服务的调用链上传播。
- B服务的RM向TC注册分支事务,并将其纳入XID对应的全局事务的管辖。
- B服务执行分支事务,向数据库实施操作。
- 全局事务调用链处理完毕,TM根据有无异常向TC发起全局事务的提交或者回滚。
- TC协调其管辖之下的所有分支事务,决定是否回滚。
使用 Seata 解决微服务场景下面临的分布式事务问题。
使用 @GlobalTransactional 注解,在微服务中传递事务上下文,可以对业务零侵入地解决分布式事务问题。
相关知识:Spring-data-jpa入门:环境配置、注解使用、增删改查、自定义SQL
本示例通过Seata中间件实现分布式事务,模拟电商中的下单和扣库存的过程
我们通过订单微服务执行下单操作,然后由订单微服务调用商品微服务扣除库存
四步操作
- 安装seata
- 将配置注册到nacos中
- 创建seata事务表
- 加入相应注解和配置 – 确保依赖对应关系
1、shop-product
在common中加入共通的依赖
        <dependency>
            <groupId>mysqlgroupId>
            <artifactId>mysql-connector-javaartifactId>

        dependency>

         <dependency>
            <groupId>org.springframework.bootgroupId>
            <artifactId>spring-boot-starter-data-jpaartifactId>
        dependency>
数据库源的所有配置(shop-product中)
url配置有一个自动建库的配置: createDatabaseIfNotExist=true
spring:
  #  数据库源的所有配置
  jpa:
    hibernate:
      ddl-auto: update #自动更新
    show-sql: true #日志中显示sql语句
  datasource:
    url: jdbc:mysql://服务器IP地址:3306/clouddemo23?createDatabaseIfNotExist=true&useUnicode=true&characterEncoding=UTF-8&serverTimezone=GMT%2B8&useSSL=false
    username: root
    password: 密码密码
    driver-class-name: com.mysql.cj.jdbc.Driver
shop-product模块的启动类上标明扫包注解
@EntityScan("com.itszt23.springcloud.shopcommon.pojo")
public class ShopProductApplication {}
此时也需要确保shop-product已经导入了shop-common
        <dependency>
            <groupId>com.itszt23groupId>
            <artifactId>shop-commonartifactId>
            <version>1.0.1version>
        dependency>
在实体类上添加相应注解
//商品
@Data
@Entity
@Table(name = "shop_product")
public class ShopProduct {
    @Id
    @GeneratedValue(strategy = GenerationType.AUTO)
    private Integer pid;//主键
    private String pname;//商品名称
    private Double pprice;//商品价格
    private Integer stock;//库存
}
实现接口
package com.itszt23.springcloud.shopproduct.repository;

public interface IShopProductRepository extends JpaRepository<ShopProduct, Long> {
}
生成测试
@SpringBootTest
class ShopProductRepositoryTest {

    @Autowired
    private IShopProductRepository shopProductRepository;

    @Test
    void test(){
        ShopProduct shopProduct = new ShopProduct();
        shopProduct.setPname("8G内存条");
        shopProduct.setPprice(399.0);
        shopProduct.setStock(50);

        shopProductRepository.save(shopProduct);

        System.out.println(shopProductRepository.findAll());
    }
}
启动时会根据配置文件自动新建数据库和对应的数据表
2、shop-order
对shop-order进行同样操作
spring:
  application:
    name: shop-order
  #  数据库源的所有配置
  jpa:
    hibernate:
      ddl-auto: update #自动更新
    show-sql: true #日志中显示sql语句
  datasource:
    url: jdbc:mysql://服务器IP地址:3306/clouddemo23?createDatabaseIfNotExist=true&useUnicode=true&characterEncoding=UTF-8&serverTimezone=GMT%2B8&useSSL=false
    username: root
    password: 密码密码
    driver-class-name: com.mysql.cj.jdbc.Driver
@EntityScan("com.itszt23.springcloud.shopcommon.pojo")
public class ShopOrderApplication {}
//订单
@Data
@Entity
@Table(name = "shop_order")
public class ShopOrder {
    @Id
    @GeneratedValue(strategy = GenerationType.AUTO)
    private Long oid;//订单id

    private Long pid;//商品id
    private String pname;//商品名称
    private Double pprice;//商品单价
    private Integer number;//购买数量
}
public interface IShopOrderRepository extends JpaRepository<ShopOrder, Long> {
}
@SpringBootTest
class IShopOrderRepositoryTest {

    @Autowired
    private IShopOrderRepository orderRepository;

    @Test
    void test1(){
        ShopOrder shopOrder = new ShopOrder();
        shopOrder.setPid(1L);
        shopOrder.setPname("三星S23");
        shopOrder.setPprice(5399.0);
        shopOrder.setNumber(20);

        orderRepository.save(shopOrder);

        List<ShopOrder> orderList = orderRepository.findAll();
        System.out.println("orderList = " + orderList);

    }
}
//下单  然后根据商品id查询商品信息(库存)
    @GlobalTransactional//全局事务控制
    @GetMapping("/order/{pid}/{num}")
    @SentinelResource("o1")
    public ShopOrder addOrder(@PathVariable Long pid, @PathVariable Integer num){
        ShopProduct shopProduct = shopProductFeign.deductStock(pid, num);

        ShopOrder shopOrder = new ShopOrder();
        shopOrder.setPid(shopProduct.getPid());
        shopOrder.setPname(shopOrder.getPname());
        shopOrder.setPprice(shopProduct.getPprice());
        shopOrder.setNumber(shopProduct.getStock());

        orderRepository.save(shopOrder);

        return shopOrder;
    }
3、事务实现
@RestController
public class ShopProductController {

    @Autowired
    private IShopProductRepository productRepository;

    //用户下单后从后台扣除商品库存
    @GetMapping("/product/{pid}/{num}")
    public ShopProduct deductStock(@PathVariable Long pid, @PathVariable Integer num){
        Optional<ShopProduct> productOptional = productRepository.findById(pid);
        ShopProduct shopProduct = productOptional.get();

        shopProduct.setStock(shopProduct.getStock() - num);

        return shopProduct;
    }
@FeignClient(value = "shop-product", fallbackFactory = ShopProductFactory.class)
public interface IShopProductFeign {

    @GetMapping("/product/{pid}/{num}")
    public ShopProduct deductStock(@PathVariable("pid") Long pid, @PathVariable("num") Integer num);
}
对应的实现方法
@Component
public class ShopProductFallBack implements IShopProductFeign {
    @Override
    public ShopProduct deductStock(Long pid, Integer num) {
        return null;
    }
@RestController
public class ShopOrderController {
    @Autowired
    private IShopProductFeign shopProductFeign;

    @Autowired
    private IShopOrderRepository orderRepository;

    //下单  然后根据商品id查询商品信息(库存)
    @GetMapping("/order/{pid}/{num}")
    public ShopOrder addOrder(@PathVariable Long pid, @PathVariable Integer num){
        ShopProduct shopProduct = shopProductFeign.deductStock(pid, num);

        ShopOrder shopOrder = new ShopOrder();
        shopOrder.setPid(shopProduct.getPid());
        shopOrder.setPname(shopOrder.getPname());
        shopOrder.setPprice(shopProduct.getPprice());
        shopOrder.setNumber(shopProduct.getStock());

        orderRepository.save(shopOrder);

        return shopOrder;
    }
}
1 .1 修改order微服务
如上
1 .2 修改Product微服务
如上
1 .3 异常模拟
在ProductServiceImpl的代码中模拟一个异常或者模拟商品服务挂掉了, 然后调用下单接口
2 启动Seata
2 .1 下载seata
下载地址:https://github.com/seata/seata/releases/v0.9.0/
2 .2 修改配置文件
将下载得到的压缩包进行解压,进入conf目录,调整下面的配置文件:
nacos-config.txt
修改nacos-config.txt
这里的语法为:service.vgroup_mapping.${your-service-gruop}=default ,中间的
${your-service-gruop}为自己定义的服务组名称, 这里需要我们在程序的配置文件中配置。
改为
service.vgroup_mapping.shop-product=default
service.vgroup_mapping.shop-order=default
2.修改registry.conf
将原文件中的内容全部删除, 换成如下内容
扩展: typesafe格式的配置文件
registry {
    type = "nacos"
    nacos {
        serverAddr = "localhost"
        namespace = "public"
        cluster = "default"
    }
}

config {
    type = "nacos"
    nacos {
        serverAddr = "localhost"
        namespace = "public"
        cluster = "default"
    }
}
3.运行脚本文件,向nacos中注册配置
# 初始化seata 的nacos配置
# 注意: 这里要保证nacos是已经正常运行的
黑窗口中打开conf目录, 运行如下命令
nacos-config.sh 127.0.0.1

执行成功后可以打开Nacos的控制台,在配置列表中,可以看到初始化了很多Group为SEATA_GROUP的配置。
10 .4 .2 .3 初始化seata在nacos的配置
4.接着 启动seata服务
黑窗口打开bin目录
seata-server.bat -p 9000 -m file
2.4 启动seata服务
启动后在 Nacos 的服务列表下面可以看到一个名为 serverAddr 的服务。
3 使用Seata实现事务控制
3.1 初始化数据表
在我们的数据库中加入一张undo_log表,这是Seata记录事务日志要用到的表
3.2 添加配置
在需要进行分布式控制的微服务中进行下面几项配置:
添加依赖
CREATE TABLE `undo_log`
(
`id` BIGINT(20) NOT NULL AUTO_INCREMENT,
`branch_id` BIGINT(20) NOT NULL,
`xid` VARCHAR(100) NOT NULL,
`context` VARCHAR(128) NOT NULL,
`rollback_info` LONGBLOB NOT NULL,
`log_status` INT(11) NOT NULL,
`log_created` DATETIME NOT NULL,
`log_modified` DATETIME NOT NULL,
`ext` VARCHAR(100) DEFAULT NULL,
PRIMARY KEY (`id`),
UNIQUE KEY `ux_undo_log` (`xid`, `branch_id`)
) ENGINE = INNODB
AUTO_INCREMENT = 1
DEFAULT CHARSET = utf8;
DataSourceProxyConfig
Seata 是通过代理数据源实现事务分支的,所以需要配置 io.seata.rm.datasource.DataSourceProxy 的Bean,且是 @Primary默认的数据源,否则事务不会回滚,无法实现分布式事务后续的操作, 需要同时在订单和商品模块中都做上
添加依赖,
        <dependency>
            <groupId>com.alibaba.cloudgroupId>
            <artifactId>spring-cloud-starter-alibaba-nacos-configartifactId>
        dependency>

        <dependency>
            <groupId>com.alibaba.cloudgroupId>
            <artifactId>spring-cloud-starter-alibaba-seataartifactId>
        dependency>
//这个配置表示seata会帮助我们托管数据源, 两个模块中都要添加这个配置

import com.alibaba.druid.pool.DruidDataSource;
import io.seata.rm.datasource.DataSourceProxy;
import org.springframework.boot.context.properties.ConfigurationProperties;
import org.springframework.context.annotation.Bean;
import org.springframework.context.annotation.Configuration;
import org.springframework.context.annotation.Primary;

@Configuration
public class DataSourceProxyConfig {
    @Bean
    @ConfigurationProperties(prefix = "spring.datasource")
    public DruidDataSource druidDataSource() {
        return new DruidDataSource();
    }

    @Primary
    @Bean
    public DataSourceProxy dataSource(DruidDataSource druidDataSource) {
        return new DataSourceProxy(druidDataSource);
    }
}
两个模块中添加配置文件 , 名字叫registry.conf
在resources下添加Seata的配置文件 registry.conf
registry {
    type = "nacos"
    nacos {
        serverAddr = "localhost"
        namespace = "public"
        cluster = "default"
    }
}

config {
    type = "nacos"
    nacos {
        serverAddr = "localhost"
        namespace = "public"
        cluster = "default"
    }
}
添加配置 比较和你原本模块中的配置文件, 将下面配置中多出的部分粘贴过去
spring:
  application:
    name: shop-order
  cloud:
    nacos:
      config:
        server-addr: 127.0.0.1:8848 # nacos的服务端地址
        namespace: public
        group: SEATA_GROUP
      discovery:
        server-addr: 127.0.0.1:8848
    alibaba:
      seata:
        tx-service-group: ${spring.application.name}
6 .4 .3 .3 在order微服务开启全局事务
@GlobalTransactional//全局事务控制
3 .4 测试
再次下单测试
4 seata运行流程分析
注意: 去掉订单模块的feign的fallback
@GlobalTransactional//全局事务控制
public Order createOrder(Integer pid) {}
要点说明:
1 、每个RM使用DataSourceProxy连接数据库,其目的是使用ConnectionProxy,使用数据源和数据连
接代理的目的就是在第一阶段将undo_log和业务数据放在一个本地事务提交,这样就保存了只要有业务
操作就一定有undo_log。
2 、在第一阶段undo_log中存放了数据修改前和修改后的值,为事务回滚作好准备,所以第一阶段完成
就已经将分支事务提交,也就释放了锁资源。
3 、TM开启全局事务开始,将XID全局事务id放在事务上下文中,通过feign调用也将XID传入下游分支
事务,每个分支事务将自己的Branch ID分支事务ID与XID关联。
4 、第二阶段全局事务提交,TC会通知各各分支参与者提交分支事务,在第一阶段就已经提交了分支事
务,这里各各参与者只需要删除undo_log即可,并且可以异步执行,第二阶段很快可以完成。
5 、第二阶段全局事务回滚,TC会通知各各分支参与者回滚分支事务,通过 XID 和 Branch ID 找到相应
的回滚日志,通过回滚日志生成反向的 SQL 并执行,以完成分支事务回滚到之前的状态,如果回滚失
败则会重试回滚操作。


