rotate-captcha-crack项目重新训练百度旋转验证码角度预测模型
参考:
building-powerful-image-classification-models-using-very-little-data.html
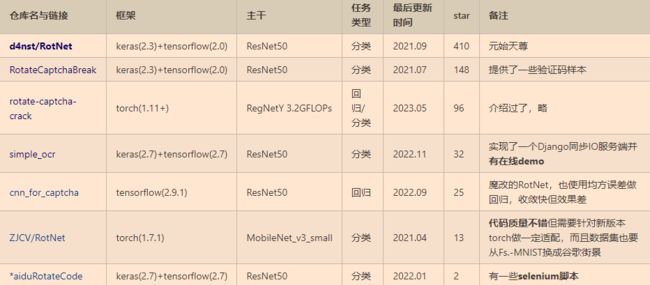
https://github.com/Starry-OvO/rotate-captcha-crack (主)作者思路:https://www.52pojie.cn/thread-1754224-1-1.html

纠正 新版百度、百家号旋转验证码识别
d4net作者博客
训练
图片来源
角度为0的百度验证码图片
可以先爬虫获取多张,然后计算相似度删除重复图片
训练数据集规模
一张验证码可以复制多次(具体多少 看你底图数据量),这样一个epoch内会出现多个角度,模型快速学习,方便收敛
一张验证码不进行多次复制,验证集loss震荡会很厉害,300张图片loss可以降低到1.4 ,但是泛化性也很差
![]()

加载原始模型代码
(rotate-captcha-crack原始加载模型方法可能报错,所以重写)
def fineturn_from_old_model(self):

        model_path = r'models/RotNetR/230308_08_02_34_000/best.pth'
        print(model_path,'------------------------------------------')
        state_dict = torch.load(model_path, map_location=torch.device('cuda'))
        model = RotNetR(180)
        model = model.to(device)
        model.load_state_dict(state_dict)
        # 冻结除最后一层之外的所有层
        for name, param in model.named_parameters():
            if not name.startswith('backbone.fc'):  # fc为最后一层的名称
                param.requires_grad = False
            else:
                print(name)
        self.model.load_state_dict(model.state_dict())
数据增强办法
rotate_captcha_crack\dataset\rot.py 中 内容如下:
使用的数据增强办法 :
- 改变图像颜色的四个方面:亮度、对比度、饱和度和色调
- 随机剪裁
- 左右翻转
from typing import Tuple

import torch
from torch import Tensor
from torch.utils.data import Dataset
from torchvision.transforms import Normalize
from torchvision import transforms

from ..const import DEFAULT_CLS_NUM, DEFAULT_TARGET_SIZE
from .helper import DEFAULT_NORM, from_img
from .typing import TypeImgTsSeq

TypeRotItem = Tuple[Tensor, Tensor]


class RotDataset(Dataset[TypeRotItem]):
    """
    Dataset for RotNet (classification).

    Args:
        imgseq (TypeImgSeq): upstream dataset
        target_size (int, optional): output img size. Defaults to `DEFAULT_TARGET_SIZE`.
        norm (Normalize, optional): normalize policy. Defaults to `DEFAULT_NORM`.

    Methods:
        - `def __len__(self) -> int:` length of the dataset
        - `def __getitem__(self, idx: int) -> TypeRotItem:` get square img_ts and index_ts
            ([C,H,W]=[3,target_size,target_size], dtype=float32, range=[0.0,1.0)), ([N]=[1], dtype=long, range=[0,cls_num))
    """

    __slots__ = [
        'imgseq',
        'cls_num',
        'target_size',
        'norm',
        'size',
        'indices',
    ]

    def __init__(
        self,
        imgseq: TypeImgTsSeq,
        cls_num: int = DEFAULT_CLS_NUM,
        target_size: int = DEFAULT_TARGET_SIZE,
        norm: Normalize = DEFAULT_NORM,
    ) -> None:
        self.imgseq = imgseq
        self.cls_num = cls_num
        self.target_size = target_size
        self.norm = norm

        self.size = self.imgseq.__len__()
        self.indices = torch.randint(cls_num, (self.size,), dtype=torch.long)
        self.transforms = transforms.Compose([
                    # transforms.Resize(240), # 将图像最短边缩至240,宽高比例不变
                    transforms.RandomHorizontalFlip(), # 以0.5的概率左右翻转图像
                    # transforms.ToTensor(), # 将PIL图像转为Tensor,并且进行归一化
                    # transforms.Normalize([0.5, 0.5, 0.5], [0.5, 0.5, 0.5]) # 进行mean与std为0.5的标准化
                     transforms.RandomResizedCrop( (350, 350), scale=(0.8, 1), ratio=(0.5, 2)),
               # 随机裁剪一个面积为原始面积50%到100%的区域,该区域的宽高比从0.5~2之间随机取值。 然后,区域的宽度和高度都被缩放到350像素。
                     # 我们可以改变图像颜色的四个方面:亮度、对比度、饱和度和色调
                      transforms.ColorJitter( brightness=0.5, contrast=0.5, saturation=0.5, hue=0.5)

        ])
    def __len__(self) -> int:
        return self.size

    def __getitem__(self, idx: int) -> TypeRotItem:
        img_ts = self.imgseq[idx] #tensor
        img_ts = self.transforms(img_ts)
        index_ts: Tensor = self.indices[idx] # 旋转44
        img_ts = from_img(img_ts, index_ts.item() / self.cls_num, self.target_size)
        img_ts = self.norm(img_ts)

        return img_ts, index_ts
tensor类型图片保存方法
from torchvision import transforms
toPIL= transforms.ToPILImage()  # 这个函数可以将张量转为PIL图片,由小数转为0-255之间的像素值
pic = toPIL(img_ts2)
pic.save('img_ts2.jpg')
训练过程和结果
结果:
一开始使用原始底图110张图片 准确率有80%(感谢simple ocr项目拥有者提供图片),数据增强后可以达到85%准确率,训练集loss可以降低到1.2,python test_RotNetR.py 计算平均误差度数的结果达到1度以内
后续训练, 增加训练图片到300张(保证图片质量较高,多样性丰富),准确度可以达到90%以上
数据预处理
找出相似的图片,先去重
import numpy as np
import os
import cv2
from tqdm import tqdm
def ssim(y_true , y_pred):
    u_true = np.mean(y_true)
    u_pred = np.mean(y_pred)
    var_true = np.var(y_true)
    var_pred = np.var(y_pred)
    std_true = np.sqrt(var_true)
    std_pred = np.sqrt(var_pred)
    R = 255
    c1 = np.square(0.01*R)
    c2 = np.square(0.03*R)
    ssim = (2 * u_true * u_pred + c1) * (2 * std_pred * std_true + c2)
    denom = (u_true ** 2 + u_pred ** 2 + c1) * (var_pred + var_true + c2)
    return ssim / denom

def show(image1,image2=''):
    # 创建一个窗口并显示合并后的图片
    if image2=='':
        combined_image =image1
    else:
        combined_image = cv2.hconcat([image1, image2])
    cv2.namedWindow('Combined Image', cv2.WINDOW_NORMAL)
    cv2.imshow('Combined Image', combined_image)

    # 等待用户按下任意键,然后关闭窗口
    cv2.waitKey(0)
    cv2.destroyAllWindows()

# 获取当前文件夹中的所有图片文件路径
image_folder = r'xxx'  # 存放图片的文件夹路径

file_list = os.listdir(image_folder)
result_file_list = []
images = sorted([os.path.join(image_folder, file) for file in file_list if file.endswith(('jpg', 'png', 'jpeg'))])
doubt_list = []

for i in range(len(images)):
    print(i)
    r_list = []
    max_r = 0
    max_j = 0
    img1 = cv2.imread(images[i] )
    # 灰度图像处理
    gray_img1 = cv2.cvtColor(img1, cv2.COLOR_BGR2GRAY)
    # _, b_img1 = cv2.threshold(gray_img1, 200, 255, cv2.THRESH_BINARY)
    # ret, img1 = cv2.threshold(img1, 127, 255, cv2.THRESH_BINARY)
    for j in range(i+1,len(images)):
        flag = 0
        try:

            img2 = cv2.imread(images[j])
            gray_img2 = cv2.cvtColor(img2, cv2.COLOR_BGR2GRAY)
            # _, b_img2 = cv2.threshold(gray_img2, 180, 255, cv2.THRESH_BINARY)
            r = ssim(gray_img1, gray_img2)
            if r > 0.99 and r > max_r:
                max_r = r
                max_j = j
        except:
            print('图片已经删除')
    if max_j!=0 and max_r>0.99:
        # show(b_img1, b_img2)
        result_file_list.append(images[i])
        cv2.imwrite('%s_first.jpg'%(i),img1)
        cv2.imwrite('%s_%s_second.jpg'%(i,max_j), cv2.imread(images[max_j]) )
        # show(img1, cv2.imread(images[max_j]))
        #
        # if flag == 1:
        #     doubt_list.append([file_list[i], file_list[j]])
print(result_file_list)#类似('101_164.png', '126_216.png') ('130_112.png', '99_172.png')
修正图片角度
注意旋转图片会造成图片质量降低,使用cv2.INTER_CUBIC填充,之后还可以使用高分辨率工具恢复图像
from flask import Flask, render_template, request
from PIL import Image
import os
import cv2
import numpy as np
from PIL import Image, ImageOps
app = Flask(__name__)

# 获取当前文件夹中的所有图片文件路径
image_folder = 'static/images'  # 存放图片的文件夹路径

images_path = sorted([os.path.join(image_folder, file) for file in os.listdir(image_folder) if file.endswith(('jpg', 'png', 'jpeg'))])
current_index = 0  # 当前显示的图片索引

def get_current_index_by_name(file_name):
    global images_path
    result_index_list = [i for i in range(len(images_path)) if os.path.basename(images_path[i])==file_name]
    return result_index_list[0]


def rotate_image( image, angle, if_fill_white = True):
    '''
    顺时针旋转
    Args:
        image:
        angle:
        if_fill_white:旋转产生的黑边填充为白色

    Returns:

    '''
    # dividing height and width by 2 to get the center of the image
    height, width = image.shape[:2]
    # get the center coordinates of the image to create the 2D rotation matrix
    center = (width / 2, height / 2)

    # using cv2.getRotationMatrix2D() to get the rotation matrix
    rotate_matrix = cv2.getRotationMatrix2D(center=center, angle=angle, scale=1)

    # rotate the image using cv2.warpAffine
    if not if_fill_white:
        rotated_image = cv2.warpAffine(src=image, M=rotate_matrix, dsize=(width, height), flags=cv2.INTER_CUBIC)
    else:
        color = (255, 255) if len(image.shape)==2 else (255, 255,255)
        rotated_image = cv2.warpAffine(src=image, M=rotate_matrix, dsize=(width, height), borderValue=color, flags=cv2.INTER_CUBIC)
    return rotated_image

# 显示当前图片
@app.route('/')
def index():
    global current_index
    img_path = images_path[current_index]
    return render_template('index.html', img_path=img_path)

def cv_imread(file_path):
    cv_img = cv2.imdecode(np.fromfile(file_path,dtype=np.uint8),-1)
    return cv_img

def cv_imwrite(img_path, img):
    cv2.imencode('.jpg', img)[1].tofile(img_path)

# 处理图片切换和旋转请求
@app.route('/action', methods=['POST'])
def handle_action():
    global current_index,images_path
    img_path = images_path[current_index] #原图路径
    action = request.form['action']
    degree = 1 if request.form['input_text']=='' else float(request.form['input_text'])

    # rotated_img = Image.open(img_path)
    rotated_img = cv_imread(img_path)
    if action == 'left':
        rotated_img = rotate_image(rotated_img, degree)
        cv_imwrite(img_path,rotated_img)
        # rotated_img = rotated_img.rotate(1, expand=False, fillcolor='white')
        # rotated_img.save(img_path, quality=95)

    elif action == 'right':
        rotated_img = rotate_image(rotated_img, -degree)
        cv_imwrite(img_path, rotated_img)
        # rotated_img = rotated_img.rotate(-1, expand=False, fillcolor='white')
        # rotated_img.save(img_path, quality = 95)
    else:
        if action == 'next':
            current_index = (current_index + 1) % len(images_path)
        elif action == 'previous':
            current_index = (current_index - 1) % len(images_path)

    return render_template('index.html', img_path= images_path[current_index] )

if __name__ == '__main__':
    app.run(debug=True)
index.html
Image Viewer
 {{ img_path }}
