数据结构——队列
目录
一、队列
1.1 队列的基本概念
1.2 队列的实现
二、队列的接口实现
(1)初始化队列
(2)销毁队列
(3)入队
(4)出队
(5)获取队头元素
(6)获取队尾元素
(7)获取队列中有效元素个数
(8)检测队列是否为空
三、关于队列的OJ题
3.1 用队列实现栈
3.2 用栈实现队列
3.3 设计循环队列
一、队列
1.1 队列的基本概念
队列是一种特殊的线性表,其特点是只允许在表的前端进行删除数据操作,在表的后端进行插入操作。
队列和栈一样,也是一种操作受限的线性表。我们前面学习了栈(数据结构——栈-CSDN博客),知道栈遵循后进先出(LIFO)的原则。与栈相对的,队列中的数据元素遵循:FIFO(First In First Out),即先进先出的原则。
队列中,进行插入操作(入队)的一端称为队尾,进行删除操作(出队)的一端称为队头。
1.2 队列的实现
我们可以使用数组结构或链表结构来实现队列。如果使用数组来实现队列的话,数组的头插头删需要对每一个元素进行移动操作,效率不如链表。所以二者取其优,我们使用链表的结构实现队列会更简便高效。
关于链表,我们在前面已经学习过了单链表和带头双向循环链表。在这里我们用单链表即可解决问题。
二、队列的接口实现
我们先创建一个头文件"Queue.h"和两个源文件"Queue.c"和"Test.c",具体作用为:
- Queue.h:栈的定义,头文件的引用和接口函数的声明
- Queue.c:接口函数的实现
- Test.c:测试各个函数
明确了使用哪种链表后,我们还要考虑更多的细节问题。出队的时候,由于队列的先进先出原则,我们要删除队头即链表头节点,所以需要一个指针保存头节点的地址;而入队的时候,我们则要从队尾即链表尾节点插入元素,所以还需要一个指针来保存尾节点的地址,所以我们不止需要一个结构体来表示队列节点,还需要一个结构体来保存头尾节点的地址。
我们先展示"Queue.h"的完整代码,最后再展示"Queue.c"的完整代码。
不要忘记在两个源文件中引用"Queue.h"
#pragma once //防止头文件被二次引用

#include
#include
#include
#include

typedef int QDataType; //如果要修改存储的数据类型可直接在此修改

typedef struct QueueNode //链式结构:表示队列节点
{
	struct QueueNode* next;
	QDataType data;
}QNode;

typedef struct Queue //队列的结构
{
	QNode* phead; //指向队头
	QNode* ptail; //指向队尾
	int size; //可选,方便函数实现
}Queue;

//队列的增删查改接口实现(因为指针在结构体中所以不需要传二级指针)

void QueueInit(Queue* que);//初始化队列

void QueueDestroy(Queue* que);//销毁队列

void QueuePush(Queue* que, QDataType x);//入队

void QueuePop(Queue* que);//出队

QDataType QueueFront(Queue* que);//获取队头元素

QDataType QueueBack(Queue* que);//获取队队元素

int QueueSize(Queue* que);//获取队列中有效元素个数

bool QueueEmpty(Queue* que);//检测队列是否为空
接下来我们开始逐个实现接口函数。
(1)初始化队列
void QueueInit(Queue* que)
{
	assert(que); //断言,防止传入空指针
	que->phead = NULL; //初始化指向头节点的指针
	que->ptail = NULL; //初始化指向尾节点的指针
	que->size = 0; //初始化队列大小
}
(2)销毁队列
void QueueDestroy(Queue* que)
{
	assert(que); //断言,防止传入空指针
	QNode* cur = que->phead; //创建一个指针变量用来保存每次的头节点位置
	while (cur) //当cur==NULL时队列销毁完毕,跳出循环
	{
		que->phead = que->phead->next; //更新头节点地址
		free(cur); //释放原来的头节点
		cur = que->phead; //cur指向新的头节点
	}
	que->phead = que->ptail = NULL; //置空
	que->size = 0; //更新size
}
(3)入队
void QueuePush(Queue* que, QDataType x)
{
	assert(que); //断言,防止传入空指针
	QNode* newnode = (QNode*)malloc(sizeof(QNode)); //创建新节点
	if (newnode == NULL) //防止空间开辟失败
	{
		perror("malloc fail");
		return;
	}
	newnode->data = x; //初始化新节点数据
	newnode->next = NULL; //新节点指向NULL
	if (que->phead == NULL || que->ptail == NULL) //如果队列为空
	{
		assert(que->phead == NULL);
		assert(que->ptail == NULL); //两个断言避免因为人为误操作导致的特殊错误
		que->phead = que->ptail = newnode; //两个指针都指向新节点
	}
	else //如果队列不为空
	{
		que->ptail->next = newnode; //原来的尾节点指向新节点
		que->ptail = newnode; //新节点变成尾节点
	}
	que->size++; //更新size
}
(4)出队
void QueuePop(Queue* que)
{
	assert(que); //断言,防止传入空指针
	assert(!QueueEmpty(que)); //断言,队列为空则报错
	if (que->phead->next == NULL) //如果队列只剩一个节点
	{
		free(que->phead); //释放唯一的节点
		que->phead = que->ptail = NULL; //两个指针置空
	}
	else //队列不止一个节点时
	{
		QNode* cur = que->phead; //保存头节点地址
		que->phead = que->phead->next; //头节点更新
		free(cur); //释放原来的头节点
	}
	que->size--; //更新size
}
(5)获取队头元素
QDataType QueueFront(Queue* que)
	assert(que); //断言,防止传入空指针
	assert(!QueueEmpty(que)); //断言,队列为空则报错
	return que->phead->data; //返回队头元素
}
(6)获取队尾元素
QDataType QueueBack(Queue* que)
{
	assert(que); //断言,防止传入空指针
	assert(!QueueEmpty(que)); //断言,队列为空则报错
	return que->ptail->data; //返回队尾元素
(7)获取队列中有效元素个数
int QueueSize(Queue* que)
{
	assert(que); //断言,防止传入空指针
	return que->size; //size即有效元素个数
}
(8)检测队列是否为空
bool QueueEmpty(Queue* que)
{
	assert(que); //断言,防止传入空指针
	return que->size == 0; //表达式为真返回true,否则返回false
}
所有接口都完成后,我们在Test.c中调试一下
一切正常,恭喜你完成了队列的接口实现!下面是"Queue.c"的完整代码:
#include "Queue.h"

void QueueInit(Queue* que)//初始化队列
{
	assert(que);
	que->phead = NULL;
	que->ptail = NULL;
	que->size = 0;
}

void QueueDestroy(Queue* que)//销毁队列
{
	assert(que);
	QNode* cur = que->phead;
	while (cur)
	{
		que->phead = que->phead->next;
		free(cur);
		cur = que->phead;
	}
	que->phead = que->ptail = NULL;
	que->size = 0;
}

void QueuePush(Queue* que, QDataType x)//队尾入队列
{
	assert(que);
	QNode* newnode = (QNode*)malloc(sizeof(QNode));
	if (newnode == NULL)
	{
		perror("malloc fail");
		return;
	}
	newnode->data = x;
	newnode->next = NULL;
	if (que->phead == NULL || que->ptail == NULL)
	{
		assert(que->phead == NULL);
		assert(que->ptail == NULL);
		que->phead = que->ptail = newnode;
	}
	else
	{
		que->ptail->next = newnode;
		que->ptail = newnode;
	}
	que->size++;
}

void QueuePop(Queue* que)//队头出队列
{
	assert(que);
	assert(!QueueEmpty(que));
	if (que->phead->next == NULL)
	{
		free(que->phead);
		que->phead = que->ptail = NULL;
	}
	else
	{
		QNode* cur = que->phead;
		que->phead = que->phead->next;
		free(cur);
	}
	que->size--;
}

QDataType QueueFront(Queue* que)//获取队列头部元素
{
	assert(que);
	assert(!QueueEmpty(que));
	return que->phead->data;
}

QDataType QueueBack(Queue* que)//获取队列队尾元素
{
	assert(que);
	assert(!QueueEmpty(que));
	return que->ptail->data;
}

int QueueSize(Queue* que)//获取队列中有效元素个数
{
	assert(que);
	return que->size;
}

bool QueueEmpty(Queue* que)//检测队列是否为空
{
	assert(que);
	return que->size == 0;
}
队列的接口实现到此结束,趁热打铁,接下来我们来做几道关于队列的OJ题练练手吧
下面的OJ题建议对栈有了一定了解后再做,如果有兴趣可以移步 数据结构——栈-CSDN博客
三、关于队列的OJ题
3.1 用队列实现栈
OJ题链接:225. 用队列实现栈 - 力扣(LeetCode)
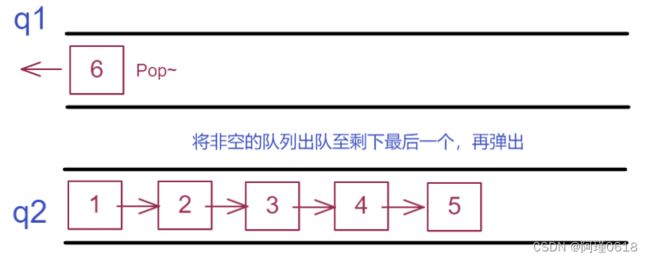
这道题要求我们用两个队列来实现栈和其接口功能,核心思路是:
- 两个队列都为空时压栈,就往任意一个队列中放元素
- 有一个队列不为空时压栈,就往那个非空的队列中放元素
- 出栈,就将非空的队列中的元素出队到另一个空队列,剩下最后一个元素,再将其弹出,就能实现栈的后进先出了
核心思路如图:
有了核心思路,大家可以尝试自己做一下这道题
需要说明的是,如果我们使用C语言来做这道题会略显麻烦,因为我们需要自己写一个队列。但是刚刚我们已经写好了,所以直接cv上去即可。
将"Queue.h"和"Queue.c"整个复制到代码栏中,然后实现题目的核心代码
typedef struct
{
    Queue q1;
    Queue q2;
} MyStack;

MyStack *myStackCreate()
{
    MyStack *obj = (MyStack *)malloc(sizeof(MyStack));
    if (obj == NULL)
    {
        perror("malloc fail");
        return NULL;
    }
    QueueInit(&obj->q1);
    QueueInit(&obj->q2);
    return obj;
}

void myStackPush(MyStack *obj, int x)
{
    if (!QueueEmpty(&obj->q1))
    {
        QueuePush(&obj->q1, x);
    }
    else
    {
        QueuePush(&obj->q2, x);
    }
}

int myStackPop(MyStack *obj)
{
    Queue *Emptyque = &obj->q1;
    Queue *NonEmptyque = &obj->q2;
    if (!QueueEmpty(&obj->q1))
    {
        Emptyque = &obj->q2;
        NonEmptyque = &obj->q1;
    }
    while (NonEmptyque->size > 1)
    {
        QueuePush(Emptyque, QueueFront(NonEmptyque));
        QueuePop(NonEmptyque);
    }
    int top = QueueFront(NonEmptyque);
    QueuePop(NonEmptyque);
    return top;
}

int myStackTop(MyStack *obj)
{
    if (!QueueEmpty(&obj->q1))
    {
        return QueueBack(&obj->q1);
    }
    else
    {
        return QueueBack(&obj->q2);
    }
}

bool myStackEmpty(MyStack *obj)
{
    return QueueEmpty(&obj->q1) && QueueEmpty(&obj->q2);
}

void myStackFree(MyStack *obj)
{
    QueueDestroy(&obj->q1);
    QueueDestroy(&obj->q2);
    free(obj);
}
3.2 用栈实现队列
OJ题链接:232. 用栈实现队列 - 力扣(LeetCode)
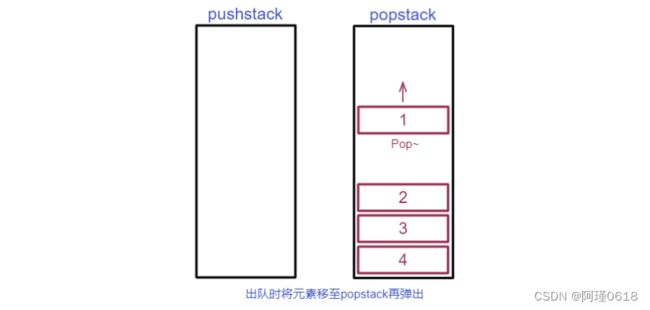
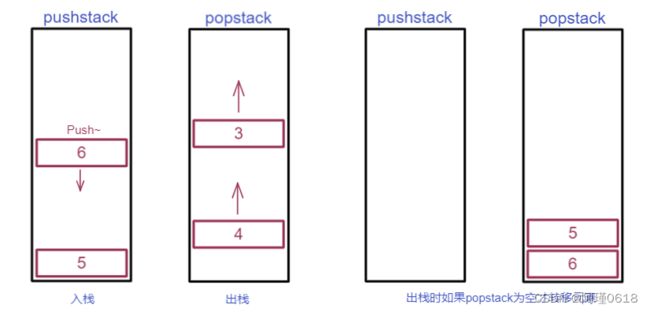
这道题要求我们用两个栈实现队列和其接口功能,核心思路是:
- 一个栈(pushstack)用来入队,一个栈(popstack)用来出队
- 入队时,将元素压入pushstack中
- 出队时,如果popstack非空,则直接从popstack出栈;如果为空,则将pushstack中的所有元素出栈并压入popstack中,就能实现队列的先入先出了
核心思路如图:
有了核心思路,大家可以尝试自己做一下这道题
使用C语言来做这道题需要自己写一个栈。如果曾经写过直接cv上去即可。
题目的核心代码如下:
typedef struct
{
    Stack pushstack;
    Stack popstack;
} MyQueue;

MyQueue *myQueueCreate()
{
    MyQueue *obj = (MyQueue *)malloc(sizeof(MyQueue));
    if (obj == NULL)
    {
        perror("malloc fail");
        return NULL;
    }
    StackInit(&obj->pushstack);
    StackInit(&obj->popstack);
    return obj;
}

void myQueuePush(MyQueue *obj, int x)
{
    StackPush(&obj->pushstack, x);
}

int myQueuePop(MyQueue *obj)
{
    // if(!StackEmpty(&obj->popstack))
    // {
    //     int front = StackTop(&obj->popstack);
    //     StackPop(&obj->popstack);
    //     return front;
    // }
    // else
    // {
    //     while(!StackEmpty(&obj->pushstack))
    //     {
    //         StackPush(&obj->popstack , StackTop(&obj->pushstack));
    //         StackPop(&obj->pushstack);
    //     }
    //     int front = StackTop(&obj->popstack);
    //     StackPop(&obj->popstack);
    //     return front;
    // }
    int front = myQueuePeek(obj);
    StackPop(&obj->popstack);
    return front;
}

int myQueuePeek(MyQueue *obj)
{
    if (StackEmpty(&obj->popstack))
    {
        while (!StackEmpty(&obj->pushstack))
        {
            StackPush(&obj->popstack, StackTop(&obj->pushstack));
            StackPop(&obj->pushstack);
        }
    }
    return StackTop(&obj->popstack);
}

bool myQueueEmpty(MyQueue *obj)
{
    return StackEmpty(&obj->pushstack) && StackEmpty(&obj->popstack);
}

void myQueueFree(MyQueue *obj)
{
    StackDestory(&obj->pushstack);
    StackDestory(&obj->popstack);
    free(obj);
}
3.3 设计循环队列
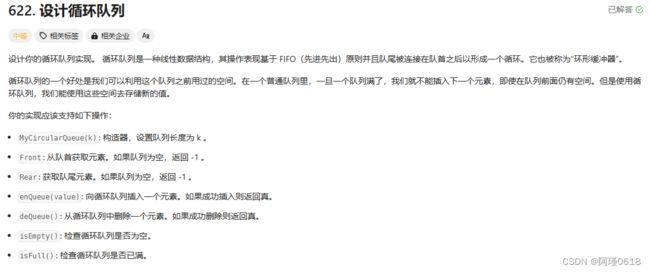
OJ题链接:622. 设计循环队列 - 力扣(LeetCode)
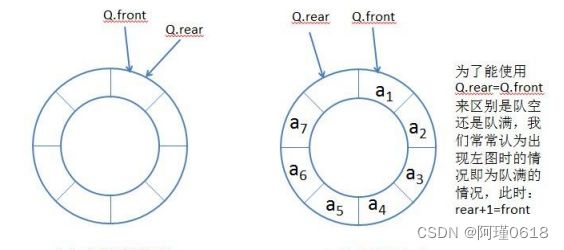
我们可以拓展了解一下一种特殊的队列:循环队列,也被称为环形队列。循环队列就是把顺序队列首尾相连,从逻辑上看成一个环。循环队列可以用数组实现,也可以使用循环链表实现。
面对循环队列,有一个重要的问题,就是判满和判空。因为是循环结构,队头(front)和队尾(rear)相等的时候,到底是空还是满呢?为了避免导致错误,我们可以设计一个比目标容量 k 大一节的循环队列,使队列为满时队尾在队头前面。
这里我们使用数组来实现循环队列,此时
判空:front = rear
判满:(rear + 1) % ( k + 1 ) = front
题目代码如下:
typedef struct
{
    int front;
    int rear;
    int k;
    int *a;
} MyCircularQueue;

MyCircularQueue *myCircularQueueCreate(int k)
{
    MyCircularQueue *obj = (MyCircularQueue *)malloc(sizeof(MyCircularQueue));
    obj->front = obj->rear = 0;
    obj->k = k;
    obj->a = (int *)malloc(sizeof(int) * (k + 1));
    return obj;
}

bool myCircularQueueIsFull(MyCircularQueue *obj)
{
    return (obj->rear + 1) % (obj->k + 1) == obj->front;
}

bool myCircularQueueIsEmpty(MyCircularQueue *obj)
{
    return obj->front == obj->rear;
}

bool myCircularQueueEnQueue(MyCircularQueue *obj, int value)
{
    if (myCircularQueueIsFull(obj))
    {
        return false;
    }
    else
    {
        obj->a[obj->rear] = value;
        obj->rear++;
        if (obj->rear == obj->k + 1)
            obj->rear = 0;
        return true;
    }
}

bool myCircularQueueDeQueue(MyCircularQueue *obj)
{
    if (myCircularQueueIsEmpty(obj))
    {
        return false;
    }
    else
    {
        obj->front++;
        if (obj->front == obj->k + 1)
            obj->front = 0;
        return true;
    }
}

int myCircularQueueFront(MyCircularQueue *obj)
{
    if (myCircularQueueIsEmpty(obj))
        return -1;
    return obj->a[obj->front];
}

int myCircularQueueRear(MyCircularQueue *obj)
{
    if (myCircularQueueIsEmpty(obj))
        return -1;
    // if(obj->rear == 0)
    //     return obj->a[obj->k];
    // else
    //     return obj->a[obj->rear-1];
    return obj->a[(obj->rear + obj->k) % (obj->k + 1)]; //很巧妙的方法
}

void myCircularQueueFree(MyCircularQueue *obj)
{
    free(obj->a);
    free(obj);
}
完.


